Blower Door Basics: - The Energy Conservatory
Blower Door Basics: - The Energy Conservatory
Blower Door Basics: - The Energy Conservatory

You also want an ePaper? Increase the reach of your titles
YUMPU automatically turns print PDFs into web optimized ePapers that Google loves.
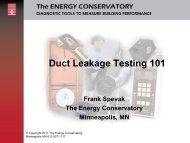
<strong>Blower</strong> <strong>Door</strong> <strong>Basics</strong>:Tried and true techniques for using thisdiagnostic tool effectivelyFrank Spevak<strong>The</strong> <strong>Energy</strong> <strong>Conservatory</strong>Minneapolis, MN© 2010<strong>The</strong> <strong>Energy</strong><strong>Conservatory</strong>
Housekeeping‣ If you do not hear anything from your computer’sspeaker system you will need to dial in and listento the presentation over the phone‣ If you have a question or a comment about thepresentation, please type your message in thebox at the lower right hand portion of the screen‣ If the image is larger than your screen you havescroll bars on the right and bottom to position thescreen for your best viewing‣ This session is being recorded and will beavailable on <strong>The</strong> <strong>Energy</strong> <strong>Conservatory</strong> websitewithin a week
Agenda‣ Overview of house leakage basics and <strong>Blower</strong><strong>Door</strong> equipment.‣ Setting up the <strong>Blower</strong> <strong>Door</strong> for consistent andaccurate test results.‣ Explore how to do a test and how to use adigital gauge to perform the test.
Hidden Construction DetailsOften the largest and most important air leaks
Hidden Construction Details
Duct LeakageIn some homes, this is the highest priority(particularly in the sun belt)
Purposes of a <strong>Blower</strong> <strong>Door</strong> Test‣ Document the relative airtightness of houses (arethey leaky - tight - or somewhere in between).‣ Help find air leaks by inducing air to move throughall leaks at the same time (chemical smoke, IRcamera, feeling with you hand, zonal pressures).
<strong>Blower</strong> <strong>Door</strong> Test‣ <strong>Blower</strong> <strong>Door</strong> fan is used to blow air out of (or into)the house.‣ Adjust fan until the house pressure is changed by50 Pa. (Approx. pressure of 20 mph wind)‣ Flow through the fanneeded to createa 50 Pa changeis the houseairtightness– CFM50.-50AtticSupply-50<strong>Blower</strong><strong>Door</strong>FanReturnCrawlspace
<strong>Blower</strong> <strong>Door</strong> Test‣ CFM50 is really a measure of the total equivalenthole size.‣ ACH50 is used to adjust for house size-
<strong>Blower</strong> <strong>Door</strong> Equipment‣ Adjustable aluminum frame and nylon panel.‣ CalibratedFan with twoFlow Rings(A and B).‣ Accessorycase withgauge,tubing andmanual.
<strong>Blower</strong> <strong>Door</strong> Fan <strong>Basics</strong>‣ Airflow is determined bymeasuring flow sensorpressure (with reference toupstream of fan).‣ Airflow can only bemeasured in one direction(from inlet to exhaust).flowsensor‣ On older fans – motor wasreversible for diagnosticpurposes only.
<strong>Blower</strong> <strong>Door</strong> Fan <strong>Basics</strong> (cont’d)‣ Flow Rings are neededwhen measuring flowsbelow 2,400 CFM(tight houses).‣ Failure to use Flow Ringscan lead to large errors.‣ Gauges will indicate whenFlow Rings should beused.Fan Configuration Flow Range (cfm) forModel 3 FanOpen (no Flow Ring) 6,300 - 2,400Ring A 3,000 - 900Ring B 1,000 - 300
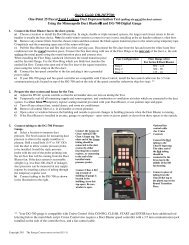
<strong>Blower</strong> <strong>Door</strong> Placement‣ Try to install in exterior door of a large openroom. Avoid installing the fan where there arestairways or major obstructions to air flow veryclose to the fan.‣ If the fan is installed next to a stairway or majorobstruction, use one of the Flow Rings ifpossible.‣ Always open the inside door and outside stormdoor as much as possible to prevent airflowrestrictions to the fan.
<strong>Blower</strong> <strong>Door</strong> Placement‣ Place the outside pressure tubing away fromfan flow.Outside pressure tubing shouldbe placed away from fan exhaust.
<strong>Blower</strong> <strong>Door</strong> Frame‣ Adjust the aluminum frameto the width of the door.‣ Adjust the frame to theheight of the door.‣ Remove frame from thedoor and place fabricaround frame (secure withvelcro).‣ Place in door and tightencam levers.
Install the Fan in the Panel‣ Fan is installed in the fabricpanel and is supported bythe frame cross bar.‣ Nylon panel makes tightseal around the fan.‣ Typically installed with inletside of fan (Flow Rings)inside the house –depressurization test.
Install the Fan in the Panel‣ For pressurization test, the fan must blow airinto the house (fan guard facing in).
DG-700 Pressure and Flow Gauge‣ Gauge measuresdifferential pressures.‣ Used to simultaneouslymeasure the change inhouse pressure, and theair flow through the<strong>Blower</strong> <strong>Door</strong> fan.‣ Proper tubingconnections and gaugesettings critical.
Tubing Connections‣ Channel A used to measurehouse pressure.‣ Channel B used to measure fanflow.‣ Depressurization testconfiguration shown.Channel B Input tap isconnected to fan (fan flow).Channel A Reference tap isconnected to outside (housepressure).
Tubing Connections (cont.)‣ <strong>Blower</strong> <strong>Door</strong> pressurization test (gauge inhouse).When pressurizing, Channel BReference tap is alsoconnected to the outside.
DG-700 Pressure and Flow Gauge‣ Simultaneous display of house pressure and fanflow.‣ Fan and Flow Ring configuration are showndirectly on the display.‣ Channel A (left side) is connected to outside tomeasure change in house pressure.‣ Channel B (right side) is connected to fan tomeasure fan flow.
Other DG-700 Features‣ Specialized Test Modes: @50 and @25 test modes make it simple toconduct single point house and ductairtightness tests. Can’t Reach 50 Factor is built-in to the flowmeasurement (CFM50).
Other DG-700 Features‣ Additional Test Features: BASELINE feature makes it simple to alwaystake a baseline measurement during the<strong>Blower</strong> <strong>Door</strong> test. Gauge displays the baseline adjusted housepressure. Eliminates need to remember how to add orsubtract negative numbers.
Other DG-700 Features‣ Additional Test Features: BASELINE feature can also be used forcombustion safety testing (worst casedepressurization).0Change in BuildingPressure FromTurning On anExhaust Fan (Pa)-1-2-2.6(Fan Off)-7.8-5.2-5(Change)-6-7(Fan On)
Other DG-700 Features‣ Push Baseline button and thenStart.‣ Wait several seconds while theBaseline is measured anddisplayed.‣ Push Enter.‣ DG-700 shows ADJ.‣ Start measuring and see the truechange in pressure.0-1-2-3-4-5-6-7-2.6(Fan Off)-7.8(Fan On)-5.2(Change)(Fan Off) - Measuring Baseline Pressure(Fan Off) - Baseline Adjusted Pressure(Fan On) - Change in Pressure
Other DG-700 Features‣ Cruise without a computer formaintaining constant housepressure.‣ Cruise at 75 Pa, 50 Pa, 25 Paand 0 Pa.‣ Cruise 50 Pa for airsealingand investigation.‣ Cruise 25 Pa for use withDuct Blaster for Duct Leakageto Outside.‣ Older DG-700 Gauges maybe upgraded to add Cruise.
Other DG-700 Features‣ Cruise control a requires a communication jackon speed controller, and a fan control cable(standard equipment).
Other DG-700 Features‣ Older fans can be upgraded to Cruise with anew fan speed controller, a fan control cable,and a DG-700 with Cruise.
TECLOG for Combustion Tests‣ TECLOG is a real time datalogging program foruse with the DG-700.‣ Displays and records both channels.‣ Measure house depressurization whilesimultaneously measuring appliance draft.
Automated Testing with a DG-700‣ Requires TECTITE softwareand USB cable (standardequipment), plus a laptopcomputer.‣ Reduces operator errors,improves consistency betweentests.‣ Better precision in windyweather.‣ Store test results and generatereports.
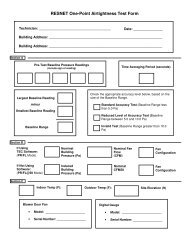
<strong>Blower</strong> <strong>Door</strong> Set-up Common Errors‣ Tubing connections to gauge are wrong.‣ Inputting wrong fan Flow Ring settings.‣ Failure to take baseline house pressure reading.‣ Not closing all windows and opening all interiordoors.
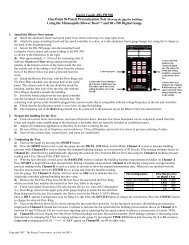
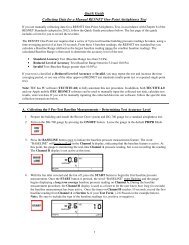
Manual <strong>Blower</strong> <strong>Door</strong> Test‣ Set gauge to PR/FL@50 mode.‣ Measure baseline house pressurewith fan covered (Baselinefeature).‣ Uncover fan then increase fanspeed with controller.‣ Adjust controller to change housepressure (Channel A) byapproximately 50 Pascals.‣ Read CFM50 from Channel B.
Manual <strong>Blower</strong> <strong>Door</strong> Test (cont.)‣ If Channel B shows LO whilereading CFM50, add Ring A orB, and change fanconfiguration setting ongauge.‣ Determine if airsealing is costeffective.‣ Perform airsealing work.‣ Retest to verify work.
<strong>Blower</strong> <strong>Door</strong> Test (cont.)‣ Only direct value obtained from a <strong>Blower</strong> <strong>Door</strong> testis CFM50.‣ All other values are calculations.‣ Use TECTITE software (manual or automatedmode) to help with other calculations.
<strong>Blower</strong> <strong>Door</strong> Test (cont.)‣ <strong>The</strong> latest version of TECTITE incorporates amechanical ventilation guideline based onASHRAE Standard 62.2.‣ Written in Code language for adoption by localauthorities.
<strong>Blower</strong> <strong>Door</strong> Test (cont.)‣ Estimated infiltration rates are just that -estimates, use carefully.‣ Infiltration rates vary from day to day anddepend on parameters not measured by the<strong>Blower</strong> <strong>Door</strong>.
Other Tests Using A <strong>Blower</strong> <strong>Door</strong>‣ Air Leakage Path investigation: <strong>Blower</strong> <strong>Door</strong> with an Infrared Camera View wall before <strong>Blower</strong> <strong>Door</strong> Test View wall with <strong>Blower</strong> <strong>Door</strong> running
Other Tests Using A <strong>Blower</strong> <strong>Door</strong>‣ Duct Leakage Diagnostics: Pressure Pan test to determine if duct work isconnected to the outside. With <strong>Blower</strong> <strong>Door</strong> maintaining 50 Pa, test registerswith Pressure Pan. Qualitative test.
Other Tests Using A <strong>Blower</strong> <strong>Door</strong>‣ Duct Leakage Diagnostics: <strong>Blower</strong> <strong>Door</strong> Subtraction(compare test results withregisters sealed andunsealed). Simultaneous pressurizationor depressurization of houseand ducts with <strong>Blower</strong> <strong>Door</strong>and Duct Blaster (preferredmethod).
Other Tests Using A <strong>Blower</strong> <strong>Door</strong>‣ Zone Pressure Testing: Measure pressure change inattached zones (e.g. attic,crawlspace) with <strong>Blower</strong><strong>Door</strong> running. Can help to quickly identifydominant house leaks.
More Useful Information‣ Fan Calibration Fans maintain their calibration unless physicaldamage occurs. <strong>The</strong>se conditions are easily detected andshould be tested for on a regular basis.
Main Issues Affecting Fan Calibration‣ <strong>The</strong> 2 most importantaspects to maintainingproper fan calibration: No leaks in flow sensor. Sensor in properposition.‣ Damaged fan housing(e.g. broken flange) andbroken/ missing blades.
Checking Flow Sensor for Leaks‣ Model 3 flow sensors can crack from impacts &thermal stress.‣ To test for leaks: Connect a piece of tubing to the fan pressure tap. Tape off the 4 holes on the side of the sensor. Create a vacuum in the tubing with your mouth. <strong>The</strong> tubing should stick to your tongue for at least 5seconds if the sensor is airtight. If sensor leaks,replace the sensor or find the source of the leak. Remove the tape from the sensor holes.
Flow Sensor Position‣ Because the <strong>Blower</strong> <strong>Door</strong>and Duct Blaster flowsensors are connected to themotor, the motor determinesthe sensor position.motormount‣ Motors can move if fan isdropped, or motor mountscan bend.motor
Checking Flow Sensor Position‣ Measure the distancebetween the inlet plane ofthe fan housing and theface of flow sensor.‣ Distance should bebetween 3/16” to 5/16”.Adjust sensor position,replace bent motor mountsor adjust motor position.
Digital Gauge Calibration‣ Calibration is recommended once a year.‣ Calibration is performed at TEC factory.‣ Cost is $75 and is usually completed in about3 or 4 days.‣ <strong>Blower</strong> <strong>Door</strong> and Duct Blaster® manualsdescribe how to perform a calibration check inthe field.‣ Upgrade of older DG-700 to Cruise is an extra$50 on top of recalibration.
More Useful Information‣ Visit our website(www.energyconservatory.com)‣ Articles on airsealing and duct leakagediagnostics.‣ Previous newsletters.‣ All product manuals and guides are online.‣ Links to other sites.‣ Download version of TECTITE.‣ Download of TECLOG.