ParkIT & LetUgo Starter Pack Guide â Installing the ParkIT Camera
ParkIT & LetUgo Starter Pack Guide â Installing the ParkIT Camera
ParkIT & LetUgo Starter Pack Guide â Installing the ParkIT Camera

Create successful ePaper yourself
Turn your PDF publications into a flip-book with our unique Google optimized e-Paper software.
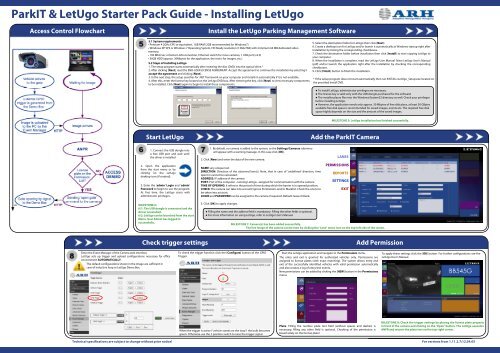
<strong>ParkIT</strong> & <strong>LetUgo</strong> <strong>Starter</strong> <strong>Pack</strong> <strong>Guide</strong> - <strong>Installing</strong> <strong>LetUgo</strong>Access Control FlowchartInstall <strong>the</strong> <strong>LetUgo</strong> Parking Management Software5.1 System requirements• Pentium 4 2GHz CPU or equivalent, 1GB RAM (2GB recommended for Windows7)• Windows XP SP3 or Windows 7 Operating System, HD Ready resolution (1366x768) with minimum 64 MB dedicated videomemory.• 100 Mbit/sec or better LAN connection, E<strong>the</strong>rnet switch for more cameras, 1 USB port (v2.0)• 30GB HDD (approx. 30Mbytes for <strong>the</strong> application, <strong>the</strong> rest is for images, etc.)5.2 Steps of installing <strong>LetUgo</strong>1. The setup program starts automatically after inserting <strong>the</strong> disc (DVD) into <strong>the</strong> optical drive.*2. After clicking [Next], read <strong>the</strong> END-USER LICENSE AGREEMENT. Accept <strong>the</strong> agreement to continue <strong>the</strong> installation by selecting Iaccept <strong>the</strong> agreement and clicking [Next].3. In <strong>the</strong> next step, <strong>the</strong> setup searches for .NET framework on your computer and installs it automatically if it is not available.4. After this, enter <strong>the</strong> license key located on <strong>the</strong> <strong>LetUgo</strong> DVD box. After entering <strong>the</strong> key, click [Next] to view necessary componentsto be installed. Click [Next] again to begin to install <strong>the</strong>se components.5. Select <strong>the</strong> destination folder for <strong>LetUgo</strong> <strong>the</strong>n click [Next].6. Create a desktop icon for <strong>LetUgo</strong> and/or launch it automatically at Windows startup right afterinstallation by ticking <strong>the</strong> corresponding checkboxes.7. Check <strong>the</strong> destination folder before installation <strong>the</strong>n click [Install] to start copying <strong>LetUgo</strong> toyour computer.8. When <strong>the</strong> installation is complete, read <strong>the</strong> <strong>LetUgo</strong> User Manual (View <strong>LetUgo</strong> User’s Manual(pdf) and/or launch <strong>the</strong> application right after <strong>the</strong> installation by checking <strong>the</strong> correspondingcheckboxes.9. Click [Finish] button to finish <strong>the</strong> installation.* If <strong>the</strong> setup program does not start automatically <strong>the</strong>n run INSTALL\<strong>LetUgo</strong>_Setup.exe located on<strong>the</strong> provided Install DVD.● To install <strong>LetUgo</strong>, administrator privileges are necessary.● The license key is valid only with <strong>the</strong> USB dongle purchased for <strong>the</strong> software!● The installer places files into <strong>the</strong> Windows/System32 directory as well. Check your privilegesbefore installing <strong>LetUgo</strong>.● However, <strong>the</strong> application needs only approx. 30 Mbytes of free disk place, at least 30 GBytesavailable free disk space is recommended for saved images, events etc. The required free diskspace highly depends on <strong>the</strong> size and <strong>the</strong> amount of <strong>the</strong> saved images.MILESTONE 5: <strong>LetUgo</strong> installation has finished successfully.Start <strong>LetUgo</strong>Add <strong>the</strong> <strong>ParkIT</strong> <strong>Camera</strong>1. Connect <strong>the</strong> USB dongle intoa free USB port and wait until<strong>the</strong> driver is installed2. Open <strong>the</strong> applicationfrom <strong>the</strong> start menu or byclicking on <strong>the</strong> <strong>LetUgo</strong>desktop icon (if created).3. Enter <strong>the</strong> ‘admin’ Login and ‘admin’Password to begin to use <strong>the</strong> program.At first time, <strong>the</strong> <strong>LetUgo</strong> starts withadministrator privileges.1. By default, no camera is added to <strong>the</strong> system, so <strong>the</strong> Settings/<strong>Camera</strong>s submenuwill appear with a warning massage. In this case click [OK].2. Click [New] and enter <strong>the</strong> data of <strong>the</strong> new camera:NAME: any unique textDIRECTION: Direction of <strong>the</strong> observed lane(s). Note, that in case of ‘undefined’ direction, timespent in cannot be calculated.ADDRESS: IP address of <strong>the</strong> cameraPORT: Port of <strong>the</strong> computer –running <strong>LetUgo</strong>– assigned for communication with <strong>the</strong> camera.TIME OF OPENING: It refers to <strong>the</strong> period of time during which <strong>the</strong> barrier is in opened position.CHECK: The camera can take into account/ignore Permissions and/or Blacklist. Check <strong>the</strong> one(s) tobe taken into account.LOGIN and PASSWORD can be assigned to <strong>the</strong> camera if required. Default: leave it blank.LANESPERMISSIONSREPORTSSETTINGSEXIT.MILESTONE 6:6/1: The USB dongle is connected and <strong>the</strong>driver is installed.6/2: <strong>LetUgo</strong> can be launched from <strong>the</strong> startMenu. User Admin has logged insuccessfully.3. Click [OK] to apply changes.● Filling <strong>the</strong> name and <strong>the</strong> address field is mandatory. Filling <strong>the</strong> o<strong>the</strong>r fields is optional.● For more information on using <strong>LetUgo</strong>, refer to <strong>LetUgo</strong> User’s Manual.MILESTONE 7: <strong>Camera</strong>(s) has been added successfully.The live image of <strong>the</strong> camera can be seen by clicking <strong>the</strong> ‘Lane’ menu icon on <strong>the</strong> top-left side of <strong>the</strong> screen.Check trigger settingsAdd PermissionEnter <strong>the</strong> Event Manager of <strong>the</strong> <strong>Camera</strong> web interface.<strong>LetUgo</strong> sets up trigger and upload configurations necessary for officeenvironment AUTOMATICALLY.The default configurations shown in <strong>the</strong> image are sufficient incase of inductive loop or <strong>LetUgo</strong> Demo Box.To check <strong>the</strong> trigger function click <strong>the</strong> [Configure] button of <strong>the</strong> GPIOTrigger.Start <strong>the</strong> <strong>LetUgo</strong> application and navigate to <strong>the</strong> Permissions menu.The entry and exit is granted for authorized vehicles only. Permissions areassigned to license plates (with exact matching). The system allows entry andexit of <strong>the</strong> successfully identified vehicles with valid permission automaticallyand also creates a log of entry/exit events.New permissions can be added by clicking <strong>the</strong> [NEW] button in <strong>the</strong> Permissionsmenu.To apply <strong>the</strong>se settings click <strong>the</strong> [OK] button. For fur<strong>the</strong>r configurations see <strong>the</strong><strong>LetUgo</strong> User’s Manual.When <strong>the</strong> trigger is active (“vehicle stands on <strong>the</strong> loop”) <strong>the</strong> bulb becomesgreen. O<strong>the</strong>rwise use <strong>the</strong> 2 position switch to raise <strong>the</strong> trigger signal.Plate: Filling <strong>the</strong> number plate text field (without spaces and dashes) isnecessary; filling any o<strong>the</strong>r field is optional. Checking of <strong>the</strong> permission isbased solely on <strong>the</strong> license plate!MILESTONE 8: Check <strong>the</strong> trigger settings by placing <strong>the</strong> license plate properlyin front of <strong>the</strong> camera and clicking on <strong>the</strong> ‘Open’ button. The <strong>LetUgo</strong> executesANPR and returns <strong>the</strong> plate text on <strong>the</strong> top-right corner.Technical specifications are subject to change without prior notice! For versions from 1.11.2.7;12.04.05