
You also want an ePaper? Increase the reach of your titles
YUMPU automatically turns print PDFs into web optimized ePapers that Google loves.
<strong>M3i.41xx</strong><br />
<strong>M3i.41xx</strong>-<strong>exp</strong><br />
high-speed 14 bit transient recorder,<br />
A/D converter board<br />
for PCI-X, PCI and PCI Express bus<br />
Hardware Manual<br />
Software Driver Manual<br />
English version August 9, 2012<br />
SPECTRUM SYSTEMENTWICKLUNG MICROELECTRONIC GMBH · AHRENSFELDER WEG 13-17 · 22927 GROSSHANSDORF · GERMANY<br />
PHONE: +49 (0)4102-6956-0 · FAX: +49 (0)4102-6956-66 · E-MAIL: info@spec.de · INTERNET: http://www.spectrum-instrumentation.com
(c) SPECTRUM SYSTEMENTWICKLUNG MICROELECTRONIC GMBH<br />
AHRENSFELDER WEG 13-17, 22927 GROSSHANSDORF, GERMANY<br />
SBench is a registered trademark of <strong>Spectrum</strong> Systementwicklung Microelectronic GmbH.<br />
Microsoft, Visual C++, Visual Basic, Windows, Windows 98, Windows NT, Window 2000 and Windows XP, Windows Vista, Windows 7<br />
are trademarks/registered trademarks of Microsoft Corporation.<br />
LabVIEW, DASYLab, Diadem and LabWindows/CVI are trademarks/registered trademarks of National Instruments Corporation.<br />
MATLAB is a trademark/registered trademark of The Mathworks, Inc.<br />
Agilent VEE, VEE Pro and VEE OneLab are trademarks/registered trademarks of Agilent Technologies, Inc.<br />
FlexPro is a registered trademark of Weisang GmbH & Co. KG.
Introduction....................................................................................................................... 7<br />
Preface ............................................................................................................................................................................... 7<br />
Overview ............................................................................................................................................................................ 7<br />
General Information ............................................................................................................................................................. 7<br />
Different models of the <strong>M3i.41xx</strong> series .................................................................................................................................. 8<br />
Additional options ................................................................................................................................................................ 9<br />
Star-Hub........................................................................................................................................................................ 9<br />
BaseXIO (versatile digital I/O) ......................................................................................................................................... 9<br />
The <strong>Spectrum</strong> type plate ...................................................................................................................................................... 10<br />
Hardware information......................................................................................................................................................... 11<br />
Block diagram.............................................................................................................................................................. 11<br />
Technical Data ............................................................................................................................................................. 12<br />
Dynamic Parameters ..................................................................................................................................................... 13<br />
Order Information......................................................................................................................................................... 14<br />
Hardware Installation ..................................................................................................... 15<br />
System Requirements .......................................................................................................................................................... 15<br />
Warnings.......................................................................................................................................................................... 15<br />
ESD Precautions ........................................................................................................................................................... 15<br />
Cooling Precautions...................................................................................................................................................... 15<br />
Sources of noise ........................................................................................................................................................... 15<br />
Installing the board in the system.......................................................................................................................................... 16<br />
Installing a single board without any options.................................................................................................................... 16<br />
Installing a board with digital inputs/outputs mounted on an extra bracket .......................................................................... 18<br />
Installing a board with option BaseXIO ........................................................................................................................... 19<br />
Installing multiple boards synchronized by star-hub option ................................................................................................. 20<br />
Software Driver Installation............................................................................................. 21<br />
Interrupt Sharing ................................................................................................................................................................ 21<br />
Windows 2000 ................................................................................................................................................................. 22<br />
Installation ................................................................................................................................................................... 22<br />
Version control ............................................................................................................................................................. 22<br />
Driver - Update............................................................................................................................................................. 23<br />
Windows XP 32/64 Bit ...................................................................................................................................................... 24<br />
Installation ................................................................................................................................................................... 24<br />
Version control ............................................................................................................................................................. 24<br />
Driver - Update............................................................................................................................................................. 25<br />
Windows 7, 32/64 Bit....................................................................................................................................................... 26<br />
Installation ................................................................................................................................................................... 26<br />
Version control ............................................................................................................................................................. 27<br />
Driver - Update............................................................................................................................................................. 27<br />
Linux................................................................................................................................................................................. 28<br />
Overview .................................................................................................................................................................... 28<br />
Standard Driver Installation............................................................................................................................................ 28<br />
Standard Driver Update ................................................................................................................................................ 29<br />
Compilation of kernel driver sources (option) ................................................................................................................... 29<br />
Update of self compiled kernel driver .............................................................................................................................. 29<br />
Library ........................................................................................................................................................................ 29<br />
Control Center ............................................................................................................................................................. 30<br />
3
Software ......................................................................................................................... 31<br />
Software Overview............................................................................................................................................................. 31<br />
Card Control Center ........................................................................................................................................................... 31<br />
Hardware information................................................................................................................................................... 32<br />
Firmware information .................................................................................................................................................... 32<br />
Driver information......................................................................................................................................................... 32<br />
Installing and removing Demo cards ............................................................................................................................... 33<br />
Debug logging for support cases .................................................................................................................................... 33<br />
Feature upgrade........................................................................................................................................................... 33<br />
Software License upgrade.............................................................................................................................................. 33<br />
Firmware upgrade ........................................................................................................................................................ 34<br />
Performing card calibration ........................................................................................................................................... 34<br />
Performing memory test ................................................................................................................................................. 34<br />
Transfer speed test........................................................................................................................................................ 35<br />
Accessing the cards with SBench 6....................................................................................................................................... 35<br />
C/C++ Driver Interface....................................................................................................................................................... 35<br />
Header files ................................................................................................................................................................. 36<br />
General Information on Windows 64 bit drivers............................................................................................................... 36<br />
Microsoft Visual C++ 6.0 and 2005 32 Bit ..................................................................................................................... 36<br />
Microsoft Visual C++ 64 Bit........................................................................................................................................... 36<br />
Borland C++ Builder 32 Bit ........................................................................................................................................... 37<br />
Linux Gnu C/C++ 32/64 Bit ......................................................................................................................................... 37<br />
C++ for .NET............................................................................................................................................................... 37<br />
Other Windows C/C++ compilers 32 Bit ........................................................................................................................ 37<br />
Other Windows C/C++ compilers 64 Bit ........................................................................................................................ 37<br />
National Instruments LabWindows/CVI........................................................................................................................... 38<br />
Driver functions .................................................................................................................................................................. 38<br />
Borland Delphi (Pascal) Programming Interface ...................................................................................................................... 43<br />
Driver interface ............................................................................................................................................................ 43<br />
Examples..................................................................................................................................................................... 44<br />
Visual Basic Programming Interface and Examples ................................................................................................................. 45<br />
Driver interface ............................................................................................................................................................ 45<br />
Examples..................................................................................................................................................................... 46<br />
.NET programming languages ............................................................................................................................................. 47<br />
Library ........................................................................................................................................................................ 47<br />
Declaration.................................................................................................................................................................. 47<br />
Using C#..................................................................................................................................................................... 47<br />
Using Managed C++/CLI.............................................................................................................................................. 47<br />
Using VB.NET .............................................................................................................................................................. 48<br />
Using J# ...................................................................................................................................................................... 48<br />
Python Programming Interface and Examples......................................................................................................................... 48<br />
Driver interface ............................................................................................................................................................ 48<br />
Examples..................................................................................................................................................................... 50<br />
Programming the Board .................................................................................................. 51<br />
Overview .......................................................................................................................................................................... 51<br />
Register tables ................................................................................................................................................................... 51<br />
Programming examples....................................................................................................................................................... 51<br />
Initialization....................................................................................................................................................................... 52<br />
Error handling.................................................................................................................................................................... 52<br />
Gathering information from the card..................................................................................................................................... 53<br />
Card type.................................................................................................................................................................... 53<br />
Hardware version......................................................................................................................................................... 53<br />
Production date ............................................................................................................................................................ 54<br />
Last calibration date...................................................................................................................................................... 54<br />
Serial number .............................................................................................................................................................. 54<br />
Maximum possible sampling rate ................................................................................................................................... 54<br />
Installed memory .......................................................................................................................................................... 54<br />
Installed features and options ......................................................................................................................................... 54<br />
Used type of driver ....................................................................................................................................................... 55<br />
Reset................................................................................................................................................................................. 57<br />
4
Analog Inputs.................................................................................................................. 58<br />
Channel Selection .............................................................................................................................................................. 58<br />
Important note on channels selection............................................................................................................................... 58<br />
Setting up the inputs ........................................................................................................................................................... 59<br />
Input Path .................................................................................................................................................................... 59<br />
Input ranges................................................................................................................................................................. 59<br />
Read out of input features .............................................................................................................................................. 60<br />
Input termination........................................................................................................................................................... 61<br />
Input coupling .............................................................................................................................................................. 61<br />
Anti aliasing filter (Bandwidth limit)................................................................................................................................. 61<br />
Enhanced Status Register............................................................................................................................................... 62<br />
Automatic on-board calibration of the offset and gain settings............................................................................................ 62<br />
Acquisition modes ........................................................................................................... 63<br />
Overview .......................................................................................................................................................................... 63<br />
Setup of the mode ........................................................................................................................................................ 63<br />
Commands........................................................................................................................................................................ 63<br />
Card Status.................................................................................................................................................................. 64<br />
Acquisition cards status overview ................................................................................................................................... 65<br />
Generation card status overview .................................................................................................................................... 65<br />
Data Transfer ............................................................................................................................................................... 65<br />
Standard Single acquisition mode ........................................................................................................................................ 67<br />
Card mode .................................................................................................................................................................. 67<br />
Memory, Pre- and Posttrigger ......................................................................................................................................... 68<br />
Example ...................................................................................................................................................................... 68<br />
FIFO Single acquisition mode .............................................................................................................................................. 68<br />
Card mode .................................................................................................................................................................. 68<br />
Length and Pretrigger.................................................................................................................................................... 68<br />
Difference to standard single acquisition mode................................................................................................................. 68<br />
Example FIFO acquisition .............................................................................................................................................. 69<br />
Limits of pre trigger, post trigger, memory size ................................................................................................................. 69<br />
Buffer handling .................................................................................................................................................................. 70<br />
Data organisation .............................................................................................................................................................. 74<br />
Sample format ................................................................................................................................................................... 74<br />
Clock generation ............................................................................................................. 75<br />
Overview .......................................................................................................................................................................... 75<br />
The different clock modes .............................................................................................................................................. 75<br />
Clock Mode Register..................................................................................................................................................... 75<br />
Details on the different clock modes...................................................................................................................................... 76<br />
Standard internal sampling clock (PLL)............................................................................................................................. 76<br />
Using Quartz2 with PLL (optional)................................................................................................................................... 76<br />
External clock (reference clock) ...................................................................................................................................... 76<br />
Trigger modes and appendant registers .......................................................................... 78<br />
General Description............................................................................................................................................................ 78<br />
Trigger Engine Overview..................................................................................................................................................... 78<br />
Multi Purpose I/O Lines....................................................................................................................................................... 79<br />
Programming the behaviour........................................................................................................................................... 79<br />
Using asynchronous I/O ............................................................................................................................................... 79<br />
Special behaviour of trigger output ................................................................................................................................. 80<br />
Special direct trigger output modes................................................................................................................................. 80<br />
Trigger masks .................................................................................................................................................................... 81<br />
Trigger OR mask .......................................................................................................................................................... 81<br />
Trigger AND mask........................................................................................................................................................ 82<br />
Software trigger ................................................................................................................................................................. 83<br />
Force- and Enable trigger .................................................................................................................................................... 83<br />
Trigger delay ..................................................................................................................................................................... 84<br />
External (analog) trigger ..................................................................................................................................................... 85<br />
Trigger Mode............................................................................................................................................................... 85<br />
Trigger Input Termination............................................................................................................................................... 85<br />
Trigger Input Coupling .................................................................................................................................................. 85<br />
Trigger level................................................................................................................................................................. 86<br />
Detailed description of the external analog trigger modes ................................................................................................. 86<br />
External (TTL) trigger using multi purpose I/O connectors ........................................................................................................ 90<br />
TTL Trigger Mode ......................................................................................................................................................... 90<br />
Edge and level triggers ................................................................................................................................................. 90<br />
Channel Trigger ................................................................................................................................................................. 92<br />
Overview of the channel trigger registers......................................................................................................................... 92<br />
Channel trigger level..................................................................................................................................................... 93<br />
Detailed description of the channel trigger modes............................................................................................................. 94<br />
5
Option Multiple Recording/Replay ................................................................................... 98<br />
Recording modes ............................................................................................................................................................... 98<br />
Standard Mode............................................................................................................................................................ 98<br />
FIFO Mode .................................................................................................................................................................. 98<br />
Limits of pre trigger, post trigger, memory size ................................................................................................................. 99<br />
Multiple Recording and Timestamps................................................................................................................................ 99<br />
Trigger Modes ................................................................................................................................................................... 99<br />
Programming examples....................................................................................................................................................... 99<br />
Option Timestamps........................................................................................................ 101<br />
General information ......................................................................................................................................................... 101<br />
Example for setting timestamp mode: ............................................................................................................................ 101<br />
Timestamp modes............................................................................................................................................................. 102<br />
Standard mode .......................................................................................................................................................... 102<br />
StartReset mode.......................................................................................................................................................... 102<br />
Refclock mode (needs BaseXIO option) ......................................................................................................................... 103<br />
Reading out the timestamps ............................................................................................................................................... 104<br />
General..................................................................................................................................................................... 104<br />
Data Transfer using DMA ............................................................................................................................................ 104<br />
Data Transfer using Polling .......................................................................................................................................... 106<br />
Comparison of DMA and polling commands.................................................................................................................. 107<br />
Data format ............................................................................................................................................................... 107<br />
Combination of Memory Segmentation Options with Timestamps ........................................................................................... 108<br />
Multiple Recording and Timestamps.............................................................................................................................. 108<br />
Example Multiple Recording and Timestamps................................................................................................................. 109<br />
ABA Mode and Timestamps......................................................................................................................................... 109<br />
Option ABA mode (dual timebase)................................................................................. 110<br />
General information ......................................................................................................................................................... 110<br />
Standard Mode.......................................................................................................................................................... 110<br />
FIFO Mode ................................................................................................................................................................ 111<br />
Limits of pre trigger, post trigger, memory size ............................................................................................................... 111<br />
Example for setting ABA mode:.................................................................................................................................... 112<br />
Reading out ABA data ...................................................................................................................................................... 112<br />
General..................................................................................................................................................................... 112<br />
Data Transfer using DMA ............................................................................................................................................ 113<br />
Data Transfer using Polling .......................................................................................................................................... 114<br />
Comparison of DMA and polling commands.................................................................................................................. 115<br />
ABA Mode and Timestamps......................................................................................................................................... 115<br />
Option BaseXIO............................................................................................................. 117<br />
Introduction ..................................................................................................................................................................... 117<br />
Different functions............................................................................................................................................................. 117<br />
Asynchronous Digital I/O............................................................................................................................................ 117<br />
Special Input Functions................................................................................................................................................ 118<br />
Transfer Data ............................................................................................................................................................. 118<br />
Programming Example ................................................................................................................................................ 118<br />
Special Sampling Feature ............................................................................................................................................ 118<br />
Electrical specifications................................................................................................................................................ 119<br />
Option Star-Hub ............................................................................................................ 120<br />
Star-Hub introduction ........................................................................................................................................................ 120<br />
Star-Hub trigger engine ............................................................................................................................................... 120<br />
Star-Hub clock engine ................................................................................................................................................. 120<br />
Software Interface ............................................................................................................................................................ 120<br />
Star-Hub Initialization.................................................................................................................................................. 120<br />
Setup of Synchronization............................................................................................................................................. 122<br />
Setup of Trigger ......................................................................................................................................................... 122<br />
Run the synchronized cards ......................................................................................................................................... 123<br />
SH-Direct: using the Star-Hub clock directly without synchronization.................................................................................. 123<br />
Error Handling ........................................................................................................................................................... 124<br />
Appendix ...................................................................................................................... 125<br />
Error Codes ..................................................................................................................................................................... 125<br />
Continuous memory for increased data transfer rate ............................................................................................................. 127<br />
Background ............................................................................................................................................................... 127<br />
Setup on Windows systems.......................................................................................................................................... 127<br />
Setup on Linux systems ................................................................................................................................................ 127<br />
Usage of the buffer ..................................................................................................................................................... 128<br />
Details on M3i cards I/O lines........................................................................................................................................... 129<br />
Multi Purpose I/O Lines............................................................................................................................................... 129<br />
Interfacing with clock input .......................................................................................................................................... 129<br />
Interfacing with clock output......................................................................................................................................... 129<br />
6
Introduction Preface<br />
Introduction<br />
Preface<br />
This manual provides detailed information on the hardware features of your <strong>Spectrum</strong> instrumentation board. This information includes technical<br />
data, specifications, block diagram and a connector description.<br />
In addition, this guide takes you through the process of installing your board and also describes the installation of the delivered driver package<br />
for each operating system.<br />
Finally this manual provides you with the complete software information of the board and the related driver. The reader of this manual will<br />
be able to integrate the board in any PC system with one of the supported bus and operating systems.<br />
Please note that this manual provides no description for specific driver parts such as those for LabVIEW or MATLAB. These drivers are provided<br />
by special order.<br />
For any new information on the board as well as new available options or memory upgrades please contact our website<br />
http://www.spectrum-instrumentation.com. You will also find the current driver package with the latest bug fixes and new features on our site.<br />
Please read this manual carefully before you install any hardware or software. <strong>Spectrum</strong> is not responsible<br />
for any hardware failures resulting from incorrect usage.<br />
Overview<br />
The PCI bus was first introduced in 1995. Nowadays it is the most common platform for PC based instrumentation boards. The very<br />
wide range of installations world-wide, especially in the consumer market, makes it a platform of good value. Its successor is the<br />
2004 introduced PCI Express standard. In today’s standard PC there are usually two to three slots of both standards available for<br />
instrumentation boards. Special industrial PCs offer up to a maximum of 20 slots. The common PCI/PCI-X bus with data rates of up<br />
to 133 MHz x 64 bit = 1 GByte/s per bus, is more and more replaced by the PCI Express standard with up to 4 GByte/s data transfer rate<br />
per slot. The <strong>Spectrum</strong> M3i boards are available in two versions, for PCI/PCI-X as well as for PCI Express. The 100% software compatible<br />
standards allow to combine both standards in one system with the same driver and software commands.<br />
Within this document the name M3i is used as a synonym for both versions, either PCI/PCI-X or PCI Express. Only passages that<br />
differ concerning the bus version of the M3i.xxxx and M3i.xxxx-<strong>exp</strong> cards are mentioned separately. Also all card drawings will<br />
show the PCI/PCI-X version as example if no differences exist compared to the PCI Express version.<br />
General Information<br />
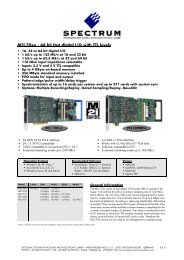
The <strong>M3i.41xx</strong> is best suitable for applications that need ultra high sample rates as well as a maximum possible resolution. These boards offer<br />
a resolution 4 times higher than 12 bit boards.<br />
On the <strong>M3i.41xx</strong> every channel has its own amplifier and A/D converter. Each input channel can be adapted to a wide variety of signal<br />
sources. This is done by software selecting a matching input path, input range, input impedance, input coupling and anti-aliasing filter. The<br />
user will easily find a matching solution from the six offered models. These versions are working with sample rates of 100 MS/s up to 400<br />
MS/s and have one or two channels and can also be updated to a multi-channel system using the internal synchronization bus.<br />
Data is written in the internal up to 2 GSample large memory. This memory can also be used as a FIFO buffer. In FIFO mode data will be<br />
transferred online into the PC RAM or to hard disk.<br />
Application examples: Automatic test systems, Supersonics, CCD imaging systems, Vibration analysis, Radar, Sonar.<br />
(c) <strong>Spectrum</strong> GmbH 7
Different models of the <strong>M3i.41xx</strong> series Introduction<br />
Different models of the <strong>M3i.41xx</strong> series<br />
The following overview shows the different available models of the <strong>M3i.41xx</strong> series. They differ in the number of available channels. You<br />
can also see the model dependant location of the input connectors.<br />
• M3i.4110<br />
• M3i.4120<br />
• M3i.4140<br />
• M3i.4110-<strong>exp</strong><br />
• M3i.4120-<strong>exp</strong><br />
• M3i.4140-<strong>exp</strong><br />
• M3i.4111<br />
• M3i.4121<br />
• M3i.4142<br />
• M3i.4111-<strong>exp</strong><br />
• M3i.4121-<strong>exp</strong><br />
• M3i.4142-<strong>exp</strong><br />
8 <strong>M3i.41xx</strong> / <strong>M3i.41xx</strong>-<strong>exp</strong> Manual
Introduction Additional options<br />
Additional options<br />
Star-Hub<br />
The star hub piggy-back module allows<br />
the synchronization of up to 8<br />
M3i cards. It is possible to synchronize<br />
cards of the same type with each<br />
other as well as different types.<br />
Two different versions of the star-hub<br />
module are available. A minor one<br />
for synchronizing up to four boards of<br />
the M3i series, without the need for<br />
an additional system slot. The major<br />
version (option SH8) allows the synchronization<br />
of up to 8 cards with the<br />
need for an additional slot.<br />
The module acts as a star hub for<br />
clock and trigger signals. Each board<br />
is connected with a small cable of the<br />
same length, even the master board.<br />
That minimizes the clock skew between<br />
the different cards. The figure shows the piggy-back module mounted on the base board schematically without any cables to achieve<br />
a better visibility. It also shows the locations of the available connectors for the two different versions of the star-hub option.<br />
The carrier card acts as the clock master and the same or any other card can be the trigger master. All trigger modes that are available on<br />
the master card are also available if the synchronization star-hub is used.<br />
The cable connection of the boards is automatically recognized and checked by the driver when initializing the star-hub module. So no care<br />
must be taken on how to cable the cards. The star-hub module itself is handled as an additional device just like any other card and the programming<br />
consists of only a few additional commands.<br />
BaseXIO (versatile digital I/O)<br />
The option BaseXIO is simple-to-use<br />
enhancement to the cards of the M3i<br />
series. It is possible to control a wide<br />
range of external instruments or<br />
other equipment by using the eight<br />
lines as asynchronous digital I/O.<br />
The BaseXIO option is useful if an<br />
external amplifier should be controlled,<br />
any kind of signal source must<br />
be programmed, if status information<br />
from an external machine has to<br />
be obtained or different test signals<br />
have to be routed to the board.<br />
In addition to the I/O features, these<br />
lines are also for special functions.<br />
One line can be used as an reference<br />
time signal (RefClock) for the<br />
timestamp option.<br />
The BaseXIO MMCX connectors are<br />
mounted on-board. To gain easier access, these lines are connected to an extra bracket, that holds eight SMB male connectors. For special<br />
purposes this option can also be ordered without the extra bracket and instead with internal cables.<br />
(c) <strong>Spectrum</strong> GmbH 9
The <strong>Spectrum</strong> type plate Introduction<br />
The <strong>Spectrum</strong> type plate<br />
The <strong>Spectrum</strong> type plate, which consists of the following components, can be found on all of our boards. Please check whether the printed<br />
information is the same as the information on your delivery note. All this information can also be read out by software:<br />
The board type, consisting of the two letters describing the bus (in this case M2i for the PCI-X bus) and the model number.<br />
The size of the on-board installed memory in MSample or GSample. In this example there are 1 GS = 1024 MSample (2 GByte =<br />
2048 MByte) installed.<br />
The serial number of your <strong>Spectrum</strong> board. Every board has a unique serial number.<br />
A list of the installed options. A complete list of all available options is shown in the order information. In this example the options<br />
Multiple recording, Gated Sampling, Timestamp and Star-Hub 5 are installed.<br />
The base card version, consisting of the hardware version (the part before the dot) and the firmware version (the part after the dot).<br />
The version of the analog/digital front-end module. Consisting of the hardware version (the part before the dot) and the firmware<br />
version (the part after the dot)<br />
The date of production, consisting of the calendar week and the year.<br />
The version of the extension module if one is installed. Consisting of the hardware version (the part before the dot) and the firmware<br />
version (the part after the dot). In our example we have the Star-Hub 5 extension module installed. Therefore the version of the extension<br />
module is filled on the type plate. If no extension module is installed this part is left open.<br />
Please always supply us with the above information, especially the serial number in case of support request. That<br />
allows us to answer your questions as soon as possible. Thank you.<br />
10 <strong>M3i.41xx</strong> / <strong>M3i.41xx</strong>-<strong>exp</strong> Manual
Introduction Hardware information<br />
Hardware information<br />
Block diagram<br />
(c) <strong>Spectrum</strong> GmbH 11
Hardware information Introduction<br />
Technical Data<br />
Analog Inputs Clock<br />
Resolution 14 bit Internal clock range 9 MHz to max (see table below)<br />
Differential non linearity (DNL) ≤ 1.5 LSB (ADC, fin = 70 MHz) Internal clock accuracy max. ± 32 ppm<br />
Integral non linearity (INL) ≤ 3 LSB (ADC, fin = 70 MHz) Internal clock setup granularity 1 Hz<br />
Programmable input offset not available Clock range gaps (internal and external) 70 to 72, 140 to 144, 281 to 287 MHz<br />
Connector (analog inputs) 3 mm SMB male External clock input connector/coupling MMCX female, AC coupled<br />
Crosstalk sine signal ±1V @ 1 MOhm 1 MHz:
Introduction Hardware information<br />
M3i.4110 M3i.4111 M3i.4120 M3i.4121 M3i.4140 M3i.4142<br />
max internal clock (1 channel active) 100 MS/s 100 MS/s 250 MS/s 250 MS/s 400 MS/s 400 MS/s<br />
max internal clock (2 channels active) n.a. 100 MS/s n.a. 250 MS/s n.a. 250 MS/s<br />
lower bandwidth limit (DC coupling) 0 Hz 0 HZ 0 Hz 0 Hz 0 Hz 0 Hz<br />
lower bandwidth limit (AC coupled, 50 Ohm)
Hardware information Introduction<br />
Order Information<br />
.<br />
.<br />
.<br />
PCI/PCI-X Order no. Standard mem 1 channel 2 channels<br />
M3i.4110 128 MSample 100 MS/s<br />
M3i.4111 128 MSample 100 MS/s 100 MS/s<br />
M3i.4120 128 MSample 250 MS/s<br />
M3i.4121 128 MSample 250 MS/s 250 MS/s<br />
M3i.4140 128 MSample 400 MS/s<br />
M3i.4142 128 MSample 400 MS/s 250 MS/s<br />
PCI Express Order no. Standard mem 1 channel 2 channels<br />
M3i.4110-<strong>exp</strong> 128 MSample 100 MS/s<br />
M3i.4111-<strong>exp</strong> 128 MSample 100 MS/s 100 MS/s<br />
M3i.4120-<strong>exp</strong> 128 MSample 250 MS/s<br />
M3i.4121-<strong>exp</strong> 128 MSample 250 MS/s 250 MS/s<br />
M3i.4140-<strong>exp</strong> 128 MSample 400 MS/s<br />
M3i.4142-<strong>exp</strong> 128 MSample 400 MS/s 250 MS/s<br />
Memory Order no. Option<br />
M3i.xxxx-256MS Memory upgrade to 256 MSample (512 MB) total memory<br />
M3i.xxxx-512MS Memory upgrade to 512 MSample (1 GB) total memory<br />
M3i.xxxx-1GS Memory upgrade to 1 GSample (2 GB) total memory<br />
M3i.xxxx-2GS Memory upgrade to 2 GSample (4 GB) total memory<br />
Options Order no. Option<br />
Cables<br />
M3i.xxxx-mr Option Multiple Recording<br />
M3i.xxxx-mt Option pack including Multiple Recording, Timestamp<br />
M3i.xxxx-mtab Option pack including Multiple Recording, Timestamp, ABA mode<br />
M3i.xxxx-SH4 Synchronization Star-Hub for up to 4 cards, only 1 slot width<br />
M3i.xxxx-SH8 Synchronization Star-Hub for up to 8 cards, 2 slots width<br />
M3i.xxxx-bxio Option BaseXIO: 8 digital I/O lines usable as asynchronous I/O and timestamp ref-clock, additional<br />
bracket with 8 SMB connectors<br />
M3i.xxxx-SMA Option SMA connections for all analog inputs + two control signals:<br />
- SMA connection XA: Trigger-In or Trigger-Out/Multi Purpose X0<br />
- SMA connection XB: Trigger-In or Clock In or Clokc-Out<br />
Connections for XA and XB must be defined with order<br />
M3i-upgrade Upgrade for M3i.xxxx: later installation of option -bxio, -SH4, SH8 or SMA connectors<br />
for Connections Connection Length<br />
Order no.<br />
to BNC male to BNC female to SMA male to SMA female<br />
Standard inputs SMB female 80 cm Cab-3f-9m-80 Cab-3f-9f-80 Cab-3f-3mA-80 Cab-3f-3fA-80<br />
Standard inputs SMB female 200 cm Cab-3f-9m-200 Cab-3f-9f-200 Cab-3f-3mA-200 Cab-3f-3fA-200<br />
Probes (short) SMB female 5 cm Cab-3f-9f-5<br />
Trigger/Clock/Extra MMCX male 80 cm Cab-1m-9m-80 Cab-1m-9f-80 Cab-1m-3mA-80 Cab-1m-3fA-80<br />
Trigger/Clock/Extra MMCX male 200 cm Cab-1m-9m-200 Cab-1m-9f200 Cab-1m-3mA-200 Cab-1m-3fA-200<br />
SMA Option SMA male 80 cm Cab-3mA-9m-80 Cab-3mA-9f-80<br />
SMA Option SMA male 200 cm Cab-3mA-9m-200 Cab-3mA-9f-200<br />
Amplifiers Order no. Bandwidth Input Impedance Coupling Amplification<br />
SPA.1601 (2) 500 MHz 50 Ohm DC x10 (20 dB)<br />
SPA.1412 (2) 200 MHz 1 MOhm AC/DC x10/x100 (20/40 dB)<br />
SPA.1411 (2) 200 MHz 50 Ohm AC/DC x10/x100 (20/40 dB)<br />
SPA.1232 (2) 10 MHz 1 MOhm AC/DC x100/x1000 (40/60 dB)<br />
SPA.1231 (2) 10 MHz 50 Ohm AC/DC x100/x1000 (40/60 dB)<br />
SPA.PW1-120 (2) External power supply for all SPA amplifiers with 120 VAC, type A (US, Japan) connector<br />
SPA.PW1-230 (2) External power supply for all SPA amplifiers with 230 VAC, type C (European) connector<br />
Information External Amplifiers with one channel, BNC connections, manually adjustable offset, manually switch<br />
between settings. A power supply need to be ordered for each amplifier!<br />
Drivers Order no. Option<br />
SBench6<br />
M3i.xxxx-ml MATLAB driver for all M3i and M3i Express cards<br />
M3i.xxxx-lv LabVIEW driver for all M3i and M3i Express cards<br />
M3i.xxxx-vee Agilent VEE driver for all M3i and M3i Express cards<br />
Order no.<br />
SBench6 Base version which support standard mode for one card<br />
SBench6-Pro Professional version for one card: FIFO mode, <strong>exp</strong>ort/import, calculation functions<br />
SBench6-Multi Option multiple cards: needs Professional version. Handles multiple synchronized cards<br />
in one system.<br />
Volume Licenses Please ask <strong>Spectrum</strong> for details.<br />
(1) : Just one of the options can be installed on a card at a time.<br />
(2) : Third party product with warranty differing from our <strong>exp</strong>ort conditions. No volume rebate possible.<br />
14 <strong>M3i.41xx</strong> / <strong>M3i.41xx</strong>-<strong>exp</strong> Manual
Hardware Installation System Requirements<br />
Hardware Installation<br />
System Requirements<br />
All <strong>Spectrum</strong> M2i/M3i.xxxx instrumentation cards are compliant to the PCI standard and require in general one free full length slot. This can<br />
either be a standard 32 bit PCI legacy slot, a 32 bit or a 64 bit PCI-X slot. Depending on the installed options additional free slots can be<br />
necessary.<br />
All <strong>Spectrum</strong> M2i/M3i.xxxx-<strong>exp</strong> instrumentation cards are compliant to the PCI Express 1.0 standard and require in general one free full<br />
length PCI Express slot. This can either be a x1, x4, x8 or x16 slot. Some x16 PCIe slots are for the use of graphic cards only and can not<br />
be used for other cards. Depending on the installed options additional free slots can be necessary.<br />
Warnings<br />
ESD Precautions<br />
The boards of the M2i/M3i.xxxx series contain electronic components that can be damaged by electrostatic discharge (ESD).<br />
Before installing the board in your system or even before touching it, it is absolutely necessary to bleed off<br />
any electrostatic electricity.<br />
Cooling Precautions<br />
The boards of the M2i/M3i.xxxx series operate with components having very high power consumption at high speeds. For this reason it is<br />
absolutely required to cool this board sufficiently. It is strongly recommended to install an additional cooling fan producing a stream of air<br />
across the boards surface. In most cases professional PC-systems are already equipped with sufficient cooling power. In that case please<br />
make sure that the air stream is not blocked.<br />
Sources of noise<br />
The analog acquisition and generator boards of the M2i/M3i.xxxx series should be placed far away from any noise producing source (like<br />
e.g. the power supply). It should especially be avoided to place the board in the slot directly adjacent to another fast board (like the graphics<br />
controller).<br />
(c) <strong>Spectrum</strong> GmbH 15
Installing the board in the system Hardware Installation<br />
Installing the board in the system<br />
Installing a single board without any options<br />
Before installing the board you first need to unscrew and remove the dedicated blind-bracket usually mounted to cover unused slots of your<br />
PC. Please keep the screw in reach to fasten your <strong>Spectrum</strong> card afterwards. All <strong>Spectrum</strong> cards require a full length PCI, PCI-X slot (either<br />
32Bit or 64Bit) or PCI Express slot (either x1, x4, x8 or x16) with a track at the backside to guide the board by its retainer. Now insert the<br />
board slowly into your computer. This is done best with one hand each at both fronts of the board.<br />
While inserting the board take care not to tilt the retainer in the track. Please take especial care to not bend<br />
the card in any direction while inserting it in the system. A bending of the card may damage the PCB totally<br />
and is not covered by the standard warranty.<br />
Please be very carefully when inserting the board in the slot, as most of the mainboards are mounted with<br />
spacers and therefore might be damaged if they are <strong>exp</strong>osed to high pressure.<br />
After the board’s insertion fasten the screw of the bracket carefully, without overdoing.<br />
Installing the M2i/M3i.xxxx PCI/PCI-X card in a 32 bit PCI/PCI-X slot<br />
Installing the M2i/M3i.xxxx PCI/PCI-X card in a 64 bit PCI/PCI-X slot<br />
16 <strong>M3i.41xx</strong> / <strong>M3i.41xx</strong>-<strong>exp</strong> Manual
Hardware Installation Installing the board in the system<br />
Installing the M2i/M3i.xxxx-<strong>exp</strong> PCI Express card in a PCIe x1 slot<br />
Installing the M2i/M3i.xxxx-<strong>exp</strong> PCI Express card in a PCIe x4, x8 or x16 slot<br />
(c) <strong>Spectrum</strong> GmbH 17
Installing the board in the system Hardware Installation<br />
Installing a board with digital inputs/outputs mounted on an extra bracket<br />
Before installing the board you first need to unscrew and remove the dedicated blind-brackets usually mounted to cover unused slots of your<br />
PC. Please keep the screws in reach to fasten your <strong>Spectrum</strong> board and the extra bracket afterwards. All <strong>Spectrum</strong> boards require a full length<br />
PCI slot with a track at the backside to guide the board by its retainer. Now insert the board and the extra bracket slowly into your computer.<br />
This is done best with one hand each at both fronts of the board.<br />
While inserting the board take care not to tilt the retainer in the track. Please take especial care to not bend<br />
the card in any direction while inserting it in the system. A bending of the card may damage the PCB totally<br />
and is not covered by the standard warranty.<br />
Please be very carefully when inserting the board in the PCI slot, as most of the mainboards are mounted<br />
with spacers and therefore might be damaged they are <strong>exp</strong>osed to high pressure.<br />
After the board’s insertion fasten the screws of both brackets carefully, without overdoing. The figure shows an example<br />
of a board with two installed modules.<br />
18 <strong>M3i.41xx</strong> / <strong>M3i.41xx</strong>-<strong>exp</strong> Manual
Hardware Installation Installing the board in the system<br />
Installing a board with option BaseXIO<br />
Before installing the board you first need to unscrew and remove the dedicated blind-brackets usually mounted to cover unused slots of your<br />
PC. Please keep the screws in reach to fasten your <strong>Spectrum</strong> board and the extra bracket afterwards. All <strong>Spectrum</strong> boards require a full length<br />
PCI slot with a track at the backside to guide the board by it’s retainer. Now insert the board and the extra bracket slowly into your computer.<br />
This is done best with one hand each at both fronts of the board.<br />
While inserting the board take care not to tilt the retainer in the track. Please take especial care to not bend<br />
the card in any direction while inserting it in the system. A bending of the card may damage the PCB totally<br />
and is not covered by the standard warranty.<br />
Please be very carefully when inserting the board in the PCI slot, as most of the mainboards are mounted<br />
with spacers and therefore might be damaged they are <strong>exp</strong>osed to high pressure.<br />
After the board’s insertion fasten the screws of both brackets carefully, without overdoing. The figure shows an example<br />
of a board with two installed modules.<br />
(c) <strong>Spectrum</strong> GmbH 19
Installing the board in the system Hardware Installation<br />
Installing multiple boards synchronized by star-hub option<br />
Hooking up the boards<br />
Before mounting several synchronized boards for a multi channel system into the PC you can hook up the cards with their synchronization<br />
cables first. If there is enough space in your computer’s case (e.g. a big tower case) you can also mount the boards first and hook them up<br />
afterwards. <strong>Spectrum</strong> ships the card carrying the star-hub option together with the needed amount of synchronization cables. All of them are<br />
matched to the same length, to achieve a zero clock delay between the cards.<br />
Only use the included flat ribbon cables.<br />
All of the cards, including the one that carries the star-hub piggy-back module, must be wired to the star-hub as the figure is showing as an<br />
example for three synchronized boards.<br />
It does not matter which of the available connectors on the star-hub module you use for which board. The software driver will detect the types<br />
and order of the synchronized boards automatically. The figure shows the three cables mounted on the option M2i.xxxx-SH16 star-hub to<br />
achieve a better visibility. The option M3i.xxxx-SH8 is handled similar to this picture. When using the M3i.xxxx-SH4 or M2i.xxxx-SH5 version,<br />
only the connectors on the upper side of the star-hub piggy-back module are available (see figure for details on the star-hub connector locations).<br />
As some of the synchronization cables are not secured against wrong plugging you should take<br />
care to have the pin 1 markers on the multiple connectors and the cable on the same side, as the<br />
figure on the right is showing.<br />
Mounting the wired boards<br />
Before installing the cards you first need to unscrew and remove the dedicated blind-brackets usually mounted to cover unused slots of your<br />
PC. Please keep the screws in reach to fasten your <strong>Spectrum</strong> cards afterwards. All <strong>Spectrum</strong> boards require a full length PCI slot with a track<br />
at the backside to guide the card by its retainer. Now insert the cards slowly into your computer. This is done best with one hand each at<br />
both fronts of the board. Please keep in mind that the board carrying the star-hub piggy-back module requires the width of two slots, when<br />
the option M3i.xxxx-SH8 or M2i.xxxx-SH16 version is used.<br />
While inserting the board take care not to tilt the retainer in the track. Please take especial care to not bend<br />
the card in any direction while inserting it in the system. A bending of the card may damage the PCB totally<br />
and is not covered by the standard warranty.<br />
Please be very careful when inserting the cards in the slots, as most of the mainboards are mounted with<br />
spacers and therefore might be damaged if they are <strong>exp</strong>osed to high pressure.<br />
After inserting all cards fasten the screws of all brackets carefully, without overdoing. The figure shows an example of three cards with two<br />
installed modules each.<br />
20 <strong>M3i.41xx</strong> / <strong>M3i.41xx</strong>-<strong>exp</strong> Manual
Software Driver Installation Interrupt Sharing<br />
Software Driver Installation<br />
Before using the board a driver must be installed that matches the operating system. The installation is done in different ways depending on<br />
the used operating system. The driver that is on CD supports all cards of the M2i/M3i series. That means that you can use the same driver<br />
for all cards of these families.<br />
With the CD revision 3.00 (June 2010) the CD structure was revised and the root folder of the Windows drivers<br />
was changed from „spcm_driver“ to „Driver“. The screen shots shown in the installation chapters might<br />
still show the former version.<br />
Interrupt Sharing<br />
This board uses a PCI interrupt for DMA data transfer and for controlling the FIFO mode. The used interrupt line is allocated by the PC BIOS<br />
at system start and is normally depending on the selected slot. Because there is only a limited number of interrupt lines available on the PCI<br />
bus it can happen that two or more boards must use the same interrupt line. This so called interrupt sharing must be supported by all drivers<br />
of the participating equipment.<br />
Most available drivers and also the <strong>Spectrum</strong> driver for your board can manage interrupt sharing. But there are also some drivers on the<br />
market that can only use one interrupt exclusively. If this equipment shares an interrupt with the <strong>Spectrum</strong> board, the system will hang up if<br />
the second driver is loaded (the time is depending on the operating system).<br />
If this happens it is necessary to reconfigure the system in that way that the critical equipment has an exclusive access to an interrupt.<br />
On most systems the BIOS shows a list of all installed PCI boards with their allocated interrupt lines directly after system start. You have to<br />
check whether an interrupt line is shared between two boards. Some BIOS allow the manual allocation of interrupt lines. Have a look in your<br />
mainboard manual for further information on this topic.<br />
Because normally the interrupt line is fixed for one PCI slot it is simply necessary to use another slot for the critical board to force a new<br />
interrupt allocation. You have to search a configuration where all critical boards have only exclusive access to one interrupt.<br />
Depending on the system, using the <strong>Spectrum</strong> board with a shared interrupt may degrade performance a little. Each interrupt needs to be<br />
checked by two drivers. For this reason when using time critical FIFO mode even the <strong>Spectrum</strong> board should have an exclusively access to<br />
one interrupt line.<br />
(c) <strong>Spectrum</strong> GmbH 21
Windows 2000 Software Driver Installation<br />
Windows 2000<br />
Installation<br />
Version control<br />
When installing the board in<br />
a Windows 2000 system the<br />
<strong>Spectrum</strong> board will be recognized<br />
automatically on the<br />
next start-up.<br />
The system offers the direct installation<br />
of a driver for the<br />
board.<br />
Let Windows search automatically<br />
for the best driver for<br />
your system.<br />
Select the CD that was delivered<br />
with the board as installation<br />
source. The driver files<br />
are located on CD in the directory<br />
\Driver\win32.<br />
The hardware assistant<br />
shows you the exact board<br />
type that has been found like<br />
the M2i.2021 in the example.<br />
The drivers can be used directly<br />
after installation. It is<br />
not necessary to restart the<br />
system. The installed drivers<br />
are linked in the device manager.<br />
Below you’ll see how to examine<br />
the driver version and<br />
how to update the driver with<br />
a newer version.<br />
If you want to check which driver version<br />
is installed in the system this can be easily<br />
done in the device manager. Therefore<br />
please start the device manager<br />
from the control panel and show the<br />
properties of the installed driver.<br />
On the property page Windows 2000<br />
shows the date and the version of the installed<br />
driver.<br />
After clicking the driver details button the<br />
detailed version information of the driver<br />
is shown. This information is also available<br />
through the control center.<br />
22 <strong>M3i.41xx</strong> / <strong>M3i.41xx</strong>-<strong>exp</strong> Manual
Software Driver Installation Windows 2000<br />
Driver - Update<br />
If a new driver version should be installed no <strong>Spectrum</strong> board is allowed to be in use by any software. So please stop and exit all software<br />
that could access the boards.<br />
A new driver version is directly<br />
installed from the device<br />
manager. Therefore please<br />
open the properties page of<br />
the driver as shown in the section<br />
before. As next step click<br />
on the update driver button<br />
and follow the steps of the<br />
driver installation in a similar<br />
way to the previous board<br />
and driver installation.<br />
Please select the path where<br />
the new driver version was<br />
unzipped to. If you’ve got the<br />
new driver version on CD<br />
please select the<br />
\Driver\win32 path on the<br />
CD containing the new driver<br />
version.<br />
The new driver version can<br />
be used directly after installation<br />
without restarting the system.<br />
Please keep in mind to<br />
update the driver of all installed<br />
<strong>Spectrum</strong> boards.<br />
(c) <strong>Spectrum</strong> GmbH 23
Windows XP 32/64 Bit Software Driver Installation<br />
Windows XP 32/64 Bit<br />
Installation<br />
When installing the board in a Windows XP system the <strong>Spectrum</strong> board will be recognized<br />
automatically on the next start-up.<br />
The system offers the direct installation of a driver for the board.<br />
Do not let Windows automatically search for the best driver, because<br />
sometimes the driver will not be found on the CD. Please take<br />
the option of choosing a manual installation path instead.<br />
Allow Windows XP to search for the most suitable driver in a specific directory. Select<br />
the CD that was delivered with the board as installation source. The driver files<br />
are located on CD in the directory \Driver\win32 for Windows XP 32 Bit or<br />
\Driver\win64 for Windows XP 64 Bit.<br />
The hardware assistant shows you the exact board type that has been found like<br />
the M2i.2021 in the example.<br />
The drivers can be used directly after installation. It is not necessary to restart the<br />
system. The installed drivers are linked in the device manager.<br />
Below you’ll see how to examine the driver version and how to update the driver<br />
with a newer version.<br />
Version control<br />
If you want to check which driver version is installed in the system this<br />
can be easily done in the device manager. Therefore please start the<br />
device manager from the control panel and show the properties of<br />
the installed driver.<br />
24 <strong>M3i.41xx</strong> / <strong>M3i.41xx</strong>-<strong>exp</strong> Manual
Software Driver Installation Windows XP 32/64 Bit<br />
On the property page Windows XP shows the date and the version of the installed driver.<br />
After clicking the driver details button the detailed version information of the driver is shown.<br />
This information is also available through the <strong>Spectrum</strong> Control Center.<br />
Driver - Update<br />
If a new driver version should be installed no <strong>Spectrum</strong> board is allowed to be in<br />
use by any software. So please stop and exit all software that could access the<br />
boards.<br />
A new driver version is directly installed from the device manager. Therefore please<br />
open the properties page of the driver as shown in the section before. As next step<br />
click on the update driver button and follow the steps of the driver installation in a<br />
similar way to the previous board and driver installation.<br />
Please select the path where the new driver version was unzipped to. If you’ve got<br />
the new driver version on CD please select either the \Driver\win32 or<br />
\Driver\win64 path on the CD containing the new driver version.<br />
The new driver version can be used directly after installation without restarting the<br />
system. Please keep in mind to update the driver of all installed <strong>Spectrum</strong> boards.<br />
(c) <strong>Spectrum</strong> GmbH 25
Windows 7, 32/64 Bit Software Driver Installation<br />
Windows 7, 32/64 Bit<br />
Installation<br />
When installing the card in a Windows 7 system, it will be recognized automatically<br />
on the next start-up. The system tries at first to automatically search<br />
and install the drivers from the Microsoft homepage.<br />
This mechanism will fail at first for the „DPIO Module“ device, as shown on the<br />
right, because the <strong>Spectrum</strong> drivers are not available via Microsoft, so simply<br />
close the dialog.<br />
Afterwards open the device manager from the Windows<br />
control panel, as shown on the right.<br />
Find the above mentioned „DPIO Module“, rightclick<br />
and select „Update Driver Software...“<br />
Do not let Windows 7 automatically search the for the best driver, because<br />
it will search the internet and not find a proper driver. Please<br />
take the option of browsing the computer manually for the driver software<br />
instead. Allow Windows 7 to search for the most suitable driver<br />
in a specific directory.<br />
Now simply select the root folder of the CD that was delivered with<br />
the board as installation source and enable the „Include subfolders“<br />
option.<br />
Alternatively you can browse to the installations folders. The driver<br />
files are located on CD in the directory<br />
\Driver\win32 for Windows 7 32 Bit<br />
or<br />
\Driver\win64 for Windows 7 64 Bit.<br />
26 <strong>M3i.41xx</strong> / <strong>M3i.41xx</strong>-<strong>exp</strong> Manual
Software Driver Installation Windows 7, 32/64 Bit<br />
On the upcoming Windows security dialog select install. To prevent<br />
Windows 7 to always ask this question for future updates, you<br />
can optionally select to always trust software from <strong>Spectrum</strong>.<br />
The hardware assistant then shows you the exact board type that has<br />
been found like the M3i.2132 in the example.<br />
The drivers can be used directly after installation. It is not necessary to<br />
restart the system. The installed drivers are linked in the device manager.<br />
Below you’ll see how to examine the driver version and how to update<br />
the driver with a newer version.<br />
Version control<br />
If you want to check which driver version is installed<br />
in the system this can be easily done in the device<br />
manager. Therefore please start the device manager<br />
from the control panel and show the properties of<br />
the installed driver.<br />
On the property page Windows 7 shows the date and the version of the installed driver.<br />
After clicking the driver details button the detailed version information of the driver is shown.<br />
This information is also available through the <strong>Spectrum</strong> Control Center.<br />
Driver - Update<br />
The driver update under Windows 7 is exact the same procedure as the initial installation. Please follow the steps above, starting from the<br />
device manager, select the <strong>Spectrum</strong> card to be updated, right-click and select „Update Driver Software...“ and follow the steps above.<br />
(c) <strong>Spectrum</strong> GmbH 27
Linux Software Driver Installation<br />
Linux<br />
Overview<br />
The <strong>Spectrum</strong> M2i cards are delivered with Linux drivers suitable for Linux installations based on kernel 2.4, kernel 2.6 or kernel 3.x, single<br />
processor (non-SMP) and SMP systems, 32 bit and 64 bit systems. As each Linux distribution contains different kernel versions and different<br />
system setup it is nearly every case necessary to have a directly matching kernel driver to run it on a specific system.<br />
<strong>Spectrum</strong> delivers pre-compiled kernel driver modules for a number of common distributions with the cards. You may try to use one of these<br />
kernel modules for different distributions which have a similar kernel version. Unfortunately this won’t work in most cases as most Linux system<br />
refuse to load a driver which is not exactly matching. In this case it is possible to get the kernel driver sources from <strong>Spectrum</strong>. Please contact<br />
your local sales representative to get more details on this procedure.<br />
The Standard delivery contains the following pre-compiled kernel driver modules. This list may have been enhanced in between since printing<br />
of the manual. If your specific Linux distribution is not in this list please download the latest drivers from our website.<br />
Distribution Kernel Version Processor Width Distribution Kernel Version Processor Width<br />
Suse 9.0 2.4.21 single only 32 bit Redhat 9.0 2.4.20 single and smp 32 bit<br />
Suse 9.1 2.6.4 single and smp 32 bit Fedora Core 3 2.6.9 single and smp 32 bit<br />
Suse 9.3 2.6.11 single and smp 32 bit Fedora Core 4 2.6.11 single and smp 32 bit<br />
Suse 10.0 2.6.13 single only 32 bit and 64 bit Fedora Core 5 2.6.15 single and smp 32 bit and 64 bit<br />
Suse 10.1 2.6.16 single only 32 bit and 64 bit Fedora Core 6 2.6.18 single and smp 32 bit and 64 bit<br />
Suse 10.2 2.6.18 single and smp 32 bit and 64 bit Fedora Core 7 2.6.21 single and smp 32 bit and 64 bit<br />
Suse 10.3 2.6.22 single and smp 32 bit and 64 bit Fedora 8 2.6.23 single and smp 32 bit and 64 bit<br />
Suse 11.0 2.6.25 single and smp 32 bit and 64 bit Fedora 9 2.6.25 single and smp 32 bit and 64 bit<br />
Suse 11.1 2.6.27 single and smp 32 bit and 64 bit Fedora 10 2.6.27 single and smp 32 bit and 64 bit<br />
Suse 11.2 2.6.31 single and smp 32 bit and 64 bit Fedora 11 2.6.29 single and smp 32 bit and 64 bit<br />
Suse 11.3 2.6.34 single and smp 32 bit and 64 bit Fedora 12 2.6.31 single and smp 32 bit and 64 bit<br />
Suse 11.4 2.6.38 single and smp 32 bit and 64 bit Fedora 13 2.6.33.3 single and smp 32 bit and 64 bit<br />
Suse 12.1 3.1 single and smp 32 bit and 64 bit Fedora 14 2.6.35.6 single and smp 32 bit and 64 bit<br />
Fedora 15 2.6.38.6 single and smp 32 bit and 64 bit<br />
Debian Sarge 2.4.27 single 32 bit Fedora 16 3.1 single and smp 32 bit and 64 bit<br />
Debian Etch 2.6.18 single and smp 32 bit and 64 bit Fedora 17 3.3.4 single and smp 32 bit and 64 bit<br />
Debian Sarge 2.6.8 single 32 bit<br />
Debian Lenny 2.6.26 single and smp 32 bit and 64 bit Ubuntu 12.04 LTS 3.2 single and smp 32 bit and 64 bit<br />
The Linux drivers have been tested with all above mentioned distributions by <strong>Spectrum</strong>. Each of these distributions has been installed with the<br />
default setup using no kernel updates. A lot more different distributions are used by customers with self compiled kernel driver modules.<br />
Standard Driver Installation<br />
The driver is delivered as installable kernel modules together with libraries to access the kernel driver. The installation script will help you with<br />
the installation of the kernel module and the library.<br />
Login as root<br />
It is necessary to have the root rights for installing a driver.<br />
Call the install.sh script<br />
This script will install the kernel module and some helper scripts to a given directory. If you do not specify a directory it will use your home<br />
directory as destination. It is possible to move the installed driver files later to any other directory.<br />
The script will give you a list of matching kernel modules. Therefore it checks for the system width (32 bit or 64 bit) and the processor (single<br />
or smp). The script will only show matching kernel modules. Select the kernel module matching your system. The script will then do the following<br />
steps:<br />
• copy the selected kernel module to the install directory (spcm.o or spcm.ko)<br />
• copy the helper scripts to the install directory (spcm_start.sh and spc_end.sh)<br />
• copy and rename the matching library to /usr/lib (/usr/lib/libspcm_linux.so)<br />
Udev support<br />
Starting with driver version 1.23 build 1576 (Linux kernel driver version 1.05 build 1572) the driver natively supports udev. Once the driver<br />
is loaded it automatically generates the device nodes under /dev. The cards are automatically named to /dev/spcm0, /dev/spcm1,...<br />
You may use all the standard naming and rules that are available with udev.<br />
Start the driver<br />
Starting the driver can be done with the spcm_start.sh script that has been placed in the install directory. If udev is installed the script will only<br />
load the driver. If no udev is installed the start script will load the driver and make the required device nodes /dev/spcm0... for accessing<br />
the drivers. Please keep in mind that you need root rights to load the kernel module and to make the device nodes!<br />
28 <strong>M3i.41xx</strong> / <strong>M3i.41xx</strong>-<strong>exp</strong> Manual
Software Driver Installation Linux<br />
Using the dedicated start script makes sure that the device nodes are matching your system setup even if new hardware and drivers have<br />
been added in between. Background: when loading the device driver it gets assigned a „major“ number that is used to access this driver.<br />
All device nodes point to this major number instead of the driver name. The major numbers are assigned first come first served. This means<br />
that installing new hardware may result in different major numbers on the next system start.<br />
Get first driver info<br />
After the driver has been loaded successfully some information about the installed boards can be found in the /proc/spcm_cards file. Some<br />
basic information from the on-board EEProm is listed for every card.<br />
cat /proc/spcm_cards<br />
Stop the driver<br />
You may want to unload the driver and clean up all device nodes. This can be done using the spcm_end.sh script that has also been placed<br />
in the install directory<br />
Standard Driver Update<br />
A driver update is done with the same commands as shown above. Please make sure that the driver has been stopped before updating it.<br />
To stop the driver you may use the spcm_end.sh script.<br />
Compilation of kernel driver sources (option)<br />
The driver sources are only available for existing customers on special request and against a signed NDA. The driver sources are not part of<br />
the standard delivery. The driver source package contains only the sources of the kernel module, not the sources of the library.<br />
Please do the following steps for compilation and installation of the kernel driver module:<br />
Login as root<br />
It is necessary to have the root rights for installing a driver.<br />
Call the compile script make_spcm_linux_kerneldrv.sh<br />
This script will examine the type of system you use and compile the kernel with the correct settings. If using a kernel 2.4 the makefile <strong>exp</strong>ects<br />
two symbolic links in your system:<br />
• /usr/src/linux pointing to the correct kernel source directory<br />
• /usr/src/linux/.config pointing to the currently used kernel configuration<br />
The compile script will then automatically call the install script and install the just compiled kernel module in your home directory. The rest of<br />
the installation procedure is similar as <strong>exp</strong>lained above.<br />
Update of self compiled kernel driver<br />
If the kernel driver has changed, one simply has to perform the same steps as shown above and recompile the kernel driver module. However<br />
the kernel driver module isn’t changed very often.<br />
Normally an update only needs new libraries. To update the libraries only you can either download the full linux driver<br />
(spcm_linux_drv_v123b4567) and only use the libraries out of this or one downloads the library package which is much smaller and doesn’t<br />
contain the pre-compiled kernel driver module (spcm_linux_lib_v123b4567).<br />
The update is done with a dedicated script which only updates the library file. this script is present in both driver archieves:<br />
sh install_libonly.sh<br />
Library<br />
The kernel driver module only contains the basic hardware functions. The main part of the driver is located inside a dynamically loadable<br />
library that is delivered with the driver. This library is available in 3 different versions:<br />
• spcm_linux_32bit_stdc++5.so - supporting libstdc++.so.5 on 32 bit systems<br />
• spcm_linux_32bit_stdc++6.so - supporting libstdc++.so.6 on 32 bit systems<br />
• spcm_linux_64bit_stdc++6.so - supporting libstdc++.so.6 on 64 bit systems<br />
The matching version is installed automatically in the /usr/lib directory by the install script. The library is renamed for easy access to<br />
libspcm_linux.so. To access the driver library one must include the library in the compilation:<br />
gcc -o test_prg -lspcm_linux test.cpp<br />
To start programming the cards under Linux please use the standard C/C++ examples which are all running under Linux and Windows.<br />
(c) <strong>Spectrum</strong> GmbH 29
Linux Software Driver Installation<br />
Control Center<br />
The <strong>Spectrum</strong> Control Center is also available for Linux and needs to<br />
be installed separately. The features of the Control Center are described<br />
in a later chapter in deeper detail. The Control Center has<br />
been tested under all Linux distributions for which <strong>Spectrum</strong> delivers<br />
pre-compiled kernel modules. The following packages need to be installed<br />
to run the Control Center:<br />
• X-Server<br />
• <strong>exp</strong>at<br />
• freetype<br />
• fontconfig<br />
• libpng<br />
• libspcm_linux (the <strong>Spectrum</strong> linux driver library)<br />
Installation<br />
Use the supplied script install_control_center.sh found in the driver section of the CD by typing as user with root rights inside a terminal window:<br />
cd /mnt/cdrom/spcm_driver/linux/spcm_control_center<br />
sh install_control_center.sh<br />
The script will install the appropriate package for your distribution, called spcmcontrol-{Version}.rpm or spcmcontrol-{Version}.deb respectively.<br />
The Control Center is installed under KDE/Gnome in the system/system tools section. It may be located directly in this menu or under a<br />
„More Programs“ menu. The final location depends on the used Linux distribution. The program itself is installed as /usr/bin/spcmcontrol<br />
and may be started directly from here.<br />
Manual Installation<br />
To manually install the Control Center, first extract the files from the rpm matching your distribution:<br />
rpm2cpio spcmcontrol-{Version}.rpm > ~/spcmcontrol-{Version}.cpio<br />
cd ~/<br />
cpio -id < spcmcontrol-{Version}.cpio<br />
You get the directory structure and the files contained in the rpm package. Copy the binary spcmcontrol to /usr/bin. Copy the .desktop file<br />
to /usr/share/applications. Run ldconfig to update your systems library cache. Finally you can run spcm_control.<br />
Troubleshooting<br />
If you get a message like the following after starting spcm_control:<br />
spcm_control: error while loading shared libraries: libz.so.1: cannot open shared object file: No such file<br />
or directory<br />
Run ldd spcm_control in the directory where spcm_control resides to see the dependencies of the program. The output may look like this:<br />
libXext.so.6 => /usr/X11R6/lib/libXext.so.6 (0x4019e000)<br />
libX11.so.6 => /usr/X11R6/lib/libX11.so.6 (0x401ad000)<br />
libz.so.1 => not found<br />
libdl.so.2 => /lib/libdl.so.2 (0x402ba000)<br />
libpthread.so.0 => /lib/tls/libpthread.so.0 (0x402be000)<br />
libstdc++.so.6 => /usr/lib/libstdc++.so.6 (0x402d0000)<br />
As seen in the output, one of the libraries isn’t found inside the library cache of the system. Be sure that this library has been properly installed.<br />
You may then run ldconfig. If this still doesn’t help please add the library path to /etc/ld.so.conf and run ldconfig again.<br />
If the libspcm_linux.so is quoted as missing please make sure that you have installed the card driver properly before. If any other library is<br />
stated as missing please install the matching package of your distribution.<br />
30 <strong>M3i.41xx</strong> / <strong>M3i.41xx</strong>-<strong>exp</strong> Manual
Software Software Overview<br />
Software<br />
This chapter gives you an overview about the structure of the drivers and the software, where to find and how to use the examples. It shows<br />
in detail, how the drivers are included using different programming languages and deals with the differences when calling the driver functions<br />
from them.<br />
This manual only shows the use of the standard driver API. For further information on programming drivers<br />
for third-party software like LabVIEW, MATLAB or VEE an additional manual is required that is delivered with<br />
the ordered driver option.<br />
Software Overview<br />
The <strong>Spectrum</strong> drivers offer you a common and fast API for using all of the board hardware features. This API is the same on all supported<br />
operating systems. Based on this API one can write own programs using any programming language that can access the driver API. This<br />
manual describes in detail the driver API, providing you with the necessary information to write your own programs.<br />
The optional drivers for third-party products like LabVIEW or DASYLab are also based on this API. The special functionality of these drivers<br />
is not subject of this document and is described with separate manuals delivered with the particular driver option.<br />
Card Control Center<br />
A special card control center is available on CD and from the internet for all <strong>Spectrum</strong><br />
M2i/M3i cards. Windows user find the Control Center installer on the CD under<br />
„Install\Win\spcmcontrol_install.exe“.<br />
Linux users find the versions for the different StdC libraries under under /Install/<br />
linux/spcm_control_center/ as RPM packages.<br />
The Control Center under Windows and Linux it is available as an executive program.<br />
Using Windows it is also linked as a system control and can be accessed directly<br />
from the Windows control panel. The different functions of the <strong>Spectrum</strong> card<br />
control center are <strong>exp</strong>lained in detail in the following passages.<br />
To install the <strong>Spectrum</strong> Control Center you will need to be<br />
logged in with adminitrator rights for your operating system. Windows Vista and Windows 7 installations<br />
with enabled UAC will ask you to start the installer with administraive rights (run as administrator).<br />
(c) <strong>Spectrum</strong> GmbH 31
Card Control Center Software<br />
Hardware information<br />
Through the control center you can easily get the main information about all the<br />
installed <strong>Spectrum</strong> hardware. For each installed card there is a separate tree of<br />
information available. The picture shows the information for one installed card<br />
by example. This given information contains:<br />
• Basic information as the type of card, the production date and it’s serial number,<br />
as well as the installed memory, the hardware revision of the base card,<br />
the number of available channels and installed acquisition modules<br />
• Information about the maximum sampling clock and the available quartz<br />
clock sources.<br />
• The installed features/options in a sub-tree. The shown card is equipped by<br />
example with the option Multiple Recording, Gated Sampling, Timestamp<br />
and ABA-mode.<br />
• Detailed Information concerning the installed acquisition modules. In case of<br />
the shown analog acquisition card the information consists of the module’s<br />
hardware revision, of the converter resolution and the last calibration date as<br />
well as detailed information on the available analog input ranges, offset<br />
compensation capabilities and additional features of the inputs.<br />
Firmware information<br />
Another sub-tree is informing about the cards firmware version. As all<br />
<strong>Spectrum</strong> cards consist of several programmable components, there is<br />
one firmware version per component.<br />
Nearly all of the components firmware can be updated by software. The<br />
only exception is the configuration device, which only can receive a factory<br />
update.<br />
The procedure on how to update the firmware of your <strong>Spectrum</strong> card<br />
with the help of the card control center is described in a dedicated section<br />
later on<br />
Driver information<br />
The <strong>Spectrum</strong> card control center also offers a way to gather<br />
information on the installed and used <strong>Spectrum</strong> driver.<br />
The information on the driver is available through a dedicated<br />
tab, as the picture is showing in the example.<br />
The provided information informs about the used type, distinguishing<br />
between Windows or Linux driver and the 32 bit or<br />
64 bit type.<br />
It also gives direct information about the version of the installed<br />
<strong>Spectrum</strong> kernel driver and the library (*.dll under<br />
Windows).<br />
The information given here can also be found under Windows<br />
using the control panel. For details in driver details within<br />
the control panel please stick to the section on driver<br />
installation in your hardware manual.<br />
32 <strong>M3i.41xx</strong> / <strong>M3i.41xx</strong>-<strong>exp</strong> Manual
Software Card Control Center<br />
Installing and removing Demo cards<br />
With the help of the card control center one can install demo cards<br />
in the system. A demo card is simulated by the <strong>Spectrum</strong> driver including<br />
data production for acquisition cards. As the demo card is<br />
simulated on the lowest driver level all software can be tested including<br />
SBench, own applications and drivers for third-party products<br />
like LabVIEW. The driver supports up to 64 demo cards at the same<br />
time. The simulated memory as well as the simulated software options<br />
can be defined when adding a demo card to the system.<br />
Please keep in mind that these demo cards are only meant to test software<br />
and to show certain abilities of the software. They do not simulate<br />
the complete behavior of a card, especially not any timing<br />
concerning trigger, recording length or FIFO mode notification. The<br />
demo card will calculate data every time directly after been called<br />
and give it to the user application without any more delay. As the<br />
calculation routine isn’t speed optimized, generating demo data<br />
may take more time than acquiring real data and transferring them to the host PC.<br />
Installed demo cards are listed together with the real hardware in the main information tree as described above. Existing demo cards can be<br />
deleted by clicking the related button. It is not possible to change any values of an installed demo card afterwards. If you need to update the<br />
card e.g. with an additional feature, you have to add a new card with the desired features and might delete the old one.<br />
For installing demo cards on a system without real hardware simply run the Control Center installer. If the<br />
installer is not detecting the necessary driver files normally be found on a system with real hardware, it will<br />
simply install the Spcm_driver.<br />
Debug logging for support cases<br />
For answering your support questions as fast as possible, the<br />
setup of the card, driver and firmware version and other information<br />
is very helpful.<br />
Therefore the card control center provides an easy way to<br />
gather all that information automatically.<br />
Different debug log levels are available through the graphical<br />
interface. By default the log level is set to „no logging“ for<br />
maximum performance.<br />
The customer can select different log levels and the path of the<br />
generated ASCII text file. One can also decide to delete the<br />
previous log file first before creating a new one automatically<br />
or to append different logs to one single log file.<br />
For maximum performance of your hardware,<br />
please make sure, that the debug logging is set to „no logging“ for normal operation. Please keep in<br />
mind, that a detailed logging in append mode can quickly generate huge log files.<br />
Feature upgrade<br />
All optional features of the M2i/M3i cards, that do not require any hardware modifications<br />
can be installed on fielded cards. After <strong>Spectrum</strong> has received the order,<br />
the customer will get a personalized upgrade code. Just start the card control center,<br />
click on „install feature“ and enter that given code. After a short moment the<br />
feature will be installed and ready to use. No restart of the host system is required.<br />
For details on the available options and prices please contact your local <strong>Spectrum</strong><br />
distributor.<br />
Software License upgrade<br />
The software license for SBench 6 Professional is installed on the hardware. If ordering<br />
a software license for a card that has already been delivered you will get an upgrade<br />
code to install that software license. The upgrade code will only match for that<br />
particular card with the serial number given in the license. To install the software license<br />
please click the „Install SW License“ button and type in the code exactly as<br />
given in the license.<br />
(c) <strong>Spectrum</strong> GmbH 33
Card Control Center Software<br />
Firmware upgrade<br />
One of the major features of the card control center is the ability to update<br />
the cards firmware by an easy-to-use software. The latest firmware revisions<br />
can be found in the download section of our homepage under<br />
http://www.spectrum-instrumentation.com.<br />
A new firmware version is provided there as an installer, that copies the latest<br />
firmware to your system. All files are located in an dedicated subfolder „FirmwareUpdate“<br />
that will be created inside the <strong>Spectrum</strong> installation folder. Under<br />
Windows this folder by default has been created in the standard<br />
program installation directory.<br />
Please do the following steps when wanting to update the firmware of your<br />
M2i/M3i card:<br />
• Download the latest software driver for your operating system provided<br />
on the <strong>Spectrum</strong> homepage.<br />
• Install the new driver as described in the driver install section of your<br />
hardware manual provided with the card. All manuals can also be found<br />
on the <strong>Spectrum</strong> homepage in the literature download section.<br />
• Download and run the latest <strong>Spectrum</strong> Control Center installer.<br />
• Download the installer for the new firmware version.<br />
• Start the installer and follow the instructions given there.<br />
• Start the card control center, select the „card“ tab, select the card from<br />
the listbox and press the „firmware update“ button on the right side.<br />
The dialogue then will inform you about the currently installed firmware version<br />
for the different devices on the card and the new versions that are available.<br />
All devices that will be affected with the update are marked as „update<br />
needed“. Simply start the update or cancel the operation now, as a running<br />
update cannot be aborted.<br />
Please keep in mind that in case you have to start the update for each card in a system in case that you have<br />
multiple cards installed. Select one card after the other from the listbox and press the „firmware update“<br />
button. The firmware installer on the other hand only needs to be started once prior to the update.<br />
Do not abort or shut down the computer while the firmware update is in progress. After a successful update<br />
please shut down your PC completely. The re-powering is required to finally activate the new firmware version<br />
of your <strong>Spectrum</strong> card.<br />
Performing card calibration<br />
The card control center also provides an easy way to access<br />
the automatic card calibration routines of the <strong>Spectrum</strong><br />
A/D converter cards. Depending on the used card<br />
family this can affect offset calibration only or also might<br />
include gain calibration. Please refer to the dedicated<br />
chapter in your hardware manual for details.<br />
Performing memory test<br />
The complete on-board memory of the <strong>Spectrum</strong> M2i/M3i cards<br />
can be tested by the memory test included with the card control<br />
center.<br />
When starting the test, randomized data is generated and written<br />
to the on-board memory. After a complete write cycle all the data<br />
is read back and compared with the generated pattern.<br />
Depending on the amount of installed on-board memory, and your<br />
computers performance this operation might take a while.<br />
34 <strong>M3i.41xx</strong> / <strong>M3i.41xx</strong>-<strong>exp</strong> Manual
Software Accessing the cards with SBench 6<br />
Transfer speed test<br />
The control center allows to measure the bus transfer<br />
speed of an installed <strong>Spectrum</strong> card. Therefore different<br />
setup is run multiple times and the overall bus transfer<br />
speed is measured. To get reliable results it is necessary<br />
that you disable debug logging as shown above. It is also<br />
highly recommended that no other software or time-consuming<br />
background threads are running on that system.<br />
The speed test program runs the following two tests:<br />
• Repetitive Memory Transfers: single DMA data transfers<br />
are repeated and measured. This test simulates<br />
the measuring of pulse repetition frequency when<br />
doing multiple single-shots. The test is done using different<br />
block sizes. One can estimate the transfer in<br />
relation to the transferred data size on multiple single-shots.<br />
• FIFO mode streaming: this test measures the streaming speed in FIFO mode. The test can only use the same direction of transfer the card<br />
has been designed for (card to PC=read for all DAQ cards, PC to card=write for all generator cards and both directions for I/O cards).<br />
The streaming speed is tested without using the front-end to measure the maximum bus speed that can be reached.<br />
The Speed in FIFO mode depends on the selected notify size which is <strong>exp</strong>lained later in this manual in greater detail.<br />
The results are given in MB/s meaning MByte per second. To estimate whether a desired acquisition speed is possible to reach one has to<br />
calculate the transfer speed in bytes. There are a few things that has to be put into the calculation:<br />
• 12, 14 and 16 bit analog cards need two bytes for each sample.<br />
• 16 channel digital cards need 2 bytes per sample while 32 channel digital cards need 4 bytes and 64 channel digital cards need 8<br />
bytes.<br />
• The sum of analog channels must be used to calculate the total transfer rate.<br />
• The figures in the Speed Test Utility are given as MBytes, meaning 1024 * 1024 Bytes, 1 MByte = 1048576 Bytes<br />
As an example running a card with 2 14 bit analog channels with 28 MHz produces a transfer rate of [2 channels * 2 Bytes/Sample *<br />
28000000] = 112000000 Bytes/second. Taking the above figures measured on a standard 33 MHz PCI slot the system is just capable of<br />
reaching this transfer speed: 108.0 MB/s = 108 * 1024 * 1024 = 113246208 Bytes/second.<br />
Unfortunately it is not possible to measure transfer speed on a system without having a <strong>Spectrum</strong> card installed.<br />
Accessing the cards with SBench 6<br />
C/C++ Driver Interface<br />
After the installation of the cards and the drivers it can be useful to first test<br />
the card function with a ready to run software before starting with programming.<br />
A base version of SBench 6 is delivered with the card on CD<br />
also including a 30 starts Professional demo version. If you already have<br />
bought a card prior to the first SBench 6 release please contact your local<br />
dealer to get a SBench 6 Professional demo version.<br />
SBench 6 supports all actual acquisition cards from <strong>Spectrum</strong>. Depending<br />
on the used card and the software setup, one can use SBench as a digital<br />
storage oscilloscope, a spectrum analyzer, a logic analyzer or simply as<br />
a data recording front end. Different <strong>exp</strong>ort and import formats allow the<br />
use of SBench 6 together with a variety of other programs.<br />
On the CD you’ll find an install version of SBench 6 in the directory /Install/SBench6.<br />
The current version of SBench 6 can be down loaded free<br />
of charge directly from the <strong>Spectrum</strong> website http://www.spectrum-instrumentation.com.<br />
Please go to the download section and get the latest version<br />
there.<br />
SBench 6 has been designed to run under Windows 2000, Windows XP,<br />
Windows Vista and Windows 7 as well as Linux using KDE or Gnome<br />
Desktop.<br />
C/C++ is the main programming language for which the drivers have been build up. Therefore the interface to C/C++ is the best match. All<br />
the small examples of the manual showing different parts of the hardware programming are done with C. As the libraries offer a standard<br />
(c) <strong>Spectrum</strong> GmbH 35
C/C++ Driver Interface Software<br />
interface it is easy to access the libraries also with other programming languages like Delphi or Basic. Please read the following chapters for<br />
additional information on this.<br />
Header files<br />
The basic task before using the driver is to include the header files that are delivered on CD together with the board. The header files are<br />
found in the directory /Driver/header_c. Please don’t change them in any way because they are updated with each new driver version to<br />
include the new registers and new functionality.<br />
dlltyp.h Includes the platform specific definitions for data types and function declarations. All data types are based on this definitions. The use of this type definition file<br />
allows the use of examples and programs on different platforms without changes to the program source. The header file supports Microsoft Visual C++, Borland<br />
C++ Builder and GNU C/C++ directly. When using other compilers it might be necessary to make a copy of this file and change the data types according to<br />
this compiler.<br />
regs.h Defines all registers and commands which are used in the <strong>Spectrum</strong> driver for the different boards. The registers a board uses are described in the board specific<br />
part of the documentation. This header file is common for all cards. Therefore this file also contains a huge number of registers used on other card types<br />
than the one described in this manual. Please stick to the manual to see which registers are valid for your type of card.<br />
spcm_drv.h Defines the functions of the used SpcM driver. All definitions are taken from the file dlltyp.h. The functions itself are described below.<br />
spcerr.h Contains all error codes used with the <strong>Spectrum</strong> driver. All error codes that can be given back by any of the driver functions are also described here shortly all.<br />
The error codes and their meaning are described in detail in the appendix of this manual.<br />
Example for including the header files:<br />
// ----- driver includes -----<br />
#include "dlltyp.h" // 1st include<br />
#include "regs.h" // 2nd include<br />
#include "spcerr.h" // 3rd include<br />
#include "spcm_drv.h" // 4th include<br />
Please always keep the order of including the four <strong>Spectrum</strong> header files. Otherwise some or all of the functions<br />
do not work properly on compiling your program will be impossible!<br />
General Information on Windows 64 bit drivers<br />
After installation of the <strong>Spectrum</strong> 64 bit driver there are two general ways to access the hardware and to develop<br />
applications. If you’re going to develop a real 64 bit application it is necessary to access the 64 bit<br />
driver dll (spcm_win64.dll) as only this driver dll is supporting the full 64 bit address range.<br />
But it is still possible to run 32 bit applications or to develop 32 bit applications even under Windows 64 bit.<br />
Therefore the 32 bit driver dll (spcm_win32.dll) is also installed in the system. The <strong>Spectrum</strong> SBench5 software<br />
is for example running under Windows 64 bit using this driver. The 32 bit dll of course only offers the 32 bit<br />
address range and is therefore limited to access only 4 GByte of memory. Beneath both drivers the 64 bit kernel<br />
driver is running.<br />
Mixing of 64 bit application with 32 bit dll or vice versa is not possible.<br />
Microsoft Visual C++ 6.0 and 2005 32 Bit<br />
Include Driver<br />
The driver files can be directly included in Microsoft C++ by simply using the library file spcm_win32_msvcpp.lib that is delivered together<br />
with the drivers. The library file can be found on the CD in the path /examples/c_cpp/c_header. Please include the library file in your Visual<br />
C++ project as shown in the examples. All functions described below are now available in your program.<br />
Examples<br />
Examples can be found on CD in the path /examples/c_cpp. This directory includes a number of different examples that can be used with<br />
any card of the same type (e.g. A/D acquisition cards, D/A acquisition cards). You may use these examples as a base for own programming<br />
and modify them as you like. The example directories contain a running workspace file for Microsoft Visual C++ 6.0 (*.dsw) as well as project<br />
files for Microsoft Visual Studio 2005 (*.vcproj) that can be directly loaded and compiled.<br />
There are also some more board type independent examples in separate subdirectory. These examples show different aspects of the cards<br />
like programming options or synchronization and can be combined with one of the board type specific examples.<br />
As the examples are build for a card class there are some checking routines and differentiation between cards families. Differentiation aspects<br />
can be number of channels, data width, maximum speed or other details. It is recommended to change the examples matching your card<br />
type to obtain maximum performance. Please be informed that the examples are made for easy understanding and simple showing of one<br />
aspect of programming. Most of the examples are not optimized for maximum throughput or repetition rates.<br />
Microsoft Visual C++ 64 Bit<br />
Depending on your version of the Visual Studio suite it may be necessary to install some additional 64 bit components (SDK) on your system.<br />
Please follow the instructions found on the MSDN for further information.<br />
36 <strong>M3i.41xx</strong> / <strong>M3i.41xx</strong>-<strong>exp</strong> Manual
Software C/C++ Driver Interface<br />
Include Driver<br />
The driver files can be directly included in Microsoft C++ by simply using the library file spcm_win64_msvcpp.lib that is delivered together<br />
with the drivers. The library file can be found on the CD in the path /examples/c_cpp/c_header. All functions described below are now<br />
available in your program.<br />
Borland C++ Builder 32 Bit<br />
Include Driver<br />
The driver files can be easily included in Borland C++ Builder by simply using the library file spcm_win32_bcppb.lib that is delivered together<br />
with the drivers. The library file can be found on the CD in the path /examples/c_cpp/c_header. Please include the library file in your Borland<br />
C++ Builder project as shown in the examples. All functions described below are now available in your program.<br />
Examples<br />
The Borland C++ Builder examples share the sources with the Visual C++ examples. Please see above chapter for a more detailed documentation<br />
of the examples. In each example directory are project files for Visual C++ as well as Borland C++ Builder.<br />
Linux Gnu C/C++ 32/64 Bit<br />
Include Driver<br />
The interface of the linux drivers does not differ from the windows interface. Please include the spcm_linux.lib library in your makefile to have<br />
access to all driver functions. A makefile may look like this:<br />
COMPILER = gcc<br />
EXECUTABLE = test_prg<br />
LIBS = -lspcm_linux<br />
OBJECTS = test.o\<br />
test2.o<br />
all: $(EXECUTABLE)<br />
$(EXECUTABLE): $(OBJECTS)<br />
$(COMPILER) $(CFLAGS) -o $(EXECUTABLE) $(LIBS) $(OBJECTS)<br />
%.o: %.cpp<br />
$(COMPILER) $(CFLAGS) -o $*.o -c $*.cpp<br />
Examples<br />
The Gnu C/C++ examples share the source with the Visual C++ examples. Please see above chapter for a more detailed documentation of<br />
the examples. Each example directory contains a makefile for the Gnu C/C++ examples.<br />
C++ for .NET<br />
Please see the next chapter for more details on the .NET inclusion.<br />
Other Windows C/C++ compilers 32 Bit<br />
Include Driver<br />
To access the driver, the driver functions must be loaded from the 32 bit driver dll. Most compiler offer special tools to generate a matching<br />
library (e.g. Borland offers the implib tool that generates a matching library out of the windows driver dll). If such a tool is available it is<br />
recommended to use it. Otherwise the driver functions need to loaded from the dll using standard Windows functions. There is one example<br />
in the example directory /examples/c_cpp/dll_loading that shows the process.<br />
Example of function loading:<br />
hDLL = LoadLibrary ("spcm_win32.dll"); // Load the 32 bit version of the Spcm driver<br />
pfn_spcm_hOpen = (SPCM_HOPEN*) GetProcAddress (hDLL, "_spcm_hOpen@4");<br />
pfn_spcm_vClose = (SPCM_VCLOSE*) GetProcAddress (hDLL, "_spcm_vClose@4");<br />
Other Windows C/C++ compilers 64 Bit<br />
Include Driver<br />
To access the driver, the driver functions must be loaded from 64 bit the driver dll. Most compiler offer special tools to generate a matching<br />
library (e.g. Borland offers the implib tool that generates a matching library out of the windows driver dll). If such a tool is available it is<br />
recommended to use it. Otherwise the driver functions need to loaded from the dll using standard Windows functions. There is one example<br />
in the example directory /examples/c_cpp/dll_loading that shows the process for 32 bit environments. The only line that needs to be modified<br />
is the one loading the DLL:<br />
(c) <strong>Spectrum</strong> GmbH 37
Driver functions Software<br />
Example of function loading:<br />
hDLL = LoadLibrary ("spcm_win64.dll"); // Modified: Load the 64 bit version of the Spcm driver here<br />
pfn_spcm_hOpen = (SPCM_HOPEN*) GetProcAddress (hDLL, "_spcm_hOpen@4");<br />
pfn_spcm_vClose = (SPCM_VCLOSE*) GetProcAddress (hDLL, "_spcm_vClose@4");<br />
National Instruments LabWindows/CVI<br />
Include Drivers<br />
To use the <strong>Spectrum</strong> driver under LabWindows/CVI it is necessary to first load the functions from the driver dll. Please use the library file<br />
spcm_win32_cvi.lib to access the driver functions.<br />
Examples<br />
Examples for LabWindows/CVI can be found on CD in the directory /examples/cvi. Please mix these examples with the standard C/C++<br />
examples to have access to all functions and modes of the cards.<br />
Driver functions<br />
The driver contains seven main functions to access the hardware.<br />
Own types used by our drivers<br />
To simplify the use of the header files and our examples with different platforms and compilers and to avoid any implicit type conversions we<br />
decided to use our own type declarations. This allows us to use platform independent and universal examples and driver interfaces. If you<br />
do not stick to these declarations please be sure to use the same data type width. However it is strongly recommended that you use our defined<br />
type declarations to avoid any hard to find errors in your programs. If you’re using the driver in an environment that is not natively supported<br />
by our examples and drivers please be sure to use a type declaration that represents a similar data width<br />
Declaration Type Declaration Type<br />
int8 8 bit signed integer (range from -128 to +127) uint8 8 bit unsigned integer (range from 0 to 255)<br />
int16 16 bit signed integer (range from -32768 to 32767) uint16 16 bit unsigned integer (range from 0 to 65535)<br />
int32 32 bit signed integer (range from -2147483648 to 2147483647) uint32 32 bit unsigned integer (range from 0 to 4294967296)<br />
int64 64 bit signed integer (full range) uint64 64 bit unsigned integer (full range)<br />
drv_handle handle to driver, implementation depends on operating system platform<br />
Notation of variables and functions<br />
In our header files and examples we use a common and reliable form of notation for variables and functions. Each name also contains the<br />
type as a prefix. This notation form makes it easy to see implicit type conversions and minimizes programming errors that results from using<br />
incorrect types. Feel free to use this notation form for your programs also-<br />
Declaration Notation Declaration Notation<br />
int8 byName (byte) uint8 cName (character)<br />
int16 nName uint16 wName (word)<br />
int32 lName (long) uint32 dwName (double word)<br />
int64 llName (long long) uint64 qwName (quad word)<br />
int32* plName (pointer to long) char szName (string with zero termination)<br />
Function spcm_hOpen<br />
This function initializes and opens an installed card supporting the new SpcM driver interface. At the time of printing this manual this are all<br />
cards of the M2i/M3i cards. The function returns a handle that has to used for driver access. If the card can’t be found or the loading of the<br />
driver generated an error the function returns a NULL. When calling this function all card specific installation parameters are read out from<br />
the hardware and stored within the driver. It is only possible to open one device by one software as concurrent hardware access may be<br />
very critical to system stability. As a result when trying to open the same device twice an error will raise and the function returns NULL.<br />
Function spcm_hOpen (char* szDeviceName):<br />
drv_handle _stdcall spcm_hOpen ( // tries to open the device and returns handle or error code<br />
char* szDeviceName); // name of the device to be opened<br />
Under Linux the device name in the function call need to be a valid device name. Please change the string according to the location of the<br />
device if you don’t use the standard linux device names. The driver is installed as default under /dev/spcm0, /dev/spcm1 and so on. The<br />
kernel driver numbers the devices starting with 0.<br />
Under windows the only part of the device name that is used is the tailing number. The rest of the device name is ignored. Therefore to keep<br />
the examples simple we use the Linux notation in all our examples. The tailing number gives the index of the device to open. The Windows<br />
kernel driver numbers all devices that it finds on boot time starting with 0.<br />
38 <strong>M3i.41xx</strong> / <strong>M3i.41xx</strong>-<strong>exp</strong> Manual
Software Driver functions<br />
Example<br />
drv_handle hDrv; // returns the handle to the opended driver or NULL in case of error<br />
hDrv = spcm_hOpen ("/dev/spcm0"); // string to the driver to open<br />
if (!hDrv)<br />
printf (“open of driver failed\n”);<br />
If the function returns a NULL it is possible to read out the error description of the failed open function by simply passing this NULL to the error<br />
function. The error function is described in one of the next topics.<br />
Function spcm_vClose<br />
This function closes the driver and releases all allocated resources. After closing the driver handle it is not possible to access this driver any<br />
more. Be sure to close the driver if you don’t need it any more to allow other programs to get access to this device.<br />
Function spcm_vClose:<br />
void _stdcall spcm_vClose ( // closes the device<br />
drv_handle hDevice); // handle to an already opened device<br />
Example:<br />
spcm_vClose (hDrv);<br />
Function spcm_dwSetParam<br />
All hardware settings are based on software registers that can be set by one of the functions spcm_dwSetParam. These functions sets a register<br />
to a defined value or executes a command. The board must first be initialized by the spcm_hOpen function. The parameter lRegister must<br />
have a valid software register constant as defined in regs.h. The available software registers for the driver are listed in the board specific<br />
part of the documentation below. The function returns a 32 bit error code if an error occurs. If no error occurs the function returns ERR_OK,<br />
what is zero.<br />
Function spcm_dwSetParam<br />
uint32 _stdcall spcm_dwSetParam_i32 ( // Return value is an error code<br />
drv_handle hDevice, // handle to an already opened device<br />
int32 lRegister, // software register to be modified<br />
int32 lValue); // the value to be set<br />
uint32 _stdcall spcm_dwSetParam_i64m ( // Return value is an error code<br />
drv_handle hDevice, // handle to an already opened device<br />
int32 lRegister, // software register to be modified<br />
int32 lValueHigh, // upper 32 bit of the value. Containing the sign bit !<br />
uint32 dwValueLow); // lower 32 bit of the value.<br />
uint32 _stdcall spcm_dwSetParam_i64 ( // Return value is an error code<br />
drv_handle hDevice, // handle to an already opened device<br />
int32 lRegister, // software register to be modified<br />
int64 llValue); // the value to be set<br />
Example:<br />
if (spcm_dwSetParam_i32 (hDrv, SPC_MEMSIZE, 16384) != ERR_OK)<br />
printf (“Error when setting memory size\n”);<br />
This example sets the memory size to 16 kSamples (16384). If an error occurred the example will show a short error message<br />
Function spcm_dwGetParam<br />
All hardware settings are based on software registers that can be read by one of the functions spcm_dwGetParam. These functions reads an<br />
internal register or status information. The board must first be initialized by the spcm_hOpen function. The parameter lRegister must have a<br />
valid software register constant as defined in the regs.h file. The available software registers for the driver are listed in the board specific part<br />
of the documentation below. The function returns a 32 bit error code if an error occurs. If no error occurs the function returns ERR_OK, what<br />
is zero.<br />
(c) <strong>Spectrum</strong> GmbH 39
Driver functions Software<br />
Function spcm_dwGetParam<br />
uint32 _stdcall spcm_dwGetParam_i32 ( // Return value is an error code<br />
drv_handle hDevice, // handle to an already opened device<br />
int32 lRegister, // software register to be read out<br />
int32* plValue); // pointer for the return value<br />
uint32 _stdcall spcm_dwGetParam_i64m ( // Return value is an error code<br />
drv_handle hDevice, // handle to an already opened device<br />
int32 lRegister, // software register to be read out<br />
int32* plValueHigh, // pointer for the upper part of the return value<br />
uint32* pdwValueLow); // pointer for the lower part of the return value<br />
uint32 _stdcall spcm_dwGetParam_i64 ( // Return value is an error code<br />
drv_handle hDevice, // handle to an already opened device<br />
int32 lRegister, // software register to be read out<br />
int64* pllValue); // pointer for the return value<br />
Example:<br />
int32 lSerialNumber;<br />
spcm_dwGetParam_i32 (hDrv, SPC_PCISERIALNO, &lSerialNumber);<br />
printf (“Your card has serial number: %05d\n”, lSerialNumber);<br />
The example reads out the serial number of the installed card and prints it. As the serial number is available under all circumstances there is<br />
no error checking when calling this function.<br />
Different call types of spcm_dwSetParam and spcm_dwGetParam: _i32, _i64, _i64m<br />
The three functions only differ in the type of the parameters that is used to call them. As some of the registers can exceed the 32 bit integer<br />
range (like memory size or post trigger) it is recommended to use the _i64 function to access these registers. However as there are some<br />
programs or compilers that don’t support 64 bit integer variables there are two functions that are limited to 32 bit integer variables. In case<br />
that you do not access registers that exceed 32 bit integer please use the _i32 function. In case that you access a register which exceeds 64<br />
bit value please use the _i64m calling convention. Inhere the 64 bit value is splitted in a low double word part and a high double word part.<br />
Please be sure to fill both parts with valid information.<br />
If accessing 64 bit registers with 32 bit functions the behaviour differs depending on the real value that is currently located in the register.<br />
Please have a look at this table to see the different reactions depending on the size of the register:<br />
Internal register read/write Function type Behaviour<br />
32 bit register read spcm_dwGetParam_i32 value is returned as 32 bit integer in plValue<br />
32 bit register read spcm_dwGetParam_i64 value is returned as 64 bit integer in pllValue<br />
32 bit register read spcm_dwGetParam_i64m value is returned as 64 bit integer, the lower part in plValueLow, the upper part in plValueHigh. The upper part can<br />
be ignored as it’s only a sign extension<br />
32 bit register write spcm_dwSetParam_i32 32 bit value can be directly written<br />
32 bit register write spcm_dwSetParam_i64 64 bit value can be directly written, please be sure not to exceed the valid register value range<br />
32 bit register write spcm_dwSetParam_i64m 32 bit value is written as llValueLow, the value llValueHigh needs to contain the sign extension of this value. In case<br />
of llValueLow being a value >= 0 llValueHigh can be 0, in case of llValueLow being a value < 0, llValueHigh has<br />
to be -1.<br />
64 bit register read spcm_dwGetParam_i32 If the internal register has a value that is inside the 32 bit integer range (-2G up to (2G - 1)) the value is returned<br />
normally. If the internal register exceeds this size an error code ERR_EXCEEDSINT32 is returned. As an example:<br />
reading back the installed memory will work as long as this memory is < 2 GByte. If the installed memory is >= 2<br />
GByte the function will return an error.<br />
64 bit register read spcm_dwGetParam_i64 value is returned as 64 bit integer value in pllValue independent of the value of the internal register.<br />
64 bit register read spcm_dwGetParam_i64m the internal value is splitted into a low and a high part. As long as the internal value is within the 32 bit range, the<br />
low part plValueLow contains the 32 bit value and the upper part plValueHigh can be ignored. If the internal value<br />
exceeds the 32 bit range it is absolutely necessary to take both value parts into account.<br />
64 bit register write spcm_dwSetParam_i32 the value to be written is limited to 32 bit range. If a value higher than the 32 bit range should be written, one of<br />
the other function types need to used.<br />
64 bit register write spcm_dwSetParam_i64 the value has to be splitted into two parts. Be sure to fill the upper part lValueHigh with the correct sign extension<br />
even if you only write a 32 bit value as the driver every time interprets both parts of the function call.<br />
64 bit register write spcm_dwSetParam_i64m the value can be written directly independent of the size.<br />
40 <strong>M3i.41xx</strong> / <strong>M3i.41xx</strong>-<strong>exp</strong> Manual
Software Driver functions<br />
Function spcm_dwGetContBuf<br />
This function reads out the internal continuous memory buffer if one has been allocated. If no buffer has been allocated the function returns<br />
a size of zero and a NULL pointer. You may use this buffer for data transfers. As the buffer is continuously allocated in memory the data<br />
transfer will speed up by 15% - 25%. Please see further details in the appendix of this manual.<br />
uint32 _stdcall spcm_dwGetContBuf_i64 ( // Return value is an error code<br />
drv_handle hDevice, // handle to an already opened device<br />
uint32 dwBufType, // type of the buffer to read as listed above under SPCM_BUF_XXXX<br />
void** ppvDataBuffer, // address of available data buffer<br />
uint64* pqwContBufLen); // length of available continuous buffer<br />
uint32 _stdcall spcm_dwGetContBuf_i64m (// Return value is an error code<br />
drv_handle hDevice, // handle to an already opened device<br />
uint32 dwBufType, // type of the buffer to read as listed above under SPCM_BUF_XXXX<br />
void** ppvDataBuffer, // address of available data buffer<br />
uint32* pdwContBufLenH, // high part of length of available continuous buffer<br />
uint32* pdwContBufLenL); // low part of length of available continuous buffer<br />
These functions have been added in driver version 1.36. The functions are not available in older driver versions.<br />
Function spcm_dwDefTransfer<br />
The spcm_dwDefTransfer function defines a buffer for a following data transfer. This function only defines the buffer there is no data transfer<br />
performed when calling this function. Instead the data transfer is started with separate register commands that are documented in a later<br />
chapter. At this position there is also a detailed description of the function parameters.<br />
Please make sure that all parameters of this function match. It is especially necessary that the buffer address is a valid address pointing to<br />
memory buffer that has at least the size that is defined in the function call. Please be informed that calling this function with non valid parameters<br />
may crash your system as these values are base for following DMA transfers.<br />
The use of this function is described in greater detail in a later chapter.<br />
Function spcm_dwDefTransfer<br />
uint32 _stdcall spcm_dwDefTransfer_i64m(// Defines the transer buffer by 2 x 32 bit unsigned integer<br />
drv_handle hDevice, // handle to an already opened device<br />
uint32 dwBufType, // type of the buffer to define as listed above under SPCM_BUF_XXXX<br />
uint32 dwDirection, // the transfer direction as defined above<br />
uint32 dwNotifySize, // no. of bytes after which an event is sent (0=end of transfer)<br />
void* pvDataBuffer, // pointer to the data buffer<br />
uint32 dwBrdOffsH, // high part of offset in board memory<br />
uint32 dwBrdOffsL, // low part of offset in board memory<br />
uint32 dwTransferLenH, // high part of transfer buffer length<br />
uint32 dwTransferLenL); // low part of transfer buffer length<br />
uint32 _stdcall spcm_dwDefTransfer_i64 (// Defines the transer buffer by using 64 bit unsigned integer values<br />
drv_handle hDevice, // handle to an already opened device<br />
uint32 dwBufType, // type of the buffer to define as listed above under SPCM_BUF_XXXX<br />
uint32 dwDirection, // the transfer direction as defined above<br />
uint32 dwNotifySize, // no. of bytes after which an event is sent (0=end of transfer)<br />
void* pvDataBuffer, // pointer to the data buffer<br />
uint64 qwBrdOffs, // offset for transfer in board memory<br />
uint64 qwTransferLen); // buffer length<br />
This function is available in two different formats as the spcm_dwGetParam and spcm_dwSetParam functions are. The background is the<br />
same. As long as you’re using a compiler that supports 64 bit integer values please use the _i64 function. Any other platform needs to use<br />
the _i64m function and split offset and length in two 32 bit words.<br />
Example:<br />
int16* pnBuffer = new int16[8192];<br />
if (spcm_dwDefTransfer_i64 (hDrv, SPCM_BUF_DATA, SPCM_DIR_CARDTOPC, 0, (void*) pnBuffer, 0, 16384) != ERR_OK)<br />
printf (“DefTransfer failed\n”);<br />
The example defines a data buffer of 8 kSamples of 16 bit integer values = 16 kByte (16384 byte) for a transfer from card to PC memory.<br />
As notify size is set to 0 we only want to get an event when the transfer has finished.<br />
Function spcm_dwInvalidateBuf<br />
The invalidate buffer function is used to tell the driver that the buffer that has been set with spcm_dwDefTransfer call is no longer valid. It is<br />
necessary to use the same buffer type as the driver handles different buffers at the same time. Call this function if you want to delete the buffer<br />
memory after calling the spcm_dwDefTransfer function. If the buffer already has been transferred after calling spcm_dwDefTransfer it is not<br />
necessary to call this function. When calling spcm_dwDefTransfer any further defined buffer is automatically invalidated.<br />
(c) <strong>Spectrum</strong> GmbH 41
Driver functions Software<br />
Function spcm_dwInvalidateBuf<br />
uint32 _stdcall spcm_dwInvalidateBuf ( // invalidate the transfer buffer<br />
drv_handle hDevice, // handle to an already opened device<br />
uint32 dwBufType); // type of the buffer to invalidate as listed above under SPCM_BUF_XXXX<br />
Function spcm_dwGetErrorInfo<br />
The function returns complete error information on the last error that has occurred. The error handling itself is <strong>exp</strong>lained in a later chapter in<br />
greater detail. When calling this function please be sure to have a text buffer allocated that has at least ERRORTEXTLEN length. The error text<br />
function returns a complete description of the error including the register/value combination that has raised the error and a short description<br />
of the error details. In addition it is possible to get back the error generating register/value for own error handling. If not needed the buffers<br />
for register/value can be left to NULL.<br />
Function spcm_dwGetErrorInfo<br />
uint32 _stdcall spcm_dwGetErrorInfo_i32 (<br />
drv_handle hDevice, // handle to an already opened device<br />
uint32* pdwErrorReg, // adress of the error register (can zero if not of interest)<br />
int32* plErrorValue, // adress of the error value (can zero if not of interest)<br />
char pszErrorTextBuffer[ERRORTEXTLEN]); // text buffer for text error<br />
Example:<br />
char szErrorBuf[ERRORTEXTLEN];<br />
if (spcm_dwSetData_i32 (hDrv, SPC_MEMSIZE, -1))<br />
{<br />
spcm_dwGetErrorInfo_i32 (hDrv, NULL, NULL, szErrorBuf);<br />
printf (“Set of memsize failed with error message: %s\n”, szErrorBuf);<br />
}<br />
42 <strong>M3i.41xx</strong> / <strong>M3i.41xx</strong>-<strong>exp</strong> Manual
Software Borland Delphi (Pascal) Programming Interface<br />
Borland Delphi (Pascal) Programming Interface<br />
Driver interface<br />
The driver interface is located in the sub-directory d_header and contains the following files. The files need to be included in the delphi project<br />
and has to be put into the „uses“ section of the source files that will access the driver. Please do not edit any of these files as they’re regularly<br />
updated if new functions or registers have been included.<br />
file spcm_win32.pas<br />
The file contains the interface to the driver library and defines some needed constants and variable types. All functions of the delphi library<br />
are similar to the above <strong>exp</strong>lained standard driver functions:<br />
// ----- device handling functions ----function<br />
spcm_hOpen (strName: pchar): int32; stdcall; external 'spcm_win32.dll' name '_spcm_hOpen@4';<br />
procedure spcm_vClose (hDevice: int32); stdcall; external 'spcm_win32.dll' name '_spcm_vClose@4';<br />
function spcm_dwGetErrorInfo_i32 (hDevice: int32; var lErrorReg, lErrorValue: int32; strError: pchar): uint32;<br />
stdcall; external 'spcm_win32.dll' name '_spcm_dwGetErrorInfo_i32@16'<br />
// ----- register access functions ----function<br />
spcm_dwSetParam_i32 (hDevice, lRegister, lValue: int32): uint32;<br />
stdcall; external 'spcm_win32.dll' name '_spcm_dwSetParam_i32@12';<br />
function spcm_dwSetParam_i64 (hDevice, lRegister: int32; llValue: int64): uint32;<br />
stdcall; external 'spcm_win32.dll' name '_spcm_dwSetParam_i64@16';<br />
function spcm_dwGetParam_i32 (hDevice, lRegister: int32; var plValue: int32): uint32;<br />
stdcall; external 'spcm_win32.dll' name '_spcm_dwGetParam_i32@12';<br />
function spcm_dwGetParam_i64 (hDevice, lRegister: int32; var pllValue: int64): uint32;<br />
stdcall; external 'spcm_win32.dll' name '_spcm_dwGetParam_i64@12';<br />
// ----- data handling ----function<br />
spcm_dwDefTransfer_i64 (hDevice, dwBufType, dwDirection, dwNotifySize: int32; pvDataBuffer: Pointer;<br />
llBrdOffs, llTransferLen: int64): uint32;<br />
stdcall; external 'spcm_win32.dll' name '_spcm_dwDefTransfer_i64@36';<br />
function spcm_dwInvalidateBuf (hDevice, lBuffer: int32): uint32;<br />
stdcall; external 'spcm_win32.dll' name '_spcm_dwInvalidateBuf@8';<br />
The file also defines types used inside the driver and the examples. The types have similar names as used under C/C++ to keep the examples<br />
more simple to understand and allow a better comparison.<br />
file SpcRegs.pas<br />
The SpcRegs.pas file defines all constants that are used for the driver. The constant names are the same names as used under the C/C++<br />
examples. All constants names will be found throughout this hardware manual when certain aspects of the driver usage are <strong>exp</strong>lained. It is<br />
recommended to only use these constant names for better visibility of the programs:<br />
const SPC_M2CMD = 100; { write a command }<br />
const M2CMD_CARD_RESET = $00000001; { hardware reset }<br />
const M2CMD_CARD_WRITESETUP = $00000002; { write setup only }<br />
const M2CMD_CARD_START = $00000004; { start of card (including writesetup) }<br />
const M2CMD_CARD_ENABLETRIGGER = $00000008; { enable trigger engine }<br />
...<br />
file SpcErr.pas<br />
The SpeErr.pas file contains all error codes that may be returned by the driver.<br />
Including the driver files<br />
To use the driver function and all the defined constants it is necessary to include the files into the project as<br />
shown in the picture on the right. The project overview is taken from one of the examples delivered on CD.<br />
Besides including the driver files in the project it is also necessary to include them in the uses section of the<br />
source files where functions or constants should be used:<br />
uses<br />
Windows, Messages, SysUtils, Classes, Graphics, Controls, Forms, Dialogs,<br />
StdCtrls, ExtCtrls,<br />
SpcRegs, SpcErr, spcm_win32;<br />
(c) <strong>Spectrum</strong> GmbH 43
Borland Delphi (Pascal) Programming Interface Software<br />
Examples<br />
Examples for Delphi can be found on CD in the directory /examples/delphi. The directory contains the above mentioned delphi header files<br />
and a couple of universal examples, each of them working with a certain type of card. Please feel free to use these examples as a base for<br />
your programs and to modify them in any kind.<br />
spcm_scope<br />
The example implements a very simple scope program that makes single acquisitions on button pressing. A fixed setup is done inside the<br />
example. The spcm_scope example can be used with any analog data acquisition card from <strong>Spectrum</strong>. It covers cards with 1 byte per sample<br />
(8 bit resolution) as well as cards with 2 bytes per sample (12, 14 and 16 bit resolution)<br />
The program shows the following steps:<br />
• Initialization of a card and reading of card information like type, function and serial number<br />
• Doing a simple card setup<br />
• Performing the acquisition and waiting for the end interrupt<br />
• Reading of data, re-scaling it and displaying waveform on screen<br />
44 <strong>M3i.41xx</strong> / <strong>M3i.41xx</strong>-<strong>exp</strong> Manual
Software Visual Basic Programming Interface and Examples<br />
Visual Basic Programming Interface and Examples<br />
Driver interface<br />
The driver interface is located in the sub-directory b_header and contains the following files. The files need to be included in the basic project.<br />
Please do not edit any of these files as they’re regularly updated if new functions or registers have been included.<br />
file spcm_win32_decl.bas<br />
The file contains the interface to the driver library and defines some needed constants. All functions of the visual basic library are similar to<br />
the above <strong>exp</strong>lained standard driver functions:<br />
' ----- card handling functions -----<br />
Public Declare Function spcm_hOpen Lib "spcm_win32.dll" Alias "_spcm_hOpen@4"<br />
(ByVal szDeviceName As String) As Long<br />
Public Declare Function spcm_vClose Lib "spcm_win32.dll" Alias "_spcm_vClose@4"<br />
(ByVal hDevice As Long) As Long<br />
Public Declare Function spcm_dwGetErrorInfo_i32 Lib "spcm_win32.dll" Alias "_spcm_dwGetErrorInfo_i32@16"<br />
(ByVal hDevice As Long, ByRef lErrorReg, ByRef lErrorValue, ByVal szErrorText As String) As Long<br />
' ----- software register handling -----<br />
Public Declare Function spcm_dwGetParam_i32 Lib "spcm_win32.dll" Alias "_spcm_dwGetParam_i32@12"<br />
(ByVal hDevice As Long, ByVal lRegister As Long, ByRef lValue As Long) As Long<br />
Public Declare Function spcm_dwGetParam_i64m Lib "spcm_win32.dll" Alias "_spcm_dwGetParam_i64m@16"<br />
(ByVal hDevice As Long, ByVal lRegister As Long, ByRef lValueHigh As Long, ByRef lValueLow As Long) As Long<br />
Public Declare Function spcm_dwSetParam_i32 Lib "spcm_win32.dll" Alias "_spcm_dwSetParam_i32@12"<br />
(ByVal hDevice As Long, ByVal lRegister As Long, ByVal lValue As Long) As Long<br />
Public Declare Function spcm_dwSetParam_i64m Lib "spcm_win32.dll" Alias "_spcm_dwSetParam_i64m@16"<br />
(ByVal hDevice As Long, ByVal lRegister As Long, ByVal lValueHigh As Long, ByVal lValueLow As Long) As Long<br />
' ----- data handling -----<br />
Public Declare Function spcm_dwDefTransfer_i64m Lib "spcm_win32.dll" Alias "_spcm_dwDefTransfer_i64m@36"<br />
(ByVal hDevice As Long, ByVal dwBufType As Long, ByVal dwDirection As Long, ByVal dwNotifySize As Long, ByRef<br />
pvDataBuffer As Any, ByVal dwBrdOffsH As Long, ByVal dwBrdOffsL As Long, ByVal dwTransferLenH As Long, ByVal<br />
dwTransferLenL As Long) As Long<br />
Public Declare Function spcm_dwInvalidateBuf Lib "spcm_win32.dll" Alias "_spcm_dwInvalidateBuf@8"<br />
(ByVal hDevice As Long, ByVal lBuffer As Long) As Long<br />
file SpcRegs.bas<br />
The SpcRegs.bas file defines all constants that are used for the driver. The constant names are the same names as used under the C/C++<br />
examples. All constants names will be found throughout this hardware manual when certain aspects of the driver usage are <strong>exp</strong>lained. It is<br />
recommended to only use these constant names for better visibility of the programs:<br />
Public Const SPC_M2CMD = 100 ' write a command<br />
Public Const M2CMD_CARD_RESET = &H1& ' hardware reset<br />
Public Const M2CMD_CARD_WRITESETUP = &H2& ' write setup only<br />
Public Const M2CMD_CARD_START = &H4& ' start of card (including writesetup)<br />
Public Const M2CMD_CARD_ENABLETRIGGER = &H8& ' enable trigger engine<br />
...<br />
file SpcErr.bas<br />
The SpcErr.bas file contains all error codes that may be returned by the driver.<br />
Including the driver files<br />
To use the driver function and all the defined constants it is necessary to include the files into the<br />
project as shown in the picture on the right. The project overview is taken from one of the examples<br />
delivered on CD.<br />
(c) <strong>Spectrum</strong> GmbH 45
Visual Basic Programming Interface and Examples Software<br />
Examples<br />
Examples for Visual Basic can be found on CD in the directory /examples/basic. The directory contains the above mentioned basic header<br />
files and a couple of universal examples, each of them working with a certain type of card. Please feel free to use these examples as a base<br />
for your programs and to modify them in any kind.<br />
spcm_scope<br />
The example implements a very simple scope program that makes single acquisitions on button pressing. A fixed setup is done inside the<br />
example. The spcm_scope example can be used with any analog data acquisition card from <strong>Spectrum</strong>. It covers cards with 1 byte per sample<br />
(8 bit resolution) as well as cards with 2 bytes per sample (12, 14 and 16 bit resolution)<br />
The program shows the following steps:<br />
• Initialization of a card and reading of card information like type, function and serial number<br />
• Doing a simple card setup<br />
• Performing the acquisition and waiting for the end interrupt<br />
• Reading of data, re-scaling it and displaying waveform on screen<br />
46 <strong>M3i.41xx</strong> / <strong>M3i.41xx</strong>-<strong>exp</strong> Manual
Software .NET programming languages<br />
.NET programming languages<br />
Library<br />
For using the driver with a .NET based language <strong>Spectrum</strong> delivers a special library that capsulates the driver in a .NET object. By adding<br />
this object to the project it is possible to access all driver functions and constants from within your .NET environment.<br />
There is one small console based example for each supported .NET language that shows how to include the driver and how to access the<br />
cards. Please combine this example with the different standard examples to get the different card functionality.<br />
Declaration<br />
The driver access methods and also all the type, register and error declarations are combined in the object Spcm and are located in the DLL<br />
SpcmDrv.NET.dll delivered with the .NET examples. <strong>Spectrum</strong> also delivers the source code of the DLL as a C# project. Theses sources are<br />
located in the directory SpcmDrv.NET.<br />
namespace Spcm<br />
{<br />
public class Drv<br />
{<br />
[DllImport("spcm_win32.dll")]public static extern IntPtr spcm_hOpen (string szDeviceName);<br />
[DllImport("spcm_win32.dll")]public static extern void spcm_vClose (IntPtr hDevice);<br />
...<br />
public class CardType<br />
{<br />
public const int TYP_M2I2020 = unchecked ((int)0x00032020);<br />
public const int TYP_M2I2021 = unchecked ((int)0x00032021);<br />
public const int TYP_M2I2025 = unchecked ((int)0x00032025);<br />
...<br />
public class Regs<br />
{<br />
public const int SPC_M2CMD = unchecked ((int)100);<br />
public const int M2CMD_CARD_RESET = unchecked ((int)0x00000001);<br />
public const int M2CMD_CARD_WRITESETUP = unchecked ((int)0x00000002);<br />
...<br />
Using C#<br />
The SpcmDrv.NET.dll needs to be included within the Solution Explorer in the References section. Please use right mouse and select „AddReference“.<br />
After this all functions and constants of the driver object are available.<br />
Please see the example in the directory CSharp as a start:<br />
// ----- open card ----hDevice<br />
= Drv.spcm_hOpen("/dev/spcm0");<br />
if ((int)hDevice == 0)<br />
{<br />
Console.WriteLine("Error: Could not open card\n");<br />
return 1;<br />
}<br />
// ----- get card type ----dwErrorCode<br />
= Drv.spcm_dwGetParam_i32(hDevice, Regs.SPC_PCITYP, out lCardType);<br />
dwErrorCode = Drv.spcm_dwGetParam_i32(hDevice, Regs.SPC_PCISERIALNR, out lSerialNumber);<br />
Using Managed C++/CLI<br />
The SpcmDrv.NET.dll needs to be included within the project options. Please select „Project“ - „Properties“ - „References“ and finally „Add<br />
new Reference“. After this all functions and constants of the driver object are available.<br />
Please see the example in the directory CppCLR as a start:<br />
// ----- open card ----hDevice<br />
= Drv::spcm_hOpen("/dev/spcm0");<br />
if ((int)hDevice == 0)<br />
{<br />
Console::WriteLine("Error: Could not open card\n");<br />
return 1;<br />
}<br />
// ----- get card type ----dwErrorCode<br />
= Drv::spcm_dwGetParam_i32(hDevice, Regs::SPC_PCITYP, lCardType);<br />
dwErrorCode = Drv::spcm_dwGetParam_i32(hDevice, Regs::SPC_PCISERIALNR, lSerialNumber);<br />
(c) <strong>Spectrum</strong> GmbH 47
Python Programming Interface and Examples Software<br />
Using VB.NET<br />
The SpcmDrv.NET.dll needs to be included within the project options. Please select „Project“ - „Properties“ - „References“ and finally „Add<br />
new Reference“. After this all functions and constants of the driver object are available.<br />
Please see the example in the directory VB.NET as a start:<br />
' ----- open card ----hDevice<br />
= Drv.spcm_hOpen("/dev/spcm0")<br />
If (hDevice = 0) Then<br />
Console.WriteLine("Error: Could not open card\n")<br />
Else<br />
' ----- get card type ----dwError<br />
= Drv.spcm_dwGetParam_i32(hDevice, Regs.SPC_PCITYP, lCardType)<br />
dwError = Drv.spcm_dwGetParam_i32(hDevice, Regs.SPC_PCISERIALNR, lSerialNumber)<br />
Using J#<br />
The SpcmDrv.NET.dll needs to be included within the Solution Explorer in the References section. Please use right mouse and select „AddReference“.<br />
After this all functions and constants of the driver object are available.<br />
Please see the example in the directory JSharp as a start:<br />
// ----- open card ----hDevice<br />
= Drv.spcm_hOpen("/dev/spcm0");<br />
if (hDevice.ToInt32() == 0)<br />
System.out.println("Error: Could not open card\n");<br />
else<br />
{<br />
// ----- get card type ----dwErrorCode<br />
= Drv.spcm_dwGetParam_i32(hDevice, Regs.SPC_PCITYP, lCardType);<br />
dwErrorCode = Drv.spcm_dwGetParam_i32(hDevice, Regs.SPC_PCISERIALNR, lSerialNumber);<br />
Python Programming Interface and Examples<br />
Driver interface<br />
The driver interface contains the following files. The files need to be included in the python project. Please do not edit any of these files as<br />
they are regularily updated if new functions or registers have been included. To use pyspcm you need python (2.4 or 2.6) and ctype, which<br />
is included in Python 2.6 and needs to be installed separately for Python 2.4.<br />
48 <strong>M3i.41xx</strong> / <strong>M3i.41xx</strong>-<strong>exp</strong> Manual
Software Python Programming Interface and Examples<br />
file pyspcm.py<br />
The file contains the interface to the driver library and defines some needed constants. All functions of the visual basic library are similar to<br />
the above <strong>exp</strong>lained standard driver functions and use ctypes as input and return parameters:<br />
# ----- Windows ----spcmDll<br />
= windll.LoadLibrary ("c:\\windows\\system32\\spcm_win32.dll")<br />
# load spcm_hOpen<br />
spcm_hOpen = getattr (spcmDll, "_spcm_hOpen@4")<br />
spcm_hOpen.argtype = [c_char_p]<br />
spcm_hOpen.restype = drv_handle<br />
# load spcm_vClose<br />
spcm_vClose = getattr (spcmDll, "_spcm_vClose@4")<br />
spcm_vClose.argtype = [drv_handle]<br />
spcm_vClose.restype = None<br />
# load spcm_dwGetErrorInfo<br />
spcm_dwGetErrorInfo_i32 = getattr (spcmDll, "_spcm_dwGetErrorInfo_i32@16")<br />
spcm_dwGetErrorInfo_i32.argtype = [drv_handle, ptr32, ptr32, c_char_p]<br />
spcm_dwGetErrorInfo_i32.restype = uint32<br />
# load spcm_dwGetParam_i32<br />
spcm_dwGetParam_i32 = getattr (spcmDll, "_spcm_dwGetParam_i32@12")<br />
spcm_dwGetParam_i32.argtype = [drv_handle, int32, ptr32]<br />
spcm_dwGetParam_i32.restype = uint32<br />
# load spcm_dwGetParam_i64<br />
spcm_dwGetParam_i64 = getattr (spcmDll, "_spcm_dwGetParam_i64@12")<br />
spcm_dwGetParam_i64.argtype = [drv_handle, int32, ptr64]<br />
spcm_dwGetParam_i64.restype = uint32<br />
# load spcm_dwSetParam_i32<br />
spcm_dwSetParam_i32 = getattr (spcmDll, "_spcm_dwSetParam_i32@12")<br />
spcm_dwSetParam_i32.argtype = [drv_handle, int32, int32]<br />
spcm_dwSetParam_i32.restype = uint32<br />
# load spcm_dwSetParam_i64<br />
spcm_dwSetParam_i64 = getattr (spcmDll, "_spcm_dwSetParam_i64@16")<br />
spcm_dwSetParam_i64.argtype = [drv_handle, int32, int64]<br />
spcm_dwSetParam_i64.restype = uint32<br />
# load spcm_dwSetParam_i64m<br />
spcm_dwSetParam_i64m = getattr (spcmDll, "_spcm_dwSetParam_i64m@16")<br />
spcm_dwSetParam_i64m.argtype = [drv_handle, int32, int32, int32]<br />
spcm_dwSetParam_i64m.restype = uint32<br />
# load spcm_dwDefTransfer_i64<br />
spcm_dwDefTransfer_i64 = getattr (spcmDll, "_spcm_dwDefTransfer_i64@36")<br />
spcm_dwDefTransfer_i64.argtype = [drv_handle, uint32, uint32, uint32, c_void_p, uint64, uint64]<br />
spcm_dwDefTransfer_i64.restype = uint32<br />
spcm_dwInvalidateBuf = getattr (spcmDll, "_spcm_dwInvalidateBuf@8")<br />
spcm_dwInvalidateBuf.argtype = [drv_handle, uint32]<br />
spcm_dwInvalidateBuf.restype = uint32<br />
# ----- Linux -----<br />
# use cdll because all driver access functions use cdecl calling convention under linux<br />
spcmDll = cdll.LoadLibrary ("libspcm_linux.so")<br />
# the loading of the driver access functions is similar to windows:<br />
# load spcm_hOpen<br />
spcm_hOpen = getattr (spcmDll, "spcm_hOpen")<br />
spcm_hOpen.argtype = [c_char_p]<br />
spcm_hOpen.restype = drv_handle<br />
# ...<br />
file regs.py<br />
The regs.py file defines all constants that are used for the driver. The constant names are the same names compared to the C/C++ examples.<br />
All constant names will be found throughout this hardware manual when certain aspects of the driver usage are <strong>exp</strong>lained. It is recommended<br />
to only use these constant names for better readability of the programs:<br />
SPC_M2CMD = 100l # write a command<br />
M2CMD_CARD_RESET = 0x00000001l # hardware reset<br />
M2CMD_CARD_WRITESETUP = 0x00000002l # write setup only<br />
M2CMD_CARD_START = 0x00000004l # start of card (including writesetup)<br />
M2CMD_CARD_ENABLETRIGGER = 0x00000008l # enable trigger engine<br />
...<br />
(c) <strong>Spectrum</strong> GmbH 49
Python Programming Interface and Examples Software<br />
file spcerr.py<br />
The spcerr.py file contains all error codes that may be returned by the driver.<br />
Examples<br />
Examples for Python can be found on CD in the directory /examples/python. The directory contains the above mentioned header files and<br />
a some examples, each of them working with a certain type of card. Please feel free to use these examples as a base for your programs and<br />
to modify them in any kind.<br />
When allocating the buffer for DMA transfers, use the following function to get a mutable character buffer:<br />
ctypes.create_string_buffer(init_or_size[, size])<br />
50 <strong>M3i.41xx</strong> / <strong>M3i.41xx</strong>-<strong>exp</strong> Manual
Programming the Board Overview<br />
Programming the Board<br />
Overview<br />
The following chapters show you in detail how to program the different aspects of the board. For every topic there’s a small example. For<br />
the examples we focused on Visual C++. However as shown in the last chapter the differences in programming the board under different<br />
programming languages are marginal. This manual describes the programming of the whole hardware family. Some of the topics are similar<br />
for all board versions. But some differ a little bit from type to type. Please check the given tables for these topics and examine carefully which<br />
settings are valid for your special kind of board.<br />
Register tables<br />
The programming of the boards is totally software register based. All software registers are described in the following form:<br />
The name of the software register<br />
as found in the regs.h file.<br />
Could directly be used by C/<br />
C++, Delphi and Basic compiler<br />
Register Value Direction Description<br />
SPC_M2CMD 100 w Command register of the board.<br />
M2CMD_CARD_START 4h Starts the board with the current register settings.<br />
M2CMD_CARD_STOP 40h Stops the board manually.<br />
Any constants that can be used to<br />
program the register directly are<br />
shown inserted beneath the register<br />
table.<br />
If no constants are given below the register table, the dedicated register is used as a switch. All such registers<br />
are activated if written with a “1“ and deactivated if written with a “0“.<br />
Programming examples<br />
In this manual a lot of programming examples are used to give you an impression on how the actual mentioned registers can be set within<br />
your own program. All of the examples are located in a separated coloured box to indicate the example and to make it easier to differ it<br />
from the describing text.<br />
All of the examples mentioned throughout the manual are written in C/C++ and can be used with any C/C++ compiler for Windows or Linux.<br />
Complete C/C++ Example<br />
#include “../c_header/dlltyp.h”<br />
#include “../c_header/regs.h”<br />
#include “../c_header/spcm_drv.h”<br />
#include <br />
int main()<br />
{<br />
drv_handle hDrv; // the handle of the device<br />
int32 lCardType; // a place to store card information<br />
hDrv = spcm_hOpen ("/dev/spcm0"); // Opens the board and gets a handle<br />
if (!hDrv) // check whether we can access the card<br />
return -1;<br />
spcm_dwGetParam_i32 (hDrv, SPC_PCITYP, &lCardType); // simple command, read out of card type<br />
printf (“Found card M2i/M3i.%04x in the system\n”, lCardType & TYP_VERSIONMASK);<br />
spcm_vClose (hDrv);<br />
return 0;<br />
}<br />
The decimal value of the software register.<br />
Also found in the regs.h file. This value must<br />
be used with all programs or compilers that<br />
cannot use the header file directly.<br />
The decimal or hexadecimal value of the<br />
constant, also found in the regs.h file. Hexadecimal<br />
values are indicated with an „h“ at<br />
the end. This value must be used with all<br />
programs or compilers that cannot use the<br />
header file directly.<br />
Describes whether<br />
the register can be<br />
read (r) and/or written<br />
(w).<br />
Short description of<br />
the use of this constant.<br />
Short description of the functionality<br />
of the register. A more detailed<br />
description is found<br />
above or below the register tables.<br />
(c) <strong>Spectrum</strong> GmbH 51
Initialization Programming the Board<br />
Initialization<br />
Before using the card it is necessary to open the kernel device to access the hardware. It is only possible to use every device exclusively using<br />
the handle that is obtained when opening the device. Opening the same device twice will only generate an error code. After ending the<br />
driver use the device has to be closed again to allow later re-opening. Open and close of driver is done using the spcm_hOpen and<br />
spcm_vClose function as described in the “Driver Functions” chapter before.<br />
Open/Close Example<br />
drv_handle hDrv; // the handle of the device<br />
hDrv = spcm_hOpen ("/dev/spcm0"); // Opens the board and gets a handle<br />
if (!hDrv) // check whether we can access the card<br />
{<br />
printf “Open failed\n”);<br />
return -1;<br />
}<br />
... do any work with the driver<br />
spcm_vClose (hDrv);<br />
return 0;<br />
Error handling<br />
If one action caused an error in the driver this error and the register and value where it occurs will be saved.<br />
The driver is then locked until the error is read out using the error function spcm_dwGetErrorInfo_i32. Any<br />
calls to other functions will just return the error code ERR_LASTERR showing that there is an error to be read<br />
out.<br />
This error locking functionality will prevent the generation of unseen false commands and settings that may lead to totally un<strong>exp</strong>ected behaviour.<br />
For sure there are only errors locked that result on false commands or settings. Any error code that is generated to report a condition to<br />
the user won’t lock the driver. As example the error code ERR_TIMEOUT showing that the a timeout in a wait function has occurred won’t<br />
lock the driver and the user can simply react to this error code without reading the complete error function.<br />
As a benefit from this error locking it is not necessary to check the error return of each function call but just checking the error function once<br />
at the end of all calls to see where an error occurred. The enhanced error function returns a complete error description that will lead to the<br />
call that produces the error.<br />
Example for error checking at end using the error text from the driver:<br />
char szErrorText[ERRORTEXTLEN];<br />
spcm_dwSetParam_i32 (hDrv, SPC_SAMPLERATE, 1000000); // correct command<br />
spcm_dwSetParam_i32 (hDrv, SPC_MEMSIZE, -345); // faulty command<br />
spcm_dwSetParam_i32 (hDrv, SPC_POSTTRIGGER, 1024); // correct command<br />
if (spcm_dwGetErrorInfo_i32 (hDrv, NULL, NULL, szErrorText) != ERR_OK) // check for an error<br />
{<br />
printf (szErrorText); // print the error text<br />
spcm_vClose (hDrv); // close the driver<br />
exit (0); // and leave the program<br />
}<br />
This short program then would generate a printout as:<br />
Error ocurred at register SPC_MEMSIZE with value -345: value not allowed<br />
All error codes are described in detail in the appendix. Please refer to this error description and the description<br />
of the software register to examine the cause for the error message.<br />
Any of the parameter of the spcm_dwGetErrorInfo_i32 function can be used to obtain detailed information on the error. If one is not interested<br />
in parts of this information it is possible to just pass a NULL (zero) to this variable like shown in the example. If one is not interested in the<br />
error text but wants to install it’s own error handler it may be interesting to just read out the error generating register and value.<br />
52 <strong>M3i.41xx</strong> / <strong>M3i.41xx</strong>-<strong>exp</strong> Manual
Programming the Board Gathering information from the card<br />
Example for error checking with own (simple) error handler:<br />
Gathering information from the card<br />
When opening the card the driver library internally reads out a lot of information from the on-board eeprom. The driver also offers additional<br />
information on hardware details. All of this information can be read out and used for programming and documentation. This chapter will<br />
show all general information that is offered by the driver. There is also some more information on certain parts of the card, like clock machine<br />
or trigger machine, that is described in detail in the documentation of that part of the card.<br />
All information can be read out using one of the spcm_dwGetParam functions. Please stick to the “Driver Functions” chapter for more details<br />
on this function.<br />
Card type<br />
The card type information returns the specific card type that is found under this device. When using multiple cards in one system it is highly<br />
recommended to read out this register first to examine the ordering of cards. Please don’t rely on the card ordering as this is based on the<br />
BIOS, the bus connections and the operating system.<br />
One of the following values is returned, when reading this register. Each card has it’s own card type constant defined in regs.h. Please note<br />
that when reading the card information as a hex value, the lower word shows the digits of the card name while the upper word is a indication<br />
for the used bus type.<br />
.<br />
uint32 dwErrorReg;<br />
int32 lErrorValue;<br />
uint32 dwErrorCode;<br />
spcm_dwSetParam_i32 (hDrv, SPC_SAMPLERATE, 1000000); // correct command<br />
spcm_dwSetParam_i32 (hDrv, SPC_MEMSIZE, -345); // faulty command<br />
spcm_dwSetParam_i32 (hDrv, SPC_POSTTRIGGER, 1024); // correct command<br />
dwErrorCode = spcm_dwGetErrorInfo_i32 (hDrv, &dwErrorReg, &lErrorValue, NULL);<br />
if (dwErrorCode) // check for an error<br />
{<br />
printf (“Errorcode: %d in register %d at value %d\n”, lErrorCode, dwErrorReg, lErrorValue);<br />
spcm_vClose (hDrv); // close the driver<br />
exit (0); // and leave the program<br />
}<br />
Register Value Direction Description<br />
SPC_PCITYP 2000 read Type of board as listed in the table below.<br />
Card type Card type<br />
as defined in<br />
regs.h<br />
Value<br />
hexadecimal<br />
Value<br />
decimal<br />
Card type Card type<br />
as defined in<br />
regs.h<br />
Value<br />
hexadecimal<br />
Value<br />
decimal<br />
M3i.4110 TYP_M3I4110 54110h 344336 M3i.4121 TYP_M3I4121 54121h 344353<br />
M3i.4111 TYP_M3I4111 54111h 344337 M3i.4140 TYP_M3I4140 54140h 344384<br />
M3i.4120 TYP_M3I4120 54120h 344352 M3i.4142 TYP_M3I4142 54142h 344386<br />
M3i.4110-<strong>exp</strong> TYP_M3I4110EXP 64110h 409872 M3i.4121-<strong>exp</strong> TYP_M3I4121EXP 64121h 409889<br />
M3i.4111-<strong>exp</strong> TYP_M3I4111EXP 64111h 409873 M3i.4140-<strong>exp</strong> TYP_M3I4140EXP 64140h 409920<br />
M3i.4120-<strong>exp</strong> TYP_M3I4120EXP 64120h 409888 M3i.4142-<strong>exp</strong> TYP_M3I4142EXP 64142h 409922<br />
Hardware version<br />
Since all of the boards from <strong>Spectrum</strong> are modular boards, they consist of one base board and one or two piggy-back front-end modules and<br />
eventually of an extension module like the star-hub. Each of these three kinds of hardware has it’s own version register. Normally you do not<br />
need this information but if you have a support question, please provide the revision together with it.<br />
Register Value Direction Description<br />
SPC_PCIVERSION 2010 read Base card version: the upper 16 bit show the hardware (PCB) version, the lower 16 bit show the firmware<br />
version.<br />
SPC_PCIMODULEVERSION 2012 read Module version: the upper 16 bit show the hardware (PCB) version, the lower 16 bit show the firmware<br />
version.<br />
If your board has a additional piggy-back extension module mounted you can get the hardware version with the following register.<br />
Register Value Direction Description<br />
SPC_PCIEXTVERSION 2011 read Extension module version: the upper 16 bit show the hardware (PCB) version, the lower 16 bit show<br />
the firmware version.<br />
(c) <strong>Spectrum</strong> GmbH 53
Gathering information from the card Programming the Board<br />
Production date<br />
This register informs you about the production date, which is returned as one 32 bit long word. The upper word is holding the information<br />
about the year, while the lower byte informs about the week of the year.<br />
Register Value Direction Description<br />
SPC_PCIDATE 2020 read Production date: week in bit 31 to 16, year in bit 15 to 0<br />
The following example shows how to read out a date and how to interpret the value:<br />
spcm_dwGetParam_i32 (hDrv, SPC_PCIDATE, &lProdDate);<br />
printf ("Production: week &d of year &d\n“, (lProdDate >> 16) & 0xffff, lProdDate & 0xffff);<br />
Last calibration date<br />
This register informs you about the date of the last factory calibration. When receiving a new card this date is similar to the delivery date<br />
when the production calibration is done. When returning the card to calibration this information is updated. This date is not updated when<br />
just doing an on-board calibration by the user. The date is returned as one 32 bit long word. The upper word is holding the information about<br />
the year, while the lower byte informs about the week of the year.<br />
Register Value Direction Description<br />
SPC_CALIBDATE 2025 read Last calibration date: week in bit 31 to 16, year in bit 15 to 0<br />
Serial number<br />
This register holds the information about the serial number of the board. This number is unique and should always be sent together with a<br />
support question. Normally you use this information together with the register SPC_PCITYP to verify that multiple measurements are done with<br />
the exact same board.<br />
Register Value Direction Description<br />
SPC_PCISERIALNO 2030 read Serial number of the board<br />
Maximum possible sampling rate<br />
This register gives you the maximum possible sampling rate the board can run. The information provided here does not consider any restrictions<br />
in the maximum speed caused by special channel settings. For detailed information about the correlation between the maximum sampling<br />
rate and the number of activated channels please refer to the according chapter.<br />
Register Value Direction Description<br />
SPC_PCISAMPLERATE 2100 read Maximum sampling rate in Hz as a 32 bit integer value<br />
Installed memory<br />
This register returns the size of the installed on-board memory in bytes as a 64 bit integer value. If you want to know the amount of samples<br />
you can store, you must regard the size of one sample of your card. All 8 bit A/D and D/A cards use only one byte per sample, while all<br />
other A/D and D/A cards with 12, 14 and 16 bit resolution use two bytes to store one sample. All digital cards need one byte to store 8<br />
data bits.<br />
Register Value Direction Description<br />
SPC_PCIMEMSIZE 2110 read _i32 Installed memory in bytes as a 32 bit integer value. Maximum return value will 1 GByte. If more memory<br />
is installed this function will return the error code ERR_EXCEEDINT32.<br />
SPC_PCIMEMSIZE 2110 read _i64 Installed memory in bytes as a 64 bit integer value<br />
The following example is written for a „two bytes“ per sample card (12, 14 or 16 bit board), on any 8 bit card memory in MSamples is<br />
similar to memory in MBytes.<br />
spcm_dwGetParam_i64 (hDrv, SPC_PCIMEMSIZE, &llInstMemsize);<br />
printf ("Memory on card: %d MBytes\n", (int32) (llInstMemsize /1024/1024));<br />
printf (" : %d MSamples\n", (int32) (llInstMemsize /1024/1024/2));<br />
Installed features and options<br />
The SPC_PCIFEATURES register informs you about the features, that are installed on the board. If you want to know about one option being<br />
installed or not, you need to read out the 32 bit value and mask the interesting bit. In the table below you will find every feature that may be<br />
installed on a M2i/M3i card. Please refer to the ordering information to see which of these features are available for your card series.<br />
Register Value Direction Description<br />
SPC_PCIFEATURES 2120 read PCI feature register. Holds the installed features and options as a bitfield. The read value must be<br />
masked out with one of the masks below to get information about one certain feature.<br />
SPCM_FEAT_MULTI 1h Is set if the option Multiple Recording / Multiple Replay is installed.<br />
SPCM_FEAT_GATE 2h Is set if the option Gated Sampling / Gated Replay is installed.<br />
54 <strong>M3i.41xx</strong> / <strong>M3i.41xx</strong>-<strong>exp</strong> Manual
Programming the Board Gathering information from the card<br />
SPCM_FEAT_DIGITAL 4h Is set if the option Digital Inputs / Digital Outputs is installed.<br />
SPCM_FEAT_TIMESTAMP 8h Is set if the option Timestamp is installed.<br />
SPCM_FEAT_STARHUB4 20h Is set on the card, that carries the star-hub piggy-back module for synchronizing up to 4 cards (M3i)<br />
SPCM_FEAT_STARHUB5 20h Is set on the card, that carries the star-hub piggy-back module for synchronizing up to 5 cards (M2i)<br />
SPCM_FEAT_STARHUB8 40h Is set on the card, that carries the star-hub piggy-back module for synchronizing up to 8 cards (M3i)<br />
SPCM_FEAT_STARHUB16 40h Is set on the card, that carries the star-hub piggy-back module for synchronizing up to 16 cards (M2i)<br />
SPCM_FEAT_ABA 80h Is set if the option ABA mode is installed.<br />
SPCM_FEAT_BASEXIO 100h Is set if the extra BaseXIO option is installed. The lines can be used for asynchronous digital I/O, extra trigger or<br />
timestamp reference signal input<br />
SPCM_FEAT_AMPLIFIER_10V 200h Arbitrary Waveform Generators only: card has additional set of calibration values for amplifier card<br />
SPCM_FEAT_STARHUBSYSMASTER 400h Is set in the card that carries a System Star-Hub Master card to connect multiple systems (M2i)<br />
SPCM_FEAT_DIFFMODE 800h M2i.30xx series only: card has option -diff installed for combining two SE channels to one differential channel<br />
SPCM_FEAT_SEQUENCE 1000h Only available for output cards or I/O cards: Replay sequence mode available.<br />
SPCM_FEAT_CUSTOMMOD_MASK F0000000h The upper 4 bit of the feature register is used to mark special custom modifications. This is only used if the card has<br />
been specially customized. Please refer to the extra documentation for the meaning of the custom modification mark.<br />
The following example demonstrates how to read out the information about one feature.<br />
spcm_dwGetParam_i32 (hDrv, SPC_PCIFEATURES, &lFeatures);<br />
if (lFeatures & SPCM_FEAT_DIGITAL)<br />
printf("Option digital inputs/outputs is installed on your card");<br />
The following example demonstrates how to read out the custom modification code.<br />
spcm_dwGetParam_i32 (hDrv, SPC_PCIFEATURES, &lFeatures);<br />
lCustomMod = (lFeatures >> 28) & 0xF;<br />
if (lCustomMod != 0)<br />
printf("Custom modification no. %d is installed.", lCustomMod);<br />
Used type of driver<br />
This register holds the information about the driver that is actually used to access the board. Although the driver interface doesn’t differ between<br />
Windows and Linux systems it may be of interest for an universal program to know on which platform it is working.<br />
Register Value Direction Description<br />
SPC_GETDRVTYPE 1220 read Gives information about what type of driver is actually used<br />
DRVTYP_LINUX 1 Linux driver is used<br />
DRVTYP_WDM 4 Windows WDM driver is used (only Windows 2000/XP/XP64/Vista).<br />
Driver version<br />
This register holds information about the currently installed driver library. As the drivers are permanently improved and maintained and new<br />
features are added user programs that rely on a new feature are requested to check the driver version whether this feature is installed.<br />
Register Value Direction Description<br />
SPC_GETDRVVERSION 1200 read Gives information about the driver library version<br />
The resulting 32 bit value for the driver version consists of the three version number parts shown in the table below:<br />
Driver Major Version Driver Minor Version Driver Build<br />
8 Bit wide: bit 24 to bit 31 8 Bit wide, bit 16 to bit 23 16 Bit wide, bit 0 to bit 15<br />
Kernel Driver version<br />
This register informs about the actually used kernel driver. Windows users can also get this information from the device manager. Please refer<br />
to the „Driver Installation“ chapter. On Linux systems this information is also shown in the kernel message log at driver start time.<br />
Register Value Direction Description<br />
SPC_GETKERNELVERSION 1210 read Gives information about the kernel driver version.<br />
The resulting 32 bit value for the driver version consists of the three version number parts shown in the table below:<br />
Driver Major Version Driver Minor Version Driver Build<br />
8 Bit wide: bit 24 to bit 31 8 Bit wide, bit 16 to bit 23 16 Bit wide, bit 0 to bit 15<br />
(c) <strong>Spectrum</strong> GmbH 55
Gathering information from the card Programming the Board<br />
The following example demonstrates how to read out the kernel and library version and how to print them.<br />
spcm_dwGetParam_i32 (hDrv, SPC_GETDRVVERSION, &lLibVersion);<br />
spcm_dwGetParam_i32 (hDrv, SPC_GETKERNELVERSION, &lKernelVersion);<br />
printf("Kernel V %d.%d build %d\n”,lKernelVersion >> 24, (lKernelVersion >> 16) & 0xff, lKernelVersion & 0xffff);<br />
printf("Library V %d.%d build %d\n”,lLibVersion >> 24, (lLibVersion >> 16) & 0xff, lLibVersion & 0xffff);<br />
This small program will generate an output like this:<br />
Kernel V 1.11 build 817<br />
Library V 1.1 build 854<br />
56 <strong>M3i.41xx</strong> / <strong>M3i.41xx</strong>-<strong>exp</strong> Manual
Programming the Board Reset<br />
Reset<br />
Every <strong>Spectrum</strong> card can be reset by software. Concerning the hardware, this reset is the same as the power-on reset when starting the host<br />
computer. In addition to the power-on reset, the reset command also brings all internal driver settings to a defined default state. A software<br />
reset is automatically performed, when the driver is first loaded after starting the host system.<br />
It is recommended, that every custom written program performs a software reset first, to be sure that the<br />
driver is in a defined state independent from possible previous setting.<br />
Performing a board reset can be easily done by the related board command mentioned in the following table.<br />
Register Value Direction Description<br />
SPC_M2CMD 100 w Command register of the board.<br />
M2CMD_CARD_RESET 1h A software and hardware reset is done for the board. All settings are set to the default values. The data in the board’s<br />
on-board memory will be no longer valid. Any output signals like trigger or clock output will be disabled.<br />
(c) <strong>Spectrum</strong> GmbH 57
Channel Selection Analog Inputs<br />
Analog Inputs<br />
Channel Selection<br />
One key setting that influences all other possible settings is the channel enable register. An unique feature of the <strong>Spectrum</strong> cards is the possibility<br />
to program the number of channels you want to use. All on-board memory can then be used by these activated channels.<br />
This description shows you the channel enable register for the complete card family. However, your specific board may have less channels<br />
depending on the card type that you have purchased and therefore does not allow you to set the maximum number of channels shown here.<br />
.<br />
Register Value Direction Description<br />
SPC_CHENABLE 11000 read/write Sets the channel enable information for the next board run.<br />
CHANNEL0 1 Activates channel 0<br />
CHANNEL1 2 Activates channel 1<br />
The channel enable register is set as a bitmap. That means one bit of the value corresponds to one channel to be activated. To activate more<br />
than one channel the values have to be combined by a bitwise OR.<br />
Example showing how to activate 2 channels:<br />
SpcSetParam (hDrv, SPC_CHENABLE, CHANNEL0 | CHANNEL1);<br />
The following table shows all allowed settings for the channel enable register.<br />
Channels to activate<br />
Ch0 Ch1 Values to program Value as hex Value as decimal<br />
X CHANNEL0 1h 1<br />
X CHANNEL1 2h 2<br />
X X CHANNEL0 | CHANNEL1 3h 3<br />
Any channel activation mask that is not shown here is not valid. If programming another channel activation<br />
the driver will return with an error.<br />
To help user programs it is also possible to read out the number of activated channels that correspond to the currently programmed bitmap.<br />
Register Value Direction Description<br />
SPC_CHCOUNT 11001 read Reads back the number of currently activated channels.<br />
Reading out the channel enable information can be done directly after setting it or later like this:<br />
spcm_dwSetParam_i32 (hDrv, SPC_CHENABLE, CHANNEL0 | CHANNEL1);<br />
spcm_dwGetParam_i32 (hDrv, SPC_CHENABLE, &lActivatedChannels);<br />
spcm_dwGetParam_i32 (hDrv, SPC_CHCOUNT, &lChCount);<br />
printf ("Activated channels bitmask is: 0x%08x\n", lActivatedChannels);<br />
printf ("Number of activated channels with this bitmask: %d\n", lChCount);<br />
Assuming that the two channels are available on your card the program will have the following output:<br />
Activated channels bitmask is: 0x00000003<br />
Number of activated channels with this bitmask: 2<br />
Important note on channels selection<br />
As some of the manuals passages are used in more than one hardware manual most of the registers and<br />
channel settings throughout this handbook are described for the maximum number of possible channels that<br />
are available on one card of the actual series. There can be less channels on your actual type of board or<br />
bus-system. Please refer to the table(s) above to get the actual number of available channels.<br />
58 <strong>M3i.41xx</strong> / <strong>M3i.41xx</strong>-<strong>exp</strong> Manual
Analog Inputs Setting up the inputs<br />
Setting up the inputs<br />
This analog acquisition board uses separate input stages and converters on each<br />
channel. This gives you the possibility to set up the desired and concerning your<br />
application best suiting input range also separately for each channel. All input<br />
stage related settings can easily be set by the corresponding input registers. The<br />
table below shows the available input stage registers and possible standard values<br />
for your type of board. As there are also modified versions available with different<br />
input ranges it is recommended to read out the currently available input ranges as<br />
shown later in this chapter.<br />
Input Path<br />
Each input stage consists of different input paths each with different available settings<br />
and features. Please refer to the technical data section to get details on the<br />
differences of the input paths.<br />
Offering different input paths gives the choice to adopt the cards input stage to<br />
the specific application in the best technical way by either using a high frequency<br />
50 ohm path to have full bandwidth and best dynamic performance or by using<br />
a buffered path with all features but limited bandwidth and dynamic performance.<br />
All following settings are related to the selected input path. To read available features like input ranges or termination settings it is first necessary<br />
to set the input path for which the features are to be read.<br />
Register Value Direction Description<br />
SPC_READAIPATHCOUNT 3120 read Returns the number of available analog input paths<br />
SPC_READAIPATH 3121 read/write Selects the input path which is used to read out the features. Please note that this settings does not<br />
change the current path selection.<br />
The following registers show the available input path settings<br />
Register Value Direction Description<br />
SPC_PATH0 30090 read/write Selects the analog input path for channel 0 (default path is path 0)<br />
SPC_PATH1 30190 read/write Selects the analog input path for channel 1 (default path is path 0)<br />
0 Input Path 0: Buffered inputs<br />
1 Input Path 1: HF input with fixed 50 ohm termination<br />
Input ranges<br />
This analog acquisition board has several different input ranges for each channel.<br />
This gives you the possibility to set up the desired and concerning your application<br />
best suiting input range also separately for each channel. The input ranges can<br />
easily be set by the corresponding input registers. The table below shows the available<br />
input registers and possible standard ranges for your type of board. As there<br />
are also modified versions available with different input ranges it is recommended<br />
to read out the currently available input ranges as shown later in this chapter.<br />
Please note that the available ranges need to be read out separately for each input<br />
path. Please set the register SPC_READAIPATH as shown above to select the input path for which the settings should be read. The available<br />
Input rages are read out using the following registers.<br />
Register Value Direction Description<br />
SPC_READAIPATH 3121 read/write Selects the input path which is used to read out the features.<br />
SPC_READIRCOUNT 3000 read Returns the number of available input ranges for the input path selected by SPC_READAIPATH<br />
SPC_READRANGEMIN0 4000 read Reads the lower border of input range 0 in mV<br />
SPC_READRANGEMIN1 4001 read Reads the lower border of input range 1 in mV<br />
... ... ...<br />
SPC_READRANGEMAX0 4100 read Reads the upper border of input range 0 in mV<br />
SPC_READRANGEMAX1 4101 read Reads the upper border of input range 1 in mV<br />
... ... ...<br />
(c) <strong>Spectrum</strong> GmbH 59
Setting up the inputs Analog Inputs<br />
The following example reads out the number of available input ranges and reads and prints the minimum and maximum value of all input<br />
ranges.<br />
spcm_dwGetParan_i32 (hDrv, SPC_READAIPATHCOUNT, &lNumOfPaths);<br />
for (lPath = 0; lPath < lNumOfPaths; lPath++)<br />
{<br />
spcm_dwSetParan_i32 (hDrv, SPC_READAIPATH, lPath)<br />
spcm_dwGetParam_i32 (hDrv, READIRCOUNT, &lNumberOfRanges);<br />
for (i = 0; i < lNumberOfRanges; i++)<br />
{<br />
spcm_dwGetParam_i32 (hDrv, SPC_READRANGEMIN0 + i, &lMinimumInputRage);<br />
spcm_dwGetParam_i32 (hDrv, SPC_READRANGEMAX0 + i, &lMaximumInputRange);<br />
printf („Path %d Range %d: %d mV to %d mV\n“, lPath, i, lMinimumInputRange, lMaximumInputRange);<br />
}<br />
}<br />
The input range is selected individually for each channel. Please note that the correct input path needs to be set<br />
Register Value Direction Description<br />
SPC_AMP0 30010 read/write Defines the input range of channel0.<br />
SPC_AMP1 30110 read/write Defines the input range of channel1.<br />
Standard Input ranges of path 0 (Buffered):<br />
Standard Input ranges of path 1 (HF, 50 ohm terminated):<br />
Read out of input features<br />
200 ± 200 mV calibrated input range for the appropriate channel.<br />
500 ± 500 mV calibrated input range for the appropriate channel.<br />
1000 ± 1 V calibrated input range for the appropriate channel.<br />
2000 ± 2 V calibrated input range for the appropriate channel.<br />
5000 ± 5 V calibrated input range for the appropriate channel.<br />
10000 ± 10 V calibrated input range for the appropriate channel.<br />
500 ± 500 mV calibrated input range for the appropriate channel.<br />
1000 ± 1 V calibrated input range for the appropriate channel.<br />
2500 ± 2.5 V calibrated input range for the appropriate channel.<br />
5000 ± 5 V calibrated input range for the appropriate channel.<br />
Each input path has different features that can be read out to make the software more general. If you only operate one single card type in<br />
your software it is not necessary to read out these features.<br />
Please note that the input features are read out for the currently selected read AI path done by register SPC_READAIPATH:<br />
Register Value Direction Description<br />
SPC_READAIPATH 3121 read/write Selects the input path which is used to read out the features. Please note that this settings does not<br />
change the current path selection.<br />
SPC_READAIFEATURES 3101 read Returns a bit map with the available features of that input path. The possible return values are listed<br />
below.<br />
Please note that the following table shows all input features settings that are available throughout all <strong>Spectrum</strong> acquisition<br />
cards. Some of these features are not installed on your specific hardware. The columns for the input paths show which settings<br />
are available for which input path on a standard card:<br />
Register Value Path 0 Path 1 Description<br />
SPCM_AI_TERM 00000001h x fixed Programmable input termination available<br />
SPCM_AI_SE 00000002h fixed fixed Input is single-ended. If available together with SPC_AI_DIFF: input type is software selectable<br />
SPCM_AI_DIFF 00000004h Input is differential. If available together with SPC_AI_SE: input type is software selectable<br />
SPCM_AI_OFFSPERCENT 00000008h x x Input offset programmable in per cent of input range<br />
SPCM_AI_OFFSMV 00000010h Input offset programmable in mV<br />
SPCM_AI_OVERRANGEDETECT 00000020h Programmable overrange detection available<br />
SPCM_AI_DCCOUPLING 00000040h x x Input is DC coupled. If available together with AC coupling: coupling is software selectable<br />
SPCM_AI_ACCOUPLING 00000080h x x Input is AC coupled. If available together with DC coupling: coupling is software selectable<br />
SPCM_AI_LOWPASS 00000100h x x Input has a selectable low pass filter (bandwidth limit)<br />
SPCM_AI_AUTOCALOFFS 00001000h x x Input offset can be auto calibrated on the card<br />
SPCM_AI_AUTOCALGAIN 00002000h x Input gain can be auto calibrated on the card<br />
SPCM_AI_AUTOCALOFFSNOIN 00004000h Input offset can auto calibrated on the card if inputs are left open<br />
60 <strong>M3i.41xx</strong> / <strong>M3i.41xx</strong>-<strong>exp</strong> Manual
Analog Inputs Setting up the inputs<br />
Register Value Path 0 Path 1 Description<br />
SPCM_AI_INDIVPULSEWIDTH 00010000h Trigger pulsewidth is individually per channel programmable<br />
The following example shows a setup of path and input range of a two channel card.<br />
Please note that this is a general example and the number of input channels may not match your card channels.<br />
spcm_dwSetParam_i32 (hDrv, SPC_PATH0 , 0); // Set up channel0 to input path 0 (buffered)<br />
spcm_dwSetParam_i32 (hDrv, SPC_AMP0 , 1000); // Set up channel0 to the range of ± 1.0 V<br />
spcm_dwSetParam_i32 (hDrv, SPC_PATH1 , 1); // Set up channel1 to input path 1 (HF, 50 ohm terminated)<br />
spcm_dwSetParam_i32 (hDrv, SPC_AMP1 , 500); // Set up channel1 to the range of ± 0.5 V<br />
Input termination<br />
The <strong>Spectrum</strong> analog acquisition cards of the M3i series offer an input path with<br />
fixed 50 ohm termination (HF path, 50 ohm path) as well as a second input path<br />
with all features to be programmed by the user (buffered path). If the HF path with<br />
fixed 50 ohm termination is activated this register will have no functionality.<br />
The buffered input path can be terminated separately with 50 Ohm by software<br />
programming. If you do so, please make sure that your signal source is able to<br />
deliver the higher output currents. If no termination is used, the inputs have an impedance<br />
of 1 Megaohm. The following table shows the corresponding register to<br />
set the input termination.<br />
Register Value Direction Description<br />
SPC_50OHM0 30030 read/write A „1“ sets the 50 ohm termination for channel0. A „0“ sets the termination to1 MOhm.<br />
SPC_50OHM1 30130 read/write A „1“ sets the 50 ohm termination for channel1. A „0“ sets the termination to1 MOhm.<br />
Input coupling<br />
All inputs can be set separately switched to AC or DC coupling. Please refer to<br />
the technical data section to see the signal frequency range that is available for<br />
the different settings.<br />
Using the AC coupling will eliminate all DC and low frequency parts of the input<br />
signal and allows best quality measurings in the frequency domain even if the DC<br />
level of the signal varies over the time.<br />
The following table shows the corresponding register to set the input coupling.<br />
Register Value Direction Description<br />
SPC_ACDC0 30020 read/write A „1“ sets the AC coupling for channel0. A „0“ sets the DC coupling (default is DC)<br />
SPC_ACDC1 30120 read/write A „1“ sets the AC coupling for channel1. A „0“ sets the DC coupling (default is DC)<br />
Anti aliasing filter (Bandwidth limit)<br />
All inputs have a separate selectable anti aliasing filter (bandwidth limit) that will<br />
cut of any aliasing effectes and that will reduce signal noise.<br />
Please note that this bandwidth limit filter will also cut of any distortion or high<br />
frequency spurious signals parts that are within the frequency spectrum of the<br />
input.<br />
Please refer to the technical data section to see the cut off frequency and the type<br />
of filter used. The following table shows the corresponding register to activate<br />
the bandwidth limit.<br />
Register Value Direction Description<br />
SPC_FILTER0 30080 read/write A „1“ selects the bandwidth limit for channel 0. A „0“ set the channel to full bandwidth (default is full)<br />
SPC_FILTER1 30180 read/write A „1“ selects the bandwidth limit for channel 1. A „0“ set the channel to full bandwidth (default is full<br />
(c) <strong>Spectrum</strong> GmbH 61
Setting up the inputs Analog Inputs<br />
Enhanced Status Register<br />
The enhanced status register shows detected channel overrange events during the last acquisition. It can only be read out after the acquisition<br />
has stopped. If the input signal on the channel exceeds the programmed input range even for just one time the overrange register is set in<br />
hardware.<br />
Register Value Direction Description<br />
SPC_ENHANCEDSTATUS 20900 read Reads out the enhanced status information of the card.<br />
SPC_ENHSTAT_OVERRANGE0 00000001h Bit is set if an overrange event has occurred on channel 0.<br />
SPC_ENHSTAT_OVERRANGE1 00000002h Bit is set if an overrange event has occurred on channel 1.<br />
Automatic on-board calibration of the offset and gain settings<br />
All of the channels are calibrated in factory before the board is shipped. These settings are stored in the on-board EEProm under the default<br />
settings.<br />
To start the automatic offset and gain adjustment, simply write the register, mentioned in the following table. The adjustment of all the channels<br />
in all different input ranges can take up some time.<br />
When starting an automatic offset and gain adjustment the card internally disconnects all signals from the<br />
inputs, so that all connected analog sources can be plugged. The calibration can take up some time. All the<br />
internal settings of the driver are changed, while the automatic offset compensation is in progress.<br />
Register Value Direction Description<br />
SPC_ADJ_AUTOADJ 50020 write Performs the automatic offset and gain compensation in the driver for all input ranges.<br />
ADJ_ALL 0 Automatic offset adjustment for all input ranges.<br />
As all settings are temporarily stored in the driver, the automatically adjustment will only affect these values. After exiting your program, all<br />
calibration information will be lost. To give you a possibility to save your own settings, every <strong>Spectrum</strong> card has a set of settings that can be<br />
saved within the on-board EEPROM.<br />
You can easily either save adjustment settings to the EEPROM with SPC_ADJ_SAVE or recall them with SPC_ADJ_LOAD. These two registers<br />
are shown in the table below. The values for these EEPROM access registers are the sets that can be stored within the EEPROM. The table<br />
below shows the EEPROM set, that is available for your board.<br />
Register Value Direction Description<br />
SPC_ADJ_LOAD 50000 write Loads the specified set of settings from the EEPROM. The default settings are automatically loaded,<br />
when the driver is started.<br />
read Reads out, what kind of settings have been loaded last.<br />
SPC_ADJ_SAVE 50010 write Stores the actual settings to the specified set in the EEPROM.<br />
read Reads out, what kind of settings have been saved last.<br />
ADJ_DEFAULT 0 Default settings, no user settings available<br />
If you want to make an offset and gain adjustment on all the channels and store the data to the ADJ_DEFAULT set of the EEPROM you can<br />
do this the way, the following example shows.<br />
spcm_dwSetParam_i32 (hDrv, SPC_ADJ_AUTOADJ, ADJ_ALL ); // Activate offset/gain adjustment on all channels<br />
spcm_dwSetParam_i32 (hDrv, SPC_ADJ_SAVE , ADJ_DEFAULT); // and store values to DEFAULT set in the EEPROM<br />
62 <strong>M3i.41xx</strong> / <strong>M3i.41xx</strong>-<strong>exp</strong> Manual
Acquisition modes Overview<br />
Acquisition modes<br />
Your card is able to run in different modes. Depending on the selected mode there are different registers that each define an aspect of this<br />
mode. The single modes are <strong>exp</strong>lained in this chapter. Any further modes that are only available if an option is installed on the card is documented<br />
in a later chapter.<br />
Overview<br />
This chapter gives you a general overview on the related registers for the different modes. The use of these registers throughout the different<br />
modes is described in the following chapters.<br />
Setup of the mode<br />
The mode register is organized as a bitmap. Each mode corresponds to one bit of this bitmap. If defining the mode to use please be sure just<br />
to set one of the bits. All other settings will return an error code.<br />
The main difference between all standard and all FIFO modes is that the standard modes are limited to on-board memory and therefore can<br />
run with full sampling rate. The FIFO modes are designed to transfer data continuously over the bus to PC memory or to hard disk and can<br />
therefore run much longer. The FIFO modes are limited by the maximum bus transfer speed the PC can use. The FIFO mode uses the complete<br />
installed on-board memory as a FIFO buffer.<br />
However as you’ll see throughout the detailed documentation of the modes the standard and the FIFO mode are similar in programming and<br />
behaviour and there are only a very few differences between them.<br />
Register Value Direction Description<br />
SPC_CARDMODE 9500 read/write Defines the used operating mode, a read command will return the currently used mode.<br />
SPC_AVAILCARDMODES 9501 read Returns a bitmap with all available modes on your card. The modes are listed below.<br />
Acquisition modes<br />
Mode Value Available<br />
for series<br />
Description<br />
SPC_REC_STD_SINGLE 1h M2i/M3i Data acquisition to on-board memory for one single trigger event.<br />
SPC_REC_STD_MULTI 2h M2i/M3i Data acquisition to on-board memory for multiple trigger events. Each recorded segment has the same size. Only<br />
available if option Multiple Recording is installed. this mode is described in greater detail in a special chapter about<br />
the Multiple Recording option.<br />
SPC_REC_STD_ABA 8h M2i/M3i Data acquisition to on-board memory for multiple trigger events. While the multiple trigger events are stored with programmed<br />
sampling rate the inputs are sampled continuously with a slower sampling speed. This mode is only available<br />
if the ABA mode option is installed. The mode is described in a special chapter about ABA mode option.<br />
SPC_REC_FIFO_SINGLE 10h M2i/M3i Continuous data acquisition for one single trigger event. The on-board memory is used completely as FIFO buffer.<br />
SPC_REC_FIFO_MULTI 20h M2i/M3i Continuous data acquisition for multiple trigger events. Only available if Multiple Recording option is installed.<br />
SPC_REC_FIFO_ABA 80h M2i/M3i Continuous data acquisition for multiple trigger events together with continuous data acquisition with a slower sampling<br />
clock. Only available if ABA mode option is installed<br />
Commands<br />
The data acquisition/data replay is controlled by the command register. The command register controls the state of the card in general and<br />
also the state of the different data transfers. Data transfers are <strong>exp</strong>lained in an extra chapter later on.<br />
The commands are splitted into two types of commands: execution commands that fulfil a job and wait commands that will wait for the occurrence<br />
of an interrupt. Again the commands register is organized as a bitmap allowing you to set several commands together with one<br />
call. As not all of the command combinations make sense (like the combination of reset and start at the same time) the driver will check the<br />
given command and return an error code ERR_SEQUENCE if the given commands is not allowed in the current state.<br />
Register Value Direction Description<br />
SPC_M2CMD 100 write only Executes a command for the card or data transfer.<br />
(c) <strong>Spectrum</strong> GmbH 63
Commands Acquisition modes<br />
Card execution commands<br />
M2CMD_CARD_RESET 1h Performs a hard and software reset of the card as <strong>exp</strong>lained further above.<br />
M2CMD_CARD_WRITESETUP 2h Writes the current setup to the card without starting the hardware. This command may be useful if changing some<br />
internal settings like clock frequency and enabling outputs.<br />
M2CMD_CARD_START 4h Starts the card with all selected settings. This command automatically writes all settings to the card if any of the settings<br />
has been changed since the last one was written. After card has been started none of the settings can be<br />
changed while the card is running.<br />
M2CMD_CARD_ENABLETRIGGER 8h The trigger detection is enabled. This command can be either send together with the start command to enable trigger<br />
immediately or in a second call after some external hardware has been started.<br />
M2CMD_CARD_FORCETRIGGER 10h This command forces a trigger even if none has been detected so far. Sending this command together with the start<br />
command is similar to using the software trigger.<br />
M2CMD_CARD_DISABLETRIGGER 20h The trigger detection is disabled. All further trigger events are ignored until the trigger detection is again enabled.<br />
When starting the card the trigger detection is started disabled.<br />
M2CMD_CARD_STOP 40h Stops the current run of the card. If the card is not running this command has no effect.<br />
Card wait commands<br />
These commands do not return until either the defined state has been reached what is signalled by an interrupt from the card or the timeout<br />
counter has <strong>exp</strong>ired. If the state has been reached the command returns with an ERR_OK. If a timeout occurs the command returns with<br />
ERR_TIMEOUT. If the card has been stopped from a second thread with a stop or reset command, the wait function returns with ERR_ABORT.<br />
M2CMD_CARD_WAITPREFULL 1000h Acquisition modes only: the command waits until the pretrigger area has once been filled with data. After pretrigger<br />
area has been filled the internal trigger engine starts to look for trigger events if the trigger detection has been<br />
enabled.<br />
M2CMD_CARD_WAITTRIGGER 2000h Waits until the first trigger event has been detected by the card. If using a mode with multiple trigger events like Multiple<br />
Recording or Gated Sampling there only the first trigger detection will generate an interrupt for this wait command.<br />
M2CMD_CARD_WAITREADY 4000h Waits until the card has completed the current run. In an acquisition mode receiving this command means that all<br />
data has been acquired. In a generation mode receiving this command means that the output has stopped.<br />
Wait command timeout<br />
If the state for which one of the wait commands is waiting isn’t reached any of the wait commands will either wait forever if no timeout is<br />
defined or it will return automatically with an ERR_TIMEOUT if the specified timeout has <strong>exp</strong>ired.<br />
Register Value Direction Description<br />
SPC_TIMEOUT 295130 read/write Defines the timeout for any following wait command in a milli second resolution. Writing a zero to<br />
this register disables the timeout.<br />
As a default the timeout is disabled. After defining a timeout this is valid for all following wait commands until the timeout is again disabled<br />
by writing a zero to this register.<br />
A timeout occurring should not be considered as an error. It did not change anything on the board status. The board is still running and will<br />
complete normally. You may use the timeout to abort the run after a certain time if no trigger has occurred. In that case a stop command is<br />
necessary after receiving the timeout. It is also possible to use the timeout to update the user interface frequently and simply call the wait<br />
function afterwards again.<br />
Example for card control:<br />
// card is started and trigger detection is enabled immediately<br />
spcm_dwSetParam_i32 (hDrv, SPC_M2CMD, M2CMD_CARD_START | M2CMD_CARD_ENABLETRIGGER);<br />
// we wait a maximum of 1 second for a trigger detection. In case of timeout we force the trigger<br />
spcm_dwSetParam_i32 (hDrv, SPC_TIMEOUT, 1000);<br />
if (spcm_dwSetParam_i32 (hDrv, SPC_M2CMD, M2CMD_CARD_WAITTRIGGER) == ERR_TIMEOUT)<br />
{<br />
printf (“No trigger detected so far, we force a trigger now!\n”);<br />
spcm_dwSetParam (hdrv, SPC_M2CMD, M2CMD_CARD_FORCETRIGGER);<br />
}<br />
// we disable the timeout and wait for the end of the run<br />
spcm_dwSetParam_i32 (hDrv, SPC_TIMEOUT, 0);<br />
spcm_dwSetParam_i32 (hDrv, SPC_M2CMD, M2CMD_CARD_WAITREADY);<br />
printf (“Card has stopped now!\n”);<br />
Card Status<br />
In addition to the wait for an interrupt mechanism or completely instead of it one may also read out the current card status by reading the<br />
SPC_M2STATUS register. The status register is organized as a bitmap showing the status of the card and also of the different data transfers.<br />
Register Value Direction Description<br />
SPC_M2STATUS 110 read only Reads out the current status information<br />
M2STAT_CARD_PRETRIGGER 1h Acquisition modes only: the pretrigger area has been filled.<br />
M2STAT_CARD_TRIGGER 2h The first trigger has been detected.<br />
M2STAT_CARD_READY 4h The card has finished it’s run and is ready.<br />
64 <strong>M3i.41xx</strong> / <strong>M3i.41xx</strong>-<strong>exp</strong> Manual
Acquisition modes Commands<br />
Acquisition cards status overview<br />
The following drawing gives you an overview of the card commands and card status information. After start of card with<br />
M2CMD_CARD_START the card is acquiring pretrigger data until one time complete pretrigger data has been acquired. Then the status<br />
M2STAT_CARD_PRETRIGGER is set. Either the trigger has been enabled together with the start command or the card now waits for trigger<br />
enable command M2CMD_CARD_ENABLETRIGGER. After receiving this command the trigger engine is enabled and card checks for a trigger<br />
event. As soon as the trigger event is received the status changes to M2STAT_CARD_TRIGGER and the card acquires the programmed<br />
posttrigger data. After all post trigger data has been acquired the status changes to M2STAT_CARD_READY and data can be read out:<br />
Generation card status overview<br />
This drawing gives an overview of the card commands and status information for a simple generation mode. After start of card with the<br />
M2CMD_CARD_START the card is armed and waiting. Either the trigger has been enabled together with the start command or the card now<br />
waits for trigger enable command M2CMD_CARD_ENABLETRIGGER. After receiving this command the trigger engine is enabled and card<br />
checks for a trigger event. As soon as the trigger event is received the status changes to M2STAT_CARD_TRIGGER and the card starts with<br />
the data replay. After replay has been finished - depending on the programmed mode - the status changes to M2STAT_CARD_READY and<br />
the card stops.<br />
Data Transfer<br />
Data transfer consists of two parts: the buffer definition and the commands/status information that controls the transfer itself. Data transfer<br />
shares the command and status register with the card control commands and status information. In general the following details on the data<br />
transfer are valid for any data transfer in any direction:<br />
• The memory size register (SPC_MEMSIZE) must be programmed before starting the data transfer.<br />
• Before starting a data transfer the buffer must be defined using the spcm_dwDefTransfer function.<br />
• Each defined buffer is only used once. After transfer has ended the buffer is automatically invalidated.<br />
• If a buffer has to be deleted although the data transfer is in progress or the buffer has at least been defined it is necessary to call the<br />
spcm_vInvalidateBuf function.<br />
Definition of the transfer buffer<br />
Before any data transfer can start it is necessary to define the transfer buffer with all it’s details. The definition of the buffer is done with the<br />
spcm_dwDefTransfer function as <strong>exp</strong>lained in an earlier chapter.<br />
uint32 _stdcall spcm_dwDefTransfer_i64 (// Defines the transfer buffer by using 64 bit unsigned integer values<br />
drv_handle hDevice, // handle to an already opened device<br />
uint32 dwBufType, // type of the buffer to define as listed below under SPCM_BUF_XXXX<br />
uint32 dwDirection, // the transfer direction as defined below<br />
uint32 dwNotifySize, // number of bytes after which an event is sent (0=end of transfer)<br />
void* pvDataBuffer, // pointer to the data buffer<br />
uint64 qwBrdOffs, // offset for transfer in board memory<br />
uint64 qwTransferLen); // buffer length<br />
(c) <strong>Spectrum</strong> GmbH 65
Commands Acquisition modes<br />
This function is used to define buffers for standard sample data transfer as well as for extra data transfer for additional ABA or timestamp<br />
information. Therefore the dwBufType parameter can be one of the following:<br />
SPCM_BUF_DATA 1000 Buffer is used for transfer of standard sample data<br />
SPCM_BUF_ABA 2000 Buffer is used to read out slow ABA data. Details on this mode are described in the chapter about the ABA mode<br />
option<br />
SPCM_BUF_TIMESTAMP 3000 Buffer is used to read out timestamp information. Details on this mode are described in the chapter about the<br />
timestamp option.<br />
The dwDirection parameter defines the direction of the following data transfer:<br />
SPCM_DIR_PCTOCARD 0 Transfer is done from PC memory to on-board memory of card<br />
SPCM_DIR_CARDTOPC 1 Transfer is done from card on-board memory to PC memory.<br />
The direction information used here must match the currently used mode. While an acquisition mode is used<br />
there’s no transfer from PC to card allowed and vice versa. It is possible to use a special memory test mode<br />
to come beyond this limit. Set the SPC_MEMTEST register as defined further below.<br />
The dwNotifySize parameter defines the amount of bytes after which an interrupt should be generated. If leaving this parameter zero, the<br />
transfer will run until all data is transferred and then generate an interrupt. Filling in notify size > zero will allow you to use the amount of<br />
data that has been transferred so far. The notify size is used on FIFO mode to implement a buffer handshake with the driver or when transferring<br />
large amount of data where it may be of interest to start data processing while data transfer is still running. Please see the chapter on<br />
handling positions further below for details.<br />
The Notify size sticks to the page size which is defined by the PC hardware and the operating system. Therefore<br />
the notify size must be a multiple of 4 kByte. For data transfer it may also be a fraction of 4k in the<br />
range of 16, 32, 64, 128, 256, 512, 1k or 2k. No other values are allowed. For ABA and timestamp the notify<br />
size can be 2k as a minimum. If you need to work with ABA or timestamp data in smaller chunks please use the<br />
polling mode as described later.<br />
The pvDataBuffer must point to an allocated data buffer for the transfer. Please be sure to have at least the amount of memory allocated that<br />
you program to be transferred. If the transfer is going from card to PC this data is overwritten with the current content of the card on-board<br />
memory.<br />
When not doing FIFO mode one can also use the qwBrdOffs parameter. This parameter defines the starting position for the data transfer as<br />
byte value in relation to the beginning of the card memory. Using this parameter allows it to split up data transfer in smaller chunks if one<br />
has acquired a very large on-board memory.<br />
The qwTransferLen parameter defines the number of bytes that has to be transferred with this buffer. Please be sure that the allocated memory<br />
has at least the size that is defined in this parameter. In standard mode this parameter cannot be larger than the amount of data defined with<br />
memory size.<br />
Memory test mode<br />
In some cases it might be of interest to transfer data in the opposite direction. Therefore a special memory test mode is available which allows<br />
random read and write access of the complete on-board memory. While memory test mode is activated no normal card commands are processed:<br />
Register Value Direction Description<br />
SPC_MEMTEST 200700 read/write Writing a 1 activates the memory test mode, no commands are then processed.<br />
Writing a 0 deactivates the memory test mode again.<br />
Invalidation of the transfer buffer<br />
The command can be used to invalidate an already defined buffer if the buffer is about to be deleted by user. This function is automatically<br />
called if a new buffer is defined or if the transfer of a buffer has completed<br />
uint32 _stdcall spcm_dwInvalidateBuf ( // invalidate the transfer buffer<br />
drv_handle hDevice, // handle to an already opened device<br />
uint32 dwBufType); // type of the buffer to invalidate as listed above under SPCM_BUF_XXXX<br />
The dwBufType parameter need to be the same parameter for which the buffer has been defined:<br />
SPCM_BUF_DATA 1000 Buffer is used for transfer of standard sample data<br />
SPCM_BUF_ABA 2000 Buffer is used to read out slow ABA data. Details on this mode are described in the chapter about the ABA mode<br />
option. The ABA mode is only available on analog acquisition cards.<br />
SPCM_BUF_TIMESTAMP 3000 Buffer is used to read out timestamp information. Details on this mode are described in the chapter about the timestamp<br />
option. The timestamp mode is only available on analog or digital acquisition cards.<br />
66 <strong>M3i.41xx</strong> / <strong>M3i.41xx</strong>-<strong>exp</strong> Manual
Acquisition modes Standard Single acquisition mode<br />
Commands and Status information for data transfer buffers.<br />
As <strong>exp</strong>lained above the data transfer is performed with the same command and status registers like the card control. It is possible to send<br />
commands for card control and data transfer at the same time as shown in the examples further below.<br />
Register Value Direction Description<br />
SPC_M2CMD 100 write only Executes a command for the card or data transfer<br />
M2CMD_DATA_STARTDMA 10000h Starts the DMA transfer for an already defined buffer. In acquisition mode it may be that the card hasn’t received a<br />
trigger yet, in that case the transfer start is delayed until the card receives the trigger event<br />
M2CMD_DATA_WAITDMA 20000h Waits until the data transfer has ended or until at least the amount of bytes defined by notify size are available. This<br />
wait function also takes the timeout parameter described above into account.<br />
M2CMD_DATA_STOPDMA 40000h Stops a running DMA transfer. Data is invalid afterwards.<br />
The data transfer can generate one of the following status information:<br />
Register Value Direction Description<br />
SPC_M2STATUS 110 read only Reads out the current status information<br />
M2STAT_DATA_BLOCKREADY 100h The next data block as defined in the notify size is available. It is at least the amount of data available but it also can<br />
be more data.<br />
M2STAT_DATA_END 200h The data transfer has completed. This status information will only occur if the notify size is set to zero.<br />
M2STAT_DATA_OVERRUN 400h The data transfer had on overrun (acquisition) or underrun (replay) while doing FIFO transfer.<br />
M2STAT_DATA_ERROR 800h An internal error occurred while doing data transfer.<br />
Example of data transfer<br />
void* pvData = (void*) new int8[1024];<br />
// transfer data from PC memory to card memory<br />
spcm_dwDefTransfer_i64 (hDrv, SPCM_BUF_DATA, SPCM_DIR_PCTOCARD , 0, pvData, 0, 1024);<br />
spcm_dwSetParam_i32 (hDrv, SPC_M2CMD, M2CMD_DATA_STARTDMA | M2CMD_DATA_WAITDMA);<br />
// transfer the same data back to PC memory<br />
spcm_dwDefTransfer_i64 (hDrv, SPCM_BUF_DATA, SPCM_DIR_CARDTOPC , 0, pvData, 0, 1024);<br />
spcm_dwSetParam_i32 (hDrv, SPC_M2CMD, M2CMD_DATA_STARTDMA | M2CMD_DATA_WAITDMA);<br />
To keep the example simple it does no error checking. Please be sure to check for errors if using these command in real world programs!<br />
Standard Single acquisition mode<br />
The standard single mode is the easiest and mostly used mode to acquire analog data with a <strong>Spectrum</strong> acquisition card. In standard single<br />
recording mode the card is working totally independent from the PC, after the card setup is done. The advantage of the <strong>Spectrum</strong> boards is<br />
that regardless to the system usage the card will sample with equidistant time intervals.<br />
The sampled and converted data is stored in the on-board memory and is held there for being read out after the acquisition. This mode allows<br />
sampling at very high conversion rates without the need to transfer the data into the memory of the host system at high speed.<br />
After the recording is done, the data can be read out by the user and is transferred via the bus into PC memory.<br />
This standard recording mode is the most common mode for all analog<br />
and digital acquisition and oscilloscope boards. The data is<br />
written to a programmed amount of the on-board memory (memsize).<br />
That part of memory is used as a ring buffer, and recording<br />
is done continuously until a trigger event is detected. After the trigger<br />
event, a certain programmable amount of data is recorded<br />
(post trigger) and then the recording finishes. Due to the continuous<br />
ring buffer recording, there are also samples prior to the triggerevent<br />
in the memory (pretrigger).<br />
When the card is started the pre trigger area is filled up with data first. While doing this the board’s trigger<br />
detection is not armed. If you use a huge pre trigger size and a slow sample rate it can take up some time<br />
after starting the board before a trigger event will be detected.<br />
Card mode<br />
The card mode has to be set to the correct mode SPC_REC_STD_SINGLE.<br />
Register Value Direction Description<br />
SPC_CARDMODE 9500 read/write Defines the used operating mode, a read command will return the currently used mode.<br />
SPC_REC_STD_SINGLE 1h Data acquisition to on-board memory for one single trigger event.<br />
(c) <strong>Spectrum</strong> GmbH 67
FIFO Single acquisition mode Acquisition modes<br />
Memory, Pre- and Posttrigger<br />
At first you have to define, how many samples are to be recorded at all and how many of them should be acquired after the triggerevent has<br />
been detected.<br />
Register Value Direction Description<br />
SPC_MEMSIZE 10000 read/write Sets the memory size in samples per channel.<br />
SPC_POSTTRIGGER 10100 read/write Sets the number of samples to be recorded after the trigger event has been detected.<br />
You can access these settings by the registers SPC_MEMSIZE, which sets the total amount of data that is recorded, and the register<br />
SPC_POSTTRIGGER, that defines the number of samples to be recorded after the triggerevent has been detected. The size of the pretrigger<br />
results on the simple formula:<br />
pretrigger = memsize - posttrigger<br />
The maximum memsize that can be use for recording is of course limited by the installed amount of memory and by the number of channels<br />
to be recorded. Please have a look at the topic "Limits of pre, post memsize, loops" later in this chapter.<br />
Example<br />
The following example shows a simple standard single mode data acquisition setup with the read out of data afterwards. To keep this example<br />
simple there is no error checking implemented.<br />
int32 lMemsize = 16384; // recording length is set to 16 kSamples<br />
spcm_dwSetParam_i32 (hDrv, SPC_CHENABLE, CHANNEL0); // only one channel activated<br />
spcm_dwSetParam_i32 (hDrv, SPC_CARDMODE, SPC_REC_STD_SINGLE); // set the standard single recording mode<br />
spcm_dwSetParam_i32 (hDrv, SPC_MEMSIZE, lMemsize); // recording length<br />
spcm_dwSetParam_i32 (hDrv, SPC_POSTTRIGGER, 8192); // samples to acquire after trigger = 8k<br />
// now we start the acquisition and wait for the interrupt that signalizes the end<br />
spcm_dwSetParam_i32 (hDrv, SPC_M2CMD, M2CMD_CARD_START | M2CMD_CARD_ENABLETRIGGER | M2CMD_CARD_WAITREADY);<br />
void* pvData = new int16[lMemsize];<br />
// read out the data<br />
spcm_dwDefTransfer_i64 (hDrv, SPCM_BUF_DATA, SPCM_DIR_CARDTOPC , 0, pvData, 0, 2 * lMemsize);<br />
spcm_dwSetParam_i32 (hDrv, SPC_M2CMD, M2CMD_DATA_STARTDMA | M2CMD_DATA_WAITDMA);<br />
FIFO Single acquisition mode<br />
The FIFO single mode does a continuous data acquisition using the on-board memory as a FIFO buffer and transferring data continuously to<br />
PC memory. One can make on-line calculations with the acquired data, store the data continuously to disk for later use or even have a data<br />
logger functionality with on-line data display.<br />
Card mode<br />
The card mode has to be set to the correct mode SPC_REC_FIFO_SINGLE.<br />
Register Value Direction Description<br />
SPC_CARDMODE 9500 read/write Defines the used operating mode, a read command will return the currently used mode.<br />
SPC_REC_FIFO_SINGLE 10h Continuous data acquisition to PC memory. Complete on-board memory is used as FIFO buffer.<br />
Length and Pretrigger<br />
Even in FIFO mode it is possible to program a pretrigger area. In general FIFO mode can run forever until it is stopped by an <strong>exp</strong>licit user<br />
command or one can program the total length of the transfer by two counters Loop and Segment size<br />
Register Value Direction Description<br />
SPC_PRETRIGGER 10030 read/write Programs the number of samples to be acquired before the trigger event detection<br />
SPC_SEGMENTSIZE 10010 read/write Length of segments to acquire.<br />
SPC_LOOPS 10020 read/write Number of segments to acquire in total. If set to zero the FIFO mode will run continuously until it is<br />
stopped by the user.<br />
The total amount of samples per channel that is acquired can be calculated by [SPC_LOOPS * SPC_SEGMENTSIZE]. Please stick to the below<br />
mentioned limitations of the registers.<br />
Difference to standard single acquisition mode<br />
The standard modes and the FIFO modes differ not very much from the programming side. In fact one can even use the FIFO mode to get the<br />
same behaviour like the standard mode. The buffer handling that is shown in the next chapter is the same for both modes.<br />
68 <strong>M3i.41xx</strong> / <strong>M3i.41xx</strong>-<strong>exp</strong> Manual
Acquisition modes FIFO Single acquisition mode<br />
Pretrigger<br />
When doing standard single acquisition memory is used as a circular buffer and the pre trigger can be up to the [installed memory] - [minimum<br />
post trigger]. Compared to this the pre trigger in FIFO mode is limited by a special pre trigger FIFO and can only be much less.<br />
Length of acquisition.<br />
In standard mode the acquisition length is defined before the start and is limited to the installed on-board memory whilst in FIFO mode the<br />
acquisition length can either be defined or it can run continuously until user stops it.<br />
Example FIFO acquisition<br />
The following example shows a simple FIFO single mode data acquisition setup with the read out of data afterwards. To keep this example<br />
simple there is no error checking implemented.<br />
spcm_dwSetParam_i32 (hDrv, SPC_CHENABLE, CHANNEL0); // only one channel activated<br />
spcm_dwSetParam_i32 (hDrv, SPC_CARDMODE, SPC_REC_FIFO_SINGLE); // set the FIFO single recording mode<br />
spcm_dwSetParam_i32 (hDrv, SPC_PRETRIGGER, 1024); // 1 kSample of data before trigger<br />
// in FIFO mode we need to define the buffer before starting the transfer<br />
int16* pnData = new int16[lBufsizeInSamples];<br />
spcm_dwDefTransfer_i64 (hDrv, SPCM_BUF_DATA, SPCM_DIR_CARDTOPC, 4096, (void*) pnData, 0, 2 * lBufsizeInSamples);<br />
// now we start the acquisition and wait for the first block<br />
dwError = spcm_dwSetParam_i32 (hDrv, SPC_M2CMD, M2CMD_CARD_START | M2CMD_CARD_ENABLETRIGGER);<br />
dwError = spcm_dwSetParam_i32 (hDrv, SPC_M2CMD, M2CMD_DATA_STARTDMA | M2CMD_DATA_WAITDMA);<br />
// we acquire data in a loop. As we defined a notify size of 4k we’ll get the data in >=4k chuncks<br />
llTotalBytes = 0;<br />
while (!dwError)<br />
{<br />
// read out the available bytes<br />
spcm_dwGetParam_i64 (hDrv, SPC_DATA_AVAIL_USER_LEN, &llAvailBytes);<br />
llTotalBytes += llAvailBytes;<br />
// here is the right position to do something with the data (printf is limited to 32 bit variables)<br />
printf ("Currently Available: %d, total: %d\n", (int32) llAvailBytes, (int32) llTotalBytes);<br />
// now we free the number of bytes and wait for the next buffer<br />
spcm_dwSetParam_i64 (hDrv, SPC_DATA_AVAIL_CARD_LEN, llAvailBytes);<br />
dwError = spcm_dwSetParam_i32 (hDrv, SPC_M2CMD, M2CMD_DATA_WAITDMA);<br />
}<br />
Limits of pre trigger, post trigger, memory size<br />
The maximum memory size parameter is only limited by the number of activated channels and by the amount of installed memory. Please<br />
keep in mind that each samples needs 2 bytes of memory to be stored. Minimum memory size as well as minimum and maximum post trigger<br />
limits are independent of the activated channels or the installed memory.<br />
Due to the internal organization of the card memory there is a certain stepsize when setting these values that has to be taken into account.<br />
The following table gives you an overview of all limits concerning pre trigger, post trigger, memory size, segment size and loops. The table<br />
shows all values in relation to the installed memory size in samples. If more memory is installed the maximum memory size figures will increase<br />
according to the complete installed memory<br />
Activated Used Memory size Pre trigger Post trigger Segment size Loops<br />
Channels Mode SPC_MEMSIZE SPC_PRETRIGGER SPC_POSTTRIGGER SPC_SEGMENTSIZE SPC_LOOPS<br />
Min Max Step Min Max Step Min Max Step Min Max Step Min Max Step<br />
1 channel Standard Single 16 Mem 8 defined by post trigger 8 8G - 8 8 not used not used<br />
Standard Multi/ABA 16 Mem 8 8 8k 8 8 Mem/2 8 16 Mem/2 8 not used<br />
FIFO Single not used 8 8k 8 not used 16 8G - 8 8 0 (∞) 4G - 1 1<br />
FIFO Multi/ABA not used 8 8k 8 8 8G - 8 8 16 Mem/2 8 0 (∞) 4G - 1 1<br />
2 channels Standard Single 16 Mem/2 8 defined by post trigger 8 8G - 8 8 not used not used<br />
Standard Multi/ABA 16 Mem/2 8 8 4k 8 8 Mem/4 8 16 Mem/4 8 not used<br />
FIFO Single not used 8 4k 8 not used 16 8G - 8 8 0 (∞) 4G - 1 1<br />
FIFO Multi/ABA not used 8 4k 8 8 8G - 8 8 16 Mem/4 8 0 (∞) 4G - 1 1<br />
All figures listed here are given in samples. An entry of [32G - 8] means [32 GSamples - 8 ] = 34,359,738,360 samples.<br />
The given memory and memory / divider figures depend on the installed on-board memory as listed below:<br />
128 MSample 256 MSample<br />
Installed Memory<br />
512 MSample 1 GSample 2 GSample<br />
Mem 128 MSample 256 MSample 512 MSample 1 GSample 2 GSample<br />
Mem / 2 64 MSample 128 MSample 256 MSample 512 MSample 1 GSample<br />
Mem / 4 32 MSample 64 MSample 128 MSample 256 MSample 512 MSample<br />
Please keep in mind that this table shows all values at once. Only the absolute maximum and minimum values are shown. There might be<br />
additional limitations. Which of these values is programmed depends on the used mode. Please read the detailed documentation of the mode.<br />
(c) <strong>Spectrum</strong> GmbH 69
Buffer handling Acquisition modes<br />
Buffer handling<br />
To handle the huge amount of data that can possibly be acquired with the M2i/M3i series cards, there is a very reliable two step buffer<br />
strategy set up. The on-board memory of the card can be completely used as a real FIFO buffer. In addition a part of the PC memory can be<br />
used as an additional software buffer. Transfer between hardware FIFO and software buffer is performed interrupt driven and automatically<br />
by the driver to get best performance. The following drawing will give you an overview of the structure of the data transfer handling:<br />
A data buffer handshake is implemented in the driver which allows to run the card in different data transfer modes. The software transfer<br />
buffer is handled as one large buffer which is on the one side controlled by the driver and filled automatically by busmaster DMA from/to<br />
the hardware FIFO buffer and on the other hand it is handled by the user who set’s parts of this software buffer available for the driver for<br />
further transfer. The handshake is fulfilled with the following 3 software registers:<br />
Register Value Direction Description<br />
SPC_DATA_AVAIL_USER_LEN 200 read Returns the number of currently to the user available bytes inside a sample data transfer.<br />
SPC_DATA_AVAIL_USER_POS 201 read Returns the position as byte index where the currently available data samples start.<br />
SPC_DATA_AVAIL_CARD_LEN 202 write Writes the number of bytes that the card can now use for sample data transfer again<br />
Internally the card handles two counters, a user counter and a card counter. Depending on the transfer direction the software registers have<br />
slightly different meanings:<br />
Transfer direction Register Direction Description<br />
Write to card SPC_DATA_AVAIL_USER_LEN read This register contains the currently available number of bytes that are free to write new data to the<br />
card. The user can now fill this amount of bytes with new data to be transferred.<br />
SPC_DATA_AVAIL_CARD_LEN write After filling an amount of the buffer with new data to transfer to card, the user tells the driver with this<br />
register that the amount of data is now ready to transfer.<br />
Read from card SPC_DATA_AVAIL_USER_LEN read This register contains the currently available number of bytes that are filled with newly transferred<br />
data. The user can now use this data for own purposes, copy it, write it to disk or start calculations<br />
with this data.<br />
SPC_DATA_AVAIL_CARD_LEN write After finishing the job with the new available data the user needs to tell the driver that this amount of<br />
bytes is again free for new data to be transferred.<br />
Any direction SPC_DATA_AVAIL_USER_POS read The register holds the current byte index position where the available bytes start. The register is just<br />
intended to help you and to avoid own position calculation<br />
Any direction SPC_FILLSIZEPROMILLE read The register holds the current fill size of the on-board memory (FIFO buffer) in promille (1/1000) of<br />
the full on-board memory. Please note that the hardware reports the fill size only in 1/16 parts of the<br />
full memory. The reported fill size is therefore only shown in 1000/16 = 63 promille steps.<br />
Directly after start of transfer the SPC_DATA_AVAIL_USER_LEN is every time zero as no data is available for the user and the<br />
SPC_DATA_AVAIL_CARD_LEN is every time identical to the length of the defined buffer as the complete buffer is available for the card for<br />
transfer.<br />
The counter that is holding the user buffer available bytes (SPC_DATA_AVAIL_USER_LEN) is sticking to the defined<br />
notify size at the DefTransfer call. Even when less bytes already have been transferred you won’t get<br />
notice of it if the notify size is programmed to a higher value.<br />
Remarks<br />
• The transfer between hardware FIFO buffer and application buffer is done with scatter-gather DMA using a busmaster DMA controller<br />
located on the card. Even if the PC is busy with other jobs data is still transferred until the application data buffer is completely used.<br />
• Even if application data buffer is completely used there’s still the hardware FIFO buffer that can hold data until the complete on-board<br />
memory is used. Therefore a larger on-board memory will make the transfer more reliable against any PC dead times.<br />
• As you see in the above picture data is directly transferred between application data buffer and on-board memory. Therefore it is abso-<br />
70 <strong>M3i.41xx</strong> / <strong>M3i.41xx</strong>-<strong>exp</strong> Manual
Acquisition modes Buffer handling<br />
lutely critical to delete the application data buffer without stopping any DMA transfers that are running actually. It is also absolutely critical<br />
to define the application data buffer with an unmatching length as DMA can than try to access memory outside the application data<br />
area.<br />
• As shown in the drawing above the DMA control will announce new data to the application by sending an event. Waiting for an event is<br />
done internally inside the driver if the application calls one of the wait functions. Waiting for an event does not consume any CPU time<br />
and is therefore highly desirable if other threads do a lot of calculation work. However it is not necessary to use the wait functions and<br />
one can simply request the current status whenever the program has time to do so. When using this polling mode the announced available<br />
bytes still stick to the defined notify size!<br />
• If the on-board FIFO buffer has an overrun (card to PC) or an underrun (PC to card) data transfer is stopped. However in case of transfer<br />
from card to PC there is still a lot of data in the on-board memory. Therefore the data transfer will continue until all data has been transferred<br />
although the status information already shows an overrun.<br />
• Getting best bus transfer performance is done using a „continuous buffer“. This mode is <strong>exp</strong>lained in the appendix in greater detail.<br />
The Notify size sticks to the page size which is defined by the PC hardware and the operating system. Therefore<br />
the notify size must be a multiple of 4 kByte. For data transfer it may also be a fraction of 4k in the<br />
range of 16, 32, 64, 128, 256, 512, 1k or 2k. No other values are allowed. For ABA and timestamp the notify<br />
size can be 2k as a minimum. If you need to work with ABA or timestamp data in smaller chunks please use the<br />
polling mode as described later.<br />
The following graphs will show the current buffer positions in different states of the transfer. The drawings have been made for the transfer<br />
from card to PC. However all the block handling is similar for the opposite direction, just the empty and the filled parts of the buffer are<br />
inverted.<br />
Step 1: Buffer definition<br />
Directly after buffer definition the complete buffer is empty (card to PC) or<br />
completely filled (PC to card). In our example we have a notify size which<br />
is 1/4 of complete buffer memory to keep the example simple. In real<br />
world use it is recommended to set the notify size to a smaller stepsize.<br />
Step 2: Start and first data available<br />
In between we have started the transfer and have waited for the first data<br />
to be available for the user. When there is at least one block of notify size<br />
in the memory we get an interrupt and can proceed with the data. Although<br />
there is more data already transferred we only get announced to<br />
have the notify size of data available. The USER_POS is still zero as we<br />
are right at the beginning of the complete transfer.<br />
Step 3: set the first data available for card<br />
Now the data can be processed. If transfer is going from card to PC that<br />
may be storing to hard disk or calculation of any figures. If transfer is going<br />
from PC to card that means we have to fill the available buffer again<br />
with data. After this the amount of data is set available for the card and<br />
for the next step.<br />
Step 4: next data available<br />
After reaching the next border of the notify size we get the next part of the<br />
data buffer to be available. In our example this part of data is again only<br />
of one notify size length. The user position will now be at the position [1<br />
x notify size].<br />
Step 5: set data available again<br />
Again after processing the data we set it free for the card use.<br />
In our example we now make something else and don’t react to the interrupt<br />
for a longer time. In the background the buffer is filled with more data.<br />
Step 6: roll over the end of buffer<br />
Now nearly the complete buffer is filled. Please keep in mind that our current<br />
user position is still at the end of the data part that we got in step 4.<br />
Therefore the data to process now is split in two parts. Part 1 is at the end<br />
of the buffer while part 2 is starting with address 0.<br />
Step 7: set the rest of the buffer available<br />
Feel free to process the complete data or just the part 1 until the end of<br />
the buffer as we do in this example. If you decide to process complete<br />
buffer please keep in mind the roll over at the end of the buffer.<br />
(c) <strong>Spectrum</strong> GmbH 71
Buffer handling Acquisition modes<br />
This buffer handling can now continue endless as long as we manage to set the data available for the card fast enough.<br />
Buffer handling example for transfer from card to PC<br />
char* pcData = new char[lBufferSizeInBytes];<br />
// we now define the transfer buffer with the minimum notify size of on page = 4 kByte<br />
spcm_dwDefTransfer_i64 (hDrv, SPCM_BUF_DATA, SPCM_DIR_CARDTOPC , 4096, (void*) pcData, 0, lBufferSizeInBytes);<br />
// we start the DMA transfer<br />
dwError = spcm_dwSetParam_i32 (hDrv, SPC_M2CMD, M2CMD_DATA_STARTDMA);<br />
do<br />
{<br />
if (!dwError)<br />
{<br />
// we wait for the next data to be available. Afte this call we get at least 4k of data to proceed<br />
dwError = spcm_dwSetParam_i32 (hDrv, SPC_M2CMD, M2CMD_DATA_WAITDMA);<br />
// if there was no error we can proceed and read out the available bytes that are free again<br />
spcm_dwGetParam_i32 (hDrv, SPC_DATA_AVAIL_USER_LEN, &lAvailBytes);<br />
spcm_dwGetParam_i32 (hDrv, SPC_DATA_AVAIL_USER_POS, &lBytePos);<br />
printf (“We now have %d new bytes available\n”, lAvailBytes);<br />
printf (“The available data starts at position %d\n”, lBytesPos);<br />
// we take care not to go across the end of the buffer<br />
if ((lBytePos + lAvailBytes) >= lBufferSizeInBytes)<br />
lAvailBytes = lBufferSizeInBytes - lBytePos;<br />
// our do function gets a pointer to the start of the available data section and the length<br />
vDoSomething (&pcData[lBytesPos], lAvailBytes);<br />
// the buffer section is now immediately set available for the card<br />
spcm_dwSetParam_i32 (hDrv, SPC_DATA_AVAIL_CARD_LEN, lAvailBytes);<br />
}<br />
}<br />
while (!dwError); // we loop forever if no error occurs<br />
Buffer handling example for transfer from PC to card<br />
char* pcData = new char[lBufferSizeInBytes];<br />
// before starting transfer we ned to once fill complete buffer memory with data<br />
vDoGenerateData (&pcData[0], lBufferSizeInBytes);<br />
// we now define the transfer buffer with the minimum notify size of on page = 4 kByte<br />
spcm_dwDefTransfer_i64 (hDrv, SPCM_BUF_DATA, SPCM_DIR_PCTOCARD , 4096, (void*) pcData, 0, lBufferSizeInBytes);<br />
// before start we once have to fill some data in for the start of the output<br />
spcm_dwSetParam_i32 (hDrv, SPC_DATA_AVAIL_CARD_LEN, lBufferSizeInBytes);<br />
dwError = spcm_dwSetParam_i32 (hDrv, SPC_M2CMD, M2CMD_DATA_STARTDMA | M2CMD_DATA_WAITDMA);<br />
do<br />
{<br />
if (!dwError)<br />
{<br />
// if there was no error we can proceed and read out the current amount of available data<br />
spcm_dwGetParam_i32 (hDrv, SPC_DATA_AVAIL_USER_LEN, &lAvailBytes);<br />
spcm_dwGetParam_i32 (hDrv, SPC_DATA_AVAIL_USER_POS, &lBytePos);<br />
printf (“We now have %d free bytes available\n”, lAvailBytes);<br />
printf (“The available data starts at position %d\n”, lBytesPos);<br />
// we take care not to go across the end of the buffer<br />
if ((lBytePos + lAvailBytes) >= lBufferSizeInBytes)<br />
lAvailBytes = lBufferSizeInBytes - lBytePos;<br />
// our do function gets a pointer to the start of the available data section and the length<br />
vDoGenerateData (&pcData[lBytesPos], lAvailBytes);<br />
// now we mark the number of bytes that we just generated for replay<br />
// and wait for the next free buffer<br />
spcm_dwSetParam_i32 (hDrv, SPC_DATA_AVAIL_CARD_LEN, lAvailBytes);<br />
dwError = spcm_dwSetParam_i32 (hDrv, SPC_M2CMD, M2CMD_DATA_WAITDMA);<br />
}<br />
}<br />
while (!dwError); // we loop forever if no error occurs<br />
Please keep in mind that you are using a continuous buffer writing/reading that will start again at the zero<br />
position if the buffer length is reached. However the DATA_AVAIL_USER_LEN register will give you the com-<br />
72 <strong>M3i.41xx</strong> / <strong>M3i.41xx</strong>-<strong>exp</strong> Manual
Acquisition modes Buffer handling<br />
plete amount of available bytes even if one part of the free area is at the end of the buffer and the second half at<br />
the beginning of the buffer.<br />
(c) <strong>Spectrum</strong> GmbH 73
Data organisation Acquisition modes<br />
Data organisation<br />
Data is organized in a multiplexed way in the transfer buffer. If using 2 channels data of first activated channel comes first, then data of<br />
second channel.<br />
Activated Channels Ch0 Ch1 Samples ordering in buffer memory starting with data offset zero<br />
1 channel X A0 A1 A2 A3 A4 A5 A6 A7 A8 A9 A10 A11 A12 A13 A14 A15 A16<br />
1 channel X B0 B1 B2 B3 B4 B5 B6 B7 B8 B9 B10 B11 B12 B13 B14 B15 B16<br />
2 channels X X A0 B0 A1 B1 A2 B2 A3 B3 A4 B4 A5 B5 A6 B6 A7 B7 A8<br />
The samples are re-named for better readability. A0 is sample 0 of channel 0, B4 is sample 4 of channel 1, and so on<br />
Sample format<br />
The 14 bit A/D samples are stored in twos complement in the lower 14 bit of the 16 bit data word. 14 bit resolution means that data is<br />
ranging from -8192…to…+8191. In standard mode the upper two bits contain the sign extension allowing to directly use the read data as<br />
16 bit integer values. If digital inputs are activated these inputs are stored in the two upper bits.<br />
Bit Standard Mode Digital inputs enabled<br />
D15 ADx Bit 13 (sign extension) Digital bit 1 (X1)<br />
D14 ADx Bit 13 (sign extension) Digital bit 0 (X0)<br />
D13 ADx Bit 13 (MSB) ADx Bit 13 (MSB)<br />
D12 ADx Bit 12 ADx Bit 12<br />
D11 ADx Bit 11 ADx Bit 11<br />
D10 ADx Bit 10 ADx Bit 10<br />
D9 ADx Bit 9 ADx Bit 9<br />
D8 ADx Bit 8 ADx Bit 8<br />
D7 ADx Bit 7 ADx Bit 7<br />
D6 ADx Bit 6 ADx Bit 6<br />
D5 ADx Bit 5 ADx Bit 5<br />
D4 ADx Bit 4 ADx Bit 4<br />
D3 ADx Bit 3 ADx Bit 3<br />
D2 ADx Bit 2 ADx Bit 2<br />
D1 ADx Bit 1 ADx Bit 1<br />
D0 ADx Bit 0 (LSB) ADx Bit 0 (LSB)<br />
74 <strong>M3i.41xx</strong> / <strong>M3i.41xx</strong>-<strong>exp</strong> Manual
Clock generation Overview<br />
Clock generation<br />
Overview<br />
The different clock modes<br />
The <strong>Spectrum</strong> M3i cards offer a wide variety of different clock modes to<br />
match all the customers needs. All of the clock modes are described in detail<br />
with programming examples in this chapter.<br />
The figure is showing an overview of the complete engine used on all M3i<br />
cards for clock generation.<br />
The purpose of this chapter is to give you a guide to the best matching clock<br />
settings for your specific application and needs.<br />
Standard internal sample rate (programmable reference quartz 1)<br />
This is the easiest and most common way to generate a sample rate with no need for additional external clock signals. The sample rate has<br />
a very fine resolution, low jitter and a high accuracy. The Quartz 1 is a high quality software programmable clock device acting as a reference<br />
to the internal PLL. The specification is found in the technical data section of this manual.<br />
Quartz2 with PLL (option)<br />
This optional second Quartz 2 is for special customer needs, either for a special direct sampling clock or as a very precise reference for the<br />
PLL. Please feel free to contact <strong>Spectrum</strong> for your special needs. The Quarz 2 clock footprint can be equipped with a wide variety of clock<br />
sources that are available on the market.<br />
External Clock (reference clock)<br />
Any clock can be fed in that matches the specification of the board. The external clock signal can be used to synchronize the board on a<br />
system clock or to feed in an exact matching sample rate. The external clock is divided/multiplied using a PLL allowing a wide range of<br />
external clock modes.<br />
Synchronization clock (option Star-Hub)<br />
The star-hub option allows the synchronization of up to 8 cards of the M3i series from <strong>Spectrum</strong> with a minimal phase delay between the<br />
different cards. The clock is distributed from the master card to all connected cards. As a source it is possible to either use the programmable<br />
Quarz 1 clock or the external clock input of the master card. For details on the synchronization option please take a look at the dedicated<br />
chapter later in this manual.<br />
Clock Mode Register<br />
The selection of the different clock modes has to be done by the SPC_CLOCKMODE register. All available modes, can be read out by the<br />
help of the SPC_AVAILCLOCKMODES register.<br />
Register Value Direction Description<br />
SPC_AVAILCLOCKMODES 20201 read Bitmask, in which all bits of the below mentioned clock modes are set, if available.<br />
SPC_CLOCKMODE 20200 read/write Defines the used clock mode or reads out the actual selected one.<br />
SPC_CM_INTPLL 1 Enables internal programmable high precision Quartz 1 for sample clock generation<br />
SPC_CM_QUARTZ2 4 Enables optional Quartz 2 as reference for sample clock generation<br />
SPC_CM_EXTREFCLOCK 32 Enables internal PLL with external reference for sample clock generation<br />
The different clock modes and all other related or required register settings are described on the following pages.<br />
(c) <strong>Spectrum</strong> GmbH 75
Details on the different clock modes Clock generation<br />
Details on the different clock modes<br />
Standard internal sampling clock (PLL)<br />
The internal sampling clock is generated in default mode by a programmable high precision quartz. You need to select the clock mode by<br />
the dedicated register shown in the table below:<br />
Register Value Direction Description<br />
SPC_CLOCKMODE 20200 read/write Defines the used clock mode<br />
SPC_CM_INTPLL 1 Enables internal programmable high precision Quartz 1 for sample clock generation<br />
The user does not have to care on how the desired sampling rate is generated by multiplying and dividing internally. You simply write the<br />
desired sample rate to the according register shown in the table below and the driver makes all the necessary calculations. If you want to<br />
make sure the sample rate has been set correctly you can also read out the register and the driver will give you back the sampling rate that<br />
is matching your desired one best.<br />
Register Value Direction Description<br />
SPC_SAMPLERATE 20000 write Defines the sample rate in Hz for internal sample rate generation.<br />
read Read out the internal sample rate that is nearest matching to the desired one.<br />
Independent of the used clock source it is possible to enable the clock output. The clock will be available on the external clock output connector<br />
and can be used to synchronize external equipment with the board.<br />
Register Value Direction Description<br />
SPC_CLOCKOUT 20110 read/write Writing a „1“ enables clock output on external clock output connector. Writing a „0“ disables the<br />
clock output (tristate)<br />
Example on writing and reading internal sampling rate<br />
spcm_dwSetParam_i32 (hDrv, SPC_CLOCKMODE, SPC_CM_INTPLL); // Enables internal programmable quarz 1<br />
spcm_dwSetParam_i32 (hDrv, SPC_SAMPLERATE, 100000000); // Set internal sampling rate to 100 MHz<br />
spcm_dwSetParam_i32 (hDrv, SPC_CLOCKOUT, 1); // enable the clock output of that 100 MHz clock<br />
spcm_dwGetParam_i32 (hDrv, SPC_SAMPLERATE, &lSamplerate); // Read back the programmed sample rate and<br />
printf („Sample rate = %d\n“, lSamplerate); // print it. Output should be „Sample rate = 100000000“<br />
Minimum internal sampling rate<br />
The minimum and the maximum internal sampling rates depend on the specific type of board. Both values can be found in the technical data<br />
section of this manual.<br />
Using Quartz2 with PLL (optional)<br />
In some cases it is necessary to use a special high precision frequency for sampling rate generation. For these applications all cards of the<br />
M3i series can be equipped with a special customer quartz. Please contact <strong>Spectrum</strong> for details on available oscillators. If your card is<br />
equipped with a second oscillator you can enable it for sampling rate generation with the following register:<br />
Register Value Direction Description<br />
SPC_CLOCKMODE 20200 read/write Defines the used clock mode<br />
SPC_CM_QUARTZ2 4 Enables optional quartz2 for sample clock generation<br />
The quartz 2 clock is routed through a PLL to allow the generation of sampling rates based on this reference clock. As with internal PLL mode<br />
it’s also possible to program the clock mode first, set a desired sampling rate with the SPC_SAMPLERATE register and to read it back. The<br />
result will then again be the best matching sampling rate.<br />
Independent of the used clock source it is possible to enable the clock output. The clock will be available on the external clock output connector<br />
and can be used to synchronize external equipment with the board.<br />
Register Value Direction Description<br />
SPC_CLOCKOUT 20110 read/write Writing a „1“ enables clock output on external clock output connector. Writing a „0“ disables the<br />
clock output (tristate)<br />
External clock (reference clock)<br />
The external clock input of the M3i series is fed through a PLL to the clock system. Therefore the input will act as a reference clock input thus<br />
allowing to either use a copy of the external clock or to generate any sampling clock within the allowed range from the reference clock.<br />
76 <strong>M3i.41xx</strong> / <strong>M3i.41xx</strong>-<strong>exp</strong> Manual
Clock generation Details on the different clock modes<br />
Please note the limited setup granularity in comparison to the internal sampling clock generation. Details are found in the technical data section.<br />
Register Value Direction Description<br />
SPC_CLOCKMODE 20200 read/write Defines the used clock mode<br />
SPC_CM_EXTREFCLOCK 32 Enables internal PLL with external reference for sample clock generation<br />
Due to the fact that the driver needs to know the external fed in frequency for an exact calculation of the sampling rate you must set the<br />
SPC_REFERENCECLOCK register accordingly as shown in the table below. The driver then automatically sets the PLL to achieve the desired<br />
sampling rate. Please be aware that the PLL has some internal limits and not all desired sampling rates may be reached with every reference<br />
clock.<br />
Register Value Direction Description<br />
SPC_REFERENCECLOCK 20140 read/write Programs the external reference clock in the range from 1 MHz to 1 GHz.<br />
External sampling rate in Hz as an integer value You need to set up this register exactly to the frequency of the external fed in clock.<br />
Example of reference clock:<br />
spcm_dwSetParam_i32 (hDrv, SPC_CLOCKMODE, SPC_CM_EXTREFCLOCK); // Set to reference clock mode<br />
spcm_dwSetParam_i32 (hDrv, SPC_REFERENCECLOCK, 10000000); // Reference clock that is fed in is 10 MHz<br />
spcm_dwSetParam_i32 (hDrv, SPC_SAMPLERATE, 25000000); // We want to have 25 MHz as sampling rate<br />
PLL Locking Error<br />
The external clock signal is routed to a PLL to generate any sampling clock from this external clock. Due to the internal structure of the card<br />
the PLL is even used if a copy of the clock fed in externally is used for sampling (SPC_REFERENCECLOCK = SPC_SAMPLERATE). The PLL needs<br />
a stable and defined external clock with no gaps and no variation in the frequency. The external clock must be present when issuing the start<br />
command. It is not possible to start the card with external clock activated and no external clock available.<br />
When starting the card all settings are written to hardware and the PLL is programmed to generate the desired sampling clock. If there has<br />
been any change to the clock setting the PLL then tries to lock on the external clock signal to generate the sampling clock. This locking will<br />
normally need 10 to 20 ms until the sampling clock is stable. Some clock settings may also need 200 ms to lock the PLL. This waiting time is<br />
automatically added at card start.<br />
However if the PLL can not lock on the external clock either because there is no clock available or it hasn’t sufficient signal levels or the clock<br />
is not stable the driver will return with an error code SPC_CLOCKNOTLOCKED. In that case it is necessary to check the external clock connection.<br />
Please see the example below:<br />
// settings done to external clock like shown above.<br />
if (spcm_dwSetParam_i32 (hDrv, SPC_M2CMD, M2CMD_CARD_START | M2CMD_CARD_ENABLETRIGGER) == SPC_CLOCKNOTLOCKED)<br />
{<br />
printf („External clock not locked. Please check connection\n“);<br />
return -1;<br />
}<br />
(c) <strong>Spectrum</strong> GmbH 77
General Description Trigger modes and appendant registers<br />
Trigger modes and appendant registers<br />
General Description<br />
The trigger modes of the <strong>Spectrum</strong> M3i series A/D cards are very extensive and give you the possibility to detect nearly any trigger event<br />
you can think of.<br />
You can choose between more than 10 external trigger modes and up to 20 internal trigger modes (on analog acquisition cards) including<br />
software and channel trigger, depending on your type of board. Many of the channel trigger modes can be independently set for each input<br />
channel (on A/D boards only) resulting in a even bigger variety of modes. This chapter is about to <strong>exp</strong>lain all of the different trigger modes<br />
and setting up the card’s registers for the desired mode.<br />
Trigger Engine Overview<br />
The trigger engine of the M3i card series allows to combine several different trigger sources with OR and AND combination, with a trigger<br />
delay or even with an OR combination across several cards when using the Star-Hub option. The above drawing gives a complete overview<br />
of the trigger engine and shows all possible features that are available.<br />
Each analog input channel has two trigger level comparators to detect edges as well as windowed triggers. The card has a total of three<br />
different additional external trigger sources. One main trigger source which also has two analog level comparators also allowing to use edge<br />
and windowed trigger detection and two multi purpose in/outputs that can be software programmed to either additional trigger inputs or<br />
trigger outputs or to some extended status signals.<br />
The Enable trigger allows the user to enable or disable all trigger sources (including channel trigger and external trigger) with a single software<br />
command. The enable trigger command will not work on force trigger.<br />
When the card is waiting for a trigger event, either a channel trigger or an external trigger the force trigger command allows to force a<br />
trigger event with a single software command. The force trigger overrides the enable trigger command.<br />
Before the trigger event is finally generated, it is wired through a programmable trigger delay. This trigger delay will also work when used<br />
in a synchronized system thus allowing each card to individually delay its trigger recognition.<br />
78 <strong>M3i.41xx</strong> / <strong>M3i.41xx</strong>-<strong>exp</strong> Manual
Trigger modes and appendant registers Multi Purpose I/O Lines<br />
Multi Purpose I/O Lines<br />
The M3i series has two multi purpose I/O lines that can be used for a wide variety of functions to help the interconnection<br />
with external equipment. The functionality of these multi purpose I/O lines can be software programmed and each of these<br />
lines can either be used for input or output.<br />
The multi purpose I/O lines may be used for additional trigger inputs allowing to combine and gate external triggers, for<br />
trigger output, for internal arm/run signals output, for asynchronous I/O to control external equipment or as additional<br />
digital input lines that are sampled synchronously with the analog data.<br />
The multi purpose I/O lines are available on the front plate and labelled with X0 (line 0 = X0 = Ext1) and X1 (line 1 = X1 = Ext2). As default<br />
these lines are switched off.<br />
Please be careful when programming these lines as an output signal being connected with an external signal<br />
source may damage components either on the external equipment or on the card itself.<br />
Programming the behaviour<br />
Each multi purpose I/O line can be individually programmed. Please check the available modes by reading the SPCM_X0_AVAILMODES<br />
and SPCM_X1_AVAILMODES register first. The available modes may differ from card to card and may be enhanced with new driver/firmware<br />
versions to come.<br />
Register Value Direction Description<br />
SPCM_X0_AVAILMODES 47210 read Bitmask with all bits of the below mentioned modes showing the available modes for (X0 = Ext1)<br />
SPCM_X1_AVAILMODES 47211 read Bitmask with all bits of the below mentioned modes showing the available modes for (X1 = Ext2)<br />
SPCM_X0_MODE 47200 read/write Defines the mode for (X0 = Ext1). Only one mode selection is possible to be set at a time<br />
SPCM_X1_MODE 47201 read/write Defines the mode for (X1 = Ext2). Only one mode selection is possible to be set at a time<br />
SPCM_XMODE_DISABLE 00000000h No mode selected. Output is tristate (default setup)<br />
SPCM_XMODE_ASYNCIN 00000001h Connector is programmed for asynchronous input. Use SPCM_XX_ASYNCIO to read data asynchronous as shown in<br />
next chapter.<br />
SPCM_XMODE_ASYNCOUT 00000002h Connector is programmed for asynchronous output. Use SPCM_XX_ASYNCIO to write data asynchronous as shown<br />
in next chapter.<br />
SPCM_XMODE_DIGIN 00000004h Connector is programmed for digital input. Digital channel X0/X1 is written as D14/D15 of data stream during<br />
acquisition (12 and 14 bit analog input cards only). Please check the data format chapter to see more details. Please<br />
note that automatic sign extension of analog data is switched off as soon as one digital input line is activated.<br />
SPCM_XMODE_TRIGIN 00000010h Connector is programmed as additional TTL trigger input. X0/X1 is available as Ext1/Ext2 trigger input. Please be<br />
sure to also set the corresponding trigger OR/AND masks to use this trigger input for trigger detection.<br />
SPCM_XMODE_TRIGOUT 00000020h Connector is programmed as trigger output and shows the trigger detection. The trigger output is HIGH as long as<br />
postcounter is running. After reaching postcounter zero it will become LOW again. In standard FIFO mode the trigger<br />
output is HIGH until FIFO mode is stopped.<br />
SPCM_XMODE_OVROUT 00000040h Shows the overrange status of the channels at the output. If the analog data of one channel exceeds the input range<br />
the overrange signal is set to high level for that time. The overrange status of channel 0 is output on X0 and the overrange<br />
status of channel 1 is output on X1.<br />
SPCM_XMODE_RUNSTATE 00000100h Connector shows the current run state of the card. If acquisition/output is running the signal is HIGH. If card has<br />
stopped the signal is LOW.<br />
SPCM_XMODE_ARMSTATE 00000200h Connector shows the current ARM state of the card. If the card is armed and ready to receive a trigger the signal is<br />
HIGH. If the card isn’t running or the card is still acquiring pretrigger data or the trigger has been detected the signal<br />
is LOW.<br />
SPCM_XMODE_DIRECTTRIGOUT 00000400h Connector is programmed as direct trigger output and shows the trigger recognition of an fed in trigger event which<br />
will lead to a card trigger event. This mode shows the upcoming detection even before the card itself will have triggered.<br />
The trigger output is HIGH as long as postcounter is running. After reaching postcounter zero it will become<br />
LOW again. This mode ensures that the card is armed and therefor the signaled event trigger event will lead to a card<br />
trigger. Please see below for a usage example for this mode.<br />
SPCM_XMODE_DIRECTTRIGOUT_LR 00000800h Nearly identical to SPCM_XMODE_DIRECTTRIGOUT, but in contrast the above mode, this mode does not make sure<br />
that the card is armed. The user has to take card that the repetition time of the fed in trigger event is longer than the<br />
recording and re-arm time, otherwise the direct trigger might be generated although this event cannot be a properly<br />
detected card trigger. Please see below for a usage example for this mode.<br />
Please note that a change to the SPCM_X0_MODE or SPCM_X1_MODE will only be updated with the next call<br />
to either the M2CMD_CARD_START or M2CMD_CARD_WRITESETUP register. For further details please see the<br />
relating chapter on the M2CMD_CARD registers.<br />
Using asynchronous I/O<br />
To use asynchronous I/O on the multi purpose I/O lines it is first necessary to switch these lines to the desired asynchronous mode by programming<br />
the above <strong>exp</strong>lained mode registers. As a special feature asynchronous input can also be read if the mode is set to trigger input<br />
or digital input.<br />
Register Value Direction Description<br />
SPCM_XX_ASYNCIO 47220 read/write Connector X0 is linked to bit 0 of the register while connector X1 is linked to bit 1 of this register.<br />
Data is written/read immediately without any relation to the currently used sampling rate or mode. If<br />
a line is programmed to output, reading this line asynchronously will return the current output level.<br />
(c) <strong>Spectrum</strong> GmbH 79
Multi Purpose I/O Lines Trigger modes and appendant registers<br />
Example of asynchronous write and read. We write a high pulse on output X1 and wait for a high level answer on input X0:<br />
spcm_dwSetParam_i32 (hDrv, SPCM_X0_MODE, SPCM_XMODE_ASYNCIN); // X0 set to asynchronous input<br />
spcm_dwSetParam_i32 (hDrv, SPCM_X1_MODE, SPCM_XMODE_ASYNCOUT); // X1 set to asynchronous output<br />
spcm_dwSetParam_i32 (hDrv, SPCM_XX_ASYNCIO, 0); // programming a high pulse on output<br />
spcm_dwSetParam_i32 (hDrv, SPCM_XX_ASYNCIO, 2);<br />
spcm_dwSetParam_i32 (hDrv, SPCM_XX_ASYNCIO, 0);<br />
do {<br />
spcm_dwGetParam_i32 (hDrv, SPCM_XX_ASYNCIO, &lAsyncIn); // read input in a loop<br />
} while ((lAsyncIn & 1) == 0) // until X0 is going to high level<br />
Special behaviour of trigger output<br />
As the driver of the M3i series is the same as the driver for the M2i series and some old software may rely on register structure of the M2i<br />
card series there is a special compatible trigger output register that will work according to the M2i series style. It is not recommended to use<br />
this register unless you’re writing software for both card series:<br />
Register Value Direction Description<br />
SPC_TRIG_OUTPUT 40100 read/write M2i style trigger output programming. Write a „1“ to enable X1 trigger output (SPCM_X1_MODE =<br />
SPCM_XMODE_TRIGOUT) and X0 run state (SPCM_X0_MODE = SPCM_XMODE_RUNSTATE).<br />
Write a „0“ to disable both outputs (SPCM_X0_MODE = SPCM_X1_MODE =<br />
SPCM_XMODE_DISABLE)<br />
The SPC_TRIG_OUTPUT register overrides the multi purpose I/O settings done by SPCM_X0_MODE and SPCM_X1_MODE and vice versa.<br />
Please do not use both methods in one program.<br />
Special direct trigger output modes<br />
The to output a record synchronous signal for starting external equipment the trigger output of the cards can be used. To cope requirements<br />
for different applications, all M3i cards support different output modes.<br />
„Standard“ Trigger Output<br />
In this mode the output signal indicates the internal trigger<br />
event after the trigger delay, and therefore the begin of post<br />
trigger area. The trigger output and the recording can be delayed<br />
by programming the user trigger delay.<br />
For details on the trigger delay, please see the related chapter<br />
in this manual.<br />
„Direct“ Trigger Output<br />
In this mode the output signal indicates that the external fed<br />
in trigger event (external or channel trigger) will lead to a recording<br />
after a fix delay and the optional programmed trigger<br />
delay. The start of the recording can be delayed by<br />
programming the user trigger delay.<br />
This can be useful when the trigger output is to be used to start<br />
the device under test, whilst avoiding the need to record unneeded<br />
data in the pre-trigger area.<br />
For details on the trigger delay, please see the related chapter<br />
in this manual.<br />
Using the direct trigger output modes requires the following driver and firmware version depending on your<br />
card. Please update your system to the newest versions to run these modes mode.<br />
• Driver version V2.06 (or newer)<br />
• Base Ctrl firmware version V6 (or newer)<br />
• M3i.21xx cards : Modul Ctrl firmware version V1 (or newer)<br />
• M3i.32xx cards : Modul Ctrl firmware version V6 (or newer)<br />
• <strong>M3i.41xx</strong> cards : Modul Ctrl firmware version V6 (or newer)<br />
80 <strong>M3i.41xx</strong> / <strong>M3i.41xx</strong>-<strong>exp</strong> Manual
Trigger modes and appendant registers Trigger masks<br />
Trigger masks<br />
Trigger OR mask<br />
Every trigger source of the M3i series cards is wired to one of the above mentioned<br />
OR masks. The user then can program which trigger source will be recognized,<br />
and which one won’t.<br />
This selection for the general mask is realized with the SPC_TRIG_ORMASK<br />
register in combination with constants for every possible trigger source.<br />
This selection for the channel mask is realized with the<br />
SPC_TRIG_CH_ORMASK0 register in combination with constants for every<br />
possible channel trigger source.<br />
In either case the sources are coded as a bitfield, so that they can be combined<br />
by one access to the driver with the help of a bitwise OR.<br />
The table below shows the relating register for the general OR mask and the<br />
possible constants that can be written to it.<br />
The purpose of this passage is to <strong>exp</strong>lain the trigger OR mask (see<br />
left figure) and all the appendant software registers in detail.<br />
The OR mask shown in the overview before as one object, is separated<br />
into two parts: a general OR mask for external trigger (external<br />
analog and multi purpose TTL trigger) and software trigger and a<br />
channel OR mask.<br />
Register Value Direction Description<br />
SPC_TRIG_AVAILORMASK 40400 read Bitmask, in which all bits of the below mentioned sources for the OR mask are set, if available.<br />
SPC_TRIG_ORMASK 40410 read/write Defines the events included within the trigger OR mask of the card.<br />
SPC_TMASK_NONE 0 No trigger source selected<br />
SPC_TMASK_SOFTWARE 1h Enables the software trigger for the OR mask. The card will trigger immediately after start.<br />
SPC_TMASK_EXT0 2h Enables the external (analog) trigger 0 for the OR mask. The card will trigger when the programmed condition for this<br />
input is valid.<br />
SPC_TMASK_EXT1 4h Enables the external (TTL) trigger 1 for the OR mask. Please note that the mode of the multi purpose connector X0 must<br />
be programmed to trigger input if using the Ext1 trigger (SPCM_X0_MODE=SPCM_XMODE_TRIGIN). The card will<br />
trigger when the programmed condition for this input is valid.<br />
SPC_TMASK_EXT2 8h Enables the external (TTL) trigger 1 for the OR mask. Please note that the mode of the multi purpose connector X1 must<br />
be programmed to trigger input if using the Ext2 trigger (SPCM_X1_MODE=SPCM_XMODE_TRIGIN). The card will<br />
trigger when the programmed condition for this input is valid.<br />
The following example shows, how to setup the OR mask, for an external trigger. As an example a simple edge detection has been chosen.<br />
The <strong>exp</strong>lanation and a detailed description of the different trigger modes for the external trigger inputs will be shown in the dedicated passage<br />
within this chapter.<br />
spcm_dwSetParam_i32 (hDrv, SPC_TRIG_ORMASK, SPC_TMASK_EXT0); // Enable external trigger within the OR mask<br />
spcm_dwSetParam_i32 (hDrv, SPC_TRIG_EXT0_LEVEL0, 1800); // Trigger level set to 1.8 V<br />
spcm_dwSetParam_i32 (hDrv, SPC_TRIG_EXT0_MODE, SPC_TM_POS); // Setting up external trigger for rising edges<br />
(c) <strong>Spectrum</strong> GmbH 81
Trigger masks Trigger modes and appendant registers<br />
The table below is showing the registers for the channel OR mask and the possible constants that can be written to it.<br />
Register Value Direction Description<br />
SPC_TRIG_CH_AVAILORMASK0 40450 read Bitmask, in which all bits of the below mentioned sources/channels (0…31) for the channel OR mask<br />
are set, if available.<br />
SPC_TRIG_CH_ORMASK0 40460 read/write Includes the analog or digital channels (0…31) within the channel trigger OR mask of the card.<br />
SPC_TMASK0_CH0 00000001h Enables channel0 for recognition within the channel OR mask.<br />
SPC_TMASK0_CH1 00000002h Enables channel1 for recognition within the channel OR mask.<br />
SPC_TMASK0_CH2 00000004h Enables channel2 for recognition within the channel OR mask.<br />
SPC_TMASK0_CH3 00000008h Enables channel3 for recognition within the channel OR mask.<br />
… … …<br />
SPC_TMASK0_CH28 10000000h Enables channel28 for recognition within the channel OR mask.<br />
SPC_TMASK0_CH29 20000000h Enables channel29 for recognition within the channel OR mask.<br />
SPC_TMASK0_CH30 40000000h Enables channel30 for recognition within the channel OR mask.<br />
SPC_TMASK0_CH31 80000000h Enables channel31 for recognition within the channel OR mask.<br />
The following example shows, how to setup the OR mask for channel trigger. As an example a simple edge detection has been chosen. The<br />
<strong>exp</strong>lanation and a detailed description of the different trigger modes for the external TTL trigger inputs will be shown in the dedicated passage<br />
within this chapter.<br />
spcm_dwSetParam_i32 (hDrv, SPC_TRIG_CH_ORMASK0, SPC_TMASK_CH0); // Enable channel0 trigger within the OR mask<br />
spcm_dwSetParam_i32 (hDrv, SPC_TRIG_CH0_LEVEL0, 0); // Trigger level is zero crossing<br />
spcm_dwSetParam_i32 (hDrv, SPC_TRIG_EXT0_MODE, SPC_TM_POS); // Setting up external trigger for rising edges<br />
Trigger AND mask<br />
Every trigger source of the M3i series cards except the software trigger is<br />
wired to one of the above mentioned AND masks. The user then can program<br />
which trigger source will be recognized, and which one won’t.<br />
This selection for the general mask is realized with the SPC_TRIG_ANDMASK<br />
register in combination with constants for every possible trigger source.<br />
This selection for the channel mask is realized with the<br />
SPC_TRIG_CH_ANDMASK0 register in combination with constants for every<br />
possible channel trigger source. In either case the sources are coded as a bitfield,<br />
so that they can be combined by one access to the driver with the help<br />
of a bitwise OR.<br />
The table below shows the relating register for the general AND mask and the<br />
possible constants that can be written to it.<br />
82 <strong>M3i.41xx</strong> / <strong>M3i.41xx</strong>-<strong>exp</strong> Manual<br />
The purpose of this passage is to <strong>exp</strong>lain the trigger AND mask (see<br />
left figure) and all the appendant software registers in detail.<br />
The AND mask shown in the overview before as one object, is separated<br />
into two parts: a general AND mask for external trigger and<br />
software trigger and a channel AND mask.<br />
Register Value Direction Description<br />
SPC_TRIG_AVAILANDMASK 40420 read Bitmask, in which all bits of the below mentioned sources for the AND mask are set, if available.<br />
SPC_TRIG_ANDMASK 40430 read/write Defines the events included within the trigger AND mask of the card.<br />
SPC_TMASK_NONE 0 No trigger source selected<br />
SPC_TMASK_EXT0 2h Enables the external (analog) trigger 0 for the AND mask. The card will trigger when the programmed condition for<br />
this input is valid.<br />
SPC_TMASK_EXT1 4h Enables the external (TTL) trigger 1 for the AND mask. Please note that the mode of the multi purpose connector X0<br />
must be programmed to trigger input if using the Ext1 trigger (SPCM_X0_MODE=SPCM_XMODE_TRIGIN). The card<br />
will trigger when the programmed condition for this input is valid.<br />
SPC_TMASK_EXT2 8h Enables the external (TTL) trigger 1 for the AND mask. Please note that the mode of the multi purpose connector X1<br />
must be programmed to trigger input if using the Ext2 trigger (SPCM_X1_MODE=SPCM_XMODE_TRIGIN). The card<br />
will trigger when the programmed condition for this input is valid.<br />
The following example shows, how to setup the AND mask, for an external trigger. As an example a simple high level detection has been
Trigger modes and appendant registers Software trigger<br />
chosen. The <strong>exp</strong>lanation and a detailed description of the different trigger modes for the external trigger inputs will be shown in the dedicated<br />
passage within this chapter.<br />
spcm_dwSetParam_i32 (hDrv, SPC_TRIG_ANDMASK, SPC_TMASK_EXT0); // Enable external trigger within the AND mask<br />
spcm_dwSetParam_i32 (hDrv, SPC_TRIG_EXT0_LEVEL0, 2000); // Trigger level is 2.0 V (2000 mV)<br />
spcm_dwSetParam_i32 (hDrv, SPC_TRIG_EXT0_MODE, SPC_TM_HIGH );// Setting up external trigger for HIGH level<br />
The table below is showing the constants for the channel AND mask and all the constants for the different channels.<br />
Register Value Direction Description<br />
SPC_TRIG_CH_AVAILANDASK0 40470 read Bitmask, in which all bits of the below mentioned sources/channels (0…31) for the channel AND<br />
mask are set, if available.<br />
SPC_TRIG_CH_ANDMASK0 40480 read/write Includes the analog or digital channels (0…31) within the channel trigger AND mask of the card.<br />
SPC_TMASK0_CH0 00000001h Enables channel0 for recognition within the channel OR mask.<br />
SPC_TMASK0_CH1 00000002h Enables channel1 for recognition within the channel OR mask.<br />
SPC_TMASK0_CH2 00000004h Enables channel2 for recognition within the channel OR mask.<br />
SPC_TMASK0_CH3 00000008h Enables channel3 for recognition within the channel OR mask.<br />
… … …<br />
SPC_TMASK0_CH28 10000000h Enables channel28 for recognition within the channel OR mask.<br />
SPC_TMASK0_CH29 20000000h Enables channel29 for recognition within the channel OR mask.<br />
SPC_TMASK0_CH30 40000000h Enables channel30 for recognition within the channel OR mask.<br />
SPC_TMASK0_CH31 80000000h Enables channel31 for recognition within the channel OR mask.<br />
The following example shows, how to setup the AND mask for a channel trigger. As an example a simple level detection has been chosen.<br />
The <strong>exp</strong>lanation and a detailed description of the different trigger modes for the channel trigger inputs will be shown in the dedicated passage<br />
within this chapter.<br />
spcm_dwSetParam_i32 (hDrv, SPC_TRIG_CH_ANDMASK0, SPC_TMASK_CH0); // Enable channel0 trigger within the AND mask<br />
spcm_dwSetParam_i32 (hDrv, SPC_TRIG_CH0_LEVEL0, 0); // channel level to detect is zero level<br />
spcm_dwSetParam_i32 (hDrv, SPC_TRIG_CH0_MODE, SPC_TM_HIGH); // Setting up ch0 trigger for HIGH levels<br />
Software trigger<br />
The software trigger is the easiest way of triggering any <strong>Spectrum</strong><br />
board. The acquisition or replay of data will start immediately after<br />
starting the board. The only delay results from the time the<br />
board needs for its setup.<br />
For enabling the software trigger one simply has to include the<br />
software event within the trigger OR mask, as the following table<br />
is showing:<br />
Register Value Direction Description<br />
SPC_TRIG_ORMASK 40410 read/write Defines the events included within the trigger OR mask of the card.<br />
SPC_TMASK_SOFTWARE 1h Sets the trigger mode to software, so that the recording/replay starts immediately.<br />
Example for setting up the software trigger:<br />
spcm_dwSetParam_i32 (hDrv, SPC_TRIG_ORMASK, SPC_TMASK_SOFTWARE); // Internal software trigger mode is used<br />
Force- and Enable trigger<br />
In addition to the softwaretrigger (free run) it is also possible to force a triggerevent by software while the board is waiting for an internal or<br />
external trigger event. The forcetrigger command will only have any effect, when the board is waiting for a trigger event. The command for<br />
forcing a trigger event is shown in the table below.<br />
Issuing the forcetrigger command will every time only generate one trigger event. If for example using Multiple Recording that will result in<br />
only one segment being acquired by force trigger. After execution of the forcetrigger command the trigger engine will fall back to the trigger<br />
mode that was originally programmed and will again wait for a trigger event.<br />
Register Value Direction Description<br />
SPC_M2CMD 100 write Command register of the M2i/M3i series cards.<br />
M2CMD_CARD_FORCETRIGGER 10h Forces a trigger event if the hardware is still waiting for a trigger event.<br />
(c) <strong>Spectrum</strong> GmbH 83
Trigger delay Trigger modes and appendant registers<br />
The example shows, how to use the forcetrigger command:<br />
spcm_dwSetParam_i32 (hDrv, SPC_M2CMD, M2CMD_CARD_FORCETRIGGER); // Forcetrigger is used.<br />
It is also possible to enable (arm) or disable (disarm) the card’s whole triggerengine by software. By default the trigger engine is disabled.<br />
Register Value Direction Description<br />
SPC_M2CMD 100 write Command register of the M2i/M3i series cards.<br />
M2CMD_CARD_ENABLETRIGGER 8h Enables the trigger engine. Any trigger event will now be recognized.<br />
M2CMD_CARD_DISABLETRIGGER 20h Disables the trigger engine. No trigger events will be recognized.<br />
The example shows, how to arm and disarm the card’s trigger engine properly:<br />
spcm_dwSetParam_i32 (hDrv, SPC_M2CMD, M2CMD_CARD_ENABLETRIGGER); // Trigger engine is armed.<br />
...<br />
spcm_dwSetParam_i32 (hDrv, SPC_M2CMD, M2CMD_CARD_DISABLETRIGGER); // Trigger engine is disarmed.<br />
Trigger delay<br />
84 <strong>M3i.41xx</strong> / <strong>M3i.41xx</strong>-<strong>exp</strong> Manual<br />
All of the <strong>Spectrum</strong> M3i series cards allow the user to program an<br />
additional trigger delay. As shown in the trigger overview section,<br />
this delay is the last element in the trigger chain. Therefore the user<br />
does not have to care for the sources when programming the trigger<br />
delay.<br />
As shown in the overview the trigger delay is located before the starhub<br />
connection meaning that every M3i card being synchronized<br />
can still have its own trigger delay programmed. The Star-Hub will<br />
combine the trigger events after being delayed.<br />
The delay is programmed in samples. The resulting time delay will<br />
therefore be [Programmed Delay] / [Sampling Rate].<br />
The following table shows the related register and the possible values. A value of 0 disables the trigger delay.<br />
Register Value Direction Description<br />
SPC_TRIG_AVAILDELAY 40800 read Contains the maximum available delay as a decimal integer value.<br />
SPC_TRIG_DELAY 40810 read/write Defines the delay for the detected trigger events.<br />
0 No additional delay will be added. The resulting internal delay is mentioned in the technical data section.<br />
8…[8G -8] in steps of 8 (12, 14 and 16 bit cards) Defines the additional trigger delay in number of sample clocks. The trigger delay is a full 33 bit counter and can<br />
therefore be programmed up to (8GSamples - 8) = 8589934584. Stepsize is 8 samples for 12, 14 and 16 bit cards.<br />
16…[8G -16] in steps of 16 (8 bit cards) Defines the additional trigger delay in number of sample clocks. The trigger delay is a full 33 bit counter and can<br />
therefore be programmed up to (8GSamples - 16) = 8589934576. Stepsize is 16 samples for 8 bit cards.<br />
The example shows, how to use the trigger delay command:<br />
spcm_dwSetParam_i32 (hDrv, SPC_TRIG_DELAY, 2000); // A detected trigger event will be<br />
// delayed for 2000 sample clocks.<br />
Using the delay trigger does not affect the ratio between pre trigger and post trigger recorded number of samples, but only shifts<br />
the trigger event itself. For changing these values, please take a look in the relating chapter about „Acquisition Modes“.
Trigger modes and appendant registers External (analog) trigger<br />
External (analog) trigger<br />
The M3i series has one main external trigger input consisting of an<br />
input stage with programmable termination and programmable AC/<br />
DC coupling and two comparators that can be programmed in the<br />
range of +/- 5000 mV. Using two comparators offers a wide range<br />
of different trigger modes that are support like edge, level, re-arm<br />
and window trigger.<br />
The external analog trigger can be easily combined with channel trigger<br />
or with one or two of the multi purpose connectors being programmed<br />
as additional external TTL trigger inputs. The programming<br />
of the masks and the multi purpose I/O behaviour is shown in the<br />
chapters above.<br />
Trigger Mode<br />
Please find the external (analog) trigger input modes below. A detailed description of the modes follows in the next chapters..<br />
Register Value Direction Description<br />
SPC_TRIG_EXT0_AVAILMODES 40500 read Bitmask shoeing all available trigger modes for external 0 (Ext0) = main analog trigger input<br />
SPC_TRIG_EXT0_MODE 40510 read/write Defines the external trigger mode for the external MMCX connector trigger input. The trigger need to<br />
be added to either OR or AND mask input to be activated.<br />
SPC_TM_NONE 00000000h Channel is not used for trigger detection. This is as with the trigger masks another possibility for disabling channels.<br />
SPC_TM_POS 00000001h Trigger detection for positive edges (crossing level 0 from below to above)<br />
SPC_TM_NEG 00000002h Trigger detection for negative edges (crossing level 0 from above to below)<br />
SPC_TM_POS | SPC_TM_REARM 01000001h Trigger detection for positive edges on lebel 0. Trigger is armed when crossing level 1 to avoid false trigger on noise<br />
SPC_TM_NEG | SPC_TM_REARM 01000002h Trigger detection for negative edges on lebel 1. Trigger is armed when crossing level 0 to avoid false trigger on noise<br />
SPC_TM_BOTH 00000004h Trigger detection for positive and negative edges (any crossing of level 0)<br />
SPC_TM_HIGH 00000008h Trigger detection for HIGH levels (signal above level 0)<br />
SPC_TM_LOW 00000010h Trigger detection for LOW levels (signal below level 0)<br />
SPC_TM_WINENTER 00000020h Window trigger for entering area between level 0 and level 1<br />
SPC_TM_WINLEAVE 00000040h Window trigger for leaving area between level 0 and level 1<br />
SPC_TM_INWIN 00000080h Window trigger for signal inside window between level 0 and level 1<br />
SPC_TM_OUTSIDEWIN 00000100h Window trigger for signal outside window between level 0 and level 1<br />
For all external edge and level trigger modes, the OR mask must contain the corresponding input, as the following table shows:<br />
Register Value Direction Description<br />
SPC_TRIG_ORMASK 40410 read/write Defines the OR mask for the different trigger sources.<br />
SPC_TMASK_EXT0 2h Enable external trigger input for the OR mask<br />
Trigger Input Termination<br />
The external trigger input is a high impedance input with 1 MOhm termination aginst GND. It is possible to program a 50 Ohm termination<br />
by software to terminate fast trigger signals correctly. If you enable the termination, please make sure, that your trigger source is capable to<br />
deliver the needed current. Please check carefully whether the source is able to fulfil the trigger input specification given in the technical data<br />
section.<br />
Register Value Direction Description<br />
SPC_TRIG_TERM 40110 read/write A „1“ sets the 50 Ohm termination for external trigger signals. A „0“ sets the high impedance termination<br />
Please note that the signal levels will drop by 50% if using the 50 ohm termination and your source also has 50 ohm output impedance (both<br />
terminations will then work as a 1:2 divider). In that case it will be necessary to reprogram the trigger levels to match the new signal levels.<br />
In case of problems receiving a trigger please check the signal level of your source while connected to the terminated input.<br />
Trigger Input Coupling<br />
The external trigger input can be switched by software between AC and DC coupling. Please see the technical data section for details on the<br />
AC bandwidth.<br />
Register Value Direction Description<br />
SPC_TRIG_EXT0_ACDC 40120 read/write A „1“ sets the AC coupling for the external trigger input. A „0“ sets the DC coupling (default)<br />
(c) <strong>Spectrum</strong> GmbH 85
External (analog) trigger Trigger modes and appendant registers<br />
Trigger level<br />
All of the external (analog) trigger modes listed above require at least one trigger level to be set (except SPC_TM_NONE of course). Some<br />
like the window or the re-arm triggers require even two levels (upper and lower level) to be set. The meaning of the trigger levels is depending<br />
on the selected mode and can be found in the detailled trigger mode description that follows.<br />
Trigger levels for the external (analog) trigger to be programmed in mV:<br />
Register Value Direction Description Range<br />
SPC_TRIG_EXT_AVAIL0_MIN 42340 read returns the minimum trigger level to be programmed in mV<br />
SPC_TRIG_EXT_AVAIL0_MAX 42341 read returns the maximum trigger level to be programmed in mV<br />
SPC_TRIG_EXT_AVAIL0_STEP 42342 read returns the step size of trigger level to be programmed in mV<br />
SPC_TRIG_EXT0_LEVEL0 42320 read/write Trigger level 0 for external trigger -5000 mV to +5000 mV<br />
SPC_TRIG_EXT0_LEVEL1 42321 read/write Trigger level 1 for external trigger -5000 mV to +5000 mV<br />
Detailed description of the external analog trigger modes<br />
For all external analog trigger modes shown below, either the OR mask or the AND must contain the external trigger to activate the external<br />
input as trigger source:.<br />
Register Value Direction Description<br />
SPC_TRIG_ORMASK 40410 read/write Defines the events included within the trigger OR mask of the card.<br />
SPC_TRIG_ANDMASK 40430 read/write Defines the events included within the trigger AND mask of the card.<br />
SPC_TMASK_EXT0 2h Enables the external (analog) trigger 0 for the mask.<br />
Trigger on positive edge<br />
The trigger input is continuously sampled with the selected<br />
sample rate. If the programmed trigger level is crossed by<br />
the trigger signal from lower values to higher values (rising<br />
edge) then the trigger event will be detected.<br />
This edge triggered external trigger mode correspond to<br />
the trigger possibilities of usual oscilloscopes.<br />
Register Value Direction set to Value<br />
SPC_TRIG_EXT0_MODE 40510 read/write SPC_TM_POS 1h<br />
SPC_TRIG_EXT0_LEVEL0 42320 read/write Set it to the desired trigger level in mV mV<br />
Trigger on negative edge<br />
The trigger input is continuously sampled with the selected<br />
sample rate. If the programmed trigger level is crossed by<br />
the trigger signal from higher values to lower values (falling<br />
edge) then the trigger event will be detected.<br />
This edge triggered external trigger mode correspond to<br />
the trigger possibilities of usual oscilloscopes.<br />
Register Value Direction set to Value<br />
SPC_TRIG_EXT0_MODE 40510 read/write SPC_TM_NEG 2h<br />
SPC_TRIG_EXT0_LEVEL0 42320 read/write Set it to the desired trigger level in mV mV<br />
86 <strong>M3i.41xx</strong> / <strong>M3i.41xx</strong>-<strong>exp</strong> Manual
Trigger modes and appendant registers External (analog) trigger<br />
Trigger on positive and negative edge<br />
The trigger input is continuously sampled with the selected<br />
sample rate. If the programmed trigger level is crossed by<br />
the trigger signal (either rising or falling edge) the trigger<br />
event will be detected.<br />
Thise edge triggered external trigger mode correspond to<br />
the trigger possibilities of usual oscilloscopes.<br />
Register Value Direction set to Value<br />
SPC_TRIG_EXT0_MODE 40510 read/write SPC_TM_BOTH 4h<br />
SPC_TRIG_EXT0_LEVEL0 42320 read/write Set it to the desired trigger level in mV mV<br />
Re-arm trigger on positive edge<br />
The trigger input is continuously sampled with the selected<br />
sample rate. If the programmed re-arm level is crossed from<br />
lower to higher values, the trigger engine is armed and<br />
waiting for trigger. If the programmed trigger level is<br />
crossed by the trigger signal from lower values to higher<br />
values (rising edge) then the trigger event will be detected<br />
and the trigger engine will be disarmed. A new trigger<br />
event is only detected if the trigger engine is armed again.<br />
The re-arm trigger modes can be used to prevent the board<br />
from triggering on wrong edges in noisy signals.<br />
Register Value Direction set to Value<br />
SPC_TRIG_EXT0_MODE 40510 read/write SPC_TM_POS | SPC_TM_REARM 01000001h<br />
SPC_TRIG_EXT0_LEVEL0 42320 read/write Set it to the desired trigger level in mV mV<br />
SPC_TRIG_EXT0_LEVEL1 42330 read/write Defines the re-arm level in mV mV<br />
Re-arm trigger on negative edge<br />
The trigger input is continuously sampled with the selected<br />
sample rate. If the programmed re-arm level is crossed from<br />
higher to lower values, the trigger engine is armed and<br />
waiting for trigger. If the programmed trigger level is<br />
crossed by the trigger signal from higher values to lower<br />
values (falling edge) then the trigger event will be detected<br />
and the trigger engine will be disarmed. A new trigger<br />
event is only detected, if the trigger engine is armed again.<br />
The re-arm trigger modes can be used to prevent the board<br />
from triggering on wrong edges in noisy signals.<br />
Register Value Direction set to Value<br />
SPC_TRIG_EXT0_MODE 40510 read/write SPC_TM_NEG | SPC_TM_REARM 01000002h<br />
SPC_TRIG_EXT0_LEVEL0 42320 read/write Defines the re-arm level in mV mV<br />
SPC_TRIG_EXT0_LEVEL1 42330 read/write Set it to the desired trigger level in mV mV<br />
(c) <strong>Spectrum</strong> GmbH 87
External (analog) trigger Trigger modes and appendant registers<br />
Window trigger for entering signals<br />
The trigger input is continuously sampled with the selected<br />
sample rate. The upper and the lower level define a window.<br />
Every time the signal enters the window from the outside,<br />
a trigger event will be detected.<br />
Register Value Direction set to Value<br />
SPC_TRIG_EXT0_MODE 40510 read/write SPC_TM_WINENTER 00000020h<br />
SPC_TRIG_EXT0_LEVEL0 42320 read/write Set it to the upper trigger level in mV mV<br />
SPC_TRIG_EXT0_LEVEL1 42330 read/write Set it to the lower trigger level in mV mV<br />
Window trigger for leaving signals<br />
The trigger input is continuously sampled with the selected<br />
sample rate. The upper and the lower level define a window.<br />
Every time the signal leaves the window from the inside,<br />
a trigger event will be detected.<br />
Register Value Direction set to Value<br />
SPC_TRIG_EXT0_MODE 40510 read/write SPC_TM_WINLEAVE 00000040h<br />
SPC_TRIG_EXT0_LEVEL0 42320 read/write Set it to the upper trigger level in mV mV<br />
SPC_TRIG_EXT0_LEVEL1 42330 read/write Set it to the lower trigger level in mV mV<br />
High level trigger<br />
This trigger mode will generate an internal gate signal that<br />
can be useful in conjunction with a second trigger mode to<br />
gate that second trigger. If using this mode as a single trigger<br />
source the card will detect a trigger event at the time when<br />
entering the high level (acting like positive edge trigger) or if<br />
the trigger signal is already above the programmed level at<br />
the start it will immediately detect a trigger event.<br />
The trigger input is continuously sampled with the selected<br />
sample rate. The trigger event will be detected if the trigger<br />
input is above the programmed trigger level.<br />
Register Value Direction set to Value<br />
SPC_TRIG_EXT0_MODE 40510 read/write SPC_TM_HIGH 00000008h<br />
SPC_TRIG_EXT0_LEVEL0 42320 read/write Set it to the upper trigger level in mV mV<br />
88 <strong>M3i.41xx</strong> / <strong>M3i.41xx</strong>-<strong>exp</strong> Manual
Trigger modes and appendant registers External (analog) trigger<br />
Low level trigger<br />
This trigger mode will generate an internal gate signal that<br />
can be useful in conjunction with a second trigger mode to<br />
gate that second trigger. If using this mode as a single trigger<br />
source the card will detect a trigger event at the time when<br />
entering the low level (acting like negative edge trigger) or if<br />
the trigger signal is already above the programmed level at<br />
the start it will immediately detect a trigger event.<br />
The trigger input is continuously sampled with the selected<br />
sample rate. The trigger event will be detected if the trigger<br />
input is below the programmed trigger level.<br />
Register Value Direction set to Value<br />
SPC_TRIG_EXT0_MODE 40510 read/write SPC_TM_LOW 00000010h<br />
SPC_TRIG_EXT0_LEVEL0 42320 read/write Set it to the upper trigger level in mV mV<br />
In window trigger<br />
This trigger mode will generate an internal gate signal that<br />
can be useful in conjunction with a second trigger mode to<br />
gate that second trigger. If using this mode as a single trigger<br />
source the card will detect a trigger event at the time when<br />
entering the window defined by the two trigger levels (acting<br />
like window enter trigger) or if the trigger signal is already<br />
inside the programmed window at the start it will immediately<br />
detect a trigger event.<br />
The trigger input is continuously sampled with the selected<br />
sample rate. The trigger event will be detected if the trigger<br />
input is inside the programmed trigger window.<br />
Register Value Direction set to Value<br />
SPC_TRIG_EXT0_MODE 40510 read/write SPC_TM_INWIN 00000080h<br />
SPC_TRIG_EXT0_LEVEL0 42320 read/write Set it to the upper trigger level in mV mV<br />
SPC_TRIG_EXT0_LEVEL1 42330 read/write Set it to the lower trigger level in mV mV<br />
Outside window trigger<br />
This trigger mode will generate an internal gate signal that<br />
can be useful in conjunction with a second trigger mode to<br />
gate that second trigger. If using this mode as a single trigger<br />
source the card will detect a trigger event at the time when<br />
leaving the window defined by the two trigger levels (acting<br />
like leaving window trigger) or if the trigger signal is already<br />
outside the programmed windo at the start it will immediately<br />
detect a trigger event.<br />
The trigger input is continuously sampled with the selected<br />
sample rate. The trigger event will be detected if the trigger<br />
input is outside the programmed trigger window.<br />
Register Value Direction set to Value<br />
SPC_TRIG_EXT0_MODE 40510 read/write SPC_TM_OUTSIDEWIN 00000100h<br />
SPC_TRIG_EXT0_LEVEL0 42320 read/write Set it to the upper trigger level in mV mV<br />
SPC_TRIG_EXT0_LEVEL1 42330 read/write Set it to the lower trigger level in mV mV<br />
(c) <strong>Spectrum</strong> GmbH 89
External (TTL) trigger using multi purpose I/O connectors Trigger modes and appendant registers<br />
External (TTL) trigger using multi purpose I/O connectors<br />
90 <strong>M3i.41xx</strong> / <strong>M3i.41xx</strong>-<strong>exp</strong> Manual<br />
The M3i card series has two additional multi purpose lines that can<br />
be programmed as additional TTL trigger inputs to be combined either<br />
with the main (analog) external trigger or with some of the channel<br />
trigger modes <strong>exp</strong>lained later in this manual.<br />
Please keep in mind that the multi purpose I/O lines need to be<br />
switched to trigger input prior to being operated as trigger input. The<br />
programming of the masks and the multi purpose I/O behaviour is<br />
shown in the chapters before.<br />
TTL Trigger Mode<br />
Please find the multi purpose TTL trigger input modes below. A detailed description of the modes follows in the next chapters..<br />
Register Value Direction Description<br />
SPC_TRIG_EXT1_AVAILMODES 40501 read Bitmask shwoing all available trigger modes for external 1 (Ext1) = multi purpose X0<br />
SPC_TRIG_EXT2_AVAILMODES 40502 read Bitmask shwoing all available trigger modes for external 2 (Ext2) = multi purpose X1<br />
SPC_TRIG_EXT1_MODE 40511 read/write Defines the external trigger mode for the multi purpose X0 MMCX connector trigger input. The trigger<br />
need to be added to either OR or AND mask input to be activated.<br />
SPC_TRIG_EXT2_MODE 40512 read/write Defines the external trigger mode for the multi purpose X1 MMCX connector trigger input. The trigger<br />
need to be added to either OR or AND mask input to be activated.<br />
SPC_TM_NONE 00000000h Channel is not used for trigger detection. This is as with the trigger masks another possibility for disabling channels.<br />
SPC_TM_POS 00000001h Trigger detection for positive edges<br />
SPC_TM_NEG 00000002h Trigger detection for negative edges<br />
SPC_TM_BOTH 00000004h Trigger detection for positive and negative edges<br />
SPC_TM_HIGH 00000008h Trigger detection for HIGH levels<br />
SPC_TM_LOW 00000010h Trigger detection for LOW levels<br />
For all external edge and level trigger modes, the OR mask must contain the corresponding input, as the following table shows:<br />
Register Value Direction Description<br />
SPC_TRIG_ORMASK 40410 read/write Defines the OR mask for the different trigger sources.<br />
SPC_TMASK_EXT1 4h Enable multi purpose X0 external trigger input for the OR mask<br />
SPC_TMASK_EXT2 8h Enable multi purpose X1 external trigger input for the OR mask<br />
Edge and level triggers<br />
Rising edge TTL trigger<br />
This mode is for detecting the rising edges of an external TTL signal.<br />
The board will trigger on the first rising edge that is detected<br />
after starting the board. The next triggerevent will then be detected,<br />
if the actual recording/replay has finished and the board is<br />
armed and waiting for a trigger again.<br />
Register Value Direction Description<br />
SPC_TRIG_EXT1_MODE 40511 read/write Sets the trigger mode for multi purpose X0 trigger input.<br />
SPC_TRIG_EXT2_MODE 40512 read/write Sets the trigger mode for multi purpose X1 trigger input.<br />
SPC_TM_POS 1h Sets the trigger mode for external TTL trigger to detect positive edges.<br />
Example on how to set up the board for positive TTL trigger:<br />
spcm_dwSetParam_i32 (hDrv, SPC_TRIG_EXT0_MODE, SPC_TM_POS);// Set up ext. TTL trigger to detect positive edges
Trigger modes and appendant registers External (TTL) trigger using multi purpose I/O connectors<br />
HIGH level TTL trigger<br />
This trigger mode will generate an internal gate signal that can be<br />
very good used together with a second trigger mode to gate the<br />
trigger. If using this mode as a single trigger source the card will<br />
detect a trigger event at the time when entering the high level (acting<br />
like positive edge trigger) or if the trigger signal is already at<br />
high level at the start it will immediately detect a trigger event.<br />
The trigger input is continuously sampled with the selected sample<br />
rate. The trigger event will be detected if the trigger input is at TTL<br />
high level.<br />
Register Value Direction Description<br />
SPC_TRIG_EXT1_MODE 40511 read/write Sets the trigger mode for multi purpose X0 trigger input.<br />
SPC_TRIG_EXT2_MODE 40512 read/write Sets the trigger mode for multi purpose X1 trigger input.<br />
SPC_TM_HIGH 8h Sets the trigger mode for external TTL trigger to detect HIGH levels.<br />
Negative TTL trigger<br />
This mode is for detecting the falling edges of an external TTL signal.<br />
The board will trigger on the first falling edge that is detected<br />
after starting the board. The next triggerevent will then be detected,<br />
if the actual recording/replay has finished and the board is<br />
armed and waiting for a trigger again.<br />
Register Value Direction Description<br />
SPC_TRIG_EXT1_MODE 40511 read/write Sets the trigger mode for multi purpose X0 trigger input.<br />
SPC_TRIG_EXT2_MODE 40512 read/write Sets the trigger mode for multi purpose X1 trigger input.<br />
SPC_TM_NEG 2h Sets the trigger mode for external TTL trigger to detect negative edges.<br />
LOW level TTL trigger<br />
This trigger mode will generate an internal gate signal that can be<br />
very good used together with a second trigger mode to gate the<br />
trigger. If using this mode as a single trigger source the card will<br />
detect a trigger event at the time when entering the low level (acting<br />
like negative edge trigger) or if the trigger signal is already at low<br />
level at the start it will immediately detect a trigger event.<br />
The trigger input is continuously sampled with the selected sample<br />
rate. The trigger event will be detected if the trigger input is at TTL<br />
low level.<br />
Register Value Direction Description<br />
SPC_TRIG_EXT1_MODE 40511 read/write Sets the trigger mode for multi purpose X0 trigger input.<br />
SPC_TRIG_EXT2_MODE 40512 read/write Sets the trigger mode for multi purpose X1 trigger input.<br />
SPC_TM_LOW 10h Sets the trigger mode for external TTL trigger to detect LOW levels.<br />
(c) <strong>Spectrum</strong> GmbH 91
Channel Trigger Trigger modes and appendant registers<br />
Positive and negative TTL trigger (both edges)<br />
This mode is for detecting the rising and falling edges of an external<br />
TTL signal. The board will trigger on the first rising or falling<br />
edge that is detected after starting the board. The next triggerevent<br />
will then be detected, if the actual recording/replay has finished<br />
and the board is armed and waiting for a trigger again.<br />
Register Value Direction Description<br />
SPC_TRIG_EXT1_MODE 40511 read/write Sets the trigger mode for multi purpose X0 trigger input.<br />
SPC_TRIG_EXT2_MODE 40512 read/write Sets the trigger mode for multi purpose X1 trigger input.<br />
SPC_TM_BOTH 4h Sets the trigger mode for external TTL trigger to detect positive and negative edges.<br />
Channel Trigger<br />
Overview of the channel trigger registers<br />
92 <strong>M3i.41xx</strong> / <strong>M3i.41xx</strong>-<strong>exp</strong> Manual<br />
The channel trigger modes are the most common modes, compared<br />
to external equipment like oscilloscopes. The huge variety of different<br />
channel trigger modes enable you to observe nearly any part of the<br />
analog signal. This chapter is about to <strong>exp</strong>lain the different modes in<br />
detail. To enable the channel trigger, you have to set the channel triggermode<br />
register accordingly. Therefore you have to choose, if you<br />
either want only one channel to be the trigger source, or if you want<br />
to combine two or more channels to a logical OR or a logical AND<br />
trigger.<br />
For all channel trigger modes, the OR mask must contain the corresponding input channels (channel 0 taken as example here):.<br />
Register Value Direction Description<br />
SPC_TRIG_CH_ORMASK0 40460 read/write Defines the OR mask for the channel trigger sources.<br />
SPC_TMASK0_CH0 1h Enables channel0 input for the channel OR mask<br />
The following table shows the according registers for the two general channel trigger modes. It lists the maximum of the available channel<br />
mode registers for your card’s series. So it can be that you have less channels installed on your specific card and therefore have less valid<br />
channel mode registers. If you try to set a channel, that is not installed on your specific card, a error message will be returned.<br />
Register Value Direction Description<br />
SPC_TRIG_CH_AVAILMODES 40600 read Bitmask, in which all bits of the below mentioned modes for the channel trigger are set, if available.<br />
SPC_TRIG_CH0_MODE 40610 read/write Sets the trigger mode for channel 0. Channel 0 must be enabled in the channel OR/AND mask.<br />
SPC_TRIG_CH1_MODE 40611 read/write Sets the trigger mode for channel 1. Channel 1 must be enabled in the channel OR/AND mask.<br />
SPC_TM_NONE 00000000h Channel is not used for trigger detection. This is as with the trigger masks another possibility for disabling channels.<br />
SPC_TM_POS 00000001h Enables the trigger detection for positive edges<br />
SPC_TM_NEG 00000002h Enables the trigger detection for negative edges<br />
SPC_TM_BOTH 00000004h Enables the trigger detection for positive and negative edges<br />
SPC_TM_POS | SPC_TM_REARM 01000001h Trigger detection for positive edges on lebel 0. Trigger is armed when crossing level 1 to avoid false trigger on noise<br />
SPC_TM_NEG | SPC_TM_REARM 01000002h Trigger detection for negative edges on lebel 1. Trigger is armed when crossing level 0 to avoid false trigger on noise<br />
SPC_TM_LOW 00000010h Enables the trigger detection for LOW levels<br />
SPC_TM_HIGH 00000008h Enables the trigger detection for HIGH levels<br />
SPC_TM_WINENTER 00000020h Enables the window trigger for entering signals<br />
SPC_TM_WINLEAVE 00000040h Enables the window trigger for leaving signals<br />
SPC_TM_INWIN 00000080h Enables the window trigger for inner signals<br />
SPC_TM_OUTSIDEWIN 00000100h Enables the window trigger for outer signals
Trigger modes and appendant registers Channel Trigger<br />
If you want to set up a two channel board to detect only a positive edge on channel 0, you would have to setup the board like the following<br />
example. Both of the examples either for the single trigger source and the OR trigger mode do not include the necessary settings for the trigger<br />
levels. These settings are detailed described in the following paragraphs.<br />
spcm_dwSetParam_i32 (hDrv, SPC_TRIG_CH_ORMASK0, SPC_TMASK0_CH0); // Enable channel 0 in the OR mask<br />
spcm_dwSetParam_i32 (hDrv, SPC_TRIG_CH0_MODE, SPC_TM_POS ); // Set triggermode of channel 0 to positive edge<br />
If you want to set up a two channel board to detect a trigger event on either a positive edge on channel 0 or a negative edge on channel 1<br />
you would have to set up your board as the following example shows.<br />
spcm_dwSetParam_i32 (hDrv, SPC_TRIG_CH_ORMASK0, SPC_TMASK0_CH0 | SPC_TMASK0_CH1); // Enable channel 0 + 1<br />
spcm_dwSetParam_i32 (hDrv, SPC_TRIG_CH0_MODE, SPC_TM_POS ); // Set triggermode of channel 0 to positive edge<br />
spcm_dwSetParam_i32 (hDrv, SPC_TRIG_CH1_MODE, SPC_TM_NEG ); // Set triggermode of channel 1 to negative edge<br />
Channel trigger level<br />
All of the channel trigger modes listed above require at least one trigger level to be set (except SPC_TM_NONE of course). Some modes like<br />
the window triggers require even two levels (upper and lower level) to be set.<br />
After the data has been sampled, the upper N data bits are compared with the N bits of the trigger levels. The following table shows the level<br />
registers and the possible values they can be set to for your specific card.<br />
As the trigger levels are compared to the digitized data, the trigger levels depend on the channels input range. For every input range available<br />
to your board there is a corresponding range of trigger levels. On the different input ranges the possible stepsize for the trigger levels differs<br />
as well as the maximum and minimum values. The table further below gives you the absolute trigger levels for your specific card series.<br />
10 bit resolution for the trigger levels:<br />
Register Value Direction Description Range<br />
SPC_TRIG_CH0_LEVEL0 42200 read/write Trigger level 0 channel 0: main trigger level / upper level if 2 levels used -511 to +511<br />
SPC_TRIG_CH1_LEVEL0 42201 read/write Trigger level 0 channel 1: main trigger level / upper level if 2 levels used -511 to +511<br />
SPC_TRIG_CH0_LEVEL1 42300 read/write Trigger level 1 channel 0: auxiliary trigger level / lower level if 2 levels used -511 to +511<br />
SPC_TRIG_CH1_LEVEL1 42301 read/write Trigger level 1 channel 1: auxiliary trigger level / lower level if 2 levels used -511 to +511<br />
Trigger level representation depending on selected input range<br />
Input ranges<br />
Triggerlevel ±200 mV ±500 mV ±1 V ±2 V ±2.5 V ±5 V ±10 V<br />
Path 0 (Buffered) x x x x n.a. x x<br />
Path 1 (HF, 50<br />
Ohms)<br />
n.a. x x n.a. x x n.a.<br />
511 +199.6 mV +499.0 mV +998.0 mV +1.996 V +2.495 V +4.99 V +9.98 V<br />
510<br />
…<br />
+199.2 mV +498.0 mV +996.0 mV +1.992 V +2.490 V +4.98 V +9.96 V<br />
256<br />
…<br />
+100.0 mV +250.0 mV +500.0 mV +1.00 V +1.25 V +2.50 V +5.00 V<br />
2 +0.8 mV +2.0 mV +4.0 mV +7.8 mV +9.8 mV +19.6 mV +39.0 mV<br />
1 +0.4 mV +1.0 mV +2.0 mV +3.9 mV +4.9 mV +9.8 mV +19.5 mV<br />
0 0 V 0 V 0 V 0 V 0V 0 V 0 V<br />
-1 -0.4 mV -1.0 mV -2.0 mV -3.9 mV -4.9 mV -9.8 mV -19.5 mV<br />
-2<br />
…<br />
-0.8 mV -2.0 mV -4.0 mV -7.8 mV -9.8 mV -19.6 mV -39.0 mV<br />
-256<br />
…<br />
-100.0 mV -250.0 mV -500.0 mV -1.00 V -1.25 V -2.50 V -5.00 V<br />
-510 -199.2 mV -498.0 mV -996.0 mV -1.992 V -2.490 V -4.98 V -9.96 V<br />
-511 -199.6 mV -499.0 mV -998.0 mV -1.996 V -2.495 V -4.99 V -9.98 V<br />
Step size 0.4 mV 1.0 mV 2.0 mV 3.9 mV 4.9 mV 9.8 mV 19.5 mV<br />
The following example shows, how to set up a one channel board to trigger on channel 0 with rising edge. It is assumed, that the input range<br />
of channel 0 is set to the the ±200 mV range. The decimal value for SPC_TRIG_CH0_LEVEL0 corresponds then with 16.0 mV, which is the<br />
resulting trigger level.<br />
spcm_dwSetParam_i32 (hDrv, SPC_TRIG_CH0_MODE, SPC_TM_POS); // Setting up channel trig (rising edge)<br />
spcm_dwSetParam_i32 (hDrv, SPC_TRIG_CH0_LEVEL0, 40); // Sets triggerlevel to 16.0 mV<br />
spcm_dwSetParam_i32 (hDrv, SPC_TRIG_CH_ORMASK0, SPC_TMASK0_CH0); // and enable it within the OR mask<br />
(c) <strong>Spectrum</strong> GmbH 93
Channel Trigger Trigger modes and appendant registers<br />
Reading out the number of possible trigger levels<br />
The <strong>Spectrum</strong> driver also contains a register, that holds the value of the maximum possible different trigger levels considering the above mentioned<br />
exclusion of the most negative possible value. This is useful, as new drivers can also be used with older hardware versions, because<br />
you can check the trigger resolution during run time. The register is shown in the following table:<br />
Register Value Direction Description<br />
SPC_READTRGLVLCOUNT 2500 r Contains the number of different possible trigger levels.<br />
In case of a board that uses 8 bits for trigger detection the returned value would<br />
be 255, as either the zero and 127 positive and negative values are possible.The<br />
resulting trigger step width in mV can easily be calculated from the returned<br />
value. It is assumed that you know the actually selected input range.<br />
To give you an example on how to use this formula we assume, that the<br />
±1.0 V input range is selected and the board uses 8 bits for trigger detection.<br />
The result would be 7.81 mV, which is the step width for your type of board<br />
within the actually chosen input range.<br />
Detailed description of the channel trigger modes<br />
For all channel trigger modes, the OR mask must contain the corresponding input channels:.<br />
Register Value Direction Description<br />
SPC_TRIG_CH_ORMASK0 40460 read/write Defines the OR mask for the channel trigger sources.<br />
SPC_TMASK0_CH0 1h Enables channel0 input for the channel OR mask<br />
SPC_TMASK0_CH1 2h Enables channel1 input for the channel OR mask<br />
Channel trigger on positive edge<br />
The analog input is continuously sampled with the selected<br />
sample rate. If the programmed trigger level is crossed by<br />
the channel’s signal from lower values to higher values (rising<br />
edge) then the triggerevent will be detected.<br />
These edge triggered channel trigger modes correspond to<br />
the trigger possibilities of usual oscilloscopes.<br />
Register Value Direction set to Value<br />
SPC_TRIG_CH0_MODE 40610 read/write SPC_TM_POS 1h<br />
SPC_TRIG_CH0_LEVEL0 42200 read/write Set it to the desired trigger level relatively to the channel’s input range. board dependant<br />
Channel trigger on negative edge<br />
The analog input is continuously sampled with the selected<br />
sample rate. If the programmed trigger level is crossed by<br />
the channel’s signal from higher values to lower values (falling<br />
edge) then the triggerevent will be detected.<br />
These edge triggered channel trigger modes correspond to<br />
the trigger possibilities of usual oscilloscopes.<br />
Register Value Direction set to Value<br />
SPC_TRIG_CH0_MODE 40610 read/write SPC_TM_NEG 2h<br />
SPC_TRIG_CH0_LEVEL0 42200 read/write Set it to the desired trigger level relatively to the channel’s input range. board dependant<br />
94 <strong>M3i.41xx</strong> / <strong>M3i.41xx</strong>-<strong>exp</strong> Manual<br />
Input Range<br />
max<br />
– Input Range<br />
min<br />
Trigger step width = ------------------------------------------------------------------------------------------------------------------------------------------------<br />
Number of trigger levels + 1<br />
+1000 mV – (-1000 mV)<br />
Trigger step width =<br />
------------------------------------------------------------------------------------------------------<br />
255 + 1
Trigger modes and appendant registers Channel Trigger<br />
Channel trigger on positive and negative edge<br />
The analog input is continuously sampled with the selected<br />
sample rate. If the programmed trigger level is crossed by<br />
the channel’s signal (either rising or falling edge) the triggerevent<br />
will be detected.<br />
These edge triggered channel trigger modes correspond to<br />
the trigger possibilities of usual oscilloscopes.<br />
Register Value Direction set to Value<br />
SPC_TRIG_CH0_MODE 40610 read/write SPC_TM_BOTH 4h<br />
SPC_TRIG_CH0_LEVEL0 42200 read/write Set it to the desired trigger level relatively to the channel’s input range. board dependant<br />
Channel re-arm trigger on positive edge<br />
The analog input is continuously sampled with the selected<br />
sample rate. If the programmed re-arm level is crossed from<br />
lower to higher values, the trigger engine is armed and<br />
waiting for trigger. If the programmed trigger level is<br />
crossed by the channel’s signal from lower values to higher<br />
values (rising edge) then the triggerevent will be detected<br />
and the trigger engine will be disarmed. A new trigger<br />
event is only detected if the trigger engine is armed again.<br />
The re-arm trigger modes can be used to prevent the board<br />
from triggering on wrong edges in noisy signals.<br />
Register Value Direction set to Value<br />
SPC_TRIG_CH0_MODE 40610 read/write SPC_TM_POS | SPC_TM_REARM 01000001h<br />
SPC_TRIG_CH0_LEVEL0 42200 read/write Set it to the desired trigger level relatively to the channel’s input range. board dependant<br />
SPC_TRIG_CH0_LEVEL1 42300 read/write Defines the re-arm level relatively to the channels’s input range board dependant<br />
Channel re-arm trigger on negative edge<br />
The analog input is continuously sampled with the selected<br />
sample rate. If the programmed re-arm level is crossed from<br />
higher to lower values, the trigger engine is armed and<br />
waiting for trigger. If the programmed trigger level is<br />
crossed by the channel’s signal from higher values to lower<br />
values (falling edge) then the triggerevent will be detected<br />
and the trigger engine will be disarmed. A new trigger<br />
event is only detected, if the trigger engine is armed again.<br />
The re-arm trigger modes can be used to prevent the board<br />
from triggering on wrong edges in noisy signals.<br />
Register Value Direction set to Value<br />
SPC_TRIG_CH0_MODE 40610 read/write SPC_TM_NEG | SPC_TM_REARM 01000002h<br />
SPC_TRIG_CH0_LEVEL0 42200 read/write Defines the re-arm level relatively to the channels’s input range board dependant<br />
SPC_TRIG_CH0_LEVEL1 42300 read/write Set it to the desired trigger level relatively to the channel’s input range. board dependant<br />
(c) <strong>Spectrum</strong> GmbH 95
Channel Trigger Trigger modes and appendant registers<br />
Channel window trigger for entering signals<br />
The analog input is continuously sampled with the selected<br />
sample rate. The upper and the lower level define a window.<br />
Every time the signal enters the window from the outside,<br />
a triggerevent will be detected.<br />
Register Value Direction set to Value<br />
SPC_TRIG_CH0_MODE 40610 read/write SPC_TM_WINENTER 00000020h<br />
SPC_TRIG_CH0_LEVEL0 42200 read/write Set it to the upper trigger level relatively to the channel’s input range. board dependant<br />
SPC_TRIG_CH0_LEVEL1 42300 read/write Set it to the lower trigger level relatively to the channel’s input range. board dependant<br />
Channel window trigger for leaving signals<br />
The analog input is continuously sampled with the selected<br />
sample rate. The upper and the lower level define a window.<br />
Every time the signal leaves the window from the inside,<br />
a triggerevent will be detected.<br />
Register Value Direction set to Value<br />
SPC_TRIG_CH0_MODE 40610 read/write SPC_TM_WINLEAVE 00000040h<br />
SPC_TRIG_CH0_LEVEL0 42200 read/write Set it to the upper trigger level relatively to the channel’s input range. board dependant<br />
SPC_TRIG_CH0_LEVEL1 42300 read/write Set it to the lower trigger level relatively to the channel’s input range. board dependant<br />
High level trigger<br />
This trigger mode will generate an internal gate signal that<br />
can be very good used together with a second trigger mode<br />
to gate the trigger. If using this mode as a single trigger<br />
source the card will detect a trigger event at the time when<br />
entering the high level (acting like positive edge trigger) or if<br />
the analog signal is already above the programmed level at<br />
the start it will immediately detect a trigger event.<br />
The channel is continuously sampled with the selected sample<br />
rate. The trigger event will be detected if the analog signal is<br />
above the programmed trigger level.<br />
Register Value Direction set to Value<br />
SPC_TRIG_CH0_MODE 40610 read/write SPC_TM_HIGH 00000008h<br />
SPC_TRIG_CH0_LEVEL0 42200 read/write Set it to the upper trigger level in mV mV<br />
96 <strong>M3i.41xx</strong> / <strong>M3i.41xx</strong>-<strong>exp</strong> Manual
Trigger modes and appendant registers Channel Trigger<br />
Low level trigger<br />
This trigger mode will generate an internal gate signal that<br />
can be very good used together with a second trigger mode<br />
to gate the trigger. If using this mode as a single trigger<br />
source the card will detect a trigger event at the time when<br />
entering the low level (acting like negative edge trigger) or if<br />
the signal is already above the programmed level at the start<br />
it will immediately detect a trigger event.<br />
The channel is continuously sampled with the selected sample<br />
rate. The trigger event will be detected if the analog signal is<br />
below the programmed trigger level.<br />
Register Value Direction set to Value<br />
SPC_TRIG_CH0_MODE 40610 read/write SPC_TM_LOW 00000010h<br />
SPC_TRIG_CH0_LEVEL0 42200 read/write Set it to the upper trigger level in mV mV<br />
In window trigger<br />
This trigger mode will generate an internal gate signal that<br />
can be very good used together with a second trigger mode<br />
to gate the trigger. If using this mode as a single trigger<br />
source the card will detect a trigger event at the time when<br />
entering the window defined by the two trigger levels (acting<br />
like window enter trigger) or if the signal is already inside the<br />
programmed window at the start it will immediately detect a<br />
trigger event.<br />
The channel is continuously sampled with the selected sample<br />
rate. The trigger event will be detected if the analog signal is<br />
inside the programmed trigger window.<br />
Register Value Direction set to Value<br />
SPC_TRIG_CH0_MODE 40610 read/write SPC_TM_INWIN 00000080h<br />
SPC_TRIG_CH0_LEVEL0 42200 read/write Set it to the upper trigger level in mV mV<br />
SPC_TRIG_CH0_LEVEL1 42300 read/write Set it to the lower trigger level in mV mV<br />
Outside window trigger<br />
This trigger mode will generate an internal gate signal that<br />
can be very good used together with a second trigger mode<br />
to gate the trigger. If using this mode as a single trigger<br />
source the card will detect a trigger event at the time when<br />
leaving the window defined by the two trigger levels (acting<br />
like leaving window trigger) or if the signal is already outside<br />
the programmed windo at the start it will immediately detect<br />
a trigger event.<br />
The channel is continuously sampled with the selected sample<br />
rate. The trigger event will be detected if the analog signal is<br />
outside the programmed trigger windo.<br />
Register Value Direction set to Value<br />
SPC_TRIG_CH0_MODE 40610 read/write SPC_TM_OUTSIDEWIN 00000100h<br />
SPC_TRIG_CH0_LEVEL0 42200 read/write Set it to the upper trigger level in mV mV<br />
SPC_TRIG_CH0_LEVEL1 42300 read/write Set it to the lower trigger level in mV mV<br />
(c) <strong>Spectrum</strong> GmbH 97
Recording modes Option Multiple Recording/Replay<br />
Option Multiple Recording/Replay<br />
The option Multiple Recording/Replay allows the acquisition/<br />
generation of data blocks with multiple trigger events without restarting<br />
the hardware.<br />
The on-board memory will be divided into several segments of<br />
the same size. Each segment will be filled with data when a trigger<br />
event occurs (acquisition mode) or replay data of one segment<br />
(replay mode),<br />
As this mode is totally controlled in hardware there is a very<br />
small re-arm time from end of one segment until the trigger detection<br />
is enabled again. You’ll find that re-arm time in the technical<br />
data section of this manual.<br />
The following table shows the register for defining the structure of the segments to be recorded with each trigger event.<br />
Register Value Direction Description<br />
SPC_POSTTRIGGER 10100 read/write Acquistion only: defines the number of samples to be recorded after the trigger event.<br />
SPC_SEGMENTSIZE 10010 read/write Size of one Multiple Recording/Replay segment: the total number of samples to be recorded/<br />
replayed after detection of one trigger event including the time recorded before the trigger (pre trigger).<br />
Each segment in acquisition mode can consist of pretrigger and/or posttrigger samples. The user always has to set the total segment size<br />
and the posttrigger, while the pretrigger is calculated within the driver with the formula: [pretrigger] = [segment size] - [posttrigger].<br />
When using Multiple Recording the maximum pretrigger is limited depending on the number of active channels.<br />
When the calculated value exceeds that limit, the driver will return the error ERR_PRETRIGGERLEN.<br />
Please have a look at the table further below to see the maximum pretrigger length that is possible.<br />
Recording modes<br />
Standard Mode<br />
With every detected trigger event one data block is filled with data. The length of one multiple recording segment is set by the value of the<br />
segment size register SPC_SEGMENTSIZE. The total amount of samples to be recorded is defined by the memsize register.<br />
Memsize must be set to a a multiple of the segment size. The table below shows the register for enabling Multiple Recording. For detailed<br />
information on how to setup and start the standard acquisition mode please refer to the according chapter earlier in this manual.<br />
Register Value Direction Description<br />
SPC_CARDMODE 9500 read/write Defines the used operating mode<br />
SPC_REC_STD_MULTI 2 Enables Multiple Recording for standard acquisition.<br />
The total number of samples to be recorded to the on-board memory in Standard Mode is defined by the SPC_MEMSIZE register.<br />
Register Value Direction Description<br />
SPC_MEMSIZE 10000 read/write Defines the total number of samples to be recorded.<br />
FIFO Mode<br />
The Multiple Recording in FIFO Mode is similar to the Multiple Recording in Standard Mode. In contrast to the standard mode it is not necessary<br />
to program the number of samples to be recorded. The acquisition is running until the user stops it. The data is read block by block<br />
by the driver as described under FIFO single mode example earlier in this manual. These blocks are online available for further data processing<br />
by the user program. This mode significantly reduces the amount of data to be transfered on the PCI bus as gaps of no interest do not<br />
have to be transferred. This enables you to use faster sample rates than you would be able to in FIFO mode without Multiple Recording.<br />
The advantage of Multiple Recording in FIFO mode is that you can stream data online to the host system. You can make real-time data processing<br />
or store a huge amount of data to the hard disk. The table below shows the dedicated register for enabling Multiple Recording. For<br />
detailed information how to setup and start the board in FIFO mode please refer to the according chapter earlier in this manual.<br />
Register Value Direction Description<br />
SPC_CARDMODE 9500 read/write Defines the used operating mode<br />
SPC_REC_FIFO_MULTI 32 Enables Multiple Recording for FIFO acquisition.<br />
The number of segments to be recorded must be set separately with the register shown in the following table:<br />
Register Value Direction Description<br />
SPC_LOOPS 10020 read/write Defines the number of segments to be recorded<br />
0 Recording will be infinite until the user stops it.<br />
1 … [4G - 1] Defines the total segments to be recorded.<br />
98 <strong>M3i.41xx</strong> / <strong>M3i.41xx</strong>-<strong>exp</strong> Manual
Option Multiple Recording/Replay Trigger Modes<br />
Limits of pre trigger, post trigger, memory size<br />
The maximum memory size parameter is only limited by the number of activated channels and by the amount of installed memory. Please<br />
keep in mind that each samples needs 2 bytes of memory to be stored. Minimum memory size as well as minimum and maximum post trigger<br />
limits are independent of the activated channels or the installed memory.<br />
Due to the internal organization of the card memory there is a certain stepsize when setting these values that has to be taken into account.<br />
The following table gives you an overview of all limits concerning pre trigger, post trigger, memory size, segment size and loops. The table<br />
shows all values in relation to the installed memory size in samples. If more memory is installed the maximum memory size figures will increase<br />
according to the complete installed memory<br />
Activated Used Memory size Pre trigger Post trigger Segment size Loops<br />
Channels Mode SPC_MEMSIZE SPC_PRETRIGGER SPC_POSTTRIGGER SPC_SEGMENTSIZE SPC_LOOPS<br />
Min Max Step Min Max Step Min Max Step Min Max Step Min Max Step<br />
1 channel Standard Single 16 Mem 8 defined by post trigger 8 8G - 8 8 not used not used<br />
Standard Multi/ABA 16 Mem 8 8 8k 8 8 Mem/2 8 16 Mem/2 8 not used<br />
FIFO Single not used 8 8k 8 not used 16 8G - 8 8 0 (∞) 4G - 1 1<br />
FIFO Multi/ABA not used 8 8k 8 8 8G - 8 8 16 Mem/2 8 0 (∞) 4G - 1 1<br />
2 channels Standard Single 16 Mem/2 8 defined by post trigger 8 8G - 8 8 not used not used<br />
Standard Multi/ABA 16 Mem/2 8 8 4k 8 8 Mem/4 8 16 Mem/4 8 not used<br />
FIFO Single not used 8 4k 8 not used 16 8G - 8 8 0 (∞) 4G - 1 1<br />
FIFO Multi/ABA not used 8 4k 8 8 8G - 8 8 16 Mem/4 8 0 (∞) 4G - 1 1<br />
All figures listed here are given in samples. An entry of [32G - 8] means [32 GSamples - 8 ] = 34,359,738,360 samples.<br />
The given memory and memory / divider figures depend on the installed on-board memory as listed below:<br />
128 MSample 256 MSample<br />
Installed Memory<br />
512 MSample 1 GSample 2 GSample<br />
Mem 128 MSample 256 MSample 512 MSample 1 GSample 2 GSample<br />
Mem / 2 64 MSample 128 MSample 256 MSample 512 MSample 1 GSample<br />
Mem / 4 32 MSample 64 MSample 128 MSample 256 MSample 512 MSample<br />
Please keep in mind that this table shows all values at once. Only the absolute maximum and minimum values are shown. There might be<br />
additional limitations. Which of these values is programmed depends on the used mode. Please read the detailed documentation of the mode.<br />
Multiple Recording and Timestamps<br />
Multiple Recording is well matching with the timestamp option. If timestamp<br />
recording is activated each trigger event and therefore each Multiple Recording<br />
segment will get timestamped as shown in the drawing on the right.<br />
Please keep in mind that the trigger events are timestamped, not the beginning<br />
of the acquisition. The first sample that is available is at the time position<br />
of [Timestamp - Pretrigger].<br />
The programming details of the timestamp option is <strong>exp</strong>lained in an extra<br />
chapter.<br />
Trigger Modes<br />
When using Multiple Recording all of the card’s trigger modes can be used except the software trigger. For detailed information on the available<br />
trigger modes, please take a look at the relating chapter earlier in this manual.<br />
Programming examples<br />
The following example shows how to set up the card for Multiple Recording in standard mode.<br />
spcm_dwSetParam_i32 (hDrv, SPC_CARDMODE, SPC_REC_STD_MULTI); // Enables Standard Multiple Recording<br />
spcm_dwSetParam_i32 (hDrv, SPC_SEGMENTSIZE, 1024); // Set the segment size to 1024 samples<br />
spcm_dwSetParam_i32 (hDrv, SPC_POSTTRIGGER, 768); // Set the posttrigger to 768 samples and therefore<br />
// the pretrigger will be 256 samples<br />
spcm_dwSetParam_i32 (hDrv, SPC_MEMSIZE, 4096); // Set the total memsize for recording to 4096 samples<br />
// so that actually four segments will be recorded<br />
spcm_dwSetParam_i32 (hDrv, SPC_TRIG_EXT0_MODE, SPC_TM_POS); // Set triggermode to ext. TTL mode (rising edge)<br />
spcm_dwSetParam_i32 (hDrv, SPC_TRIG_ORMASK, SPC_TMASK_EXT0); // and enable it within the trigger OR-mask<br />
(c) <strong>Spectrum</strong> GmbH 99
Programming examples Option Multiple Recording/Replay<br />
The following example shows how to set up the card for Multiple Recording in FIFO mode.<br />
spcm_dwSetParam_i32 (hDrv, SPC_CARDMODE, SPC_REC_FIFO_MULTI); // Enables FIFO Multiple Recording<br />
spcm_dwSetParam_i32 (hDrv, SPC_SEGMENTSIZE, 2048); // Set the segment size to 2048 samples<br />
spcm_dwSetParam_i32 (hDrv, SPC_POSTTRIGGER, 1920); // Set the posttrigger to 1920 samples and therefore<br />
// the pretrigger will be 128 samples<br />
spcm_dwSetParam_i32 (hDrv, SPC_LOOPS 256); // 256 segments will be recorded<br />
spcm_dwSetParam_i32 (hDrv, SPC_TRIG_EXT0_MODE, SPC_TM_NEG); // Set triggermode to ext. TTL mode (falling edge)<br />
spcm_dwSetParam_i32 (hDrv, SPC_TRIG_ORMASK, SPC_TMASK_EXT0); // and enable it within the trigger OR-mask<br />
100 <strong>M3i.41xx</strong> / <strong>M3i.41xx</strong>-<strong>exp</strong> Manual
Option Timestamps General information<br />
Option Timestamps<br />
General information<br />
The timestamp function is used to record trigger events relative to the beginning of the measurement, relative to a fixed time-zero point or<br />
synchronized to an external reset clock. The reset clock can come from a radio clock a GPS signal or from any other external machine.<br />
The timestamp is internally realized as a very wide counter that is running with the currently used sampling rate. The counter is reset either<br />
by <strong>exp</strong>licit software command or depending on the mode by the start of the card. On receiving the trigger event the current counter value is<br />
stored in an extra FIFO memory.<br />
This function is designed as an enhancement to the Multiple Recording mode and is also used together with the ABA mode option but can<br />
also be used without these options with plain single acquisitions.<br />
Each recorded timestamp consists of the number of samples that has been counted since the last<br />
counter reset has been done. The actual time in relation to the reset command can be easily calculated<br />
by the formula on the right. Please note that the timestamp recalculation depends on the currently<br />
used sampling rate. Please have a look at the clock chapter to see how to read out the<br />
sampling rate.<br />
If you want to know the time between two timestamps, you can simply calculate this by the formula<br />
on the right.<br />
The following registers can be used for the timestamp option:<br />
Register Value Direction Description<br />
SPC_TIMESTAMP_STARTTIME 47030 read/write Return the reset time when using reference clock mode. Hours are placed in bit 16 to 23, minutes are<br />
placed in bit 8 to 15, seconds are placed in bit 0 to 7<br />
SPC_TIMESTAMP_STARTDATE 47031 read/write Return the reset date when using reference clock mode. The year is placed in bit 16 to 31, the month<br />
is placed in bit 8 to 15 and the day of month is placed in bit 0 to 7<br />
SPC_TIMESTAMP_TIMEOUT 47045 read/write Set’s a timeout in milli seconds for waiting of an reference clock edge<br />
SPC_TIMESTAMP_AVAILMODES 47001 read Returns all available modes as a bitmap. Modes are listed below<br />
SPC_TIMESTAMP_CMD 47000 read/write Programs a timestamp mode and performs commands as listed below<br />
SPC_TSMODE_DISABLE 0 Timestamp is disabled.<br />
SPC_TS_RESET 1h The counters are reset. If reference clock mode is used this command waits for the edge the timeout time.<br />
SPC_TSMODE_STANDARD 2h Standard mode, counter is reset by <strong>exp</strong>licit reset command.<br />
SPC_TSMODE_STARTRESET 4h Counter is reset on every card start, all timestamps are in relation to card start.<br />
SPC_TSCNT_INTERNAL 100h Counter is running with complete width on sampling clock<br />
SPC_TSCNT_REFCLOCKPOS 200h Counter is split, upper part is running with external reference clock positive edge, lower part is running with sampling<br />
clock<br />
SPC_TSCNT_REFCLOCKNEG 400h Counter is split, upper part is running with external reference clock negative edge, lower part is running with sampling<br />
clock<br />
SPC_TSXIOINC_ENABLE 2000h Enables the trigger synchronous acquisition of the two 10 bit incremental counters with every stored timestamp in the<br />
upper 20 bit of the timestamp data.<br />
SPC_TSXIOACQ_ENABLE 1000h Enables the trigger synchronous acquisition of the BaseXIO inputs with every stored timestamp in the upper byte.<br />
SPC_TSXIOACQ_DISABLE 0 The timestamp is filled up with leading zeros as a sign extension for positive values.<br />
SPC_TSFEAT_NONE 0 No additional timestamp is created. The total number of stamps is only trigger related.<br />
SPC_TSFEAT_STORE1STABA 10000h Enables the creation of one additional timestamp for the first A area sample when using the optional ABA (dual-timebase)<br />
mode.<br />
Example for setting timestamp mode:<br />
The timestamp mode consists of one of the mode constants, one of the counter and one of the feature constants:<br />
// setting timestamp mode to standard using internal clocking<br />
spcm_dwSetParam_i32 (hDrv, SPC_TIMESTAMP_CMD, SPC_TSMODE_STANDARD | SPC_TSCNT_INTERNAL | SPC_TSFEAT_NONE);<br />
// setting timestamp mode to start reset mode using internal clocking<br />
spcm_dwSetParam_i32 (hDrv, SPC_TIMESTAMP_CMD, SPC_TSMODE_STARTRESET | SPC_TSCNT_INTERNAL | SPC_TSFEAT_NONE);<br />
// setting timestamp mode to standard using external reference clock with positive edge<br />
spcm_dwSetParam_i32 (hDrv, SPC_TIMESTAMP_CMD, SPC_TSMODE_STANDARD | SPC_TSCNT_REFCLOCKPOS | SPC_TSFEAT_NONE);<br />
(c) <strong>Spectrum</strong> GmbH 101<br />
∆t<br />
=<br />
t<br />
Timestamp<br />
= ---------------------------------------------------------<br />
Sampling rate<br />
Timestamp<br />
n + 1<br />
– Timestamp<br />
n<br />
----------------------------------------------------------------------------------------------------------------------------<br />
Sampling rate
Timestamp modes Option Timestamps<br />
Timestamp modes<br />
Standard mode<br />
In standard mode the timestamp counter is set to zero once by writing the TS_RESET commando to the command register. After that command<br />
the counter counts continuously independent of start and stop of acquisition. The timestamps of all recorded trigger events are referenced to<br />
this common zero time. With this mode you can calculate the exact time difference between different recordings and also within one acquisition<br />
(if using Multiple Recording or Gated Sampling).<br />
The following table shows the valid values that can be written to the timestamp command register for this mode:<br />
Register Value Direction Description<br />
SPC_TIMESTAMP_CMD 47000 read/write Programs a timestamp mode and performs commands as listed below<br />
SPC_TSMODE_DISABLE 0 Timestamp is disabled.<br />
SPC_TS_RESET 1h The timestamp counter is set to zero<br />
SPC_TSMODE_STANDARD 2h Standard mode, counter is reset by <strong>exp</strong>licit reset command.<br />
SPC_TSCNT_INTERNAL 100h Counter is running with complete width on sampling clock<br />
Please keep in mind that this mode only work sufficiently as long as you don’t change the sampling rate<br />
between two acquisitions that you want to compare.<br />
StartReset mode<br />
In StartReset mode the timestamp counter is set to zero on every start of the card. After starting the card the counter counts continuously. The<br />
timestamps of one recording are referenced to the start of the recording. This mode is very useful for Multiple Recording and Gated Sampling<br />
(see according chapters for detailed information on these two optional modes)<br />
The following table shows the valid values that can be written to the timestamp command register.<br />
Register Value Direction Description<br />
SPC_TIMESTAMP_CMD 47000 read/write Programs a timestamp mode and performs commands as listed below<br />
SPC_TSMODE_DISABLE 0 Timestamp is disabled.<br />
SPC_TSMODE_STARTRESET 4h Counter is reset on every card start, all timestamps are in relation to card start.<br />
SPC_TSCNT_INTERNAL 100h Counter is running with complete width on sampling clock<br />
102 <strong>M3i.41xx</strong> / <strong>M3i.41xx</strong>-<strong>exp</strong> Manual
Option Timestamps Timestamp modes<br />
Refclock mode (needs BaseXIO option)<br />
The counter is split in a HIGH and a LOW part and an additional external signal, that affects both parts of the counter, needs to be fed in<br />
externally. The external reference clock signal will reset the LOW part of the counter and increase the HIGH part of the counter. The upper<br />
32 bit of the timestamp value hold the number of the clock edges that have occurred on the external reference clock signal, the lower 32 bit<br />
will hold the timestamp counter with the position within the current reference clock period with the resolution of the sampling rate.<br />
This mode can be used to obtain an absolute time reference when using an external radio clock or a GPS receiver. In that case the higher<br />
part is counting the seconds since the last reset and the lower part is counting the position inside the second using the current sampling rate.<br />
Please keep in mind that as this mode uses an additional external signal and can therefore only be used<br />
when the option BaseXIO is installed on the card. Otherwise there is no additional reference clock input available<br />
and this mode has no functionality.<br />
The counting is initialized with the timestamp reset command. Both counter parts will then be set to zero.<br />
The following table shows the valid values that can be written to the timestamp command register for this mode:<br />
Register Value Direction Description<br />
SPC_TIMESTAMP_STARTTIME 47030 read/write Return the reset time when using reference clock mode. Hours are placed in bit 16 to 23, minutes are<br />
placed in bit 8 to 15, seconds are placed in bit 0 to 7<br />
SPC_TIMESTAMP_STARTDATE 47031 read/write Return the reset date when using reference clock mode. The year is placed in bit 16 to 31, the month<br />
is placed in bit 8 to 15 and the day of month is placed in bit 0 to 7<br />
SPC_TIMESTAMP_TIMEOUT 47045 read/write Sets a timeout in milli seconds for waiting for a reference clock edge<br />
SPC_TIMESTAMP_CMD 47000 read/write Programs a timestamp mode and performs commands as listed below<br />
SPC_TSMODE_DISABLE 0 Timestamp is disabled.<br />
SPC_TS_RESET 1h The counters are reset. If reference clock mode is used this command waits for the edge the timeout time.<br />
SPC_TSMODE_STANDARD 2h Standard mode, counter is reset by <strong>exp</strong>licit reset command.<br />
SPC_TSMODE_STARTRESET 4h Counter is reset on every card start, all timestamps are in relation to card start.<br />
SPC_TSCNT_REFCLOCKPOS 200h Counter is split, upper part is running with external reference clock positive edge, lower part is running with sampling<br />
clock<br />
SPC_TSCNT_REFCLOCKNEG 400h Counter is split, upper part is running with external reference clock negative edge, lower part is running with sampling<br />
clock<br />
To synchronize the external reference clock signal with the PC clock it is possible to perform a timestamp reset command which waits a specified<br />
time for the occurrence of the external clock edge. As soon as the clock edge is found the function stores the current PC time and date<br />
which can be used to get the absolute time. As the timestamp reference clock can also be used with other clocks that don’t need to be synchronized<br />
with the PC clock the waiting time can be programmed using the SPC_TIMESTAMP_TIMEOUT register.<br />
Example for initialization of timestamp reference clock and synchronization of a seconds signal with the PC clock:<br />
spcm_dwSetParam_i32 (hDrv, SPC_TIMESTAMP_CMD, SPC_TSMODE_STANDARD | SPC_TSCNT_REFCLOCKPOS);<br />
spcm_dwSetParam_i32 (hDrv, SPC_TIMESTAMP_TIMEOUT, 1500);<br />
if (ERR_TIMEOUT == spcm_dwSetParam_i32 (hDrv, SPC_TIMESTAMP_CMD, SPC_TS_RESET))<br />
printf ("Synchronization with external clock signal failed\n");<br />
// now we read out the stored synchronization clock and date<br />
int32 lSyncDate, lSyncTime;<br />
spcm_dwGetParam_i32 (hDrv, SPC_TIMESTAMP_STARTDATE, &lSyncDate);<br />
spcm_dwGetParam_i32 (hDrv, SPC_TIMESTAMP_STARTTIME, &lSyncTime);<br />
// and print the start date and time information (European format: day.month.year hour:minutes:seconds)<br />
printf ("Start date: %02d.%02d.%04d\n", lSyncDate & 0xff, (lSyncDate >> 8) & 0xff, (lSyncData >> 16) & 0xffff);<br />
printf ("Start time: %02d:%02d:%02d\n", (lSyncTime >> 16) & 0xff, (lSyncTime >> 8) & 0xff, lSyncTime & 0xff);<br />
(c) <strong>Spectrum</strong> GmbH 103
Reading out the timestamps Option Timestamps<br />
Reading out the timestamps<br />
General<br />
The timestamps are stored in an extra FIFO that is located in hardware on the card. This extra FIFO can read out timestamps using DMA<br />
transfer similar to the DMA transfer of the main sample data DMA transfer. The card has two completely independent busmaster DMA engines<br />
in hardware allowing the simultaneous transfer of both timestamp and sample data.<br />
As seen in the picture the extra FIFO is holding ABA and timestamp data as the same time. Nevertheless it is not necessary to care for the<br />
shared FIFO as the extra FIFO data is splitted inside the driver in the both data parts.<br />
The only part that is similar for both kinds of data transfer is the handling of the DMA engine. This is similar to the main sample data transfer<br />
engine. Therefore additional information can be found in the chapter <strong>exp</strong>laining the main data transfer.<br />
Commands and Status information for extra transfer buffers.<br />
As <strong>exp</strong>lained above the data transfer is performed with the same command and status registers like the card control and sample data transfer.<br />
It is possible to send commands for card control, data transfer and extra FIFO data transfer at the same time<br />
Register Value Direction Description<br />
SPC_M2CMD 100 write only Executes a command for the card or data transfer<br />
M2CMD_EXTRA_STARTDMA 100000h Starts the DMA transfer for an already defined buffer.<br />
M2CMD_EXTRA_WAITDMA 200000h Waits until the data transfer has ended or until at least the amount of bytes defined by notify size are available. This<br />
wait function also takes the timeout parameter into account.<br />
M2CMD_EXTRA_STOPDMA 400000h Stops a running DMA transfer. Data is invalid afterwards.<br />
M2CMD_EXTRA_POLL 800000h Polls data without using DMA. As DMA has some overhead and has been implemented for fast data transfer of large<br />
amounts of data it is in some cases more simple to poll for available data. Please see the detailed examples for this<br />
mode. It is not possible to mix DMA and polling mode.<br />
The extra FIFO data transfer can generate one of the following status information:.<br />
Register Value Direction Description<br />
SPC_M2STATUS 110 read only Reads out the current status information<br />
M2STAT_EXTRA_BLOCKREADY 1000h The next data block as defined in the notify size is available. It is at least the amount of data available but it also can<br />
be more data.<br />
M2STAT_EXTRA_END 2000h The data transfer has completed. This status information will only occur if the notify size is set to zero.<br />
M2STAT_EXTRA_OVERRUN 4000h The data transfer had on overrun (acquisition) or underrun (replay) while doing FIFO transfer.<br />
M2STAT_EXTRA_ERROR 8000h An internal error occurred while doing data transfer.<br />
Data Transfer using DMA<br />
Data transfer consists of two parts: the buffer definition and the commands/status information that controls the transfer itself. Extra data transfer<br />
shares the command and status register with the card control, data transfer commands and status information.<br />
The DMA based data transfer mode is activated as soon as the M2CMD_EXTRA_STARTDMA is given. Please see next chapter to see how<br />
the polling mode works.<br />
104 <strong>M3i.41xx</strong> / <strong>M3i.41xx</strong>-<strong>exp</strong> Manual
Option Timestamps Reading out the timestamps<br />
Definition of the transfer buffer<br />
Before any data transfer can start it is necessary to define the transfer buffer with all it’s details. The definition of the buffer is done with the<br />
spcm_dwDefTransfer function as <strong>exp</strong>lained in an earlier chapter. The following example will show the definition of a transfer buffer for<br />
timestamp data, definition for ABA data is similar:<br />
spcm_dwDefTransfer_i64 (hDrv, SPCM_BUF_TIMESTAMP, SPCM_CARDTOPC, 0, pvBuffer, 0, lLenOfBufferInBytes);<br />
In this example the notify size is set to zero, meaning that we don’t want to be notified until all extra data has been transferred. Please have<br />
a look at the sample data transfer in an earlier chapter to see more details on the notify size.<br />
Please note that extra data transfer is only possible from card to PC and there’s no programmable offset available for this transfer.<br />
Buffer handling<br />
A data buffer handshake is implemented in the driver which allows to run the card in different data transfer modes. The software transfer<br />
buffer is handled as one large buffer for each kind of data (timestamp and ABA) which is on the one side controlled by the driver and filled<br />
automatically by busmaster DMA from the hardware extra FIFO buffer and on the other hand it is handled by the user who set’s parts of this<br />
software buffer available for the driver for further transfer. The handshake is fulfilled with the following 3 software registers:<br />
Register Value Direction Description<br />
SPC_ABA_AVAIL_USER_LEN 210 read This register contains the currently available number of bytes that are filled with newly transferred<br />
slow ABA data. The user can now use this ABA data for own purposes, copy it, write it to disk or start<br />
calculations with this data.<br />
SPC_ABA_AVAIL_USER_POS 211 read The register holds the current byte index position where the available ABA bytes start. The register is<br />
just intended to help you and to avoid own position calculation<br />
SPC_ABA_AVAIL_CARD_LEN 212 write After finishing the job with the new available ABA data the user needs to tell the driver that this<br />
amount of bytes is again free for new data to be transferred.<br />
SPC_TS_AVAIL_USER_LEN 220 read This register contains the currently available number of bytes that are filled with newly transferred<br />
timestamp data. The user can now use these timestamps for own purposes, copy it, write it to disk or<br />
start calculations with the timestamps.<br />
SPC_TS_AVAIL_USER_POS 221 read The register holds the current byte index position where the available timestamp bytes start. The register<br />
is just intended to help you and to avoid own position calculation<br />
SPC_TS_AVAIL_CARD_LEN 222 write After finishing the job with the new available timestamp data the user needs to tell the driver that this<br />
amount of bytes is again free for new data to be transferred.<br />
Directly after start of transfer the SPC_XXX_AVAIL_USER_LEN is every time zero as no data is available for the user and the<br />
SPC_XXX_AVAIL_CARD_LEN is every time identical to the length of the defined buffer as the complete buffer is available for the card for<br />
transfer.<br />
The counter that is holding the user buffer available bytes (SPC_XXX_AVAIL_USER_LEN) is sticking to the defined<br />
notify size at the DefTransfer call. Even when less bytes already have been transferred you won’t get<br />
notice of it if the notify size is programmed to a higher value.<br />
Remarks<br />
• The transfer between hardware FIFO buffer and application buffer is done with scatter-gather DMA using a busmaster DMA controller<br />
located on the card. Even if the PC is busy with other jobs data is still transferred until the application buffer is completely used.<br />
• As shown in the drawing above the DMA control will announce new data to the application by sending an event. Waiting for an event is<br />
done internally inside the driver if the application calls one of the wait functions. Waiting for an event does not consume any CPU time<br />
and is therefore highly requested if other threads do lot of calculation work. However it is not necessary to use the wait functions and one<br />
can simply request the current status whenever the program has time to do so. When using this polling mode the announced available<br />
(c) <strong>Spectrum</strong> GmbH 105
Reading out the timestamps Option Timestamps<br />
bytes still stick to the defined notify size!<br />
• If the on-board FIFO buffer has an overrun data transfer is stopped immediately.<br />
Buffer handling example for DMA timestamp transfer (ABA transfer is similar, just using other registers)<br />
char* pcData = new char[lBufSizeInBytes];<br />
// we now define the transfer buffer with the minimum notify size of one page = 4 kByte<br />
spcm_dwDefTransfer_i64 (hDrv, SPCM_BUF_TIMESTAMP, SPCM_DIR_CARDTOPC, 4096, (void*) pcData, 0, lBufSizeInBytes);<br />
do<br />
{<br />
// we wait for the next data to be available. After this call we get at least 4k of data to proceed<br />
dwError = spcm_dwSetParam_i32 (hDrv, SPC_M2CMD, M2CMD_EXTRA_STARTDMA | M2CMD_EXTRA_WAITDMA);<br />
if (!dwError)<br />
{<br />
// if there was no error we can proceed and read out the current amount of available data<br />
spcm_dwGetParam_i32 (hDrv, SPC_TS_AVAIL_USER_LEN, &lAvailBytes);<br />
spcm_dwGetParam_i32 (hDrv, SPC_TS_AVAIL_USER_POS, &lBytePos);<br />
printf (“We now have %d new bytes available\n”, lAvailBytes);<br />
printf (“The available data starts at position %d\n”, lBytesPos);<br />
// we take care not to go across the end of the buffer<br />
if ((lBytePos + lAvailBytes) >= lBufSizeInBytes)<br />
lAvailBytes = lBufSizeInBytes - lBytePos;<br />
// our do function get’s a pointer to the start of the available data section and the length<br />
vProcessTimestamps (&pcData[lBytesPos], lAvailBytes);<br />
// the buffer section is now immediately set available for the card<br />
spcm_dwSetParam_i32 (hDrv, SPC_TS_AVAIL_CARD_LEN, lAvailBytes);<br />
}<br />
}<br />
while (!dwError); // we loop forever if no error occurs<br />
The extra FIFO has a quite small size compared to the main data buffer. As the transfer is done initiated by<br />
the hardware using busmaster DMA this is not critical as long as the application data buffers are large<br />
enough and as long as the extra transfer is started BEFORE starting the card.<br />
Data Transfer using Polling<br />
When using M2i cards the Polling mode needs driver version V1.25 and firmware version V11 to run. Please<br />
update your system to the newest versions to run this mode. Polling mode for M3i cards is included starting<br />
with the first delivered card version.<br />
If the extra data is quite slow and the delay caused by the notify size on DMA transfers is inacceptable for your application it is possible to<br />
use the polling mode. Please be aware that the polling mode uses CPU processing power to get the data and that there might be an overrun<br />
if your CPU is otherwise busy. You should only use polling mode in special cases and if the amount of data to transfer is not too high.<br />
Most of the functionality is similar to the DMA based transfer mode as <strong>exp</strong>lained above.<br />
The polling data transfer mode is activated as soon as the M2CMD_EXTRA_POLL is executed.<br />
Definition of the transfer buffer<br />
is similar to the above <strong>exp</strong>lained DMA buffer transfer. The value „notify size“ is ignored and should be set to 4k (4096).<br />
Buffer handling<br />
The buffer handling is also similar to the DMA transfer. As soon as one of the registers SPC_TS_AVAIL_USER_LEN or<br />
SPC_ABA_AVAIL_USER_LEN is read the driver will read out all available data from the hardware and will return the number of bytes that<br />
has been read. In minimum this will be one DWORD = 4 bytes.<br />
106 <strong>M3i.41xx</strong> / <strong>M3i.41xx</strong>-<strong>exp</strong> Manual
Option Timestamps Reading out the timestamps<br />
Buffer handling example for polling timestamp transfer (ABA transfer is similar, just using other registers)<br />
char* pcData = new char[lBufSizeInBytes];<br />
// we now define the transfer buffer with the minimum notify size of one page = 4 kByte<br />
spcm_dwDefTransfer_i64 (hDrv, SPCM_BUF_TIMESTAMP, SPCM_DIR_CARDTOPC, 4096, (void*) pcData, 0, lBufSizeInBytes);<br />
// we start the polling mode<br />
dwError = spcm_dwSetParam_i32 (hDrv, SPC_M2CMD, M2CMD_EXTRA_POLL);<br />
// this is pur polling loop<br />
do<br />
{<br />
spcm_dwGetParam_i32 (hDrv, SPC_TS_AVAIL_USER_LEN, &lAvailBytes);<br />
spcm_dwGetParam_i32 (hDrv, SPC_TS_AVAIL_USER_POS, &lBytePos);<br />
if (lAvailBytes > 0)<br />
{<br />
printf (“We now have %d new bytes available\n”, lAvailBytes);<br />
printf (“The available data starts at position %d\n”, lBytesPos);<br />
Comparison of DMA and polling commands<br />
This chapter shows you how small the difference in programming is between the DMA and the polling mode:<br />
Data format<br />
// we take care not to go across the end of the buffer<br />
if ((lBytePos + lAvailBytes) >= lBufSizeInBytes)<br />
lAvailBytes = lBufSizeInBytes - lBytePos;<br />
// our do function get’s a pointer to the start of the available data section and the length<br />
vProcessTimestamps (&pcData[lBytesPos], lAvailBytes);<br />
// the buffer section is now immediately set available for the card<br />
spcm_dwSetParam_i32 (hDrv, SPC_TS_AVAIL_CARD_LEN, lAvailBytes);<br />
}<br />
}<br />
while (!dwError); // we loop forever if no error occurs<br />
DMA mode Polling mode<br />
Define the buffer spcm_dwDefTransfer_i64 (hDrv, SPCM_BUF_TIMESTAMP, SPCM_DIR...); spcm_dwDefTransfer_i64 (hDrv, SPCM_BUF_TIMESTAMP, SPCM_DIR...);<br />
Start the transfer spcm_dwSetParam_i32 (hDrv, SPC_M2CMD, M2CMD_EXTRA_STARTDMA) spcm_dwSetParam_i32 (hDrv, SPC_M2CMD, M2CMD_EXTRA_POLL)<br />
Wait for data spcm_dwSetParam_i32 (hDrv, SPC_M2CMD, M2CMD_EXTRA_WAITDMA) not in polling mode<br />
Available bytes? spcm_dwGetParam_i32 (hDrv, SPC_TS_AVAIL_USER_LEN, &lBytes); spcm_dwGetParam_i32 (hDrv, SPC_TS_AVAIL_USER_LEN, &lBytes);<br />
Min available bytes programmed notify size 4 bytes<br />
Current position? spcm_dwGetParam_i32 (hDrv, SPC_TS_AVAIL_USER_LEN, &lBytes); spcm_dwGetParam_i32 (hDrv, SPC_TS_AVAIL_USER_LEN, &lBytes);<br />
Free buffer for card spcm_dwSetParam_i32 (hDrv, SPC_TS_AVAIL_CARD_LEN, lBytes); spcm_dwSetParam_i32 (hDrv, SPC_TS_AVAIL_CARD_LEN, lBytes);<br />
Each timestamp is 56 bit long and internally mapped to 64 bit (8 bytes). The counter value contains the number of clocks that have been<br />
recorded with the currently used sampling rate since the last counter-reset has been done. The matching time can easily be calculated as<br />
described in the general information section at the beginning of this chapter.<br />
The values the counter is counting and that are stored in the timestamp FIFO represent the moments the trigger event occurs internally. Compared<br />
to the real external trigger event, these values are delayed. This delay is fix and therefore can be ignored, as it will be identical for all<br />
recordings with the same setup.<br />
Standard data format<br />
When internally mapping the timestamp from 56 bit to a 64 bit value the leading 8 bits are filled up with zeros (as a sign extension for<br />
positive values), to have the stamps ready for calculations as a unsigned 64 bit wide integer value.<br />
Timestamp Mode 8 th byte 7 th byte 6 th byte 5 th byte 4 th byte 3 rd byte 2 nd byte 1 st byte<br />
Standard/StartReset 0h 56 bit wide Timestamp<br />
Refclock mode 0h 24 bit wide Refclock edge counter (seconds counter) 32bit wide sample counter<br />
Extended BaseXIO-Data format<br />
Sometimes it is useful to store the level of additional external static signals together with a recording, such as e.g. control inputs of an external<br />
input multiplexer or settings of an external. When programming a special flag the upper byte of every 64 bit timestamp value is not (as in<br />
standard data mode) filled up with leading zeros, but with the values of the BaseXIO digital inputs. The following table shows the resulting<br />
64 bit timestamps.<br />
Timestamp Mode 8th byte 7th byte 6th byte 5th byte 4th byte 3rd byte 2nd byte 1st byte<br />
Standard / StartReset XIO7…XIO0 56 bit wide Timestamp<br />
Refclock mode XIO7…XIO0 24 bit wide Refclock edge counter (seconds counter) 32bit wide sample counter<br />
(c) <strong>Spectrum</strong> GmbH 107
Combination of Memory Segmentation Options with Timestamps Option Timestamps<br />
The BaseXIO-Data sampling option requires the option BaseXIO to be installed. All enhanced timestamps are<br />
no longer sign extended integer 64 values so that before using these stamps for calculations (such as calculating<br />
the difference between two stamps) one has to mask out the leading byte of the stamps first.<br />
Extended BaseXIO incremental encoder counter format<br />
Some applications require to relate the generated timestamps to a rotary position coming from incremental encoders. Therefore this dedicated<br />
timestamp mode provides storage of values from two 10 bit counters (leading to a range from 0 to 1023) with separate „Count“ and „Reset“<br />
lines is provided. This mode requires therefore four external TTL lines which are only available, if the BaseXIO option is installed. Details of<br />
the BaseXIO pinout can be found in the BaseXIO chapter in this manual.<br />
With each rising edge of the count input the counter is incremented by one step. Because that input is synchronized into the internal clock<br />
domain, please make sure that the HIGH and the LOW time are at least 16 times of the sampling period time long. So when sampling with<br />
100 MS/s (10 ns period time) the pulse has at least a length of 160 ns. A HIGH event on the reset line (assertion) will set the counter asynchronously<br />
back to zero. The de-assertion of the reset line is synchronized to the same internal clock domain as the count inputs to prevent<br />
runt pulses from corrupting the counter reset.<br />
When enabling the M3i encoder option the total 64 bits of one timestamp are divided up into up to four parts:<br />
Timestamp Mode 8 th byte 7 th byte 6 th byte 5 th byte 4 th byte 3 rd byte 2 nd byte 1 st byte<br />
Standard / StartReset 10 bit wide Incremental<br />
Counter 1<br />
Refclock mode 10 bit wide Incremental<br />
Counter 1<br />
10 bit wide Incremental<br />
Counter 2<br />
10 bit wide Incremental<br />
Counter 2<br />
44bit wide sample counter<br />
14 bit wide Refclock edge<br />
counter (seconds counter)<br />
Using the incremental encoder counter requires the driver V2.16 (or newer) and the M3i main control firmware<br />
version V14 (or newer). Please update your system to the latest versions to run this mode.<br />
The BaseXIO-Data sampling option requires the option BaseXIO to be installed. All enhanced timestamps are<br />
no longer sign extended integer 64 values so that before using these stamps for calculations (such as calculating<br />
the difference between two stamps) one has to mask out the incremental counter and the Reference<br />
clock counter values of the stamps first.<br />
Selecting the timestamp data format<br />
The selection between the different data format for the timestamps is done with a flag that is written to the timestamp command register. As<br />
this register is organized as a bitfield, the data format selection is available for all possible timestamp modes.<br />
Combination of Memory Segmentation Options with Timestamps<br />
This topic should give you a brief overview how the timestamp option interacts with the options Multiple Recording and ABA mode for which<br />
the timestamps option has been made.<br />
Multiple Recording and Timestamps<br />
Multiple Recording is well matching with the timestamp option. If timestamp<br />
recording is activated each trigger event and therefore each Multiple Recording<br />
segment will get timestamped as shown in the drawing on the right.<br />
Please keep in mind that the trigger events are timestamped, not the beginning<br />
of the acquisition. The first sample that is available is at the time position<br />
of [Timestamp - Pretrigger].<br />
The programming details of the timestamp option is <strong>exp</strong>lained in an extra<br />
chapter.<br />
108 <strong>M3i.41xx</strong> / <strong>M3i.41xx</strong>-<strong>exp</strong> Manual<br />
30bit wide sample counter<br />
Register Value Direction Description<br />
SPC_TIMESTAMP_CMD 47100 r/w<br />
SPC_TSXIOINC_ENABLE 2000h Enables the trigger synchronous acquisition of the two 10 bit incremental counters with every stored timestamp in the<br />
upper 20 bit of the timestamp data.<br />
SPC_TSXIOACQ_ENABLE 1000h Enables the trigger synchronous acquisition of the BaseXIO inputs with every stored timestamp in the upper byte.<br />
SPC_TSXIOACQ_DISABLE 0 The timestamp is filled up with leading zeros as a sign extension for positive values.
Option Timestamps Combination of Memory Segmentation Options with Timestamps<br />
Example Multiple Recording and Timestamps<br />
The following example shows the setup of the Multiple Recording mode together with activated timestamps recording and a short display of<br />
the acquired timestamps. The example doesn’t care for the acquired data itself and doesn’t check for error:<br />
// setup of the Multiple Recording mode<br />
spcm_dwSetParam_i32 (hDrv, SPC_CARDMODE, SPC_REC_STD_MULTI); // Enables Standard Multiple Recording<br />
spcm_dwSetParam_i32 (hDrv, SPC_SEGMENTSIZE, 1024); // Segment size is 1 kSample, Posttrigger is 768<br />
spcm_dwSetParam_i32 (hDrv, SPC_POSTTRIGGER, 768); // samples and pretrigger therefore 256 samples.<br />
spcm_dwSetParam_i32 (hDrv, SPC_MEMSIZE, 4096); // 4 kSamples in total acquired -> 4 segments<br />
// setup the Timestamp mode and make a reset of the timestamp counter<br />
spcm_dwSetParam_i32 (hDrv, SPC_TIMESTAMP_CMD, SPC_TSMODE_STANDARD | SPC_TSCNT_INTERNAL);<br />
spcm_dwSetParam_i32 (hDrv, SPC_TIMESTAMP_CMD, SPC_TSMODE_RESET);<br />
// now we define a buffer for timestamp data and start acquistion, each timestamp is 64 bit = 8 bytes<br />
int64* pllStamps = new int64[4];<br />
spcm_dwDefTransfer_i64 (hDrv, SPCM_BUF_TIMESTAMP, SPCM_DIR_CARDTOPC, 0, (void*) pllStamps, 0, 4 * 8);<br />
spcm_dwSetParam_i32 (hDrv, SPC_M2CMD, M2CMD_CARD_START | M2CMD_CARD_ENABLETRIGGER | M2CMD_EXTRA_STARTDMA);<br />
// we wait for the end timestamps transfer which will be received if all segments have been recorded<br />
spcm_dwSetParam_i32 (hDrv, SPC_M2CMD, M2CMD_EXTRA_WAITDMA);<br />
// as we now have the timestamps we just print them and calculate the time in milli seconds<br />
int32 lSamplerate, lOver, i;<br />
spcm_dwGetParam_i32 (hDrv, SPC_SAMPLERATE, &lSamplerate);<br />
spcm_dwGetParam_i32 (hDrv, SPC_OVERSAMPLINGFACTOR, &lOver);<br />
for (i = 0; i < 4; i++)<br />
printf ("#%d: %I64d samples = %.3f ms\n", i, pllStamps[i], 1000.0 * pllStamps[i] / lSamplerate / lOver);<br />
ABA Mode and Timestamps<br />
The ABA mode is well matching with the timestamp option. If timestamp<br />
recording is activated, each trigger event and therefore each B time base<br />
segment will get time tamped as shown in the drawing on the right.<br />
Please keep in mind that the trigger events - located in the B area - are time<br />
tamped, not the beginning of the acquisition. The first B sample that is<br />
available is at the time position of [Timestamp - Pretrigger].<br />
The first A area sample is related to the card start and therefore in a fixed<br />
but various settings dependant relation to the timestamped B sample. To<br />
bring exact relation between the first A area sample (and therefore all<br />
area A samples) and the B area samples it is possible to let the card stamp<br />
the first A area sample automatically after the card start. The following table shows the register to enable this mode:<br />
Register Value Direction Description<br />
SPC_TIMESTAMP_CMD 47000 read/write Programs a timestamp setup including mode and additional features<br />
SPC_TSFEAT_MASK F0000h Mask for the feature relating bits of the SPC_TIMESTAMP_CMD bitmask.<br />
SPC_TSFEAT_STORE1STABA 10000h Enables storage of one additional timestamp for the first A area sample (B time base related) in addition to the trigger<br />
related timestamps.<br />
SPC_TSFEAT_NONE 0h No additional timestamp is created. The total number of stamps is only trigger related.<br />
This mode is compatible with all existing timestamp modes. Please keep in mind that the timestamp counter is running with the B area timebase.<br />
// normal timestamp setup (e.g. setting timestamp mode to standard using internal clocking)<br />
uint32 dwTimestampMode = (SPC_TSMODE_STANDARD | SPC_TSMODE_DISABLE);<br />
// additionally enable index of the first A area sample<br />
dwTimestampMode |= SPC_TSFEAT_STORE1STABA;<br />
spcm_dwSetParam_i32 (hDrv, SPC_TIMESTAMP_CMD, dwTimestampMode);<br />
Using the cards in ABA mode with the timestamp feature to stamp the first A are sample requires the following<br />
driver and firmware version depending on you card:<br />
M2i: driver version V2.06 (or newer) and firmware version V16 (or newer)<br />
M3i: driver version V2.06 (or newer) and firmware version V6 (or newer)<br />
Please update your system to the newest versions to run this mode.<br />
The programming details of the ABA mode and timestamp modes are each <strong>exp</strong>lained in an dedicated chapter in this manual.<br />
(c) <strong>Spectrum</strong> GmbH 109
General information Option ABA mode (dual timebase)<br />
Option ABA mode (dual timebase)<br />
General information<br />
The ABA option allows the acquisition of data with a dual timebase. In case of trigger event the inputs are sampled very fast with the programmed<br />
sampling rate. This part is similar to the Multiple Recording option. But instead of having no data in between the segments one has<br />
the opportunity to continuously sample the inputs with a slower sampling rate the whole time. Combining this with the recording of the<br />
timestamps gives you a complete acquisition with a dual timebase as shown in the drawing.<br />
As seen in the drawing the area around the trigger event is sampled between pretrigger and posttrigger with full sampling speed (area B of<br />
the acquisition). Outside of this area B the input is sampled with the slower ABA clock (area A of the acquisition). As changing sampling<br />
clock on the fly is not possible there is no real change in the sampling speed but area A runs continuously with a slow sampling speed without<br />
stopping when the fast sampling takes place. As a result one gets a continuous slow sampled acquisition (area A) with some fast sampled<br />
parts (area B)<br />
The ABA mode is available for standard recording as well as for FIFO recording. In case of FIFO recording ABA and the acquisition of the<br />
fast sampled segments will run continuously until it is stopped by the user.<br />
A second possible application for the ABA mode is the use of the ABA data for slow monitoring of the inputs while waiting for an acquisition.<br />
In that case one wouldn’t record the timestamps but simply monitor the current values by acquiring ABA data.<br />
The ABA mode needs a second clock base. As <strong>exp</strong>lained above the acquisition is not changing the sampling clock but runs the slower acquisition<br />
with a divided clock. The ABA memory setup including the divider value can be programmed with the following registers<br />
Register Value Direction Description<br />
SPC_SEGMENTSIZE 10010 read/write Size of one Multiple Recording segment: the number of samples to be record after each trigger event.<br />
SPC_POSTTRIGGER 10030 read/write Defines the number of samples to be recorded after each trigger event.<br />
SPC_ABADIVIDER 10040 read/write Programs the divider which is used to sample slow ABA data:<br />
For 12 bit and 14 bit cards : between 8 and 131064 in steps of 8<br />
For 8 bit: between 16 and 262128 in steps of 16<br />
The resulting ABA clock is then calculated by sampling rate / ABA divider.<br />
Each segment can consist of pretrigger and/or posttrigger samples. The user always has to set the total segment size and the posttrigger,<br />
while the pretrigger is calculated within the driver with the formula: [pretrigger] = [segment size] - [posttrigger].<br />
When using ABA mode or Multiple Recording the maximum pretrigger is limited depending on the number<br />
of active channels. When the calculated value exceeds that limit, the driver will return the error<br />
ERR_PRETRIGGERLEN.<br />
Standard Mode<br />
With every detected trigger event one data block is filled with data. The length of one ABA segment is set by the value of the segmentsize<br />
register. The total amount of samples to be recorded is defined by the memsize register.<br />
Memsize must be set to a a multiple of the segment size. The table below shows the register for enabling standard ABA mode. For detailed<br />
information on how to setup and start the standard acquisition mode please refer to the according chapter earlier in this manual.<br />
Register Value Direction Description<br />
SPC_CARDMODE 9500 read/write Defines the used operating mode<br />
110 <strong>M3i.41xx</strong> / <strong>M3i.41xx</strong>-<strong>exp</strong> Manual
Option ABA mode (dual timebase) General information<br />
The total number of samples to be recorded to the on-board memory in standard mode is defined by the SPC_MEMSIZE register.<br />
FIFO Mode<br />
SPC_REC_STD_ABA 8h Data acquisition to on-board memory for multiple trigger events. While the multiple trigger events are stored with programmed<br />
sampling rate the inputs are sampled continuously with a slower sampling speed. This mode is only available<br />
if the ABA mode option is installed. The mode is described in a special chapter about ABA mode option.<br />
Register Value Direction Description<br />
SPC_MEMSIZE 10000 read/write Defines the total number of samples to be recorded.<br />
The ABA FIFO Mode is similar to the Multiple Recording FIFO mode. In contrast to the standard mode it is not necessary to program the<br />
number of samples to be recorded. The acquisition is running until the user stops it. The data is read block by block by the driver as described<br />
under Single FIFO mode example earlier in this manual. These blocks are online available for further data processing by the user program.<br />
This mode significantly reduces the average data transfer rate on the PCI bus. This enables you to use faster sample rates then you would be<br />
able to in FIFO mode without ABA.<br />
Register Value Direction Description<br />
SPC_CARDMODE 9500 read/write Defines the used operating mode<br />
SPC_REC_FIFO_ABA 80h Continuous data acquisition for multiple trigger events together with continuous data acquisition with a slower sampling<br />
clock. Only available if ABA mode option is installed<br />
The number of segments to be recorded must be set separately with the register shown in the following table:<br />
Register Value Direction Description<br />
SPC_LOOPS 10020 read/write Defines the number of segments to be recorded<br />
0 Recording will be infinite until the user stops it.<br />
1 … [4G - 1] Defines the total segments to be recorded.<br />
Limits of pre trigger, post trigger, memory size<br />
The maximum memory size parameter is only limited by the number of activated channels and by the amount of installed memory. Please<br />
keep in mind that each samples needs 2 bytes of memory to be stored. Minimum memory size as well as minimum and maximum post trigger<br />
limits are independent of the activated channels or the installed memory.<br />
Due to the internal organization of the card memory there is a certain stepsize when setting these values that has to be taken into account.<br />
The following table gives you an overview of all limits concerning pre trigger, post trigger, memory size, segment size and loops. The table<br />
shows all values in relation to the installed memory size in samples. If more memory is installed the maximum memory size figures will increase<br />
according to the complete installed memory<br />
Activated Used Memory size Pre trigger Post trigger Segment size Loops<br />
Channels Mode SPC_MEMSIZE SPC_PRETRIGGER SPC_POSTTRIGGER SPC_SEGMENTSIZE SPC_LOOPS<br />
Min Max Step Min Max Step Min Max Step Min Max Step Min Max Step<br />
1 channel Standard Single 16 Mem 8 defined by post trigger 8 8G - 8 8 not used not used<br />
Standard Multi/ABA 16 Mem 8 8 8k 8 8 Mem/2 8 16 Mem/2 8 not used<br />
FIFO Single not used 8 8k 8 not used 16 8G - 8 8 0 (∞) 4G - 1 1<br />
FIFO Multi/ABA not used 8 8k 8 8 8G - 8 8 16 Mem/2 8 0 (∞) 4G - 1 1<br />
2 channels Standard Single 16 Mem/2 8 defined by post trigger 8 8G - 8 8 not used not used<br />
Standard Multi/ABA 16 Mem/2 8 8 4k 8 8 Mem/4 8 16 Mem/4 8 not used<br />
FIFO Single not used 8 4k 8 not used 16 8G - 8 8 0 (∞) 4G - 1 1<br />
FIFO Multi/ABA not used 8 4k 8 8 8G - 8 8 16 Mem/4 8 0 (∞) 4G - 1 1<br />
All figures listed here are given in samples. An entry of [32G - 8] means [32 GSamples - 8 ] = 34,359,738,360 samples.<br />
The given memory and memory / divider figures depend on the installed on-board memory as listed below:<br />
128 MSample 256 MSample<br />
Installed Memory<br />
512 MSample 1 GSample 2 GSample<br />
Mem 128 MSample 256 MSample 512 MSample 1 GSample 2 GSample<br />
Mem / 2 64 MSample 128 MSample 256 MSample 512 MSample 1 GSample<br />
Mem / 4 32 MSample 64 MSample 128 MSample 256 MSample 512 MSample<br />
Please keep in mind that this table shows all values at once. Only the absolute maximum and minimum values are shown. There might be<br />
additional limitations. Which of these values is programmed depends on the used mode. Please read the detailed documentation of the mode.<br />
(c) <strong>Spectrum</strong> GmbH 111
Reading out ABA data Option ABA mode (dual timebase)<br />
Example for setting ABA mode:<br />
The following example will program the standard ABA mode, will set the fast sampling rate to 100 MHz and acquire 2k segments with 1k<br />
pretrigger and 1k posttrigger on every rising edge of the trigger input. Meanwhile the inputs are sampled continuously with the ABA mode<br />
with a ABA divider set to 5000 resulting in a slow sampling clock for the A area of 100 MHz / 5000 = 20 kHz:<br />
// setting the fast sampling clock as internal 100 MHz<br />
spcm_dwSetParam_i32 (hDrv, SPC_CLOCKMODE, SPC_CM_INTPLL);<br />
spcm_dwSetParam_i32 (hDrv, SPC_SAMPLERATE, 100000000);<br />
// enable the ABA mode and set the ABA divider to 5000 -> 100 MHz / 5000 = 20 kHz<br />
spcm_dwSetParam_i32 (hDrv, SPC_CARDMODE, SPC_REC_STD_ABA);<br />
spcm_dwSetParam_i32 (hDrv, SPC_ABADIVIDER, 5000);<br />
// define the segmentsize, pre and posttrigger and the total amount of data to acquire<br />
spcm_dwSetParam_i32 (hDrv, SPC_MEMSIZE, 16384);<br />
spcm_dwSetParam_i32 (hDrv, SPC_SEGMENTSIZE, 2048);<br />
spcm_dwSetParam_i32 (hDrv, SPC_POSTTRIGGER, 1024);<br />
// set the trigger mode to external with positive edge<br />
spcm_dwSetParam_i32 (hDrv, SPC_TRIG_ORMASK, SPC_TMASK_EXT0);<br />
spcm_dwSetParam_i32 (hDrv, SPC_TRIG_EXT0_MODE, SPC_TM_POS);<br />
Reading out ABA data<br />
General<br />
The slow „A“ data is stored in an extra FIFO that is located in hardware on the card. This extra FIFO can read out slow „A“ data using DMA<br />
transfer similar to the DMA transfer of the main sample data DMA transfer. The card has two completely independent busmaster DMA engines<br />
in hardware allowing the simultaneous transfer of both „A“ and sample data. The sample data itself is read out as <strong>exp</strong>lained before using<br />
the standard DMA routine.<br />
As seen in the picture the extra FIFO is holding ABA and timestamp data as the same time. Nevertheless it is not necessary to care for the<br />
shared FIFO as the extra FIFO data is splitted inside the driver in the both data parts.<br />
The only part that is similar for both kinds of data transfer is the handling of the DMA engine. This is similar to the main sample data transfer<br />
engine. Therefore additional information can be found in the chapter <strong>exp</strong>laining the main data transfer.<br />
Commands and Status information for extra transfer buffers.<br />
As <strong>exp</strong>lained above the data transfer is performed with the same command and status registers like the card control and sample data transfer.<br />
It is possible to send commands for card control, data transfer and extra FIFO data transfer at the same time<br />
Register Value Direction Description<br />
SPC_M2CMD 100 write only Executes a command for the card or data transfer<br />
M2CMD_EXTRA_STARTDMA 100000h Starts the DMA transfer for an already defined buffer.<br />
M2CMD_EXTRA_WAITDMA 200000h Waits until the data transfer has ended or until at least the amount of bytes defined by notify size are available. This<br />
wait function also takes the timeout parameter into account.<br />
M2CMD_EXTRA_STOPDMA 400000h Stops a running DMA transfer. Data is invalid afterwards.<br />
M2CMD_EXTRA_POLL 800000h Polls data without using DMA. As DMA has some overhead and has been implemented for fast data transfer of large<br />
amounts of data it is in some cases more simple to poll for available data. Please see the detailed examples for this<br />
mode. It is not possible to mix DMA and polling mode.<br />
112 <strong>M3i.41xx</strong> / <strong>M3i.41xx</strong>-<strong>exp</strong> Manual
Option ABA mode (dual timebase) Reading out ABA data<br />
The extra FIFO data transfer can generate one of the following status information:.<br />
Register Value Direction Description<br />
SPC_M2STATUS 110 read only Reads out the current status information<br />
M2STAT_EXTRA_BLOCKREADY 1000h The next data block as defined in the notify size is available. It is at least the amount of data available but it also can<br />
be more data.<br />
M2STAT_EXTRA_END 2000h The data transfer has completed. This status information will only occur if the notify size is set to zero.<br />
M2STAT_EXTRA_OVERRUN 4000h The data transfer had on overrun (acquisition) or underrun (replay) while doing FIFO transfer.<br />
M2STAT_EXTRA_ERROR 8000h An internal error occurred while doing data transfer.<br />
Data Transfer using DMA<br />
Data transfer consists of two parts: the buffer definition and the commands/status information that controls the transfer itself. Extra data transfer<br />
shares the command and status register with the card control, data transfer commands and status information.<br />
The DMA based data transfer mode is activated as soon as the M2CMD_EXTRA_STARTDMA is given. Please see next chapter to see how<br />
the polling mode works.<br />
Definition of the transfer buffer<br />
Before any data transfer can start it is necessary to define the transfer buffer with all it’s details. The definition of the buffer is done with the<br />
spcm_dwDefTransfer function as <strong>exp</strong>lained in an earlier chapter. The following example will show the definition of a transfer buffer for<br />
timestamp data, definition for ABA data is similar:<br />
spcm_dwDefTransfer_i64 (hDrv, SPCM_BUF_TIMESTAMP, SPCM_CARDTOPC, 0, pvBuffer, 0, lLenOfBufferInBytes);<br />
In this example the notify size is set to zero, meaning that we don’t want to be notified until all extra data has been transferred. Please have<br />
a look at the sample data transfer in an earlier chapter to see more details on the notify size.<br />
Please note that extra data transfer is only possible from card to PC and there’s no programmable offset available for this transfer.<br />
Buffer handling<br />
A data buffer handshake is implemented in the driver which allows to run the card in different data transfer modes. The software transfer<br />
buffer is handled as one large buffer for each kind of data (timestamp and ABA) which is on the one side controlled by the driver and filled<br />
automatically by busmaster DMA from the hardware extra FIFO buffer and on the other hand it is handled by the user who set’s parts of this<br />
software buffer available for the driver for further transfer. The handshake is fulfilled with the following 3 software registers:<br />
Register Value Direction Description<br />
SPC_ABA_AVAIL_USER_LEN 210 read This register contains the currently available number of bytes that are filled with newly transferred<br />
slow ABA data. The user can now use this ABA data for own purposes, copy it, write it to disk or start<br />
calculations with this data.<br />
SPC_ABA_AVAIL_USER_POS 211 read The register holds the current byte index position where the available ABA bytes start. The register is<br />
just intended to help you and to avoid own position calculation<br />
SPC_ABA_AVAIL_CARD_LEN 212 write After finishing the job with the new available ABA data the user needs to tell the driver that this<br />
amount of bytes is again free for new data to be transferred.<br />
SPC_TS_AVAIL_USER_LEN 220 read This register contains the currently available number of bytes that are filled with newly transferred<br />
timestamp data. The user can now use these timestamps for own purposes, copy it, write it to disk or<br />
start calculations with the timestamps.<br />
SPC_TS_AVAIL_USER_POS 221 read The register holds the current byte index position where the available timestamp bytes start. The register<br />
is just intended to help you and to avoid own position calculation<br />
SPC_TS_AVAIL_CARD_LEN 222 write After finishing the job with the new available timestamp data the user needs to tell the driver that this<br />
amount of bytes is again free for new data to be transferred.<br />
Directly after start of transfer the SPC_XXX_AVAIL_USER_LEN is every time zero as no data is available for the user and the<br />
SPC_XXX_AVAIL_CARD_LEN is every time identical to the length of the defined buffer as the complete buffer is available for the card for<br />
transfer.<br />
The counter that is holding the user buffer available bytes (SPC_XXX_AVAIL_USER_LEN) is sticking to the defined<br />
notify size at the DefTransfer call. Even when less bytes already have been transferred you won’t get<br />
notice of it if the notify size is programmed to a higher value.<br />
Remarks<br />
• The transfer between hardware FIFO buffer and application buffer is done with scatter-gather DMA using a busmaster DMA controller<br />
located on the card. Even if the PC is busy with other jobs data is still transferred until the application buffer is completely used.<br />
• As shown in the drawing above the DMA control will announce new data to the application by sending an event. Waiting for an event is<br />
done internally inside the driver if the application calls one of the wait functions. Waiting for an event does not consume any CPU time<br />
and is therefore highly requested if other threads do lot of calculation work. However it is not necessary to use the wait functions and one<br />
can simply request the current status whenever the program has time to do so. When using this polling mode the announced available<br />
(c) <strong>Spectrum</strong> GmbH 113
Reading out ABA data Option ABA mode (dual timebase)<br />
bytes still stick to the defined notify size!<br />
• If the on-board FIFO buffer has an overrun data transfer is stopped immediately.<br />
Buffer handling example for DMA timestamp transfer (ABA transfer is similar, just using other registers)<br />
char* pcData = new char[lBufSizeInBytes];<br />
// we now define the transfer buffer with the minimum notify size of one page = 4 kByte<br />
spcm_dwDefTransfer_i64 (hDrv, SPCM_BUF_TIMESTAMP, SPCM_DIR_CARDTOPC, 4096, (void*) pcData, 0, lBufSizeInBytes);<br />
do<br />
{<br />
// we wait for the next data to be available. After this call we get at least 4k of data to proceed<br />
dwError = spcm_dwSetParam_i32 (hDrv, SPC_M2CMD, M2CMD_EXTRA_STARTDMA | M2CMD_EXTRA_WAITDMA);<br />
if (!dwError)<br />
{<br />
// if there was no error we can proceed and read out the current amount of available data<br />
spcm_dwGetParam_i32 (hDrv, SPC_TS_AVAIL_USER_LEN, &lAvailBytes);<br />
spcm_dwGetParam_i32 (hDrv, SPC_TS_AVAIL_USER_POS, &lBytePos);<br />
printf (“We now have %d new bytes available\n”, lAvailBytes);<br />
printf (“The available data starts at position %d\n”, lBytesPos);<br />
// we take care not to go across the end of the buffer<br />
if ((lBytePos + lAvailBytes) >= lBufSizeInBytes)<br />
lAvailBytes = lBufSizeInBytes - lBytePos;<br />
// our do function get’s a pointer to the start of the available data section and the length<br />
vProcessTimestamps (&pcData[lBytesPos], lAvailBytes);<br />
// the buffer section is now immediately set available for the card<br />
spcm_dwSetParam_i32 (hDrv, SPC_TS_AVAIL_CARD_LEN, lAvailBytes);<br />
}<br />
}<br />
while (!dwError); // we loop forever if no error occurs<br />
The extra FIFO has a quite small size compared to the main data buffer. As the transfer is done initiated by<br />
the hardware using busmaster DMA this is not critical as long as the application data buffers are large<br />
enough and as long as the extra transfer is started BEFORE starting the card.<br />
Data Transfer using Polling<br />
When using M2i cards the Polling mode needs driver version V1.25 and firmware version V11 to run. Please<br />
update your system to the newest versions to run this mode. Polling mode for M3i cards is included starting<br />
with the first delivered card version.<br />
If the extra data is quite slow and the delay caused by the notify size on DMA transfers is inacceptable for your application it is possible to<br />
use the polling mode. Please be aware that the polling mode uses CPU processing power to get the data and that there might be an overrun<br />
if your CPU is otherwise busy. You should only use polling mode in special cases and if the amount of data to transfer is not too high.<br />
Most of the functionality is similar to the DMA based transfer mode as <strong>exp</strong>lained above.<br />
The polling data transfer mode is activated as soon as the M2CMD_EXTRA_POLL is executed.<br />
Definition of the transfer buffer<br />
is similar to the above <strong>exp</strong>lained DMA buffer transfer. The value „notify size“ is ignored and should be set to 4k (4096).<br />
Buffer handling<br />
The buffer handling is also similar to the DMA transfer. As soon as one of the registers SPC_TS_AVAIL_USER_LEN or<br />
SPC_ABA_AVAIL_USER_LEN is read the driver will read out all available data from the hardware and will return the number of bytes that<br />
has been read. In minimum this will be one DWORD = 4 bytes.<br />
114 <strong>M3i.41xx</strong> / <strong>M3i.41xx</strong>-<strong>exp</strong> Manual
Option ABA mode (dual timebase) Reading out ABA data<br />
Buffer handling example for polling timestamp transfer (ABA transfer is similar, just using other registers)<br />
char* pcData = new char[lBufSizeInBytes];<br />
// we now define the transfer buffer with the minimum notify size of one page = 4 kByte<br />
spcm_dwDefTransfer_i64 (hDrv, SPCM_BUF_TIMESTAMP, SPCM_DIR_CARDTOPC, 4096, (void*) pcData, 0, lBufSizeInBytes);<br />
// we start the polling mode<br />
dwError = spcm_dwSetParam_i32 (hDrv, SPC_M2CMD, M2CMD_EXTRA_POLL);<br />
// this is pur polling loop<br />
do<br />
{<br />
spcm_dwGetParam_i32 (hDrv, SPC_TS_AVAIL_USER_LEN, &lAvailBytes);<br />
spcm_dwGetParam_i32 (hDrv, SPC_TS_AVAIL_USER_POS, &lBytePos);<br />
if (lAvailBytes > 0)<br />
{<br />
printf (“We now have %d new bytes available\n”, lAvailBytes);<br />
printf (“The available data starts at position %d\n”, lBytesPos);<br />
// we take care not to go across the end of the buffer<br />
if ((lBytePos + lAvailBytes) >= lBufSizeInBytes)<br />
lAvailBytes = lBufSizeInBytes - lBytePos;<br />
// our do function get’s a pointer to the start of the available data section and the length<br />
vProcessTimestamps (&pcData[lBytesPos], lAvailBytes);<br />
// the buffer section is now immediately set available for the card<br />
spcm_dwSetParam_i32 (hDrv, SPC_TS_AVAIL_CARD_LEN, lAvailBytes);<br />
}<br />
}<br />
while (!dwError); // we loop forever if no error occurs<br />
Comparison of DMA and polling commands<br />
This chapter shows you how small the difference in programming is between the DMA and the polling mode:<br />
DMA mode Polling mode<br />
Define the buffer spcm_dwDefTransfer_i64 (hDrv, SPCM_BUF_TIMESTAMP, SPCM_DIR...); spcm_dwDefTransfer_i64 (hDrv, SPCM_BUF_TIMESTAMP, SPCM_DIR...);<br />
Start the transfer spcm_dwSetParam_i32 (hDrv, SPC_M2CMD, M2CMD_EXTRA_STARTDMA) spcm_dwSetParam_i32 (hDrv, SPC_M2CMD, M2CMD_EXTRA_POLL)<br />
Wait for data spcm_dwSetParam_i32 (hDrv, SPC_M2CMD, M2CMD_EXTRA_WAITDMA) not in polling mode<br />
Available bytes? spcm_dwGetParam_i32 (hDrv, SPC_TS_AVAIL_USER_LEN, &lBytes); spcm_dwGetParam_i32 (hDrv, SPC_TS_AVAIL_USER_LEN, &lBytes);<br />
Min available bytes programmed notify size 4 bytes<br />
Current position? spcm_dwGetParam_i32 (hDrv, SPC_TS_AVAIL_USER_LEN, &lBytes); spcm_dwGetParam_i32 (hDrv, SPC_TS_AVAIL_USER_LEN, &lBytes);<br />
Free buffer for card spcm_dwSetParam_i32 (hDrv, SPC_TS_AVAIL_CARD_LEN, lBytes); spcm_dwSetParam_i32 (hDrv, SPC_TS_AVAIL_CARD_LEN, lBytes);<br />
ABA Mode and Timestamps<br />
The ABA mode is well matching with the timestamp option. If timestamp<br />
recording is activated, each trigger event and therefore each B time base<br />
segment will get time tamped as shown in the drawing on the right.<br />
Please keep in mind that the trigger events - located in the B area - are time<br />
tamped, not the beginning of the acquisition. The first B sample that is<br />
available is at the time position of [Timestamp - Pretrigger].<br />
The first A area sample is related to the card start and therefore in a fixed<br />
but various settings dependant relation to the timestamped B sample. To<br />
bring exact relation between the first A area sample (and therefore all<br />
area A samples) and the B area samples it is possible to let the card stamp<br />
the first A area sample automatically after the card start. The following table shows the register to enable this mode:<br />
Register Value Direction Description<br />
SPC_TIMESTAMP_CMD 47000 read/write Programs a timestamp setup including mode and additional features<br />
SPC_TSFEAT_MASK F0000h Mask for the feature relating bits of the SPC_TIMESTAMP_CMD bitmask.<br />
SPC_TSFEAT_STORE1STABA 10000h Enables storage of one additional timestamp for the first A area sample (B time base related) in addition to the trigger<br />
related timestamps.<br />
SPC_TSFEAT_NONE 0h No additional timestamp is created. The total number of stamps is only trigger related.<br />
(c) <strong>Spectrum</strong> GmbH 115
Reading out ABA data Option ABA mode (dual timebase)<br />
This mode is compatible with all existing timestamp modes. Please keep in mind that the timestamp counter is running with the B area timebase.<br />
// normal timestamp setup (e.g. setting timestamp mode to standard using internal clocking)<br />
uint32 dwTimestampMode = (SPC_TSMODE_STANDARD | SPC_TSMODE_DISABLE);<br />
// additionally enable index of the first A area sample<br />
dwTimestampMode |= SPC_TSFEAT_STORE1STABA;<br />
spcm_dwSetParam_i32 (hDrv, SPC_TIMESTAMP_CMD, dwTimestampMode);<br />
Using the cards in ABA mode with the timestamp feature to stamp the first A are sample requires the following<br />
driver and firmware version depending on your card:<br />
M2i: driver version V2.06 (or newer) and firmware version V16 (or newer)<br />
M3i: driver version V2.06 (or newer) and firmware version V6 (or newer)<br />
Please update your system to the newest versions to run this mode.<br />
The programming details of the ABA mode and timestamp modes are each <strong>exp</strong>lained in an dedicated chapter in this manual.<br />
116 <strong>M3i.41xx</strong> / <strong>M3i.41xx</strong>-<strong>exp</strong> Manual
Option BaseXIO Introduction<br />
Option BaseXIO<br />
Introduction<br />
With this simple-to-use versatile enhancement it is possible to control a wide range of external instruments or other equipment. Therefore you<br />
have up to eight asynchronous digital I/Os available. When using the BaseXIO lines as digital I/O, they are completely independent from<br />
the board’s function, data direction or sampling rate and directly controlled by software (asynchronous I/Os).<br />
Using the option BaseXIO this way is useful if external equipment should be digitally controlled or any kind of signal source must be programmed.<br />
It also can be used if status information from an external machine has to be obtained or different test signals have to be routed to<br />
the board. In addition to the asynchronous I/O function, some of these lines can have special purposes such as secondary TTL trigger lines<br />
(M2i cards only), RefClock seconds signal for the timestamp option and special lines for incremental encoders (M3i cards only).<br />
The eight MMCX coaxial connectors are directly mounted on the base card. When plugged internally with right-angle MMCX connectors,<br />
this options does not require any additional system slot. By default this option is delivered with a readily plugged additional bracket equipped<br />
with SMB connectors, to have access to the lines from outside the system to easily connect with external equipment.<br />
The internal connectors are mounted on two locations on the base card. The picture below shows the location of the MMCX connectors on<br />
the card, the details of the connectors on the extra bracket are shown in the introductional part of this manual.<br />
Different functions<br />
Asynchronous Digital I/O<br />
This way of operating the option BaseXIO allows to asynchronously sample the data on the inputs or to generate asynchronous pattern on<br />
the outputs. The eight available lines consist of two groups of buffers each driving or receiving 4 bits of digital data as the drawing is showing.<br />
The data direction of each group can be individually<br />
programmed to be either input or output.<br />
As a result three different combinations are possible<br />
when using BaseXIO as pure digital I/O:<br />
• 8 asynchronous digital inputs<br />
• 8 asynchronous digital outputs<br />
• mixed mode with 4 inputs and 4 outputs<br />
The table below shows the direction register and the possible values. To combine the values you can easily OR them bitwise.<br />
Register Value Direction Description<br />
SPC_XIO_DIRECTION 47100 r/w Defines groupwise the direction of the digital I/O lines. Values can be combined by a bitwise OR.<br />
XD_CH0_INPUT 0 Sets the direction of the lower group (bit D3…D0) to input.<br />
XD_CH1_INPUT 0 Sets the direction of the upper group (bit D7…D4) to input.<br />
XD_CH0_OUTPUT 1 Sets the direction of the lower group (bit D3…D0) to output.<br />
XD_CH1_OUTPUT 2 Sets the direction of the upper group (bit D7…D4) to output.<br />
(c) <strong>Spectrum</strong> GmbH 117
Different functions Option BaseXIO<br />
Special Input Functions<br />
Some of the BaseXIO lines can be used in special functions, which requires the respective of the above mentioned groups of four lines<br />
(XIO3…XIO0) or (XIO4…XIO7) to be set as input. The upper group can be programmed to be either input or output, when only using the<br />
timestamp reference option and thus only uses one input in the lower group:<br />
118 <strong>M3i.41xx</strong> / <strong>M3i.41xx</strong>-<strong>exp</strong> Manual<br />
• XIO0: no special function yet<br />
• XIO1: no special function yet<br />
• XIO2: RefClock for timestamp option<br />
• XIO3: Count input for incremental counter1<br />
• XIO4: Count input for incremental counter2<br />
• XIO5: Reset input for incremental counter1<br />
• XIO6: no special function yet<br />
• XIO7: Reset input for incremental counter2<br />
All of the above mentioned special features are <strong>exp</strong>lained in detail in the relating section of this manual. Because the incremental counter<br />
also implies the RefClock usage (see timestamp chapter for details) the only two valid setups using special features are:<br />
• None of the special inputs are used, both groups can be input or output<br />
• Only RefClock used, other group can be either input or output<br />
• RefClock and incremental counters are used, so both groups must be set to input<br />
When using one or more of the inputs with their special features, it is still possible to sample the groups asynchronously as described in the<br />
section before. So as an example when using only bit 2 as an reference clock input the remaining three lines of the input group can still be<br />
used as asynchronous digital inputs. When reading the data of the inputs all bits are sampled, even those that are used for special purposes.<br />
In these cased the user might mask the read out digital data manually, to not receive unwanted lines.<br />
The table below shows the direction register for the remaining upper group and the possible values. To combine the values for both groups<br />
you can easily OR them bitwise.<br />
Register Value Direction Description<br />
SPC_XIO_DIRECTION 47100 read/write Defines the direction of the remaining digital I/O lines.<br />
XD_CH0_INPUT 0 The direction of the lower group (bit D3…D0) must be set to input, when using the special features.<br />
XD_CH1_INPUT 0 Sets the direction of the upper group (bit D7…D4) to input.<br />
XD_CH1_OUTPUT 2 Sets the direction of the upper group (bit D7…D4) to output.<br />
Transfer Data<br />
The outputs can be written or read by a single 32 bit register. If the register is read, the actual pin data will be sampled. Therefore reading<br />
the lines declared as outputs gives back the generated pattern. The single bits of the digital I/O lines correspond with the number of the bit<br />
of the 32 bit register. Values written to the three upper bytes will be ignored.<br />
Register Value Direction Description<br />
SPC_XIO_DIGITALIO 47110 r Reads the data directly from the pins of all digital I/O lines either if they are declared as inputs or<br />
outputs.<br />
SPC_XIO_DIGITALIO 47110 w Writes the data to all digital I/O lines that are declared as outputs. Bytes that are declared as inputs<br />
will ignore the written data.<br />
Programming Example<br />
The following example shows, how to program the lower group to be input and the upper group to be output, and how to write and read<br />
and interpret/mask the digital data:<br />
// Define direction: set Ch0 as Input and Ch1 as output<br />
spcm_dwSetParam_i32 (hDrv, SPC_XIO_DIRECTION, XD_CH0_INPUT | XD_CH1_OUTPUT);<br />
spcm_dwSetParam_i32 (hDrv, SPC_XIO_DIGITALIO, 0xA0); // Set all even output bits HIGH, all odd to LOW<br />
// The write to the inputs will be ignored<br />
spcm_dwGetParam_i32 (hDrv, SPC_XIO_DIGITALIO, &lData); // Read back the digital data (incl. outputs)<br />
// Bits 7…4 will be the output value 0xA<br />
lData = lData & (uint32) 0x0F // Mask out the output bits to have inputs only<br />
Special Sampling Feature<br />
When using the option BaseXIO in combination with the timestamp option one can enable two special auto sampling option: one that samples<br />
the eight BaseXIO lines synchronously with each trigger event and another that samples values from two 10 bit counters for incremental encoder<br />
applications. This feature is independent of the BaseXIO line settings. For details, please refer to the timestamp chapter in this manual.
Option BaseXIO Different functions<br />
This special sampling feature requires the option Timestamp to be installed.<br />
Electrical specifications<br />
The electrical specifications of the BaseXIO inputs and outputs can be found either in the technical data section of this manual or in the<br />
datasheet.<br />
(c) <strong>Spectrum</strong> GmbH 119
Star-Hub introduction Option Star-Hub<br />
Option Star-Hub<br />
Star-Hub introduction<br />
The purpose of the Star-Hub is to extend the number of channels available for acquisition or generation by interconnecting multiple cards and<br />
running them simultaneously.<br />
The Star-Hub option allows to synchronize several cards of the M3i series that are mounted within one host system (PC). Two different versions<br />
are available: a small version with 4 connectors (option SH4) for synchronizing up to four cards and a big version with 8 connectors (option<br />
SH8) for synchronizing up to eight cards.<br />
Both versions are implemented as a piggy -back module that is mounted to one of the cards. For details on how to install several cards including<br />
the one carrying the Star-Hub module, please refer to the section on hardware installation.<br />
Either which of the two available Star-Hub options is used, there will be no phase delay between the sampling clocks of the synchronized<br />
cards and either no delay between the trigger events. The card holding the Star-Hub is automatically also the clock master. Any one of the<br />
synchronized cards can be part of the trigger generation.<br />
Star-Hub trigger engine<br />
The trigger bus between an M3i card and the Star-Hub option consists of several lines. Some of them send the trigger information from the<br />
card’s trigger engine to the Star-Hub and some receives the resulting trigger from the Star-Hub. All trigger events from the different cards<br />
connected are combined with OR on the star-hub.<br />
While the returned trigger is identical for all synchronized cards, the sent out trigger of every single card depends on their trigger settings.<br />
Star-Hub clock engine<br />
The card holding the Star-Hub is the clock master for the complete system. If<br />
you need to feed in an external clock to a synchronized system the clock has<br />
to be connected to the master card. Slave cards cannot generate a star-hub<br />
system clock. As shown in the drawing on the right the clock master can use<br />
either the programmable quartz 1 or the external clock input to be broadcasted<br />
to all other cards.<br />
All cards including the clock master itself receive the distributed clock with<br />
equal phase information. This makes sure that there is no phase delay between<br />
the cards.<br />
Software Interface<br />
The software interface is similar to the card software interface that is <strong>exp</strong>lained earlier in this manual. The same functions and some of the<br />
registers are used with the Star-Hub. The Star-Hub is accessed using its own handle which has some extra commands for synchronization<br />
setup. All card functions are programmed directly on card as before. There are only a few commands that need to be programmed directly<br />
to the Star-Hub for synchronization.<br />
The software interface as well as the hardware supports multiple Star-Hubs in one system. Each set of cards connected by a Star-Hub then<br />
runs totally independent. It is also possible to mix cards that are connected with the Star-Hub with other cards that run independent in one<br />
system.<br />
Star-Hub Initialization<br />
The interconnection between the Star-Hubs is probed at driver load time and does not need to be programmed separately. Instead the cards<br />
can be accessed using a logical index. This card index is only based on the ordering of the cards in the system and is not influenced by the<br />
current cabling. It is even possible to change the cable connections between two system starts without changing the logical card order that<br />
is used for Star-Hub programming.<br />
The Star-Hub initialization must be done AFTER initialization of all cards in the system. Otherwise the interconnection<br />
won’t be received properly.<br />
The Star-Hubs are accessed using a special device name „sync“ followed by the index of the star-hub to access. The Star-Hub is handled<br />
completely like a physical card allowing all functions based on the handle like the card itself.<br />
120 <strong>M3i.41xx</strong> / <strong>M3i.41xx</strong>-<strong>exp</strong> Manual
Option Star-Hub Software Interface<br />
Example with 4 cards and one Star-Hub (no error checking to keep example simple)<br />
drv_handle hSync;<br />
drv_handle hCard[4];<br />
for (i = 0; i < 4; i++)<br />
{<br />
sprintf (s, "/dev/spcm%d", i);<br />
hCard[i] = spcm_hOpen (s);<br />
}<br />
hSync = spcm_hOpen ("sync0");<br />
...<br />
spcm_vClose (hSync);<br />
for (i = 0; i < 4; i++)<br />
spcm_vClose (hCard[i]);<br />
When opening the Star-Hub the cable interconnection is checked. The Star-Hub may return an error if it sees internal cabling problems or if<br />
the connection between Star-Hub and the card that holds the Star-Hub is broken. It can’t identify broken connections between Star-Hub and<br />
other cards as it doesn’t know that there has to be a connection.<br />
The synchronization setup is done using bit masks where one bit stands for one recognized card. All cards that are connected with a Star-<br />
Hub are internally numbered beginning with 0. The number of connected cards as well as the connections of the star-hub can be read out<br />
after initialization. For each card that is connected to the star-hub one can read the index of that card:<br />
Register Value Direction Description<br />
SPC_SYNC_READ_SYNCCOUNT 48990 read Number of cards that are connected to this Star-Hub<br />
SPC_SYNC_READ_CARDIDX0 49000 read Index of card that is connected to star-hub logical index 0 (mask 0x0001)<br />
SPC_SYNC_READ_CARDIDX1 49001 read Index of card that is connected to star-hub logical index 1 (mask 0x0002)<br />
... read ...<br />
SPC_SYNC_READ_CARDIDX7 49007 read Index of card that is connected to star-hub logical index 7 (mask 0x0080)<br />
SPC_SYNC_READ_CARDIDX8 49008 read M2i only: Index of card that is connected to star-hub logical index 8 (mask 0x0100)<br />
... read ...<br />
SPC_SYNC_READ_CARDIDX15 49015 read M2i only: Index of card that is connected to star-hub logical index 15 (mask 0x8000)<br />
SPC_SYNC_READ_CABLECON0 read Returns the index of the cable connection that is used for the logical connection 0. The cable connections<br />
can be seen printed on the PCB of the star-hub. Use these cable connection information in case<br />
that there are hardware failures with the star-hub cabeling.<br />
... 49100 read ...<br />
SPC_SYNC_READ_CABLECON15 49115 read Returns the index of the cable connection that is used for the logical connection 15.<br />
In standard systems where all cards are connected to one star-hub reading the star-hub logical index will simply return the index of the card<br />
again. This results in bit 0 of star-hub mask being 1 when doing the setup for card 0, bit 1 in star-hub mask being 1 when setting up card 1<br />
and so on. On such systems it is sufficient to read out the SPC_SYNC_READ_SYNCCOUNT register to check whether the star-hub has found<br />
the <strong>exp</strong>ected number of cards to be connected.<br />
spcm_dwGetParam_i32 (hSync, SPC_SYNC_READ_SYNCCOUNT, &lSyncCount);<br />
for (i = 0; i < lSyncCount; i++)<br />
{<br />
spcm_dwGetParam_i32 (hSync, SPC_SYNC_READ_CARDIDX0 + i, &lCardIdx);<br />
printf ("star-hub logical index %d is connected with card %d\n“, i, lCardIdx);<br />
}<br />
In case of 4 cards in one system and all are connected with the star-hub this program except will return:<br />
star-hub logical index 0 is connected with card 0<br />
star-hub logical index 1 is connected with card 1<br />
star-hub logical index 2 is connected with card 2<br />
star-hub logical index 3 is connected with card 3<br />
Let’s see a more complex example with two Star-Hubs and one independent card in one system. Star-Hub A connects card 2, card 4 and<br />
card 5. Star-Hub B connects card 0 and card 3. Card 1 is running completely independent and is not synchronized at all:<br />
card Star-Hub connection card handle star-hub handle card index in star-hub mask for this card in<br />
star-hub<br />
card 0 - /dev/spcm0 0 (of star-hub B) 0x0001<br />
card 1 - /dev/spcm1 -<br />
card 2 star-hub A /dev/spcm2 sync0 0 (of star-hub A) 0x0001<br />
card 3 star-hub B /dev/spcm3 sync1 1 (of star-hub B) 0x0002<br />
card 4 - /dev/spcm4 1 (of star-hub A) 0x0002<br />
card 5 - /dev/spcm5 2 (of star-hub A) 0x0004<br />
(c) <strong>Spectrum</strong> GmbH 121
Software Interface Option Star-Hub<br />
Now the program has to check both star-hubs:<br />
for (j = 0; j < lStarhubCount; j++)<br />
{<br />
spcm_dwGetParam_i32 (hSync[j], SPC_SYNC_READ_SYNCCOUNT, &lSyncCount);<br />
for (i = 0; i < lSyncCount; i++)<br />
{<br />
spcm_dwGetParam_i32 (hSync[j], SPC_SYNC_READ_CARDIDX0 + i, &lCardIdx);<br />
printf ("star-hub %c logical index %d is connected with card %d\n“, (!j ? ’A’ : ’B’), i, lCardIdx);<br />
}<br />
printf ("\n");<br />
}<br />
In case of the above mentioned cabling this program except will return:<br />
star-hub A logical index 0 is connected with card 2<br />
star-hub A logical index 1 is connected with card 4<br />
star-hub A logical index 2 is connected with card 5<br />
star-hub B logical index 0 is connected with card 0<br />
star-hub B logical index 1 is connected with card 3<br />
For the following examples we will assume that 4 cards in one system are all connected to one star-hub to keep things easier.<br />
Setup of Synchronization<br />
The synchronization setup only requires one additional registers to enable the cards that are synchronized in the next run<br />
Register Value Direction Description<br />
SPC_SYNC_ENABLEMASK 49200 read/write Mask of all cards that are enabled for the synchronization<br />
The enable mask is based on the logical index <strong>exp</strong>lained above. It is possible to just select a couple of cards for the synchronization. All other<br />
cards then will run independently. Please be sure to always enable the card on which the star-hub is located as this one is a must for the<br />
synchronization.<br />
In our example we synchronize all four cards. The star-hub is located on card #2 and is therefor the clock master<br />
spcm_dwSetParam_i32 (hSync, SPC_SYNC_ENABLEMASK, 0x000F); // all 4 cards are masked<br />
// set the clock master to 100 MS/s internal clock<br />
spcm_dwSetParam_i32 (hCard[2], SPC_CLOCKMODE, SPC_CM_INTPLL);<br />
spcm_dwSetParam_i32 (hCard[2], SPC_SAMPLEATE, MEGA(100));<br />
// set all the slaves to run synchronously with 100 MS/s<br />
spcm_dwSetParam_i32 (hCard[0], SPC_SAMPLEATE, MEGA(100));<br />
spcm_dwSetParam_i32 (hCard[1], SPC_SAMPLEATE, MEGA(100));<br />
spcm_dwSetParam_i32 (hCard[3], SPC_SAMPLEATE, MEGA(100));<br />
Setup of Trigger<br />
Setting up the trigger does not need any further steps of synchronization setup. Simply all trigger settings of all cards that have been enabled<br />
for synchronization are connected together. All trigger sources and all trigger modes can be used on synchronization as well.<br />
Having positive edge of external trigger on card 0 to be the trigger source for the complete system needs the following setup:<br />
spcm_dwSetParam_i32 (hCard[0], SPC_TRIG_ORMASK, SPC_TMASK_EXT0);<br />
spcm_dwSetParam_i32 (hCard[0], SPC_TRIG_EXT0_MODE, SPC_TM_POS);<br />
spcm_dwSetParam_i32 (hCard[1], SPC_TRIG_ORMASK, SPC_TM_NONE);<br />
spcm_dwSetParam_i32 (hCard[2], SPC_TRIG_ORMASK, SPC_TM_NONE);<br />
spcm_dwSetParam_i32 (hCard[3], SPC_TRIG_ORMASK, SPC_TM_NONE);<br />
122 <strong>M3i.41xx</strong> / <strong>M3i.41xx</strong>-<strong>exp</strong> Manual
Option Star-Hub Software Interface<br />
Assuming that the 4 cards are analog data acquisition cards with 4 channels each we can simply setup a synchronous system with all channels<br />
of all cards being trigger source. The following setup will show how to set up all trigger events of all channels to be OR connected. If any of<br />
the channels will now have a signal above the programmed trigger level the complete system will do an acquisition:<br />
for (i = 0; i < lSyncCount; i++)<br />
{<br />
int32 lAllChannels = (SPC_TMASK0_CH0 | SPC_TMASK0_CH1 | SPC_TMASK_CH2 | SPC_TMASK_CH3);<br />
spcm_dwSetParam_i32 (hCard[i], SPC_TRIG_CH_ORMASK0, lAllChannels);<br />
for (j = 0; j < 2; j++)<br />
{<br />
}<br />
// set all channels to trigger on positive edge crossing trigger level 100<br />
spcm_dwSetParam_i32 (hCard[i], SPC_TRIG_CH0_MODE + j, SPC_TM_POS);<br />
spcm_dwSetParam_i32 (hCard[i], SPC_TRIG_CH0_LEVEL0 + j, 100);<br />
}<br />
Run the synchronized cards<br />
Running of the cards is very simple. The star-hub acts as one big card containing all synchronized cards. All card commands have to be<br />
omitted directly to the star-hub which will check the setup, do the synchronization and distribute the commands in the correct order to all<br />
synchronized cards. The same card commands can be used that are also possible for single cards:<br />
Register Value Direction Description<br />
SPC_M2CMD 100 write only Executes a command for the card or data transfer<br />
M2CMD_CARD_RESET 1h Performs a hard and software reset of the card as <strong>exp</strong>lained further above<br />
M2CMD_CARD_WRITESETUP 2h Writes the current setup to the card without starting the hardware. This command may be useful if changing some<br />
internal settings like clock frequency and enabling outputs.<br />
M2CMD_CARD_START 4h Starts the card with all selected settings. This command automatically writes all settings to the card if any of the settings<br />
has been changed since the last one was written. After card has been started none of the settings can be<br />
changed while the card is running.<br />
M2CMD_CARD_ENABLETRIGGER 8h The trigger detection is enabled. This command can be either send together with the start command to enable trigger<br />
immediately or in a second call after some external hardware has been started.<br />
M2CMD_CARD_FORCETRIGGER 10h This command forces a trigger even if none has been detected so far. Sending this command together with the start<br />
command is similar to using the software trigger.<br />
M2CMD_CARD_DISABLETRIGGER 20h The trigger detection is disabled. All further trigger events are ignored until the trigger detection is again enabled.<br />
When starting the card the trigger detection is started disabled.<br />
M2CMD_CARD_STOP 40h Stops the current run of the card. If the card is not running this command has no effect.<br />
All other commands and settings need to be send directly to the card that it refers to.<br />
This example shows the complete setup and synchronization start for our four cards:<br />
spcm_dwSetParam_i32 (hSync, SPC_SYNC_ENABLEMASK, 0x000F); // all 4 cards are masked<br />
// to keep it easy we set all card to the same clock and disable trigger<br />
for (i = 0; i < 4; i++)<br />
{<br />
spcm_dwSetParam_i32 (hCard[i], SPC_CLOCKMODE, SPC_CM_INTPLL);<br />
spcm_dwSetParam_i32 (hCard[i], SPC_SAMPLERATE, MEGA(100));<br />
spcm_dwSetParam_i32 (hCard[i], SPC_TRIG_ORMASK, SPC_TM_NONE);<br />
}<br />
// card 0 is trigger master and waits for external positive edge<br />
spcm_dwSetParam_i32 (hCard[0], SPC_TRIG_ORMASK, SPC_TMASK_EXT0);<br />
spcm_dwSetParam_i32 (hCard[0], SPC_TRIG_EXT0_MODE, SPC_TM_POS);<br />
// start the cards and wait for them a maximum of 1 second to be ready<br />
spcm_dwSetParam_i32 (hSync, SPC_TIMEOUT, 1000);<br />
spcm_dwSetParam_i32 (hSync, SPC_M2CMD, M2CMD_CARD_START | M2CMD_CARD_ENABLETRIGGER);<br />
if (spcm_dwSetParam_i32 (hSync, SPC_M2CMD, M2CMD_CARD_WAITREADY) == ERR_TIMEOUT)<br />
printf ("Timeout occured - no trigger received within time\n")<br />
Using one of the wait commands for the star-hub will return as soon as the card holding the star-hub has<br />
reached this state. However when synchronizing cards with different memory sizes there may be other cards<br />
that still haven’t reached this level.<br />
SH-Direct: using the Star-Hub clock directly without synchronization<br />
Starting with driver version 1.26 build 1754 it is possible to use the clock from the star-hub just like an external clock and running one or<br />
more cards totally independent of the synchronized card. The mode is by example useful if one has one or more output cards that run continuously<br />
in a loop and are synchronized with star-hub and in addition to this one or more acquisition cards should make multiple acquisitions<br />
but using the same clock.<br />
For all M2i cards is is also possible to run the „slave“ cards with a divided clock. Therefore please program a desired divided sampling rate<br />
in the SPC_SAMPLERATE register (example: running the star-hub card with 10 MS/s and the independent cards with 1 MS/s). The sampling<br />
rate is automatically adjusted by the driver to the next matching value.<br />
(c) <strong>Spectrum</strong> GmbH 123
Software Interface Option Star-Hub<br />
What is necessary?<br />
• All cards need to be connected to the star-hub<br />
• The card(s) that should run independently can not hold the star-hub<br />
• The card(s) with the star-hub must be setup to synchronization even if it’s only one card<br />
• The synchronized card(s) have to be started prior to the card(s) that run with the direct star-hub clock<br />
Setup<br />
At first all cards that should run synchronized with the star-hub are set-up exactly as <strong>exp</strong>lained before. The card(s) that should run independently<br />
and use the star-hub clock need to use the following clock mode:<br />
Register Value Direction Description<br />
SPC_CLOCKMODE 20200 read/write Defines the used clock mode<br />
SPC_CM_SHDIRECT 128 Uses the clock from the star-hub as if this was an external clock<br />
Example<br />
In this example we have one generator card with the star-hub mounted running in a continuous loop and one acquisition card running independently<br />
using the SH-Direct clock.<br />
// setup of the generator card<br />
spcm_dwSetParam_i32 (hCard[0], SPC_CARDMODE, SPC_REP_STD_CONTINUOUS);<br />
spcm_dwSetParam_i32 (hCard[0], SPC_CLOCKMODE, SPC_CM_INTPLL);<br />
spcm_dwSetParam_i32 (hCard[0], SPC_SAMPLEATE, MEGA(1));<br />
spcm_dwSetParam_i32 (hCard[0], SPC_TRIG_ORMASK, SPC_TM_SOFTWARE);<br />
spcm_dwSetParam_i32 (hSync, SPC_SYNC_ENABLEMASK, 0x0001); // card 0 is the generator card<br />
spcm_dwSetParam_i32 (hSync, SPC_SYNC_CLKMASK, 0x0001); // ...<br />
// Setup of the acquisition card (waiting for external trigger)<br />
spcm_dwSetParam_i32 (hCard[1], SPC_CARDMODE, SPC_REC_STD_SINGLE);<br />
spcm_dwSetParam_i32 (hCard[1], SPC_CLOCKMODE, SPC_CM_SHDIRECT);<br />
spcm_dwSetParam_i32 (hCard[1], SPC_SAMPLEATE, MEGA(1));<br />
spcm_dwSetParam_i32 (hCard[1], SPC_TRIG_ORMASK, SPC_TMASK_EXT0);<br />
spcm_dwSetParam_i32 (hCard[1], SPC_TRIG_EXT0_MODE, SPC_TM_POS);<br />
// now start the generator card (sync!) first and then the acquisition card 2 times<br />
spcm_dwSetParam_i32 (hSync, SPC_TIMEOUT, 1000);<br />
spcm_dwSetParam_i32 (hSync, SPC_M2CMD, M2CMD_CARD_START | M2CMD_CARD_ENABLETRIGGER);<br />
spcm_dwSetParam_i32 (hCard[1], SPC_M2CMD, M2CMD_CARD_START | M2CMD_CARD_ENABLETRIGGER | M2CMD_CARD_WAITREADY);<br />
spcm_dwSetParam_i32 (hCard[1], SPC_M2CMD, M2CMD_CARD_START | M2CMD_CARD_ENABLETRIGGER | M2CMD_CARD_WAITREADY);<br />
Error Handling<br />
The Star-Hub error handling is similar to the card error handling and uses the function spcm_dwGetErrorInfo_i32. Please see the example in<br />
the card error handling chapter to see how the error handling is done.<br />
124 <strong>M3i.41xx</strong> / <strong>M3i.41xx</strong>-<strong>exp</strong> Manual
Appendix Error Codes<br />
Appendix<br />
Error Codes<br />
The following error codes could occur when a driver function has been called. Please check carefully the allowed setup for the register and<br />
change the settings to run the program.<br />
error name value (hex) value (dec.) error description<br />
ERR_OK 0h 0 Execution OK, no error.<br />
ERR_INIT 1h 1 An error occurred when initialising the given card. Either the card has already been opened by another process or an<br />
hardware error occurred.<br />
ERR_TYP 3h 3 Initialisation only: The type of board is unknown. This is a critical error. Please check whether the board is correctly<br />
plugged in the slot and whether you have the latest driver version.<br />
ERR_FNCNOTSUPPORTED 4h 4 This function is not supported by the hardware version.<br />
ERR_BRDREMAP 5h 5 The board index re map table in the registry is wrong. Either delete this table or check it carefully for double values.<br />
ERR_KERNELVERSION 6h 6 The version of the kernel driver is not matching the version of the DLL. Please do a complete reinstallation of the hardware<br />
driver. This error normally only occurs if someone copies the driver library and the kernel driver manually.<br />
ERR_HWDRVVERSION 7h 7 The hardware needs a newer driver version to run properly. Please install the driver that was delivered together with<br />
the card.<br />
ERR_ADRRANGE 8h 8 One of the address ranges is disabled (fatal error), can only occur under Linux<br />
ERR_INVALIDHANDLE 9h 9 The used handle is not valid.<br />
ERR_BOARDNOTFOUND Ah 10 A card with the given name has not been found.<br />
ERR_BOARDINUSE Bh 11 A card with given name is already in use by another application.<br />
ERR_EXPHW64BITADR Ch 12 Express hardware version not able to handle 64 bit addressing -> update needed<br />
ERR_FWVERSION Dh 13 Firmware versions of synchronized cards or for this driver do not match -> update needed<br />
ERR_LASTERR 10h 16 Old Error waiting to be read. Please read the full error information before proceeding. The driver is locked until the<br />
error information has been read.<br />
ERR_BOARDINUSE 11h 17 Board is already used by another application. It is not possible to use one hardware from two different programs at the<br />
same time.<br />
ERR_ABORT 20h 32 Abort of wait function. This return value just tells that the function has been aborted from another thread. The driver<br />
library is not locked if this error occurs.<br />
ERR_BOARDLOCKED 30h 48 The card is already in access and therefore locked by another process. It is not possible to access one card through<br />
multiple processes. Only one process can access a specific card at the time.<br />
ERR_REG 100h 256 The register is not valid for this type of board.<br />
ERR_VALUE 101h 257 The value for this register is not in a valid range. The allowed values and ranges are listed in the board specific documentation.<br />
ERR_FEATURE 102h 258 Feature (option) is not installed on this board. It’s not possible to access this feature if it’s not installed.<br />
ERR_SEQUENCE 103h 259 Command sequence is not allowed. Please check the manual carefully to see which command sequences are possible.<br />
ERR_READABORT 104h 260 Data read is not allowed after aborting the data acquisition.<br />
ERR_NOACCESS 105h 261 Access to this register is denied. This register is not accessible for users.<br />
ERR_TIMEOUT 107h 263 A timeout occurred while waiting for an interrupt. This error does not lock the driver.<br />
ERR_CALLTYPE 108h 264 The access to the register is only allowed with one 64 bit access but not with the multiplexed 32 bit (high and low double<br />
word) version.<br />
ERR_EXCEEDSINT32 109h 265 The return value is int32 but the software register exceeds the 32 bit integer range. use double int32 or int64 accesses<br />
instead, to get correct return values.<br />
ERR_NOWRITEALLOWED 10Ah 266 The register that should be written is a read-only register. No write accesses are allowed.<br />
ERR_SETUP 10Bh 267 The programmed setup for the card is not valid. The error register will show you which setting generates the error message.<br />
This error is returned if the card is started or the setup is written.<br />
ERR_CLOCKNOTLOCKED 10Ch 268 Synchronisation to external clock failed: no signal connected or signal not stable. Please check external clock or try to<br />
use a different sampling clock to make the PLL locking easier.<br />
ERR_CHANNEL 110h 272 The channel number may not be accessed on the board: Either it is not a valid channel number or the channel is not<br />
accessible due to the actual setup (e.g. Only channel 0 is accessible in interlace mode)<br />
ERR_NOTIFYSIZE 111h 273 The notify size of the last spcm_dwDefTransfer call is not valid. The notify size must be a multiple of the page size of<br />
4096. For data transfer it may also be a fraction of 4k in the range of 16, 32, 64, 128, 256, 512, 1k or 2k. For ABA<br />
and timestamp the notify size can be 2k as a minimum.<br />
ERR_RUNNING 120h 288 The board is still running, this function is not available now or this register is not accessible now.<br />
ERR_ADJUST 130h 304 Automatic card calibration has reported an error. Please check the card inputs.<br />
ERR_PRETRIGGERLEN 140h 320 The calculated pretrigger size (resulting from the user defined posttrigger values) exceeds the allowed limit.<br />
ERR_DIRMISMATCH 141h 321 The direction of card and memory transfer mismatch. In normal operation mode it is not possible to transfer data from<br />
PC memory to card if the card is an acquisition card nor it is possible to transfer data from card to PC memory if the<br />
card is a generation card.<br />
ERR_POSTEXCDSEGMENT 142h 322 The posttrigger value exceeds the programmed segment size in multiple recording/ABA mode. A delay of the multiple<br />
recording segments is only possible by using the delay trigger!<br />
ERR_SEGMENTINMEM 143h 323 Memsize is not a multiple of segment size when using Multiple Recording/Replay or ABA mode. The programmed segment<br />
size must match the programmed memory size.<br />
ERR_MULTIPLEPW 144h 324 Multiple pulsewidth counters used but card only supports one at the time<br />
ERR_NOCHANNELPWOR 145h 325 The channel pulsewidth on this card can’t be used together with the OR conjunction. Please use the AND conjunction<br />
of the channel trigger sources.<br />
ERR_ANDORMASKOVRLAP 146h 326 Trigger AND mask and OR mask overlap in at least one channel. Each trigger source can only be used either in the<br />
AND mask or in the OR mask, no source can be used for both.<br />
ERR_ANDMASKEDGE 147h 327 One channel is activated for trigger detection in the AND mask but has been programmed to a trigger mode using an<br />
edge trigger. The AND mask can only work with level trigger modes.<br />
ERR_ORMASKLEVEL 148h 328 One channel is activated for trigger detection in the OR mask but has been programmed to a trigger mode using a<br />
level trigger. The OR mask can only work together with edge trigger modes.<br />
ERR_EDGEPERMOD 149h 329 This card is only capable to have one programmed trigger edge for each module that is installed. It is not possible to<br />
mix different trigger edges on one module.<br />
ERR_DOLEVELMINDIFF 14Ah 330 The minimum difference between low output level and high output level is not reached<br />
ERR_STARHUBENABLE 14Bh 331 The card holding the star-hub must be enabled when doing synchronization<br />
ERR_PATPWSMALLEDGE 14Ch 332 Combination of pattern with pulsewidht smaller and edge is not allowed<br />
ERR_PCICHECKSUM 203h 515 The check sum of the card information has failed. This could be a critical hardware failure. Restart the system and<br />
check the connection of the card in the slot.<br />
ERR_MEMALLOC 205h 517 Internal memory allocation failed. Please restart the system and be sure that there is enough free memory.<br />
(c) <strong>Spectrum</strong> GmbH 125
Error Codes Appendix<br />
error name value (hex) value (dec.) error description<br />
ERR_EEPROMLOAD 206h 518 timeout occurred while loading information from the on-board eeprom. This could be a critical hardware failure. Please<br />
restart the system and check the PCI connector.<br />
ERR_CARDNOSUPPORT 207h 519 The card that has been found in the system seems to be a valid <strong>Spectrum</strong> card of a type that is supported by the driver<br />
but the driver did not find this special type internally. Please get the latest driver from http://www.spectrum-instrumentation.com<br />
and install this one.<br />
ERR_FIFOHWOVERRUN 301h 769 Hardware buffer overrun in FIFO mode. The complete on-board memory has been filled with data and data wasn’t<br />
transferred fast enough to PC memory. If acquisition speed is smaller than the theoretical bus transfer speed please<br />
check the application buffer and try to improve the handling of this one.<br />
ERR_FIFOFINISHED 302h 770 FIFO transfer has been finished, programmed data length has been transferred completely.<br />
ERR_TIMESTAMP_SYNC 310h 784 Synchronization to timestamp reference clock failed. Please check the connection and the signal levels of the reference<br />
clock input.<br />
ERR_STARHUB 320h 800 The auto routing function of the star-hub initialisation has failed. Please check whether all cables are mounted correctly.<br />
ERR_INTERNAL_ERROR FFFFh 65535 Internal hardware error detected. Please check for driver and firmware update of the card.<br />
126 <strong>M3i.41xx</strong> / <strong>M3i.41xx</strong>-<strong>exp</strong> Manual
Continuous memory for increased data transfer rate<br />
Continuous memory for increased data transfer rate<br />
The continuous memory buffer has been added to the driver version 1.36. The continuous buffer is not available<br />
in older driver versions. Please update to the latest driver if you wish to use this function.<br />
Background<br />
All modern operating systems use a very complex memory management strategy that strictly separates between physical memory, kernel memory<br />
and user memory. The memory management is based on memory pages (normally 4 kByte = 4096 Bytes). All software only sees virtual<br />
memory that is translated into physical memory addresses by a memory management unit based on the mentioned pages.<br />
This will lead to the circumstance that although a user program allocated a larger memory block (as an example 1 MByte) and it sees the<br />
whole 1 MByte as a virtually continuous memory area this memory is physically located as spread 4 kByte pages all over the physical memory.<br />
No problem for the user program as the memory management unit will simply translate the virtual continuous addresses to the physically<br />
spread pages totally transparent for the user program.<br />
When using this virtual memory for a DMA transfer things become more complicated. The DMA engine of any hardware can only access<br />
physical addresses. As a result the DMA engine has to access each 4 kByte page separately. This is done through the Scatter-Gather list. This<br />
list is simply a linked list of the physical page addresses which represent the user buffer. All translation and set-up of the Scatter-Gather list is<br />
done inside the driver without being seen by the user. Although the Scatter-Gather DMA transfer is an advanced and powerful technology it<br />
has one disadvantage: For each transferred memory page of data it is necessary to also load one Scatter-Gather entry (which is 16 bytes on<br />
32 bit systems and 32 bytes on 64 bit systems). The little overhead to transfer (16/32 bytes in relation to 4096 bytes, being less than one<br />
percent) isn’t critical but the fact that the continuous data transfer on the bus is broken up every 4096 bytes and some different addresses<br />
have to be accessed slow things down.<br />
The solution is very simple: everything works faster if the user buffer is not only virtually continuous but also physically continuous. Unfortunately<br />
it is not possible to get a physical continuous buffer for a user program. Therefore the kernel driver has to do the job and the user<br />
program simply has to read out the address and the length of this continuous buffer. This is done with the function spcm_dwGetContBuf as<br />
already mentioned in the general driver description. The desired length of the continuous buffer has to be programmed to the kernel driver<br />
for load time and is done different on the different operating systems. Please see the following chapters for more details.<br />
Next we’ll see some measuring results of the data transfer rate with/without continuous buffer. You will find more results on different motherboards<br />
and systems in the application note number 6 „Bus Transfer Speed Details“<br />
Bus Transfer Speed Details (example system)<br />
PCI 33 MHz slot PCI-X 66 MHz slot PCI Express x1 slot<br />
Mode read write read write read write<br />
User buffer 109 MB/s 107 MB/s 195 MB/s 190 MB/s 130 MB/s 138 MB/s<br />
Continuous kernel buffer 125 MB/s 122 MB/s 248 MB/s 238 MB/s 160 MB/s 170 MB/s<br />
Speed advantage 15% 14% 27% 25% 24% 23%<br />
Setup on Windows systems<br />
The continuous buffer settings is done with the <strong>Spectrum</strong> Control Center using<br />
a setup located on the „Support“ page. Please fill in the desired continuous<br />
buffer settings as MByte. After setting up the value the system needs<br />
to be restarted as the allocation of the buffer is done during system boot<br />
time.<br />
If the system cannot allocate the amount of memory it will divide the desired<br />
memory by two and try again. This will continue until the system can<br />
allocate a continuous buffer. Please note that this try and error routine will<br />
need several seconds for each failed allocation try during boot up procedure.<br />
During these tries the system will look like being crashed. It is then<br />
recommended to change the buffer settings to a smaller value to avoid the<br />
long waiting time during boot up.<br />
Continuous buffer settings should not exceed 1/4 of system memory. During<br />
tests the maximum amount that could be allocated was 384 MByte of<br />
continuous buffer on a system with 4 GByte memory installed.<br />
Setup on Linux systems<br />
On Linux systems the continuous buffer setting is done via the command line argument contmem_mb when loading the kernel driver module:<br />
insmod spcm.ko contmem_mb=4<br />
(c) <strong>Spectrum</strong> GmbH 127
Continuous memory for increased data transfer rate<br />
As memory allocation is organized completely different compared to Windows the amount of data that is available for a continuous DMA<br />
buffer is unfortunately limited to a maximum of 8 MByte. On most systems it will even be only 4 MBytes.<br />
Usage of the buffer<br />
The usage of the continuous memory is very simple. It is just necessary to read the start address of the continuous memory from the driver and<br />
use this address instead of a self allocated user buffer for data transfer.<br />
Function spcm_dwGetContBuf<br />
This function reads out the internal continuous memory buffer if one has been allocated. If no buffer has been allocated the function returns<br />
a size of zero and a NULL pointer.<br />
uint32 _stdcall spcm_dwGetContBuf_i64 ( // Return value is an error code<br />
drv_handle hDevice, // handle to an already opened device<br />
uint32 dwBufType, // type of the buffer to read as listed above under SPCM_BUF_XXXX<br />
void** ppvDataBuffer, // address of available data buffer<br />
uint64* pqwContBufLen); // length of available continuous buffer<br />
uint32 _stdcall spcm_dwGetContBuf_i64m (// Return value is an error code<br />
drv_handle hDevice, // handle to an already opened device<br />
uint32 dwBufType, // type of the buffer to read as listed above under SPCM_BUF_XXXX<br />
void** ppvDataBuffer, // address of available data buffer<br />
uint32* pdwContBufLenH, // high part of length of available continuous buffer<br />
uint32* pdwContBufLenL); // low part of length of available continuous buffer<br />
Please note that it is not possible to free the continuous memory for the user application.<br />
Example<br />
The following example shows a simple standard single mode data acquisition setup with the read out of data afterwards. To keep this example<br />
simple there is no error checking implemented.<br />
int32 lMemsize = 16384; // recording length is set to 16 kSamples<br />
spcm_dwSetParam_i32 (hDrv, SPC_CHENABLE, CHANNEL0); // only one channel activated<br />
spcm_dwSetParam_i32 (hDrv, SPC_CARDMODE, SPC_REC_STD_SINGLE); // set the standard single recording mode<br />
spcm_dwSetParam_i32 (hDrv, SPC_MEMSIZE, lMemsize); // recording length<br />
spcm_dwSetParam_i32 (hDrv, SPC_POSTTRIGGER, 8192); // samples to acquire after trigger = 8k<br />
// now we start the acquisition and wait for the interrupt that signalizes the end<br />
spcm_dwSetParam_i32 (hDrv, SPC_M2CMD, M2CMD_CARD_START | M2CMD_CARD_ENABLETRIGGER | M2CMD_CARD_WAITREADY);<br />
// we now try to use a continuous buffer for data transfer or allocate our own buffer in case there’s none<br />
spcm_dwGetContBuf_i64 (hDrv, SPCM_BUF_DATA, &pvData, &qwContBufLen);<br />
if (qwContBufLen < (2 * lMemsize))<br />
pvData = new int16[lMemsize];<br />
// read out the data<br />
spcm_dwDefTransfer_i64 (hDrv, SPCM_BUF_DATA, SPCM_DIR_CARDTOPC , 0, pvData, 0, 2 * lMemsize);<br />
spcm_dwSetParam_i32 (hDrv, SPC_M2CMD, M2CMD_DATA_STARTDMA | M2CMD_DATA_WAITDMA);<br />
if (qwContBufLen < (2 * lMemsize))<br />
delete[] pvData;<br />
128 <strong>M3i.41xx</strong> / <strong>M3i.41xx</strong>-<strong>exp</strong> Manual
Details on M3i cards I/O lines<br />
Multi Purpose I/O Lines<br />
The MMCX Multi Purpose I/O connectors<br />
(X0 and X1) of the M3i cards from<br />
<strong>Spectrum</strong> are protected against over<br />
voltage conditions.<br />
For this purpose clamping diodes of the<br />
types 1N4148 are used in conjunction<br />
with a series resistor. Both I/O lines are<br />
internally clamped to signal ground and<br />
to 3.3V clamping voltage. So when connecting<br />
sources with a higher level than<br />
the clamping voltage plus the forward<br />
voltage of typically 0.6..0.7 V will be<br />
the resulting maximum high-level level.<br />
Details on M3i cards I/O lines<br />
The maximum forward current limit for the used 1N4148 diodes is 100 mA, which is effectively limited by the used series resistor for logic<br />
levels up to 5.0V. To avoid floating levels with unconnected inputs, a pull up resistor of 10 kOhm to 3.3V is used on each line.<br />
Interfacing with clock input<br />
The clock input of the M3i cards is AC-coupled, singleended<br />
PECL type. Due to the internal biasing and a relatively<br />
high maximum input voltage swing, it can be directlly<br />
connected to various logic standards, without the<br />
need for external level converters.<br />
Single-ended LVTTL sources<br />
All LVTTL sources, be it 2.5V LVTTL or 3.3V LVTTL must be<br />
terminated with a 50 Ohm series resistor to avoid reflections<br />
and limit the maximum swing for the M3i card.<br />
Differential (LV)PECL sources<br />
Differential drivers require equal load on both the true<br />
and the inverting outputs. Therefore the inverting output<br />
should be loaded as shown in the drawing. All PECL drivers<br />
require a proper DC path to ground, therefore emitter<br />
resistors RE must be used, whose value depends on the<br />
supply voltage of the driving PECL buffer:<br />
VCC - VEE 2.5 V 3.3 V 5.0 V<br />
RE ~50 Ohm ~100 Ohm ~200 Ohm<br />
Interfacing with clock output<br />
The clock output of the M3i cards is AC-coupled, single-ended<br />
PECL type. The output swing of the M3i<br />
clock output is approximately 800 mVPP. Internal biased single-ended receivers<br />
Because of the AC coupling of the M3i clock output,<br />
the signal must be properly re-biased for the receiver.<br />
Receivers that provide an internal re-bias only require<br />
the signal to be terminated to ground by a<br />
50 Ohm resistor.<br />
Differential (LV)PECL receivers<br />
Differential receivers require proper re-biasing and<br />
likely a small minimum difference between the true<br />
and the inverting input to avoid ringing with open receiver<br />
inputs. Therefore a Thevenin-equivalent can<br />
be used, with receiver-type dependant values for<br />
R1, R2, R1’ and R2’.<br />
(c) <strong>Spectrum</strong> GmbH 129