Slide Bracket Replacement Procedures - JOST International
Slide Bracket Replacement Procedures - JOST International
Slide Bracket Replacement Procedures - JOST International

Create successful ePaper yourself
Turn your PDF publications into a flip-book with our unique Google optimized e-Paper software.
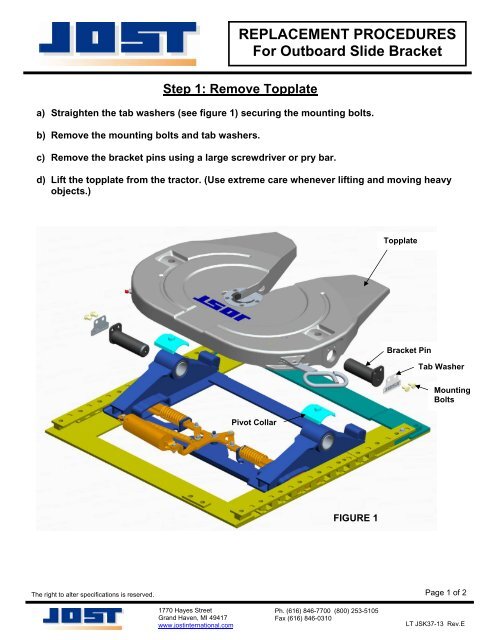
REPLACEMENT PROCEDURESFor Outboard <strong>Slide</strong> <strong>Bracket</strong>Step 1: Remove Topplatea) Straighten the tab washers (see figure 1) securing the mounting bolts.b) Remove the mounting bolts and tab washers.c) Remove the bracket pins using a large screwdriver or pry bar.d) Lift the topplate from the tractor. (Use extreme care whenever lifting and moving heavyobjects.)Topplate<strong>Bracket</strong> PinTab WasherMountingBoltsPivot CollarFIGURE 1The right to alter specifications is reserved.Page 1 of 21770 Hayes StreetGrand Haven, MI 49417www.jostinternational.comPh. (616) 846-7700 (800) 253-5105Fax (616) 846-0310LT JSK37-13 Rev.E
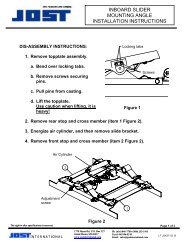
Step 2: Replace <strong>Bracket</strong>Grind off tack welds orremove 7/16 bolts.Remove (2) Rear Framebolts each sideFIGURE 2a) Grind off the three welds located on both sides of the rear of the slider bedplate orremove the 7/16 bolts attaching the rear stop to the slider rack.b) Remove (4) rear frame bolts attaching therear stop plate to the tractor frame.c) Remove the rear stop plate bysliding it sideways (see Figure 3).<strong>Slide</strong> to removed) Actuate slider cylinder and removeslide bracket.e) Actuate slider cylinder on new bracketand slide onto bedplate with the cylinderend forward.Rear stop plateFIGURE 3f) Replace the rear stop plate and bolts. Torque fasteners to bolt manufacturer’srecommendations (5/8-11 grade 8 = 210 Ft-lbs). It is not necessary to replace the tackwelds or 7/16 bolts removed in item “a”.Step 3: Re-Install Topplatea) Lower the topplate onto the bracket using a suitablelifting device.b) Install the bracket pins, tab washers and mountingbolts. Securely tighten the mounting bolts, then bendthe locking tabs over each bolt (see figure 4).Assembly Tip: Before putting the topplate back on themounting bracket, liberally grease the top ofthe pivot collars to help hold them in place.Bend tabs to secure both screwsFIGURE 4The right to alter specifications is reserved.Page 2 of 21770 Hayes StreetGrand Haven, MI 49417www.jostinternational.comPh. (616) 846-7700 (800) 253-5105Fax (616) 846-0310LT JSK37-13 Rev.E