DEHA HD-SOCKET LIFTING SYSTEM - Alcor SA
DEHA HD-SOCKET LIFTING SYSTEM - Alcor SA
DEHA HD-SOCKET LIFTING SYSTEM - Alcor SA
- No tags were found...

You also want an ePaper? Increase the reach of your titles
YUMPU automatically turns print PDFs into web optimized ePapers that Google loves.
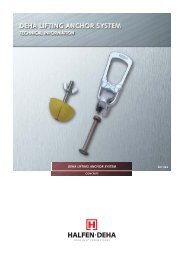
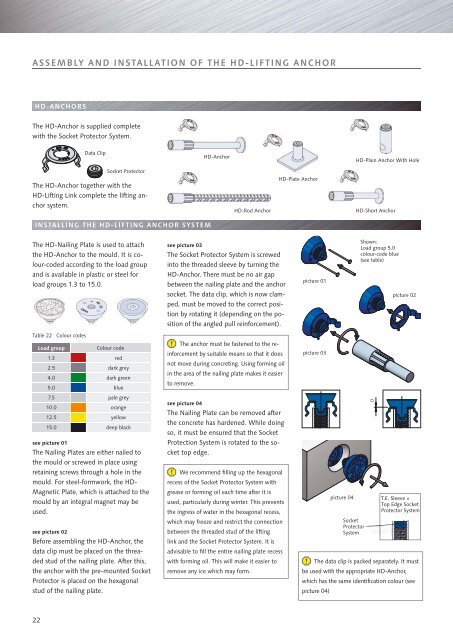
ASSEMBLY AND INSTALLATION OF THE <strong>HD</strong>-<strong>LIFTING</strong> ANCHOR<strong>HD</strong>-ANCHORSThe <strong>HD</strong>-Anchor is supplied completewith the Socket Protector System.Data Clip<strong>HD</strong>-Anchor<strong>HD</strong>-Plain Anchor With HoleSocket ProtectorThe <strong>HD</strong>-Anchor together with the<strong>HD</strong>-Lifting Link complete the lifting anchorsystem.<strong>HD</strong>-Rod Anchor<strong>HD</strong>-Plate Anchor<strong>HD</strong>-Short AnchorINSTALLING THE <strong>HD</strong>-<strong>LIFTING</strong> ANCHOR <strong>SYSTEM</strong>The <strong>HD</strong>-Nailing Plate is used to attachthe <strong>HD</strong>-Anchor to the mould. It is colour-codedaccording to the load groupand is available in plastic or steel forload groups 1.3 to 15.0.see picture 03The Socket Protector System is screwedinto the threaded sleeve by turning the<strong>HD</strong>-Anchor. There must be no air gapbetween the nailing plate and the anchorsocket. The data clip, which is now clamped,must be moved to the correct positionby rotating it (depending on the positionof the angled pull reinforcement).picture 01Shown:Load group 5.0colour-code blue(see table)picture 02Table 22 Colour codesLoad groupColour code1.3 red2.5 dark grey4.0 dark green5.0 blue7.5 pale grey10.0 orange12.5 yellow15.0 deep blacksee picture 01The Nailing Plates are either nailed tothe mould or screwed in place usingretaining screws through a hole in themould. For steel-formwork, the <strong>HD</strong>-Magnetic Plate, which is attached to themould by an integral magnet may beused.see picture 02Before assembling the <strong>HD</strong>-Anchor, thedata clip must be placed on the threadedstud of the nailing plate. After this,the anchor with the pre-mounted SocketProtector is placed on the hexagonalstud of the nailing plate.The anchor must be fastened to the reinforcementby suitable means so that it doesnot move during concreting. Using forming oilin the area of the nailing plate makes it easierto remove.see picture 04The Nailing Plate can be removed afterthe concrete has hardened. While doingso, it must be ensured that the SocketProtection System is rotated to the sockettop edge.We recommend filling up the hexagonalrecess of the Socket Protector System withgrease or forming oil each time after it isused, particularly during winter. This preventsthe ingress of water in the hexagonal recess,which may freeze and restrict the connectionbetween the threaded stud of the liftinglink and the Socket Protector System. It isadvisable to fill the entire nailing plate recesswith forming oil. This will make it easier toremove any ice which may form.picture 03picture 04 T.E. Sleeve =Top Edge SocketProtector SystemSocketProtectorSystemThe data clip is packed separately. It mustbe used with the appropriate <strong>HD</strong>-Anchor,which has the same identification colour (seepicture 04)22