Manual BluePRESSLine MUG - EN - Walter Schulze GmbH
Manual BluePRESSLine MUG - EN - Walter Schulze GmbH
Manual BluePRESSLine MUG - EN - Walter Schulze GmbH

You also want an ePaper? Increase the reach of your titles
YUMPU automatically turns print PDFs into web optimized ePapers that Google loves.
Instruction manualVersion 10.01Heat press<strong>BluePRESSLine</strong><strong>MUG</strong>Version 10.01 1/14
1. Introduction1.1 Content1. Introduction 021.1 Content 021.2 Illustration of the heat press 031.3 Technical Data 031.4 Exchangeable heating element 031.5 Safety arrangements of the heat plate 041.6 Safety arrangements at the workspace 042. Initiation 042.1 Tips for transport 042.2 Installation of the heat press 042.3 Power supply 052.4 Initiation of the heat press 053. Working with the heat press 053.1 Programming of electronic devices 053.2 Bugfixing of the electronic devices 053.3 Application range and sample adjustments of the heat press 063.4 Apply a transfer film to a cup 063.5 Pressure Settings 063.6 Exchange the heating band 074. Maintenance 084.1 Maintenance 084.2 Replacing the main fuse 084.3 Replacing electronic devices 094.4 Troubleshooting 104.5 Connection diagram 114.6 Testing Report 124.7 EC-Conformance declaration 125. Spare parts and Illustrations 135. 1 Illustration heat press 135. 2 Table of spare parts 14Version 10.01 2/14
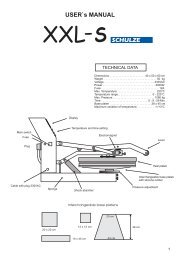
1.2 Illustration of the heat press1. Main switch2. Main fuse3. Contact pressure adjustment4. Fixation of the heating element5. Movable Part6. Pressure lever with rubber grip7. Electronic devices8. Power cable with connector9. Heating band1.3 Technical DataDimensions of the press: ................................. 38 x 15 x 31 cmWeight: ............................................................................... 8 kgOperating voltage: ...................................................... 230 VACRated power: .................................................................. 300 WFuse: .................................................................................... 6AMax. temperature: ......................................................... 200°CTemperature range: ................................................. 90 - 200°CHeating band: ..................................................... 105 x 230 mmMax. pressure area: ............................................. 80 x 180 mmDiameter of the cup: ............................................... 72 - 82 mm1.4 Exchangeable heating elementThere are different hot plates for this heat press.The instruction manual for exchanging the heating element iswritten in chapter 3.6.1. heating element for a pitcher: diameter 95 mm2. the base plate for plates3. the heating plate for plates Ø 12 cm4. the heating plate for plates Ø 15 cm5. the mounting the heating plateVersion 10.01 3/14
1.5 Safety arrangements of the heat pressThe <strong>BluePRESSLine</strong> <strong>MUG</strong> is equipped with different safety arrangements, to make a safe usage possible.Main fuse 6AThe main fuse 6A is placed over the main switch of the heat press. In case of overcharge the main fuse saves the heat press of gettingdamaged. If the fuse is activated it must be changed. The Instruction of the Exchange is written in chapter 4.2.Acoustic signal3 Seconds before the end of the pressing process an acoustic signal will sound.1.6 Safety arrangements at the workspaceTesting the heat pressAfter a correct installation of the press it is important to ensure that the press works properly, isn't damaged and has no safety defects. Thetesting can only be done by the employer or other authorized persons and is mandatory to guarantee correct installation and safe usage ofthe press.If any irregularities regarding functionality or safety are found during the testing, these have to been noted and reported to <strong>Walter</strong> <strong>Schulze</strong><strong>GmbH</strong> in written form within 7 days. Until clarification the press can not be used.Information and EducationAccording to § 81 industrial relations law and § 14 employment protection law the employer has to make arrangements to give allinformation about the function and the range of application to the user.In particular the user needs to be acquainted with the complete manual and be explicitly informed of the dangers of working with the press.The details have to be explained in a coherent form and language.Safety distance and ventilationThe press has to be installed at a place which gives enough space on both sides to put the material on.The space in front of the press has to be wide enough to let nothing disturb the user at work.Using the press with certain materials may create a strong smell. That’s why the user should evaluate the need for a ventilation system atthe workplace.Safety instruction:• The press should only be used by trained personal after notice of this manual• Only one person is allowed to work on the press at a time.• Beware of heating plate – risk of burns.• The plug has to be pulled out of the power outlet while maintenance.2. Initiation2.1 Tips for transportThe <strong>BluePRESSLine</strong> <strong>MUG</strong> is covered with a cardboard for transport. Right after the receiving you should check if the cardboard and thepress are in good condition. Later on, if you have to send the press somewhere, we ask you to cover the press with the same cardboardand in the same way. The press has to be cold and the pressure lever has to be pulled down.2.2 Installation of the heat pressThe press is delivered in a cardboard. After unpacking and connecting, you can work with the press. The <strong>BluePRESSLine</strong> <strong>MUG</strong> doesn'tneed any other montage or installationVersion 10.01 4/14
2.3 Power supplyThe <strong>BluePRESSLine</strong> <strong>MUG</strong> has to be connected to a voltage of 230VAC/ 50Hz. The press is equipped with a plug. Make sure that thepower outlet is in the right condition and that the grounding is connected to the power outlet.2.4 Initiation of the heat pressWhile powering up the press, the movable part has to be in the upper position, which means that the press has to be open. The press alsohas to be open while heating up. The press can be turned on with the green switch. If the green switch glows the press heats up to theadjusted temperature. After finishing the work with the press the switch has to be turned off and the plug has to be pulled out.3. Working with the heat press3.1 Programming electronic devicesAfter switching on the press, the current temperature isshown on the display and the press heats up. To change thesettings,1. Programming mode shows up when you press thesetup button about 5 seconds, until the LED 1 blinks.2. The programmed temperature is shown on the display.The programming mode is activated.3. With the buttons – or + you can adjust the disiredprint temperature.4. Press the setup button shortly. Now you can see the protime. With the buttons – or + you can adjust the disiredtime.5. To leave the programming mode press the setup buttonAll settings ared saved.Control of adjusted temperatureIf you want to check up the adjusted temperature press the +button.Control of adjusted timeIf you want to check upp the adjusted time press the - button3.2 Bugfixing of the electronic devicesThe electronic devices of the <strong>BluePRESSLine</strong> <strong>MUG</strong> heat press control the main functions of the press.Here is a list of possible messages:ERR.1 – No connection of the electronic devices to the temperature sensor, (Temperature sensor defect/ cable not connected)ERR.2 – Connection of electronic devices and temperature sensor bypassed , (Temperature sensor defect/)ERR.3 – Resistor of temperature sensor too low. The temperature range of the electronic devices is deceeded.ERR.4 – Resistor of temperature sensor too high. The temperature range of the electronic devices exceeded.ERR.5 – No temperature rise within 3 minutes even if heating element is switched on. (Temperature fuse is defect)ERR.6 – No reduction of the temperature within 3 minutes even if heating element is turned off. (Power relay CRYDOM is defect)ERR.7 – Temperature too high, over 230°C (Power relay CRYDOM is defect)ERR.3 and ERR.4 can occur if the electronic devices are not programmed properly.Version 10.01 5/14
3.3 Application range and sample adjustments of the heat pressThis heat press is made for transfers to cups and pitchers. Here are some settings.Settings sublimation to a cup (Example):– Print temperature 180°C– Time 4 minutesYou must never close the heat press without a cup inside!3.4 Apply a transfer film to a cupInsert the cup with the transfer filminto the press.Press the cup into the heatingelement.Continue to press the cup down whileclosing the press with the lever. Thepress will heat up to the programmedtemprature and the count the preset timedown. After the lapse of time a acusticsignal will sound. Open the press andtake the cup out.3.5 Pressure settingsThe contact pressure setting screw is placed at the front of the heat press. To adjust the settings, the heat press must be open. Thecontact pressure should not be too high, otherwise there could be a partial damage. After every modification you have to test the newsettings.Damage, which is made by an excessive pressure setting, is not covered by the warranty.If you want to make the pressure settings, please follow thisdescription:1. Place the cup in the heat press.2. Close the heat press to check up the contact pressure.3. Open the heat press.4. To raise the contact pressure twirl the screw to the left(+).5. To downsize the contact pressure twirl the screw tothe right (-).Version 10.01 6/14
3.6 Exchange the heating bandBefore you can change the heating band, switch off the heat press and pull out the plug. The heating band must be cool.1. Take a Philips head screw driver and screw out the fixation screws from the heating band (photo 1)2. Take out the heating band (photo 2)3. Screw out the guard and take it out (photo 3-4)4. Excerpt the rated power (photo 5-6)5. Install the new heating element for a pitcher or the new heating plate for plates (photo 7-8)6. Put the rated power and screw guard7. Attech the new heating band (photo 2-1)8. Screw the mounting the heating plate (photo 9-10)9. Put the heating plate for plates (photo 11)10. Put the base plate for plates (photo 12)Check if the heat press is ready to work.Version 10.01 7/14
4. Maintenance4.1 MaintenanceIf it is necessary you can grease the movable elementsBefore you can start greasing the heat press must be deactivated and cool. Pull out the plug. You can use a usual car grease.While greasing you have to move the pressure lever up and down slowly.Lubrication service points:1. Under the heating band (photo 1 & 2).2. The moveable parts on the pressure lever in the base of the heat press (photo 3 & 4).4.2 Replacing the main fuseIf the heat press do not work and the main switch is glowing, check the main fuse. The main fuse 6A is placed at the right side of the heatpress (photo 1). To change the main fuse switch off the heat press and disconnect it from electricity. Screw out the fuse bracket (photo 1),change the fuse (photo 2 & 3) and screw in the bracket (photo 4).Version 10.01 8/14
4.3 Replacing electronic devicesThe electronic devices are placed inside the heat press on the right side, which are regulating the time and the temperature. To changethe electronic devices switch out the heat press and screw the back cap loose (photo 1 – 3). Disconnect the green plug (photo 4 - 5). Putin the new electronic devices, fix it and connect it with the green plug. Fixing the cap is the last step you have to do.Version 10.01 9/14
4.4 TroubleshootingProblem Cause DebuggingGrüner Schalter leuchtet aber: main f use 10 A ist def ect Exchange main f use 10 Adisplay doesn´t glow if the main f use is okay , than the electronic dev ices are def ect Exchange electronic dev icesheat plate doesn´t f uelDisplay shows Err 1, temeperature sensor is def ect or cable is broken chack temperature connectionno temperatue or time rangeor change temeperature sensorAf ter closing the heat press the time is not counting angel at the START-button bent Bent the angel while pushing START – buttonSTART-button is def ectexchange START - button if time doesn't countdown while pressing the start buttonNo acoustic signal af ter end of pressing beeper is def ect Exchange electronic dev icestemperature rises more than adjustedalthough the red diode do not glow on the displayExample: temperature was adjustedTemperature rises to 180 °C – red diode glows breakdown of electronic dev ices Exchange electronic dev icesaf ter reaching 180°C red diode lapseTemperature rises more than 220°C, than sinkingdisplay shows Err 6buttons on the electronic dev ices def ect setting buttons are def ect Exchange electronic dev icesno settings f or time and temperature possiblereal temperature doesn´t match witch temperature breakdown of electronic dev ices reset electronic dev icesshown on the display – temperature too high/ lowVersion 10.01 10/14
4.5 Connection diagramVersion 10.01 11/14
4.6 Testing Reportfinal check of the heat press:o - base, painto - greasing of the waveso - heating plate and baseplate, silicon, teflono - electronic connection, safety wire, power cableo - electronic, max. temperature 220°Coooooo- check of all functions- working time at 180°C . . . . . . . hours- temperature tolernace at 180°C . . . . . . -/ . . . . . .+°C- working time at 180°C . . . . . . . .hours- test with a transfer film- caution labelsSerial number . . . . . . . . . . . . . . . . . . Date . . . . . . . . . . . . . . . . . . . . Signature . . . . . . . . . . . . . . . . . . . . . . . . . . .4.7 EC-Conformance-Declaration after EC- guideline for machines 2006/46 ECThe <strong>Walter</strong> <strong>Schulze</strong> <strong>GmbH</strong>Schmalenbachstraße 1512057 Berlinas European representative of the manufacturer company ROMANIK hereby declares that the following machine:Heat press . . . . . . . . . . . . . . . Serial number . . . . . . . . . . . .is compliant with the specifications of the following EC directives:Machinery ( 2006/46)Low Voltage (2006/95)EMC (2004/108)used norms and technical specifications:<strong>EN</strong> 292-1 <strong>EN</strong> 292-2 safety of machines<strong>EN</strong> 60204-1 electrical equipment of machinesBerlin , . . . . . . ._____________________________Peter MeidingerPresidentAll SCHULZE heat presses are exempt from the waste disposal law under reg. no. DE 231060054.Version 10.01 12/14
5. Spare parts and illustrations5.1 Illustration heat pressVersion 10.01 13/14
5.2 Table of spare partsSymbolDescription55 001 Rubber grip55 002 Movable Part55 003 Washer Ø1055 004 Connection piece55 005 Safety sheet55 006 Screw M4x1255 007 Mounting component55 008 Contact pressure adjustment plate Elesa55 009 Contact pressure adjustment screw55 010 Cover sheet55 011 Back cover55 012 Cover cap55 013 Pressure lever55 014 Bolt Ø10x13055 015 Base frame55 016 Fuse housing55 017 Main switch55 018 Heating band55 019 Threaded nut55 020 Rubber foot55 021 Screw M6x1555 022 Cable gland M16x1,555 023 Electronic devices55 024 Filter55 025 Washer Ø855 026 Screw M855 027 Time switchVersion 10.01 14/14