Instruction Manual - FactoryMation
Instruction Manual - FactoryMation
Instruction Manual - FactoryMation

Create successful ePaper yourself
Turn your PDF publications into a flip-book with our unique Google optimized e-Paper software.
4H358D0180009Installation <strong>Manual</strong>MA7200AC Inverter208 to 230V 1 / 3 Phase 1 ~ 3HP3 Phase 5 ~ 40HP380 to 460V 3 Phase 1 ~ 75HP
• SAFE OPERATION NOTESRead this instruction manual thoroughly before installation, operation, maintenanceor inspection of the inverter. Only authorized personnel should be permitted to performmaintenance, inspections or parts replacement.In this manual, notes for safe operation are classified as:“WARNING” or “CAUTION”.WARNINGCAUTION: Indicates a potentially hazardous situation that, if not avoided,could result in death or serious injury to personnel.: Indicates a potentially hazardous situation that, if not avoided,may result in minor or moderate injury to personnel and damageto the equipment.• “WARNING” and “CAUTION”WARNING• Always turn off the input power supply before wiring terminals.• After turning OFF the main circuit power supply, do not touch the circuitcomponents until the “CHARGE” LED is extinguished.• Never connect power circuit output U/T1, V/T2, W/T3 to AC power supply.CAUTION• When mounting the MA7200 in a separate enclosure, install a fan or other coolingdevice to keep the intake air temperature below 113 o F (45 o C).• Do not perform a withstand voltage test to the inverter.• All the parameters of the inverter have been preset at the factory. Do not changethe settings unnecessarily.This inverter has been placed through demanding tests at the factory before shipment.After unpacking, check for the following:1. Verify that part numbers on shipping carton and unit match the purchase ordersheet and/or packing list.2. Do not install or operate any inverter that is damaged or missing parts.3. Do not install or operate any inverter that has no QC marking.Contact your local TECO authorized distributor or TECO representative if any ofthe above irregularities have been found.
ContentsPage1. MA7200 Handling Description ------------------------------------- 1-11.1 Inspection Procedure upon Receiving ---------------------------------------- 1-11.2 Installation ------------------------------------------------------------------------ 1-21.3 Removing/Attaching of LCD Digital Operator and Front Cover---------- 1-41.4 Wiring between Inverter and Peripheral Devices --------------------------- 1-71.5 Description of Terminal Function -------------------------------------------- 1-111.6 Main Circuit Wiring Diagram -------------------------------------------------1-131.7 Wiring Main Circuit------------------------------------------------------------ 1-141.8 Inverter Specifications --------------------------------------------------------- 1-171.9 Dimensions ---------------------------------------------------------------------- 1-191.10 Peripheral Units ----------------------------------------------------------------- 1-222. Using LCD Digital Operator----------------------------------------- 2-13. Parameter Setting------------------------------------------------------ 3-13.1 Frequency Command An- ----------------------------------------------- 3-13.2 Parameters That Can be Changed during Running Bn- -------------- 3-23.3 Control Parameters Cn- ------------------------------------------------- 3-123.4 System Parameters Sn- -------------------------------------------------- 3-303.5 Monitoring Parameters Un- --------------------------------------------- 3-754. Fault Display and Troubleshooting ------------------------------ 4-14.1 General ---------------------------------------------------------------------------- 4-14.2 Error Message and Troubleshooting ------------------------------------------ 4-2AppendixA. PID Parameter Setting -------------------------------------------------------App-1B. Supplementary on PID Control Block Diagram --------------------------App-3C. Wiring for PG Feedback Use------------------------------------------------App-4D. RS-485 Communication Interface------------------------------------------App-5E. SINK/SOURCE Typical Connection Diagram ---------------------------App-7F. RS-232C Serial Communication Connection Diagram------------------App-8G. Set-up Using the Sensorless Vector Control ------------------------------App-9H. Notes for Circuit Protection and Environmental Ratings-------------- App-11I. Spare Parts------------------------------------------------------------------- App-15J. Electrical Ratings For Contstant Torque and Quadratic Torque------ App-25K. Inverter Heat Loss ---------------------------------------------------------- App-26
1. MA7200 Handling Description1.1 Inspection Procedure upon ReceivingBefore delivery, Every MA7200 inverter has been properly adjusted and passed thedemanding function test. After receiving the inverter, the customer should take it out andfollow the below procedure:• Verify that the Type No. of the inverter you’ve received is the same as the Type No.listed on your purchase order. (Please read the Nameplate)• Observe the condition of the shipping container and report any damage immediately tothe commercial carrier that has delivered your inverter.■ Inverter nameplate:Model:MA7200-2002-N1 HP:2 KVA:2.7AC Input: 1PH/3PH 200-230V 50/60HzAC Output: 3PH 0-230V Amps: 6.4AINVERTER MODELINPUT SPECIFICATIONOUTPUT SPECIFICATIONMOTOR COMPANYLISTED(IND. CONT. EQ.)848F■ Inverter model number :MA7200-2002 -N1MA7200SeriesN1: NEMA1N4: NEMA4Rated Voltage2: 200~230V4: 380~460VMax. Applicable MotorCapacity (HP)0001 : 1HP∫ ∫0075 : 75HPNEMA4 for 1~20HP only1-1
1.2 InstallationWhen installing the inverter, always provide the following space to allow normalheat dissipation.50 mm min.120 mmmin.AIRambienttemperature-10 ~ + 40 ℃50 mmmin.30 mmmin.30 mmmin.120 mmmin.AIR(a) Space in Side (b) Space in Top/bottomFig. 1-a. Air clearance for MA7200 wall mounting1-2
L1(L) L2(N) L3220-240V380-480VSingle/ThreePhasesT1 T2 T33Phases IML1(L) L2(N) L3220-240V380-480VSingle/ThreePhasesT1 T2 T33Phases IM(a) NEMA4 Frame1 (b) NEMA4 Frame2Fig. 1-b. MA7200 NEMA4 InstallationCAUTIONLocation of equipment is important to achieve proper performance and normaloperating life. The MA7200 inverter should be installed in area where the followingconditions exist.• Ambient temperature: +14 to 104 o F, (-10 to 40 o C).• Install the MA7200 in a location protected from rain, moisture and direct sunlight.• Install the MA7200 in a location free from harmful mists, gases, liquids, airbornedusts and metallic particles.• Install the MA7200 in a location free from vibration and electromagnetic noise. (i.e.welding machines, power units, etc…)• When mounting multiple units in a common enclosure, install a cooling fan or someother means to cool the air entering the inverter to at least 113 o F (+45 o C) or below.1-3
1.3 Removing/Attaching the Digital Operator and Front coverCAUTIONPlease disassemble Front Cover before you connect wires to terminals on MA7200models.• 230V 1~25HP & 460V 1~30HP models: Plastic instructions, so please disconnectLCD Digital Operator before you disassemble Front Cover. After you finished thewiring connection, assemble Front Cover first then reinstall LCD Digital Operator.• 230V 30HP、40HP & 460V 40~75HP: Iron instructions, you can disassemble FrontCover for wiring connection without disconnect LCD Digital Operator. Thenreinstall Front Cover back after you finished wiring connection.MA7200 disassembly / Assembly procedures will be depended on different model asfollows:(A) For 230V : 1-2HP, 460V : 1-2HP• MA7200-2001-N1 • MA7200-4001-N1• MA7200-2002-N1 • MA7200-4002-N1■ Removing the digital operator :Take off the two screws on the front cover in theplace a and b. Remove the front cover and takeoff the screws in the place c and d. Disconnectthe RS-232 cable connector on the backside ofthe LCD digital operator. Lift and remove digitaloperator.■ Attaching the front cover and digital operator:Connect the RS-232 cable connector on the backof the LCD digital operator.Front CoverabLCD DigitalOperatorcdRS-232CableConnectorAttach the digital operator and tighten the screws in the place c and d. Insert the tabs ofthe upper part of front cover into the groove of the inverter and tighten the screws in theplace a and b.1-4
(B) For 230V : 3-10HP, 460V : 3-10HP• MA7200-2003-N1 • MA7200-4003-N1• MA7200-2005-N1 • MA7200-4005-N1• MA7200-2007-N1 • MA7200-4007-N1• MA7200-2010-N1 • MA7200-4010-N1■ Removing the digital operatorTake off the screws in the place a. and b.Press the lever on the side of the digital operatorin the direction of arrow 1 to unlock the digitaloperator.Disconnect the RS-232 cable connector on theback side of the LCD digital operator. Lift thedigital operator in the direction of arrow 2 toremove the digital operator.LCD Digital OperatorFront Cover 2a1b■ Removing the front coverPress the left and right sides of the front cover inthe directions of arrow 1 and lift the bottom of thecover in the direction of arrow 2 to remove thefront cover.1FrontCover2RS-232CableConnectorc1■ Mounting the front cover and digital operatorInsert the tab of the upper part of front cover intothe groove of the inverter and press the lower partof the front cover onto the inverter until the frontcover snaps shut.Connecting the RS-232 cable connector on theback side of the LCD digital operator and hookthe digital operator at a on the front cover in thedirection of arrow 1.Press the digital operator in the direction of arrow2 until it snaps in the place b and then tighten thescrews in the place c and d. (on the front cover)DigitalOperatorFrontCoveredc1ab2RS-232CableConnector1-5
(C) For 230V 15,20HP and 460V 15,20HP Series• MA7200-2015-N1 • MA7200-4015-N1• MA7200-2020-N1 • MA7200-4020-N1■ Removing the digital operator :Take off the screws in the place a. and b.Disconnect the RS-232 cable connector on theback side of the LCD digital operator and then liftthe digital operator upwards.■ Removing the front cover :Loosen the two screws of the front cover in theplace c and d. And lift the bottom of the frontcover to remove the front cover.dFrontCovercbaLCD DigitalOperatorRS-232 CableConnector■ Mounting the front cover and digital operator :Insert the tab of the upper part of front cover intothe groove of the inverter and tighten the screwsin the place c and d.Connect the RS-232 cable connector on the backof the LCD digital operator.Attach the digital operator and tighten the screwsin the place a and b.(D) For 230V 30~40HP and 460V 40~75HP Series■ Removing the front cover: Loosen the two screwsFront coverof the front cover in the place a. and b. Thenloosen the two screws c and d, lift the front coverupwards. (Don’t removing the digital operator.)■ Mounting the front cover: Press the front coverand then tighten the screws in the place a, b, c andd.1-6
1.4 Wiring between Inverter and Peripheral devices and noticeCAUTION1. After turning OFF the main circuit power supply, do not touch the circuitcomponents or change any circuit components before the “CHARGE” lampsextinguished. (It indicates that there is still some charge in the capacitor).2. Never do wiring work or take apart the connectors in the inverter while the poweris still on.3. Never connect the inverter output U/T1, V/T2, W/T3 to the AC source.4. Always connect the ground lead E to ground.5. Never apply high voltage test directly to the components within the inverter. (Thesemiconductor devices are vulnerable to high voltage shock.)6. The CMOS IC on the control board is vulnerable to ESD. Do not try to touch thecontrol board.7. If Sn-03 is 7,9,11 (2-wire mode) or is 8, 10, 12 (3-wire mode), except parametersettings of Sn-01 and Sn-02, the other parameter settings will return to their initialsettings at factory. If the inverter is initially operated in 3-wire mode (Sn-03= 8,10, 12), the motor will rotate in CCW sense after setting changed to 2-wire mode.(Sn-03= 7, 9, 11). Be sure that the terminals 1 and 2 are OPEN so as not toharmful to personal or cause any potential damage to machines.CAUTION1. Determine the wire size for the main circuit so that the line voltage drop is within2% of the rated voltage. If there is the possibility of excessive voltage drop due towire length, use a larger wire (larger diameter) suitable to the required lengthLine voltage drop(V) = 3 × wire resistance( Ω/km)× wire length(m) × current(A) × 102. If the length of the cable wire between the inverter and the motor exceeds 30m,use a lower carrier frequency for PWM (adjust the parameter Cn-34). Refer toPage 3-21-31-7
■ Standard Connection DiagramThe standard connection diagram of MA7200 is shown in Fig. 2. The sign ◎indicates the main circuit terminal and the sign ○ indicates control circuit terminal. Theterminal function and arrangement are summarized in Table 1 and Table 2. There arethree types of control board, the terminal arrangement is shown as below.(A) For Compact Size Type 230V : 1-2HP, 460V : 1-2HP (NEMA4 are the same)•MA7200-2001/2-N1 •MA7200-4001/2-N1Braking ResistorB1/PB2Main CktPower SupplyNFBMCR/L1S/L2T/L3U/T1V/T2W/T3IMFWD/STOPREV/STOPExternal Fault123FWDREVEb("Close":FWD)("Close":REV)AnalogOutput 1AnalogOutput 2EAO1AO2GNDGrounding Lead(
(B) 230V : 3-40HP, 460V : 3-75HP (NEMA4 to 20HP)• MA7200-2003-N1• MA7200-4003-N1throughthroughMA7200-2040-N1 MA7200-4075-N1Braking ResistorB1/PB2Main CktPower SupplyNFBMCR/L1S/L2T/L3U/T1V/T2W/T3IMEGrounding Lead(
1.5 Description of terminal functionTable 1 Main circuit terminalsTerminal 230V:1~20HP, 460V:1~20HP 230V:25~40HP, 460V:25~75HPR/L1S/L2T/L3B1/PB2ΘMain circuit input power supply(For single phase power supply, please use R/L1, S/L2 as input terminal)B1/P, B2: External braking resistorB1/P, Θ: DC power supply input• ⊕ - : DC power supply orbraking unit⊕ -B2/R Unused -U/T1V/T2 Inverter outputW/T3EGrounding lead (3rd type grounding)-■ Terminal block configuration․230V : 1 ~ 2HP․ 460V : 1 ~ 2HPR/L1 S/L2 T/L3 B1/P․230V : 3~5HPJ4 J2B1/PB2 U/T1 V/T2 W/T3B2 R/L1 S/L2 T/L3U/T1 V/T2 W/T3E R/L1 S/L2 T/L3 B1/P B1/R B2Power InDynamic Brake․460V : 3~5HPU/T1 V/T2To MotorCHARGEW/T3E R/L1 S/L2 T/L3 B1/P B2U/T1 V/T2To MotorPower InDynamic Brake CHARGE․230V/460V : 7.5~10HPW/T3E R/L1 S/L2 T/L3 B1/P B1/R B2Power InDynamic Brake․230V/460V : 15~20HPU/T1 V/T2 W/T3 ETo MotorCHARGE․ 230V : 25~40HP, 460V : 25~75HPR/L1 S/L2 T/L3B1/P B2 U/T1 V/T2 W/T3 R/L1 S/L2 T/L3 U/T1 V/T2 W/T31-11
Table 2 Control circuit terminalsTerminalFunctions1(DI1) Forward Operation – Stop Signal2(DI2) Reverse Operation – Stop Signal3(DI3) External Fault Input4(DI4) Fault Reset5(DI5)6(DI6)7(DI7)8(DI8)Multifunction Input Terminal: 3-Wire Operation, Load/Remote Control, Multi-Speed Select,FWD/REV Select, ACC/DEC Choice, ACC/DEC Halting, Base Block, Overheat Warn, PIDControl, DC Braking, Speed Search, Up/Down Function, PG Feedback Control, External Fault,Timer function, Multifunction Analog Input SettingSC(DG)(24VG)Digital Signal GroundSink Common Point (Locate the short jumper of TP2 in SINK position)24V Source Common Point (Locate the short jumper of TP2 in SOURCE position)E Connection to Shield Signal Lead (Frame Ground)+15V(+12V) DC voltage for External Device-12V Only support by the board 4P101C01301VIN Master speed Voltage Reference (0~10V) (4P101C01301 support –10V~10V input)AIN Master speed Current Reference (4~20mA)Auxiliary Analog Input:AUXAuxiliary frequency Command, Frequency Gain, Frequency Bias, Overtorque Detection, OutputVoltage Bias, ACC/DEC Ramp, DC-Brake Current, Stall Prevention Current Level duringRunning Mode, PID Control, Lower-Bound of Frequency Command, Frequency-Jump-4, etcGND Analog Signal CommonIP12IG12External Power Source For PG Feedback UseA(+)A(-)Signal Input of PG (also can be the input terminal of Pulse Input Frequency Command)AO1 Analog Multifunction Output Port:Frequency Commend, Output Frequency, Output Current, Output Voltage, DC Voltage, PIDAO2 Controlled Value, Analog Command Input of VIN, AIN or AUX.(Below 2mA)GND Common Lead for Analog PortRA(R1A)RB(R1B)RC(R1C)Relay Contact Output ARelay Contact Output BRelay Contact CommonSame function as terminal DO1,DO2Digital Multi-Function (Open Collector) Output “1”, “2” Terminals:DO1During-Running, Zero-speed, Agreed-frequency, Agree-frequency-setting, Frequency-Output,Inverter-Operation-Ready, Undervoltage-Detection, Base-Block Output, Run Source, FrequencyDO2 ( R2AR2B ) command, Overtorque Detection, Frequency Command Invalid, Fault, Undervoltage, Overheat,Motor Overload, Inverter Overload, During-Retry, Communication-Fault, Timer-Function-OutputDOGS(+)S(-)Common Terminal (of Open Collector Transistor)RS-485 PortCaution• Use the control circuit terminals VIN, AIN according the setting of Sn-24.• The MAX. Output current at terminal (+15V or +12V) is 20mA.• The multi-function analog output terminals AO1, AO2 is a dedicated output for a frequency meter, ammeter,etc. Do not use these 2 analog outputs for feedback control or any other control purpose.1-12
1.6 Main Circuit Wiring DiagramMain Circuit Wiring Diagram of MA7200:1. 230V/460V : 1~20HP2. 230V : 25HP 460V : 25~30HP3. 230V : 30~40HP 460V : 40~75HP1-13
1.7 Wiring main circuit and notice■ Main circuit wiringThe non-fusible-breaker (NFB) should be installed between the AC source and theR/L1-S/L2-T/L3 input terminal of MA7200 inverter. The user can make his own decisionof installing electromagnetic contactor block (MCB) or not. To protect against the falsetriggering of leakage-current, the user should install a leakage current breaker withamperage sensitivity≧200mA and operation time≧0.1 sec.PowersupplyTable 3 230V and 460V class applicable wire size and connectorMA7200 model Wire size (mm 2 )ApplicablePower Rating(HP) *1RatedKVARatedcurrent(A)Maincircuit *2Groundconnectionwire E (G)ControlNFB *4 MCB *4wire *31HP 2 4.8 2~5.5 2~5.5 0.5~2 TO-50EC(15A) CN-11230V2HP 2.7 6.4 2~5.5 3.5~5.5 0.5~2 TO-50EC(20A) CN-111Φ/3Φ3HP 4 9.6 3.5~5.5 3.5~5.5 0.5~2 TO-50EC(20A) CN-115.4HP 7.5 17.5 5.5 5.5 0.5~2 TO-50EC(30A) CN-167.5HP 10.1 24 8 5.5~8 0.5~2 TO-100S(50A) CN-1810HP 13.7 32 8 5.5~8 0.5~2 TO-100S(60A) CN-25230V 15HP 20.6 48 14 8 0.5~2 TO-100S(100A) CN-503 Φ 20HP 27.4 64 22 8 0.5~2 TO-100S(100A) CN-6525HP 34 80 22 14 0.5~2 TO-225S(150A) CN-8030HP 41 96 38 14 0.5~2 TO-225S(175A) CN-10040HP 54 130 60 22 0.5~2 TO-225S(175A) CN-1251HP 2.2 2.6 2~5.5 2~5.5 0.5~2 TO-50EC(15A) CN-112HP 3.4 4 2~5.5 3.5~5.5 0.5~2 TO-50EC(15A) CN-113HP 4.1 4.8 2~5.5 3.5~5.5 0.5~2 TO-50EC(15A) CN-115.4HP 7.5 8.7 2~5.5 3.5~5.5 0.5~2 TO-50EC(15A) CN-187.5HP 10.3 12 3~5.5 3.5~5.5 0.5~2 TO-50EC(20A) CN-1810HP 12.3 15 5.5 5.5 0.5~2 TO-50EC(30A) CN-25460V 15HP 20.6 24 8 8 0.5~2 TO-50EC(30A) CN-253Φ 20HP 27.4 32 8 8 0.5~2 TO-100S(50A) CN-3525HP 34 40 8 8 0.5~2 TO-100S(75A) CN-5030HP 41 48 14 8 0.5~2 TO-100S(100A) CN-5040HP 54 64 22 8 0.5~2 TO-100S(100A) CN-6550HP 68 80 22 14 0.5~2 TO-125S(125A) CN-8060HP 82 96 38 14 0.5~2 TO-225S(175A) CN-10075HP 110 128 60 22 0.5~2 TO-225S(175A) CN-125*1 : It is assumed constant torque load.*2 : The main circuit has terminals of R/L1, S/L2, T/L3, U/T1, V/T2, W/T3, B1/P, B2/R, B2,Θ.*3 : The control wire is the wire led to the pin terminals of control board.*4 : In Table 3, the specified Part No. of NFB and MC are the item No. of the products of TECO. Thecustomer can use the same rating of similar products from other sources. To decrease the noiseinterference, be sure to add R-C surge suppressor (R: 10Ω/5W, C: 0.1µF/1000VDC) at the 2terminals of coils of electromagnetic contactor.1-14
■ External circuit wiring precaution:(A) Control circuit wiring:(1) Separate the control circuit wiring from main circuit wiring (R/L1, S/L2, T/L3, U/T1,V/T2, W/T3) and other high-power lines to avoid noise interruption.(2) Separate the wiring for control circuit terminals RA-RB-RC (R1A-R2B-R2C) (contactoutput) from wiring for terminals ~, A01, A02, GND, DO1, DO2 , DOG 15V(or+12V, -12V), VIN, AIN, AUX, GND, IP12, IG12, A (+), A (-), S(+) and S(-).(3) Use the twisted-pair or shielded twisted-pair cables for control circuits to preventoperating faults. Process the cable ends as shown in Fig. 3. The max. wiring distanceshould not exceed 50 meter.Shield sheathArmorConnect to shieldsheath terminal EInsulated with tapeDo notconnect hereFig. 3. Processing the ends of twisted-pair cablesWhen the digital multi-function output terminals connect serially to an external relay, ananti-parallel freewheeling diode should be applied at both ends of relay, as shown below.50 mA max.48V max.free-wheeling diode(100V, >100mA)MA7200 7200MAexternal wiring circuitFig. 4. The Optical-couplers connect to external inductive load(B) Wiring the main circuit terminals:(1) Input power supply can be connected to any terminal R/L1, S/L2 or T/L3 on theterminal block. The phase sequence of input power supply is irrelevant to the phasesequence.(2) Never connect the AC power source to the output terminals U/T1, V/T2 and. W/T3.(3) Connect the output terminals U/T1, V/T2, W/T3 to motor lead wires U/T1, V/T2, andW/T3, respectively.(4) Check that the motor rotates forward with the forward run source. Switch over any 2of the output terminals to each other and reconnect if the motor rotates in reverse withthe forward run source.(5) Never connect a phase advancing capacitor or LC/RC noise filter to an output circuit.1-15
(C) GROUNDING :(1) Always use the ground terminal (E) with a ground resistance of less than 100Ω.(2) Do not share the ground wire with other devices, such as welding machines orpower tools.(3) Always use a ground wire that complies with the technical standards on electricalequipment and minimize the length of ground wire.(4) When using more than one inverter, be careful not to loop the ground wire, asshown below.(a) OK (b) OK (c) NOFig. 5. MA7200 ground winding• Determine the wire size for the main circuit so that the line voltage drop is within2% of the rated voltage. (If there is the possibility of excessive voltage drop, use alarger wire suitable to the required length)• Installing an AC reactorIf the inverter is connected to a large-capacity power source (600kVA or more),install an optional AC reactor on the input side of the inverter. This also improvesthe power factor on the power supply side.• If the cable between the inverter and the motor is long, the high-frequencyleakage current will increase, causing the inverter output current to increase aswell. This may affect peripheral devices. To prevent this, adjust the carrierfrequency, as shown below:Cable length < 100ft. 100-165ft. 166-328ft. > 329ft.Carrier frequency(Cn-34)15kHz max(Cn-34=6)10kHz max(Cn-34=4)5kHz max(Cn-34=2)2.5kHz(Cn-34=1)1-16
1.8 Inverter Specifications• Basic Specifications(a) 230V SeriesInverter (HP) 1 2 3 5 7.5 10 15 20 25 30 40Max. Applicable MotorOutput HP *1 (KW)Rated OutputCapacity (KVA)Rated OutputCurrent (A)Max. Output Voltage(V)Max. OutputFrequency (Hz)Rated Voltage,FrequencyAllowable VoltageFluctuationAllowable FrequencyFluctuationOutput CharacteristicsPower Supply1(0.75)2(1.5)3(2.2)5.4(4)7.5(5.5)10(7.5)15(11)20(15)25(18.5)30(22)2 2.7 4 7.5 10.1 13.7 20.6 27.4 34 41 5440(30)4.8 6.4 9.6 17.5 24 32 48 64 80 96 1301PH/3PH 200V~230V,50/60Hz3-Phases, 200V~230VThrough Parameter Setting 0.1~400.0 Hz3-Phases, 200V~230V, 50/60Hz-15% ~ +10%(b) 460V SeriesInverter (HP) 1 2 3 5 7.5 10 15 20 25 30 40 50 60 75Max. Applicable MotorOutput HP *1 (KW)Rated OutputCapacity (KVA)Rated OutputCurrent (A)Max. Output Voltage(V)Max. OutputFrequency (Hz)Rated Voltage,FrequencyAllowable VoltageFluctuationAllowable FrequencyFluctuationOutput CharacteristicsPower Supply1(0.75)2(1.5)3(2.2)*1. Based on 4 pole motor*2. The spec. of NEMA4 are the same5.4(4)7.5(5.5)10(7.5)15(11)±5%20(15)25(18.5)30(22)40(30)50(37)60(45)75(55)2.2 3.4 4.1 7.5 10.3 12.3 20.6 27.4 34 41 54 68 82 1102.6 4 4.8 8.7 12 15 24 32 40 48 64 80 96 1283-Phases, 380V~460VThrough Parameter Setting 0.1~400.0 Hz3-Phases, 380V ~ 460V, 50/60Hz-15% ~ +10%±5%1-17
• General SpecificationsOperation ModeGraphic LCD Panel (English and Chinese) with parameters copying (LED:option)Control ModeSinusoidal PWMFrequency Control Range 0.1Hz ~ 400HzFrequency Accuracy(varied with temperature)Digital Command: ±0.01% (-10 ~ +40ºC),Analog Command: ±0.1% (25ºC±10ºC),Speed Control Accuracy ±0.1%(V/F with PG feedback), ±0.5%(Sensorless Vector Control)Frequency CommandResolutionDigital Command: 0.01Hz Analog Command: 0.06Hz/60HzFrequency OutputResolution0.01HzOverload Resistibility 150% Rated Current for 1 MinFrequency Setting SignalDC 0~+10V / 4~20 mA, DC-10V~+10V and Pulse Input Frequency Command(Above 230V/460V 3HP)Acc./Dec. Time0.0~6000.0 sec ( Accel/Decel Time Can Be Set Independently)Voltage–FrequencyCharacteristicsV/F Curve Can Be Set Through Parameter SettingRegeneration Torque Approx. 20%Restart After Momentary Power Loss, PID Control, Auto Torque Boost, SlipBasic Control Function Compensation, RS_485 Communication, Speed Feedback Control, SimplePLC function, 2 Analog Output PortCumulative Power on & Operation Hour memory, Energy Saving, Up/DownOperation, 4 Different sets of Fault Status Record (Including Latest one),Extra FunctionMODBUS Communication, Multiple-Pulse Output Ports, Select Local/Remote,Customer Application Software Environment (C.A.S.E), SINK/SOURCEInterface.During Acceleration/Deceleration and constant Speed RunningStall Prevention(Current Level Can Be Selected During Acceleration and Constant SpeedRunning. During Deceleration, Stall Prevention Can Be Enabled or Disabled)InstantaneousOvercurrentStopped if above 200% Rated CurrentMotor Overload Protection Electronic Overload Curve ProtectionInverter OverloadProtectionStopped if above 150% Rated Current for 1 Min.OvervoltageStop if VDC410V (230 Class) or VDC820V (460 Class)UndervoltageStop if VDC200V (230 Class) or VDC400V (460 Class)Momentary Power LossRide-Through time15ms, stop otherwiseOverheat Protection Protected by ThermistorGrounding Protection Protection by DC Current SensorCharge Indication (LED) Lit when the DC Bus Voltage Above 50VInput Phase Loss (IPL) Motor coasts to stop at Input Phase LossOutput Phase Loss (OPL) Motor coasts to stop at Output Phase LossApplication SiteIndoor (No Corrosive Gas And Dust Present)Ambient Temperature -10ºC ~ +40ºC (Not Frozen)Storage Temperature -20ºC ~ +60ºCAmbient Humidity Below 90%RH (Non-Condensing)Height, Vibration Below 1000M, 5.9m/S 2 (0.6G), (JISC0911 Standard)Communication Function RS-485 Installed (MODBUS Protocol)Encoder Feedback InterfaceBuilt-in PG Feedback Interface and set to Open-collector Interface Drive orComplementary Interface DriveEMIMeet EN 61800-3 With Specified EMI FilterEMS Compatibility Meet EN 61800-3OptionPROFIBUS CardControl CharacteristicsProtection FunctionEnvironmentalCondition1-18
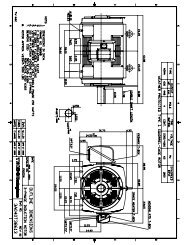
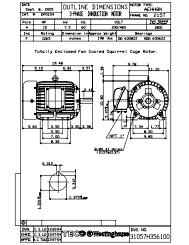
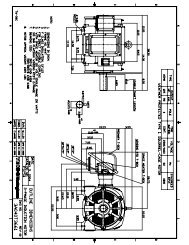
1.9 DimensionsVoltage230V1/3Φ230V3Φ460V3ΦOpen Chassis Type (IP00)Weight Enclosed Type (NEMA1) (mm) Weight(mm)(kg)(kg)W H D W1 H1 dW H D W1 H1 d12-132 217 143.5 122 207 M5 2.3 (a)3140 279.5 176.5 126 226 M6 4.35 140 279.5 176.5 126 226 M6 4.37.5211.2 300 215 192 286 M6 5.710-151220265 360 225 245 340 M6(b)251330 30 31269 553 277 210 530 M10 269 647 277 210 530 M10403132 (c)12132 217 143.5 122 207 M5 2.3 (a)35140 279.5 176.5 126 226 M6 4.37.5- 211.2 300 215 192 286 M6 5.710(b)151220265 360 225 245 340 M62513304050269 553 277 210 530 M10 30 269 647 277 210 530 M10 316075308 653 282 250 630 M10 46 308 747 282 250 630 M10 47(c)InverterCapacity(HP)ReferenceFigure(a) 230V / 460V : 1~2HPWW1dDH1HH21-19
(b) 230V : 3HP~25HP460V : 3HP~30HP11(c) 230V : 30HP~40HP460V : 40HP~75HPWWW1DW1DHHH1H1(Open Chassis Type-IP00) (Enclosed, Wall-mounted Type-NEMA1)dd(d) NEMA4 Type : 1HP~20HP1-20
Voltage230V1/3Φ230V3Φ460V3ΦInverterNEMA4 (mm)WeightCapacity(HP) W H D W1 H1 d (kg)12 198 335 217 115 315 M66.337.55 198 335 217 115 315 M6 7.57.51015223 460 245 140 440 M6 162016.32198 335 217 115 315 M637.557.51015223 460 245 140 440 M6 16201-21
1-22
1.10 Peripheral Units■ Braking resistorsMA7200 230V/460V 1~20HP model have built-in braking transistor, and can beconnected external braking resistor between B1/P and B2 when lack of brakingability. Above 25HP models, need to connect braking unit (on ⊕ - of inverter)and braking resistors (on B-P0 of braking unit).Voltage230V1/3Φ230V3ΦTable 4 Braking resistor listInverter Braking Unit Braking ResistorRatedNumberHPModelCode NO.Specs.current (A)usedNumberusedBraking Torque(%)1 4.8 - - JNBR-150W200 150W/200Ω 1 119%, 10%ED2 6.4 - - JNBR-150W100 150W/100Ω 1 119%, 10%ED3 9.6 - - JNBR-260W70 260W/70Ω 1 115%, 10%ED5 17.5 - - JNBR-390W40 390W/40Ω 1 119%, 10%ED7.5 24 - - JNBR-520W30 520W/30Ω 1 108%, 10%ED10 32 - - JNBR-780W20 780W/20Ω 1 119%, 10%ED15 48 - - JNBR-2R4KW13R6 2400W/13.6Ω 1 117%, 10%ED20 64 - - JNBR-3KW10 3000W/10Ω 1 119%, 10%ED25 80 JNTBU-230 1 JNBR-4R8KW8 4800W/8Ω 1 119%, 10%ED30 96 JNTBU-230 1 JNBR-4R8KW6R8 4800W/6.8Ω 1 117%, 10%ED40 130 JNTBU-230 2 JNBR-3KW10 3000W/10Ω 2 119%, 10%ED1 2.6 - - JNBR-150W750 150W/750Ω 1 126%, 10%ED2 4 - - JNBR-150W400 150W/400Ω 1 119%, 10%ED3 4.8 - - JNBR-260W250 260W/250Ω 1 126%, 10%ED5 8.7 - - JNBR-400W150 400W/150Ω 1 126%, 10%ED7.5 12 - - JNBR-600W130 600W/130Ω 1 102%, 10%ED460V3Φ10 15 - - JNBR-800W100 800W/100Ω 1 99%, 10%ED15 24 - - JNBR-1R6KW50 1600W/50Ω 1 126%, 10%ED20 32 - - JNBR-1R5KW50 1500W/40Ω 1 119%, 10%ED25 40 JNTBU-430 1 JNBR-4R8KW32 4800W/32Ω 1 119%, 10%ED30 48 JNTBU-430 1 JNBR-4R8KW27R2 4800W/27.2Ω 1 117%, 10%ED40 64 JNTBU-430 1 JNBR-6KW20 6000W/20Ω 1 119%, 10%ED50 80 JNVPHV-0060 1 JNBR-9R6KW16 9600W/16Ω 1 119%, 10%ED60 96 JNVPHV-0060 1 JNBR-9R6KW13R6 9600W/13.6Ω 1 117%, 10%ED75 128 JNTBU-430 2 JNBR-6KW20 6000W/20Ω 2 126%, 10%ED1-23
■ AC reactor• An AC reactor can be added on the power supply side if the inverter is connected to amuch larger capacity power supply system, or the inverter is within short distance(
■ Noise filterA. INPUT SIDE NOISE FILTER• Installing a noise filter on power supply side to eliminate noise transmitted betweenthe power line and the inverter• MA7200 has its specified noise filter to meet the EN61800-3 class A specificationVInverterRatedHPCurrent (A)1 4.8ATable 6 Noise filter on the input sideNoise FilterCode Specifications Current Dimensions1Φ 4H300D1750003 JUNF12015S-MA 15 A Fig. (a)3Φ 4H300D1710001 JUNF32012S-MA 12 A Fig. (a)230V1/3Φ2 6.5A3 9.6A1Φ 4H300D1750003 JUNF12015S-MA 15 A Fig. (a)3Φ 4H300D1710001 JUNF32012S-MA 12 A Fig. (a)1Φ 4H300D1600001 JUNF12020S-MA 20 A Fig. (a)3Φ 4H300D1610007 JUNF32024S-MA 24 A Fig. (a)230V3Φ5.4 17.5A 4H300D1610007 JUNF32024S-MA 24 A Fig. (a)7.5 24A 4H300D1620002 JUNF32048S-MA 48 A Fig. (b)10 32A 4H300D1620002 JUNF32048S-MA 48 A Fig. (b)15 48A 4H300D1730002 JUNF32070S-MA 70 A Fig. (b)20 64A 4H300D1730002 JUNF32070S-MA 70 A Fig. (b)1 2.6A 4H300D1720007 JUNF34008S-MA 8 A Fig. (a)2 4A 4H300D1720007 JUNF34008S-MA 8 A Fig. (a)3 4.8A 4H300D1630008 JUNF34012S-MA 12 A Fig. (a)5.4 8.7A 4H300D1630008 JUNF34012S-MA 12 A Fig. (a)7.5 12A 4H300D1640003 JUNF34024S-MA 24 A Fig. (b)10 15A 4H300D1640003 JUNF34024S-MA 24 A Fig. (b)460V3Φ15 24A 4H300D1740008 JUNF34048S-MA 48 A Fig. (b)20 32A 4H300D1740008 JUNF34048S-MA 48 A Fig. (b)25 40A 4H000D1770008 KMF370A 70A Fig. (c)30 48A 4H000D1790009 KMF370A 70A Fig. (c)40 64A 4H000D1790009 KMF3100A 100A Fig. (c)50 80A 4H000D1800004 KMF3100A 100A Fig. (c)60 96A 4H000D1800004 KMF3150A 150A Fig. (c)75 128A 4H000D1820005 KMF3180A 180A Fig. (c)1-25
• Dimension : (unit : mm)(a)(b)1401252502258040L1 L2 L3LINELOADL1 L2 L32 −φ 6.510050L1 L2 L3PEPELINELOADL1 L2 L34 − φ 6.5PEPE6070(c)ModelDimension (mm)W W1 H H1 D d MKMF370A 93 79 312 298 190 7 M6KMF3100A 93 79 312 298 190 7 M6KMF3150A 126 112 334 298 224 7 M6KMF3180A 126 112 334 298 224 7 M61-26
DRIVE FWD REVDIGITAL OPERATOR JNEP-31PRGMDRIVEFWDREVREMOTEEDITENTERRESETB. EMI SUPPRESSION ZERO PHASE CORE• Model : JUNFOC046S -------• Code No. : 4H000D0250001• According to the required power rating and wire size, select the matched ferrite core tosuppress EMI noise.• The ferrite core can attenuate the frequency response at high frequency range (from100KHz to 50MHz, as shown below). It should be able to attenuate the RFI frominverter to outside.• The zero-sequence noise ferrite core can be installed either on the input side or on theoutput side. The wire around the core for each phase should be winded by followingthe same convention and one direction. The more winding turns the better attenuationeffect. (Without saturation). If the wire size is too big to be winded, all the wire can begrouped and go through these several cores together in one direction.• Frequency attenuation characteristics (10 windings case)0atteuatoin value (dB)-10-20-30-4010 1 10 2 10 3 10 4 10 5Interference Frequency (kHz)Example: EMI suppression zero phase core application exampleJOGDSPLRUNSTOPNote: All the line wire of U/T1, V/T2, W/T3 phase must pass through the same zerophasecore in the same winding sense.1-27
■ LCD operator with extension wireWhen used for remote control purpose, the LCD operator can have differentextension wires based upon the applications. Some extension wires are listed below.MA7200LCable Length Extension Cable Set *1 Extension Cable *2 Blank Cover *31m 4H332D0010000 4H314C00100032m 4H332D0030001 4H314C00300043m 4H332D0020005 4H314C00200095m 4H332D0040006 4H314C004000010m 4H332D0130005 4H314C00600014H300D1120000*1 : Including special cable for LCD digital operator, blank cover, fixed use screws andinstallation manual.*2 : One special cable for LCD digital operator.*3 : A blank cover to protect against external dusts, metallic powder, etc.The physical dimension of LCD digital operator is drawn below.D R IV EFW DR EVR EM O TESEQR EFD IG ITA L O PERA TO R JN EP-31PRG MD RIV EJO GFW DREVD SPLED ITEN TERRESETRU NSTO PFig. 6. LCD Digital Operator Dimension1-28
R/L1S/L2T/L3BREAKERFWD RUNSTOPMaster Freq. Ref.976Ω , 1/4 W2kΩ0 ~ 10VFMAnalog OperatorB1/PR/L1S/L2T/L3SC(+15V, 20 mA)15V Power Supplyfor Speed Ref .VIN Master SpeedGND 0VA01GNDdiagram is shown below.1ANALOGOUTPUTMA7200B2U/T1V/T2W/T3RARBRCDO1DO2DOGIMMulti-FunctionContact Output250V AC, max. 1A30V DC, max. 1ADuringRunningSpeedAgreeMulti-FunctionOutput 1, 2(Open Collector48V/50mA)■ Analog operatorAll MA7200 have thedigital LCD digital operator.Moreover, an analog operatoras JNEP-16 (shown in fig. 7)is also available and can beconnected through wire as aportable operator. The wiringFig. 7. Analog Operator■ PROFIBUS Communication Card• Code No. : 4H300D0290009• Please refer to the appendix D and “MA7200 PROFIBUS-DP CommunicationApplication manual” for communication interface.1-29
2. Using LCD Digital Operator■ Functions of LCD digital operatorJNEP-36 LCD digital operator has 2 modes: DRIVE mode and PRGM mode. Whenthe inverter is stopped, DRIVE mode or PRGM mode can be selected by pressingPRGMthe key DRIVE . In DRIVE mode, the operation is enabled. Instead, in the PRGMmode, the parameter settings for operation can be changed but the operation is notenabled. The component names and function are shown as below:DRIVE FWD REV REMOTESEQ REFDIGITAL OPERATOR JNEP-36PRGMDRIVEJOGFWDREVRUNREMOTE/LOCALDSPLEDITENTERRESETSTOPoperation mode indicatorsDRIVE : lit when in DRIVE modeFWD : lit when there is a forward run command inputREV : lit when there is a reverse run command inputSEQ : lit when the run command is enabled from thecontrol circuit terminal or RS-485 port (REMOTE mode)REF : lit when the frequency reference from the controlcircuit terminals (VIN or AIN) or RS-485 port isenabled (REMOTE mode)LCD DisplayChinese Display : 2-line by 8-characterEnglish Display : 2-line by 20-characterKeys (Key functions are defined in Table 7)Fig. 8. LCD Digital operator• Remote/Local switch function:• Local mode – RUN command input from LCD Digital Operator (SEQ LED off)– Frequency command input from LCD Digital Operator (REF LEDoff)• Remote mode –RUN command input from control circuit (when Sn-04=1) or RS-485 comm. port (when Sn-04=2) (SEQ LED lit)–Frequency command input from control circuit (when Sn-05=1) orRS-485 comm. port (when Sn-05=2) (REF LED lit)JOG• Press and bothRESETtoswitch Local/Remote mode. (Switching action ofLocal/Remote only can be done while Inverter stop.)2-1
Table 7 Key's functionsKey Name FunctionPRGMDRIVEPRGM/DRIVEkeyDSPL DSPL key Display operation statusSwitches over between program mode (PRGM) and drivemode (DRIVE).JOGFWDREVRESETEDITENTERRUNSTOPJOG keyFWD/REVkeyRESET keyINCREMENTkeyDECREMENTkeyEDIT/ENTERkeyRUN keySTOP keyEnable jog operation from LCD digital operator in operation(DRIVE).Select the rotation direction from LCD digital operator.Set the number of digital for user constant settings. Also Itacts as the reset key when a fault has occurred.Select the menu items, groups, functions, and user constantname, and increment set values.Select the menu items, groups, functions, and user constantname, and decrement set values.Select the menu items, groups, functions, and user constantsname, and set values (EDIT). After finishing the aboveaction, press the key (ENTER).Start inverter operation in (DRIVE) mode when the digitaloperator is used. The LED will light.Stop inverter operation from LCD digital operator. TheSTOP key can be enabled or disabled by setting theparameter Sn-07 when operating from the control circuitterminal.RUN,STOP indicator lights or blinks to indicate the 3 operating status:Inverter output frequencyFrequency settingSTOPRUNSTOPRUNSTOPON Blink OFF2-2
■ Display contents in DRIVE mode and PRGM modePower onPRGM modePRGMDRIVEDRIVE mode*1DSPLDSPLAn- □□ monitor/setDSPLBn- □□ monitor/setDSPLSn- □□ monitor/setDSPLCn- □□ monitor/setFrequency referencevalue displayedDSPLdisplay monitor/set itemDSPLUn- □□ monitorDSPLAn- □□ monitor/set*2DSPLDSPLBn- □□ monitor/setDSPL+RESETSn- □□ monitorDSPLCn- □□ monitor*3*1 When the inverter is powered up, the inverter system immediately enters into DRIVEPRGMmode. Press the DRIVE key, the system will switch into PRGM mode. If the faultoccurs, press thePRGMDRIVE key and enter into DRIVE mode to monitor thecorresponding Un-□□ contents. If a fault occurs in the DRIVE mode, thecorresponding fault will be displayed. Press the key and reset the fault.RESET*2 The monitored items will be displayed according to the settings of Bn-12 and Bn-13.*3 When in the DRIVE mode, press the DSPL key and RESETkey, the setting values ofSn- and Cn-□□ will only be displayed for monitoring but not for changing or setting.2-3
■ Parameter descriptionThe inverter has 4 groups of user parameters:ParametersAn-□□Bn-□□Sn-□□Cn-□□DescriptionFrequency commandParameter groups can be changed during runningSystem parameter groups (can be changes only after stop)Control parameter groups (can be changed only after stop)The parameter setting of Sn-03 (operation status) will determine if the setting valueof different parameter groups are allowed to be changed or only to be monitored, asshown below:Sn-03DRIVE modePRGM modeTo be set To be monitored To be set To be monitored0 *1 An,Bn Sn,Cn An,Bn,Sn,Cn -1 An Bn,(Sn,Cn) *2 An Bn,Sn,Cn*1 : Factory setting*2 : When in DRIVE mode, the parameter group Sn-, Cn- can only be monitored if theRESETkey and the DSPL key are to be pressed simultaneously.*3 : After a few trial and adjustment, the setting value Sn-03 is set to be “1” so as not bemodified again.2-4
■ Example of using LCD digital operatorNote :Before operation: Control parameter Cn-01 value must be set as theinput AC voltage value. For example, Cn-01=380 ifAC input voltage is 380.This example will explain the operating of the inverter according to the following timechart.■ OPERATION MODE(1)(2) (3) (4) (5) (6) FWD (7) (8)60 HzSTOPPOWERONSET INPUTVOLTAGEFWD JOGOPERATIONFREQUENCYSETTINGFWD RUNFREQ REF.VALUE CHANGEDREV RUNREV60Hz■ Example of operationDescription Key Sequence Digital OperatorDisplayRemark(1)(2)When Power onInput voltagesetting (e.g. ACinput voltage is380V )(continued)Select frequency referencevalue displayedSelect PRGM modeSelect CONTROLPARAMETERDisplay Cn-01 settingInput Voltage 380VPRGMDRIVEDSPLEDITENTERRESETEDITENTERpress 3timesFreq. Cmd.000.00HzTECOAn -01Freq. Cmd. 1Cn -01-Input VoltageCn-01 = 440.0VInput VoltageCn-01 = 380.0VInput VoltageEntry AcceptedLEDOFFDRIVEDisplayfor 0.5 sec2-5
(continued)Description Key SequenceDigital OperatorDisplayRemark(3)FWD JOGSelect DRIVE modeSelect output frequencydisplayedPRGMDRIVEDSPLFreq. Cmd.000.00HzTECOFreq. Cmd.0.00 HzO/P Freq. 0.00 HzLEDONLEDONDRIVEFWDSelect direction of rotation(When power on, initiallydefaulted FWD)(4)Frequency settingJog operationSelect frequency cmddisplayedJOGDSPLpress4 timesO/P Freq. 6.00 HzFreq. Cmd. 6.00 HzFreq. Cmd.000.00HzTECO15 HzChange frequency cmdRESETFreq. Cmd.015.00HzTECOSet new frequency cmdEDITENTERFreq. Cmd.015.00HzTECOEntry AcceptedDisplayed for 0.5secConfirm the display.(5)FWD runSelect O/P frequencydisplayedRunning operationDSPLRUNO/P Freq. 0.00 HzFreq. Cmd. 15.00 HzO/P Freq. 15.00 HzFreq. Cmd. 15.00 HzLEDONRUN(6) Frequencycommand change60 HzSelect frequency cmddisplayedChange reference valueRESETDSPLpress4 timesFreq. Cmd.015.00HzTECOFreq. Cmd.060.00HzTECO(7)REV RUNEnter new frequency cmdsettingSelect frequency cmddisplayedChange to REVEDITENTERDSPLFWDREVFreq. Cmd.060.00HzTECOEntry AcceptedO/P Freq. 60.00 HzFreq. Cmd. 60.00 HzO/P Freq. 60.00 HzFreq. Cmd. 60.00 HzDisplayed for 0.5secConfirm the display.LEDONREV(8)STOPDecrement to STOPSTOPO/P Freq. 0.00 HzFreq. Cmd. 60.00 HzLEDON(Blinkingwhiledecel.)STOPRUN2-6
■ Example of display (use and keys to display monitoreditems/contents)DescriptionKey SequenceDigital OperatorDisplayRemarkDisplayFrequency CommandFreq. Cmd. 60.00HzTECODisplayMoniter Contents *1DSPLFreq. Cmd. 60.00 HzO/P Freq. 60.00 HzDisplayOutput CurrentFreq. Cmd. 60.00 HzO/P I 12.5 ADisplayOutput VoltageDisplayDC VoltageDisplayOutput VoltageDisplayOutput CurrentFreq. Cmd. 60.00 HzO/P Volt. 220.0 VFreq. Cmd. 60.00 HzDC Volt. 310.0 VFreq. Cmd. 60.00 HzO/P Volt. 220.0 VFreq. Cmd. 60.00 HzO/P I 12.5 A*1. The monitor contents can be selected by the setting of Bn-12 and Bn-132-7
3. Parameter Setting3.1 Frequency command (in Multi-speed operation) An *1 -□□Under the DRIVE mode, the user can monitor the parameters and set their values.ParameterNo.An-01 Frequency Command 1An-02 Frequency Command 2An-03 Frequency Command 3An-04 Frequency Command 4An-05 Frequency Command 5An-06 Frequency Command 6An-07 Frequency Command 7An-08 Frequency Command 8An-09 Frequency Command 9An-10 Frequency Command 10An-11 Frequency Command 11An-12 Frequency Command 12An-13 Frequency Command 13An-14 Frequency Command 14An-15 Frequency Command 15An-16 Frequency Command 16An-17Name LCD Display (English) Setting RangeJog FrequencyCommandAn-01= 000.00HzFreq. Cmd. 1An-02= 000.00HzFreq. Cmd. 2An-03= 000.00HzFreq. Cmd. 3An-04= 000.00HzFreq. Cmd. 4An-05= 000.00HzFreq. Cmd. 5An-06= 000.00HzFreq. Cmd. 6An-07= 000.00HzFreq. Cmd. 7An-08= 000.00HzFreq. Cmd. 8An-09= 000.00HzFreq. Cmd. 9An-10= 000.00HzFreq. Cmd. 10An-11= 000.00HzFreq. Cmd. 11An-12= 000.00HzFreq. Cmd. 12An-13= 000.00HzFreq. Cmd. 13An-14= 000.00HzFreq. Cmd. 14An-15= 000.00HzFreq. Cmd. 15An-16= 000.00HzFreq. Cmd. 16An-17= 000.00HzJog Freq. Cmd.Setting *2UnitFactorySetting0.00~400.00Hz 0.01Hz 0.00Hz0.00~400.00Hz 0.01Hz 0.00Hz0.00~400.00Hz 0.01Hz 0.00Hz0.00~400.00Hz 0.01Hz 0.00Hz0.00~400.00Hz 0.01Hz 0.00Hz0.00~400.00Hz 0.01Hz 0.00Hz0.00~400.00Hz 0.01Hz 0.00Hz0.00~400.00Hz 0.01Hz 0.00Hz0.00~400.00Hz 0.01Hz 0.00Hz0.00~400.00Hz 0.01Hz 0.00Hz0.00~400.00Hz 0.01Hz 0.00Hz0.00~400.00Hz 0.01Hz 0.00Hz0.00~400.00Hz 0.01Hz 0.00Hz0.00~400.00Hz 0.01Hz 0.00Hz0.00~400.00Hz 0.01Hz 0.00Hz0.00~400.00Hz 0.01Hz 0.00HzRef.Page3-543-703-710.00~400.00Hz 0.01Hz 6.00Hz 3-56*1. At factory setting, the value of “Setting Unit” is 0.01Hz.*2. The displayed “Setting Unit” can be changed through the parameter Cn-28.3-1
3.2 Parameters Groups Can Be Changed during Running Bn-□□FunctionAcc/DectimeAnalogFrequencyMulti-FunctionAnalogInputTorqueBoostMonitorMulti-FunctionAnalogOutputPIDControlUnder the DRIVE mode, the Parameter group can be monitored and set by the users.ParameterNo.NameBn-01 Acceleration Time 1Bn-02 Deceleration Time 1Bn-03 Acceleration Time 2Bn-04 Deceleration Time 2Bn-05Bn-06Bn-07Bn-08Bn-09Bn-10Bn-11Analog FrequencyCmd. Gain (Voltage)Analog FrequencyCmd. Bias (Voltage)Analog Frequency CmdGain. (Current)Analog Frequency CmdBias (Current)Multi-Function AnalogInput GainMulti-Function AnalogInput BiasAuto Torque Boost GainBn-12 Monitor 1Bn-13 Monitor 2Bn-14Bn-15Bn-16Bn-17Bn-18Bn-19Bn-20Multi-Function AnalogOutput AO1 GainMulti-Function AnalogOutput AO2 GainPID Detection GainPID Proportional GainPID integral timePID Differential TimePID BiasLCD display(English)Bn-01= 0010.0sAcc. Time 1Bn-02= 0010.0sDec. Time 1Bn-03= 0010.0sAcc. Time 2Bn-04= 0010.0sDec. Time 2Bn-05= 0100.0%Voltage Cmd. GainBn-06= 000.0%Voltage Cmd. BiasBn-07= 0100.0%Current Cmd. GainBn-08= 000.0%Current Cmd. BiasBn-09= 0100.0%Multi_Fun. ~GainBn-10= 000.0%Multi_Fun. ~BiasBn-11= 0.5Auto_Boost GainBn-12= 01Display: Freq.Cmd.Bn-13= 02Display: O/P Freq.Bn-14= 1.00~Output AO1 GainBn-15= 1.00~Output AO2 GainBn-16= 01.00PID Cmd. GainBn-17= 01.00PID P_gainBn-18= 10.00sPID I_TimeBn-19= 0.00sPID D_TimeBn-20= 0%PID BiasSetting rangeSettingUnitFactorySetting0.0~6000.0s 0.1s 10.0s0.0~6000.0s 0.1s 10.0s0.0~6000.0s 0.1s 10.0s0.0~6000.0s 0.1s 10.0s0.0~1000.0% 0.10% 100.00%-100.0%~100.0% 0.10% 0.00%0.0~1000.0% 0.10% 100.00%-100.0%~100.0% 0.10% 0.00%0.0~1000.0% 0.10% 100.00%-100.0%~100.0% 0.10% 0.00%Ref.Page3-43-53-50.0~2.0 0.1 0.5 3-51~18 1 11~18 1 20.01~2.55 0.01 10.01~2.55 0.01 10.01~10.00 0.01 10.01~10.00 0.01 10.00~100.00s 0.01s 10.00s0~1.00s 0.01s 0.00s0~109% 1% 0%3-63-73-73-2
Auto_RunTimeFunctionTimerFunctionEnergySavingParameterNo.Bn-21Bn-22Bn-23Bn-24Bn-25Bn-26Bn-27Bn-28Bn-29Bn-30Bn-31Bn-32Bn-33Bn-34Bn-35Bn-36Bn-37Bn-38Bn-39Name1st_Step Time UnderAuto_Run Mode2nd_Step Time UnderAuto_Run Mode3rd_Step Time UnderAuto_Run Mode4th_Step Time UnderAuto_Run Mode5th_Step Time UnderAuto_Run Mode6th_Step Time UnderAuto_Run Mode7th_Step Time UnderAuto_Run Mode8th_Step Time UnderAuto_Run Mode9th_Step Time UnderAuto_Run Mode10th_Step Time UnderAuto_Run Mode11th_Step Time UnderAuto_Run Mode12th_Step Time UnderAuto_Run Mode13th_Step Time UnderAuto_Run Mode14th_Step Time UnderAuto_Run Mode15th_Step Time UnderAuto_Run Mode16th_Step Time UnderAuto_Run ModeTimer FunctionOn_Delay TimeTimer FunctionOff_Delay TimeEnergy_Saving GainMonitor Bn-40 Monitor 3LCD display(English)Bn-21= 0000.0sTime 1Bn-22= 0000.0sTime 2Bn-23= 0000.0sTime 3Bn-24= 0000.0sTime 4Bn-25= 0000.0sTime 5Bn-26= 0000.0sTime 6Bn-27= 0000.0sTime 7Bn-28= 0000.0sTime 8Bn-29= 0000.0sTime 9Bn-30= 0000.0sTime 10Bn-31= 0000.0sTime 11Bn-32= 0000.0sTime 12Bn-33= 0000.0sTime 13Bn-34= 0000.0sTime 14Bn-35= 0000.0sTime 15Bn-36= 0000.0sTime 16Bn-37= 0000.0sON_delay SettingBn-38= 0000.0sOFF_delay SettingBn-39= 100%Eg.Saving GainBn-40=00Display : Set_Freq.Setting rangeSettingUnitFactorySetting0.0~6000.0s 0.1s 0.0s0.0~6000.0s 0.1s 0.0s0.0~6000.0s 0.1s 0.0s0.0~6000.0s 0.1s 0.0s0.0~6000.0s 0.1s 0.0s0.0~6000.0s 0.1s 0.0s0.0~6000.0s 0.1s 0.0s0.0~6000.0s 0.1s 0.0s0.0~6000.0s 0.1s 0.0s0.0~6000.0s 0.1s 0.0s0.0~6000.0s 0.1s 0.0s0.0~6000.0s 0.1s 0.0s0.0~6000.0s 0.1s 0.0s0.0~6000.0s 0.1s 0.0s0.0~6000.0s 0.1s 0.0s0.0~6000.0s 0.1s 0.0s0.0~6000.0s 0.1s 0.0s0.0~6000.0s 0.1s 0.0sRef.Page3-703-713-950~150% 1% 100% 3-1000~18 1 0 3-103-3
PulseInputParameterNo.Bn-41Bn-42Bn-43Bn-44NamePulse Input Upper LimitPulse Input GainPulse Input BiasPulse Input Delay TimePID Feedback DisplayPID Bn-45 *1at 0%FeedbackDisplay PID Feedback DisplayBn-46 *1at 100%LCD display(English)Bn-41=1440 HzPulse_Mul._Up_BoundBn-41=100.0 %Pulse_Mul._GainBn-41=000.0 %Pulse_Mul._BiasBn-41=0.10 sPulse_Mul._FilterBn-45= 0000PID Display at 0%Bn-46= 1000PID Display at 0%Setting rangeSettingUnitFactorySetting1440~32000 1 Hz 14400.0~1000.0 0.10% 100-100.0~100.0 0.1Hz 00.00~2.00 0.01s 0.11~9999 *1 1 *2 0Ref.Page3-111~9999 *1 1 *2 1000 3-11*1. These parameters are available for 74.03 and later software version only.*2. The displayed “Setting Unit” and “Setting Range” can be changed through parameter Cn-28 andSn-70.(1) Acceleration Time 1 (Bn-01)(2) Deceleration Time 1 (Bn-02)(3) Acceleration Time 2 (Bn-03)(4) Deceleration Time 2 (Bn-04)• Set individual Acceleration/Deceleration times• Acceleration time: the time required to go from 0% to 100% of the maximumoutput frequency• Deceleration time: the time required to go from 100% to 0% of the maximumoutput frequency• If the acceleration/deceleration time sectors 1 and 2 are input via the multi-functioninputs terminal ~, the acceleration/Deceleration can be switched between 2sectors even in the running status.Output frequencyCn-02Control circuit terminals 5 ~ 8Open : select the 1st sector Acc./Dec. timeClose :(Parameters Bn-01, Bn-02 set)select the 2nd sector ACC/DEC time(Parameters Bn-03, Bn-04 set)Bn-01Bn-02TimeBn-03Bn-04Fig. 9. Acceleration and Deceleration timeNote :1. To set the S-curve characteristics function, please refer to the description of Cn-41~Cn-44.2. The S-curve characteristic times can be set respectively for beginning-accel. end-accel.,beginning-decel., and end-decel. through the parameters setting of Cn-41~Cn-44.3-4
(5) Analog Frequency Command Gain (Voltage) (Bn-05)(6) Analog Frequency Command Bias (Voltage) (Bn-06)(7) Analog Frequency Command Gain (Current) (Bn-07)(8) Analog Frequency Command Bias (Current) (Bn-08)(9) Multi-function Analog Input Gain (Bn-09)(10) Multi-function Analog Input Bias (Bn-10)• For every different analog frequency command (voltage or current) and multifunctionanalog inputs, their corresponding gain and bias should be specifiedrespectively.command valueMax. output gainfrequency 100Max. output biasfrequency 1000V(4 mA)10V(20 mA)Input voltage(Input current)* ( ) If currentcommand is usedFig. 10. Analog input gain and bias(11) Auto Torque Boost Gain (Bn-11)• The inverter can increase the output torque to compensate the load increaseautomatically through the auto torque boost function. Then the output voltage willincrease. As a result, the fault trip cases can be decreased. The energy efficiency isalso improved. In the case that the wiring distance between the inverter and themotor is too long (e.g. more than 100m), the motor torque is a little short because ofvoltage drop. Increase the value of Bn-11 gradually and make sure the current willnot increase too much. Normally, no adjustment is required.outputvoltage100 %torqueincreasetorquedecreaseBase frequencyFig. 11. Adjust the auto torque boost gain Bn-11 to increase the output torque.• If the driven motor capacity is less than the inverter capacity (Max. applicablemotor capacity), raise the setting.• If the motor generates excessive oscillation, lower the setting.3-5
(12) Monitor 1 (Bn-12)(13) Monitor 2 (Bn-13)• In the DRIVE mode, 2 inverter input/output statuses can be monitored at the sametime. The specified items can be set through the setting of Bn-12 and Bn-13. Formore details, refer to Table 8.• Example:(1) Bn-12= 02 Display O/P Freq. 15.00HzBn-13= 01Freq.Cmd. 15.00Hz(2) Bn-12= 03Bn-13= 05(3) Bn-12= 11Bn-13= 12Display O/P I 21.0ADC Volt 311VDisplay I/P Term. 00101010O/P Term. 00010010Note : While monitoring, use the or key to show the next lower-rowdisplayed. But the setting of Bn-12 and Bn-13 does not change.SettingTable 8 Setting of Monitoring contentsMonitoringcontentsSettingMonitoringcontentsBn-12= 01 Freq.Cmd. Bn-13= 01 Freq.Cmd.Bn-12= 02 O/P Freq. Bn-13= 02 O/P Freq.Bn-12= 03 O/P I Bn-13= 03 O/P IBn-12= 04 O/P V Bn-13= 04 O/P VBn-12= 05 DC Volt Bn-13= 05 DC VoltBn-12= 06 Term. VIN Bn-13= 06 Term. VINBn-12= 07 Term. AIN Bn-13= 07 Term. AINBn-12= 08 Term. AUX Bn-13= 08 Term. AUXBn-12= 09 ~ Output(AO1) Bn-13= 09 ~ Output(AO1)Bn-12= 10 ~ Output(AO2) Bn-13= 10 ~ Output(AO1)Bn-12= 11 I/P Term Bn-13= 11 I/P TermBn-12= 12 O/P Term Bn-13= 12 O/P TermBn-12= 13 Sp. FBK Bn-13= 13 Sp. FBKBn-12= 14 Sp. Compen. Bn-13= 14 Sp. Compen.Bn-12= 15 PID I/P Bn-13= 15 PID I/PBn-12= 16 PID O/P(Un-16) Bn-13= 16 PID O/P(Un-16)Bn-12= 17 PID O/P(Un-17) Bn-13= 17 PID O/P(Un-17)Bn-12= 18 Motor Sp. Bn-13= 18 Motor Sp.3-6
(14) Multi-function Analog Output AO1 Gain (Bn-14)(15) Multi-function Analog Output AO1 Gain (Bn-15)• Multi-function analog output AO1 and AO2 can be set for their individual voltagelevel respectively.Multi-functional analog output AO1(output contents depend on Sn-33)10.0 V * Bn-14TerminalAO1Multi-functional analog output AO2( output contents depend on Sn-34)(16) PID Detection Gain (Bn-16)(17) PID Proportional Gain (Bn-17)(18) PID Integral Time (Bn-18)(19) PID Differential Time (Bn-19)10.0 V * Bn-15TerminalAO2(20) PID Bias (Bn-20)• The PID control function is a control system that matches a feedback value (i.e., adetected value) to the set target value. Combining the proportional (P), integral (I)and derivative (D) control make the control possible to achieve required responsewith the constant setting and tuning procedure of proportional gain Bn-17, integraltime Bn-18 and derivative time Bn-19.• See the appendix on page App.1 for “PID Parameter Setting”.• Fig. 12 is a Block diagram of the inverter’s internal PID control.• If both the target value and feedback value are set to 0, adjust the inverter outputfrequency to zero.Targetvalue(multi-functionalanalog input terminalAux when Sn-29 = 09)Detected value Bn-16Ref. Com.terminal¡GVin 0 ~ 10 V (Sn-24 = 0)Ain 4 ~ 20mA (Sn-24 = 1)while PID enabled(P)Bn-17(I)Bn-18(D)Bn-19PID control input(Un-15)integralupper_limitCn-55Upper_limit(+/- 109 %)BiasBn-20PID control O/P 1(Un-16)1st order delayconstantCn-56Freq. Com.PID control O/P 2(Un-17)Fig. 12. Block diagram for PID control in inverter(For the version before 30.17)3-7
DeviationTarget valueDeviationDetected value(P)Bn-18(I)Deviation(D)20 msFig. 13. Response of PID control for step-shape (deviation) input• Deviation = Target value-Detected value ×Bn-16.• P’s control output = deviation ×Bn-17.• I’s control output will increase with time and the output will be equal to thedeviation after time specified by parameter Bn-18The parameter Cn-55 will prevent the calculated value of the integral control (withthe integral time Bn-18) in the PID control from exceeding the fixed amount.Bn-19D’s control output = difference × (5 m sec )Note: The enable PID function, parameter Sn-64 must be set to 130.18 newly revised version inverter develops 8 PID control modes as following description:0: Unavailable1: (Positive characteristic) input of differential controller is balance of feedback valueand frequency value.2: (Positive characteristic) input of differential controller is feedback value3: (Positive characteristic) refers to frequency and PID control output. Input ofdifferential controller is balance of feedback value and frequency value.4: (Positive characteristic) refers to frequency and PID control output. Input ofdifferential controller is feedback value5: (Negative characteristic) input of differential controller is balance of feedback valueand frequency value.6: (Negative characteristic) input of differential controller is feedback value7: (Negative characteristic) refers to frequency and PID control output. Input ofdifferential controller is balance of feedback value and frequency value.8: (Negative characteristic) refers to frequency and PID control output. Input ofdifferential controller is feedback value.t3-8
PID controloutput 1 (Un-16)++Fig. 14. PID Control Block diagram (After Version 30.18)(21) Time Setting in Auto_Run Mode (Bn-21~Bn-36)• In Auto_Run mode, the time setting for individual step is described on “(Sn-44~60)auto run mode selection and enable”.(22) Timer ON_Delay Time (Bn-37)(23) Timer OFF_Delay Time (Bn-38)• The timer function is enabled when the timer function input setting (Sn-25~28=19)and its timer function output setting (Sn-30~32=21) are set for the multi-functioninput and output respectively.• These inputs and outputs serve as general-purpose I/O. Setting ON/OFF delay time(Bn-37/38) for the timer can prevent chattering of sensors, switches and so on.• When the timer function input ON times is longer than the value set for Bn-37, thetimer function output turns ON.• When the timer function input OFF time is longer than the value set for Bn-38, thetimer function output turns OFF. An example is shown below.Timer function input ON ONTimer function output ON ONBn-37 Bn-38 Bn-37 Bn-38Fig. 15. An operation example of timer function3-9
(24) Energy Saving Gain (Bn-39)• Input the energy saving command while a light load causes the inverter outputvoltage to be reduced and save energy. Set this value as a percentage of the V/Fpattern. The setting range is 50~150%. The factory setting is 100% and the energysaving function is disabled. If the energy saving gain Bn-39 is not 100%, the energysaving function is enabled.• In energy saving mode (Bn-39≠100), the output voltage will automaticallydecrease and be proportional to energy saving gain Bn-39. The Bn-39 settingshould not be small so that the motor will not stall.• The energy saving function is disabled in the PID close-loop control and duringacceleration and deceleration.Run commandOutput voltageV/f(Cn-01 & Cn-08) * Bn-390.1 sec 0.1 secFig. 16. Time chart for energy-saving operation(25) Monitor 3 (Bn-40)• The parameter sets immediate display content as power on.• When Bn-40 = 00, inverter power on, the first line will display frequencycommand, while the second line will display characters “TECO” as followingdiagram:Freq . Cmd. : 15.00 HzTECO• When Bn-40≠00, that is Bn-40=01~18, LCD will display the set monitor itemswhile inverter power on. The first line display content is determined by Bn-12. Thesecond line is determined by Bn-40 as following diagram:SetBn-12=01Bn-40=02Freq . Cmd. :O / P Freq.:15.00 Hz00.00 Hz• Bn-40=01~18 parameter description is same with Bn-12, Bn-13.Please refer to Table 1, Monitor item set.3-10
(26) Pulse Input setting (Bn-41~Bn-44)• Setting Sn-05=3 before starting Pulse Input function. Please refer to Sn-05.• Please refer to the following figure:External InputFrequencyBn-44Pulse InputDelayBn-41Pulse InputUpper LimitUpper Limit 100%Command ValueBn-42Max. Output Freq. ×100Bn-43Max. Output Freq. ×1000%100% Input Freq.Upper Limit 100%Command Value(27) PID Feedback Display at 0% (Bn-45)(28) PID Feedback Display at 100% (Bn-46)• These parameters are available for 74.03 and later software version only.• The PID feedback can be input from control terminal VIN (0~10V) or AIN (4-20mA).• The PID feedback value can be monitored by the monitoring parameter Un-34.The display content can be set by Cn-28, Sn-70, Bn-45 and Bn-46.Cn-28 sets the decimal point position of Un-34.Sn-70 sets the unit of Un-34.Bn-45 is the equivalent value displayed for 0% PID Feedback.Bn-46 is the equivalent value displayed for 100% PID Feedback.TargetPIDPrimaryDelayFrequencyCommandFeedbackSignalBn-16Bn-45,46PID Feedback Display(Un-34)• The decimal point position and the unit of Bn-45, Bn-46 can be set by Cn-28 andSn-70. It is necessary to set the value of Cn-28 and Sn-70 before Bn-45 and Bn-46are set.• Ex PID feedback signal is pressure signal. 0% for 5.0 PSI, and 100% for 100.0 PSI.Set Sn-70 = 3 (unit as PSI)Cn-28 = 10000 (1 decimal)Bn-45 = 005.0PSI (display at 0%)Bn-46 = 100.0PSI (display at 100%)3-11
3.3 Control Parameters Cn-□□FunctionV/FPatternSettingMotorParameterDC BrakingFunctionFrequencyLimitFrequencyJumpParameterNo.Cn-01Cn-02Cn-03Cn-04Cn-05Cn-06Cn-07Cn-08Cn-09Cn-10Cn-11Cn-12Cn-13Cn-14Cn-15Cn-16Cn-17Cn-18Cn-19NameInput VoltageMax. Output FrequencyMax. Output VoltageMax. Voltage FrequencyMiddle Output FrequencyVoltage At Middle OutputFrequencyMin Output FrequencyVoltage At Min. OutputFrequencyMotor Rated CurrentNo Load Current OfMotorRated Slip Of MotorLine-To-Line ResistanceOf MotorTorque Compensation OfCore LossDC Injection BrakingStarting FrequencyDC Braking CurrentDC Injection BrakingTime At StopDC Injection BrakingTime At StartFrequency CommandUpper BoundFrequency CommandLower BoundCn-20 Frequency Jump Point 1Cn-21 Frequency Jump Point 2Cn-22 Frequency Jump Point 3Cn-23Jump Frequency WidthLCD display(English)Cn-01= 230.0VInput VoltageCn-02= 060.0HzMax. O/P Freq.Cn-03= 230.0HzMax. VoltageCn-04= 060.0HzMax. Volt FrequencyCn-05= 003.0HzMiddle O/P Freq.Cn-06= 014.9VMiddle VoltageCn-07= 001.5HzMin O/P Freq.Cn-08= 007.9VMin. VoltageCn-09= 0003.3AMotor Rated ICn-10= 30%Motor No-Load ICn-11= 0.0%Motor Rated SlipCn-12= 05.732ΩMotor Line RCn-13= 0064WCore LossCn-14= 01.5HzC Braking Start FCn-15= 050%DC Braking CurrentCn-16= 00.5sDC Braking Stop TimeCn-17= 00.0sDC Braking Start TimeCn-18= 100%Freq.Cmd. Up BoundCn-19= 000%Freq. Cmd. Low BoundCn-20= 000.0HzFreq. Jump 1Cn-21= 000.0HzFreq. Jump 2Cn-22= 000.0HzFreq. Jump 3Cn-23= 01.0HzFreq. Jump WidthSetting rangeSettingUnitFactorySettingRef.Page150.0~255.0V *2 0.1V 230.0V *1 3-1550.0~400.0Hz 0.1Hz 60.0Hz0.1~255.0V *2 0.1V 230.0V *10.1~400.0Hz 0.1Hz 60.0Hz0.1~400.0Hz 0.1Hz 3.0Hz 3-150.1~255.0V *2 0.1V 8.2V *10.1~255.0V *2 0.1V 15.5V *10.1~400.0Hz 0.1Hz 1.5Hz*3 0.1A 3.3A *4 3-150~99% 1% 30%0~9.9% 0.10% 0.00%0~65.535Ω 0.001Ω 5.732 *43-160~65535W 1W 64 *4 3-170.1~10.0 Hz 0.1Hz 1.5Hz0~100% 1% 50%0.0~25.5s 0.1s 0.5s0.0~25.5s 0.1s 0.0s0~109% 1% 100%0~109% 1% 0%0.0~400.0Hz 0.1Hz 0.0Hz0.0~400.0Hz 0.1Hz 0.0Hz0.0~400.0Hz 0.1Hz 0.0Hz0.0~25.5Hz 0.1Hz 1.0Hz3-173-183-183-12
FunctionParameterNo.NameLCD display(English)Setting rangeSettingUnitFactorySettingRef.PageRetryFunctionCn-24Number of Auto RestartAttemptCn-24= 00Retry Times0~10 1 0 3-19StallPreventionCn-25Cn-26Stall Prevention DuringAccelerationStall Prevention DuringRunningCn-25= 170%Acc. StallCn-26= 160%Run Stall30~200% 1% 170%30~200% 1% 160%3-20Comm.FaultdetectionCn-27Communication FaultDetection TimeCn-27=01.0sComm. Flt Det. Time0.1~25.5s 0.1s 1s 3-20DisplayUnitCn-28LCD Digital OperatorDisplay UnitCn-28= 00000Operator Disp. Unit0-39999 1 0 3-21FrequencyAgreeDetectionCn-29Cn-30Cn-31Freq. Agree DetectionLevel During Accel.Freq. Agree DetectionLevel During Decel.Frequency AgreeDetection WidthCn-29= 000.0HzAcc. Freq. Det.LevelCn-30= 000.0HzDec. Freq. Det. LevelCn-31= 02.0HzF Agree Det. Width0.0~400.0Hz 0.1Hz 0.0Hz0.0~400.0Hz 0.1Hz 0.0Hz0.1~25.5Hz 0.1Hz 2.0Hz3-22TorqueDetection 1Cn-32Cn-33TorqueDetection Level 1TorqueDetection Time 1Cn-32= 160%Tq. Det. Level 1Cn-33= 00.1sTq. Det. Time 10~200% 1% 160%0.0~25.5s 0.1s 0.1s3-23CarrierFrequencyCn-34Carrier frequency settingCn-34= 6Carry_Freq Setting1~6 1 6 3-24Cn-35Speed Search DetectionLevelCn-35= 150%Sp-Search Level0~200% 1% 150%SpeedSearchControlCn-36Cn-37Speed Search TimeMin. Baseblock TimeCn-36= 02.0sSp-Search TimeCn-37= 0.5sMin. B.B. Time0.1~25.5s 0.1s 2.0s0.5~5.0s 0.1s 0.5s3-24Cn-38V/F Curve in SpeedSearchCn-38= 100Sp-search V/F Gain10~100% 1% 100%LowVoltageDetectionCn-39Low Voltage AlarmDetection LevelCn-39= 200VLow Volt. Det. Level150~210V 1V 200V *1 3-26Slip Comp.Cn-40Slip CompensationPrimary Delay TimeCn-40= 02.0sSlip Filter0.0~25.5s 0.1s 2.0s 3-26Cn-41S-curve CharacteristicTime at Accel. StartCn-41= 0.0sS1 Curve Time0.0~1.0s 0.1s 0.0sS-curvetimeCn-42Cn-43S-curve CharacteristicTime at Accel. EndS-curve CharacteristicTime at Decel. startCn-42= 0.0sS2 Curve TimeCn-43= 0.0sS3 Curve Time0.0~1.0s 0.1s 0.0s0.0~1.0s 0.1s 0.0s3-26Cn-44S-curve CharacteristicTime at Decel. endCn-44= 0.0sS4 Curve Time0.0~1.0s 0.1s 0.0s3-13
SpeedfeedbackcontrolPIDControlSensorlessVectorControlTorqueDetection 2ParameterNo.Cn-45Cn-46NamePG ParameterPole no. of MotorCn-47 ASR Proportional Gain 1Cn-48 ASR Integral Gain 1Cn-49 ASR Proportional Gain 2Cn-50 ASR Integral Gain 2Cn-51Cn-52Cn-53Cn-54Cn-55Cn-56Cn-57Cn-58Cn-59Cn-60Cn-61Cn-62 *5Cn-63 *5ASR Upper BoundASR Lower BoundExcessive SpeedDeviation Detection LevelOverspeed DetectionLevelPID Integral UpperBoundPID Primary Delay TimeConstantMotor Line-to-LineResistance (R1)Motor Rotor EquivalentResistance (R2)Motor LeakageInductance (Ls)Motor MutualInductance (Lm)Slip Compensation GainTorqueDetection Level 2TorqueDetection Time 2LCD display(English)Cn-45= 0000.0PG ParameterCn-46= 04PMotor PoleCn-47= 0.00ASR Gain 1Cn-48= 01.0sASR Intgl. Time 1Cn-49= 0.02ASR Gain 2Cn-50= 01.0sASR Intgl. Time 2Cn-51= 05.0%ASR Up BoundCn-52= 00.1%ASR Low BoundCn-53= 10%Sp.Deviat. Det.LevelCn-54= 110%Over Sp.Det. LevelCn-55= 100%PID I-UpperCn-56= 0.0sPID FilterCn-57= 02.233ΩMtr LINE_RCn-58= 01.968ΩMtr ROTOR_RCn-59= 9.6mHMtr LEAKAGE_XCn-60= 149.7mHMtr MUTUAL_XCn-61= 1.00SLIP GAINCn-62= 160%Tq. Det. Level 1Cn-63= 00.1sTq. Det. Time 1Setting rangeSettingUnitFactorySetting0.0~3000.0P/R 0.1P/R 0.0P/R2~32P 2P 4P0.00~2.55 0.01 00.1~10.0S 0.1s 1.0s0.00~2.55 0.01 0.020.1~10.0S 0.1s 1.0s0.1~10.0% 0.10% 5.00%0.1~10.0% 0.10% 0.10%1~50% 1% 10%1~120% 1% 110%0~109% 1% 100%0.0~2.5s 0.1s 0.0sRef.Page3-273-283-280.001~60.000Ω 0.001Ω 2.233Ω *4 3-280.001~60.000Ω 0.001Ω 1.968Ω *40.01~200.00mH 0.01mH 9.6mH *40.1~6553.5mH 0.1mH 149.7mH *40.00~2.55 0.01 10~200% 1% 160%0.0~25.5s 0.1s 0.1s*1 These are for a 230V class inverter. Value(*1) for a 460V class inverter is double.*2 These are for a 230V class inverter. Value(*2) for a 460V class inverter is double.*3 The setting range is 10% ~200% of the inverter rated current.*4 The factory setting values will vary based upon the inverter capacity selection (Sn-01) value. Inthis case, the setting is for 4-pole, 230V, 60Hz, 1Hp TECO standard induction motors.*5. These parameters are available for 74.03 and later software version only.3-293-233-14
(1) Input Voltage Setting (Cn-01)• Set inverter voltage to match power supply voltage at input side (e.g. : 200V/230V,380V/415V/440V/460V)(2) V/F Curve Parameter Settings (Cn-02~Cn-08)• The V/F curve can be set to either one of the preset curves (setting Sn-02=0~14)or a customer user-set curve (setting Sn-02=15).• Setting Cn-02~Cn-08 can be set by the user when Sn-02 has been set to “15”. Theuser-defined V/F curve can be specified through the settings of Cn-02~Cn-08 asshown in Fig. 17. The factory setting is straight line for the V/F curve. (Cn-05=Cn-07, Cn-06 is not used) as shown below (230V/60Hz case).VoltageVoltage(Factory Setting)Cn-03220VCn-03Cn-06Cn-080Cn-07 Cn-05 Cn-04 Cn-02(Cn-08=Cn-06)13Freq.01.5 Hz(Cn-07=Cn-05)60 Hz Freq.(Cn-04=Cn-02)Fig. 17. User-defined V/F curve• In low speed operation ( Mid. Output freq. ≧ Min. output freq.(Cn-02) (Cn-04) (Cn-05) (Cn-07)(b) Max. output volt.≧ Mid. output volt. > Min. output voltage(Cn-03) (Cn-06) (Cn-08)• If Mid. Output frequency (Cn-05) = Min. output frequency (Cn-07), the setting(Cn-06) is not effective.(3) Motor Rated Current (Cn-09)• Electronic overload thermal reference current• The factory setting depends upon the capacity type of inverter (Sn-01).• The setting range is 10%~200% of the inverter rated output current.• Set the rated current shown on the motor name plate if not using the TECO 4-polemotor.3-15
(4) Motor No-Load Current (Cn-10)• This setting is used as a reference value for torque compensation function.• The setting range is 0~99% of the inverter rated current Cn-09 (100%).• The slip compensation is enabled when the output current is greater than motor noloadcurrent (Cn-10). The output frequency will shift from f1 to f2 (>f1) for thepositive change of load torque. (See Fig. 18)Slip compensation =Motor rated slip (Cn-11) ×(Output current – Motor no-load current(Cn-10))Motor rated current (Cn-09) – Motor no-load current (Cn-10)Load torquef1smaller loadf2larger loadspeedFig. 18. Output frequency with slip compensation.(5) Motor Rated Slip (Cn-11)• This setting is used as a reference value for torque compensation function. See Fig.17. The setting is 0.0~9.9% as a percentage of motor Max. voltage frequency (Cn-04) as 100%.• The setting is shown in Fig. 19 in the constant torque and constant output range. Ifsetting Cn-11 is zero, no slip compensation is used.• There is no slip compensation in the cases when the frequency command is lessthan the Min. output frequency or during regeneration.Motor rated slip (Cn-11) =Motor rated freq. (Hz) ×(Rated speed(RPM) – Motor No. of poles)Max-voltage freq (Cn-04) ×120×100%Cn-02Cn-04Cn-11Cn-11Cn-04Fig. 19. Slip compensation limitCn-023-16
(6) Motor Line-to-Line Resistance (Cn-12)(7) Motor Iron-Core Loss (Cn-13)• It is for torque compensation function. The default setting depends upon theinverter capacity (Sn-01). Normally, the setting does not need to be altered. SeeTable 10~11 on page 3-39.(8) DC Injection Braking Starting Frequency (Cn-14)(9) DC Injection Braking Current (Cn-15)(10) DC Injection Braking Time at Stop (Cn-16)(11) DC Injection Braking Time at Start (Cn-17)• The DC injection braking function decelerates by applying a DC current to themotor. This happens in the 2 cases:a. DC injection braking time at start: It is effective for temporarily stopping and thenrestarting, without regeneration, a motor coasting by inertia.b. DC injection braking time at stop: It is used to prevent coasting by inertia when themotor is not completely stopped by normal deceleration when there is a large load.Lengthening the DC injection braking time (Cn-16) or increasing the DC injectionbraking current (Cn-15) can shorten the stopping time.• For the DC injection braking current (Cn-15), set the value for the current that isoutput at the time of DC injection braking. DC injection braking current is set as apercentage of inverter rated output current, with the inverter rated output currenttaken as 100%.• For the DC injection braking time at start (Cn-17), set the DC injection brakingoperating time when the motor is started.• For the DC injection braking starting frequency (Cn-14), set the frequency forbeginning DC injection braking for deceleration. If the excitation level is less thanthe Min. output frequency (Cn-07), the DC injection braking will begin from Min.output frequency.• If the DC injection braking time at start (Cn-17) is 0.0, the motor starts from theMin. output frequency and no DC injection braking are enabled.• If the DC injection braking time at stop (Cn-16) is 0.0, no DC injection braking isenabled. In this case, the inverter output will be blocked off when the outputfrequency is less than the DC injection braking at start frequency (Cn-14).Cn-07Min. output frequencyCn-14DC injection brakingstarting frequencyCn-17DC injection braking at startCn-16DC injection braking at stopFig. 20. DC injection braking time chart3-17
(12) Frequency Command Upper Bound (Cn-18)(13) Frequency Command Lower Bound (Cn-19)• The upper and lower bounds of the frequency command are set as a percentage ofthe Max. output frequency (Cn-02 as 100%), in increments of 1%.• The relationship Cn-18 > Cn-19 must be abided by. If not, an error message “Freq.Limit Setting Error” may occur.• When the frequency command is zero and a run command is input, the motoroperates at the frequency command lower bound (Cn-19). The motor will notoperate, however, if the lower limit is set lower than the Min. output frequency (Cn-07).Output frequency100%Cn-18Cn-19frequency command100%Fig. 21. Upper and lower bounds of the frequency command(14) Frequency Jump Point 1 (Cn-20)(15) Frequency Jump Point 2 (Cn-21)(16) Frequency Jump Point 3 (Cn-22)(17) Jump Frequency Width (Cn-23)• These settings allow the “jumping” of certain frequencies within the inverter’soutput frequency range so that the motor can operate without resonant oscillationscaused by some machine systems.OutputfrequencyCn-20Cn-21Cn-23Cn-22Cn-23Cn- 20≥ Cn- 21≥Cn- 22Cn-23Set frequency commandFig. 22. setting jump frequencies3-18
• Operation is prohibited within the jump frequency range, but changes duringacceleration and deceleration are smooth with no jump. To disable this function, setthe jump frequency 1~3 (Cn-20~Cn-22) to 0.0Hz.• For the jump frequency 1~3 (Cn-20~Cn-22), set the center frequency to bejumped.• Be sure to set the jump so that Cn-20 ≥ Cn-21 ≥ Cn-22. If not, a message “Jumpfrequency setting error” is displayed. For Cn-23, set the jump frequency bandwidth.If Cn-23 is set as 0.0Hz, the jump frequency function is disabled.(18) Number of Auto Restart Attempt (Cn-24)• The fault restart function will restart the inverter even when an internal fault occursduring inverter operation. Use this function only when continuing operation is moreimportant than possibly damaging the inverter.• The fault restart function is effective with the following faults. With other faults, theprotective operations will engage immediately without attempting to restartoperation.• Over-current •Ground fault •Main circuit over-voltage• The fault restart count will automatically increase upon the restart activated andwill be cleared in the following cases:a. When the operation is normal for 10 minutes after a fault restart is performed.b. When the fault-reset input is received after the protection operation has beenactivated and the fault confirmed. (e.g., by pressing RESET or enable Fault resetterminal )c. When the power is turned off and on again.• When one of the multi-function output terminals (RA-RB-RC or R1A-R1B-R1C,DO1, DO2 or R2A-R2C) is set to restart enabled, the output will be ON while thefault restart function is in progress. See page 63 for the setting of (Sn-30~Sn-32).3-19
(19) Stall Prevention Level During Acceleration (Cn-25)(20) Stall Prevention Level During Running (Cn-26)• A stall occurs if the rotor can not keep up with the rotating electromagnetic field inthe motor stator side when a large load is applied or a sudden acceleration ordeceleration is performed. In this case, the inverter should automatically adjust theoutput frequency to prevent stall.• The stall prevention function can be set independently for accelerating and running.• Stall Prevention During Acceleration: See Fig.23. Stop acceleration if Cn-25 settingis exceeded. Accelerate again when the current recovers.• Stall Prevention During running : See Fig.24. Deceleration is started if the run stallprevention level Cn-26 is exceeded, especially when an impact load is appliedsuddenly. Accelerate again when the current level is lower than Cn-26.LoadcurrentLoadcurrentCn-25Cn-26OutputfrequencyTimeOutputfrequencyTimeDeceleration timeupon Bn-02, Bn-04The output frequency iscontrolled to prevent stallingTimeTimeThe output frequencydecreases to prevent stallingFig. 23 Acceleration stall prevention Fig. 24 Run stall prevention functionfunction• Set the parameters Cn-25 and Cn-26 as a percentage of inverter rated current (100%corresponds to inverter rated current).• See page 3-48, 3-49 for stall prevention function selection.(21) Communication Fault Detection Time (Cn-27)• Please refer to “MODBUS/PROFIBUS Application <strong>Manual</strong>”.3-20
(22) LCD Digital Operator Display Unit (Cn-28)• It sets the units to be displayed for the frequency command and frequencymonitoring. and sets the decimal points of PID feedback display (Un-34), PIDfeedback display at 0% and 100% (Bn-45, 46) as described below:Table 9 LCD digital Operator Display unitSetting / Reading ContentCn-28Frequency command/monitoring PID Feedback0 Units of 0.01 Hz1 Units of 0.01%2 to 3940 to39999Set in the units of r / min (0 to 39999).r / min = 120 x frequency reference (Hz) /Cn-28(Set the number of motor poles in Cn-28,only even data is allowed)The position of decimal point is set by thevalue of the 5th digit of Cn-20.5th digit = 0: Displayed as XXXX5th digit = 1: Displayed as XXX.X5th digit = 2: Displayed as XX.XX5th digit = 3: Displayed as X.XXXThe 1st digit to 4th digits of Cn-28 set thevalue of 100% frequency.• Example 1:When the set value of 100% speed is 200.0, Cn-28 = 12000 is set.60% speed is displayed as 120.0 at Cn-28 = 12000.• Example 2:When the set value of 100% speed is 65.00, Cn-28 = 26500 is set.60% speed is displayed as 39.00 at Cn-28 = 26500.Displayed as XXXXUnit specified by Sn-70• 5th digit = 0:Displayed as XXXX• 5th digit = 1:Displayed as XXX.X• 5th digit = 2:Displayed as XX.XX• 5th digit = 3:displayed as X.XXXThe 1 st digit to 4 thdigits of Cn-28 are notused.Unit specified by Sn-703-21
(23) Frequency Agree Detection Level During Acceleration (Cn-29)(24) Frequency Agree Detection Level During Deceleration (Cn-30)(25) Frequency Agree Detection Width (Cn-31)• Frequency detection function: Set the multi-function output terminals (controlcircuit terminals RA-RB-RC or R1A-R1B-R1C, DO1, DO2 or R2A-R2C) to outputthe desired Frequency Agree signal, Setting Frequency Agree and OutputFrequency Detection level (through proper setting of Sn-30 ~ Sn-32).• The time chart for Frequency Detection operation is described as follows:Function Frequency Detection Operation DescriptionFrequencyAgreeSettingFrequencyAgreeOutputFrequencyDetection 1OutputFrequencyDetection 2freq. commandoutput freq.freq. agreesignal outputfreq. commandoutput freq.OFFagree freq.signal output OFF ONoutput freq. Cn-31Cn-29output freq.detection 1 signalONoutput freq. Cn-31Cn-29output freq.detection 2 signalONOFFCn-31Cn-31Cn-31Cn-29Cn-31Cn-30Cn-31ONCn-29Cn-31Cn-30Cn-31OFFCn-29FWDREVFWDREVFWDCn-30REVCn-31ONFWDCn-30REVCn-31OFF ON OFF ON OFF• When output freq. is within freq.command +/- freq. Detection width(Cn-31), frequency agree output is“ON”.•Set Sn-30~Sn-32 to be “02” for thesetting of frequency agree output.•After acceleration, the output freq.reaches freq. Agree detection levelduring acceleration (Cn-29) and withinfreq. Agree detection width (Cn-31),agreed freq. output is “ON”.•Set Sn-30~Sn-32 to be “03”.•During acceleration, the output freq. isless than freq. agree detection levelduring acceleration (Cn-29), outputfreq. Detection 1 is “ON”.•During deceleration, the output freq. isless than freq. agree detection levelduring deceleration (Cn-30), outputfreq. Detection 1 is “ON”.•Set Sn-30~Sn-32 to be “04” for thesetting of output freq. detection.•During acceleration, the output freq. islarger than freq. Agree detection levelduring acceleration (Cn-29), outputfreq. detection 2 is “ON”.•During deceleration, the output freq. islarger than freq. Agree detection levelduring deceleration (Cn-30), outputfreq. detection 2 is “ON”.•Set Sn-30~Sn-32 to be “05” for thesetting of output freq. detection.3-22
(26) Torque Detection Level 1 (Cn-32)(27) Torque Detection Time 1 (Cn-33)(28) Torque Detection Level 2 (Cn-62)(29) Torque Detection Time 2 (Cn-63)• Cn-62, 63 are available for 74.03 and later software version only.• Both Overtorque Detection Function and Undertorque Detection Function areincluded in Torque Detection Function. The Overtorque Detection Function detectsexcessive mechanical load from an increase of output current. The UndertorqueDetection Function detects broken fan belt from a decrease of output current.• An overtorque 1 condition is detected when the output current exceeds the TorqueDetection Level (Cn-32, Cn-62) for longer than the Torque Detection Time 1 (Cn-33, Cn-63). See Fig.25-a below.• An undertorque condition is detected when the output current is lower than theTorque Detection Level (Cn-32, Cn-62) for longer than the Torque Detection Time(Cn-33, Cn-63). See Fig.25-b below.• When Torque Detection 1 is enabled through the setting Sn-12, be sure to setTorque Detection Level 1 (Cn-32) and Torque Detection Time 1 (Cn-33).• The Multi-Function Output Terminals (Control Circuit Terminals RA-RB-RC orR1A-R1B-R1C, DO1, DO2 or R2A-R2C) can be set to indicate an overtorquecondition or an undertorque condition has been detected.MotorCurrentCn-32HysteresisWidth 5%OvertorqueDetection SignalFig. 25-a.MotorCurrentCn-32Cn-33ONCn-33ONOvertorque Detection Time ChartHysteresisWidth 5%UndertorqueDetection SignalFig. 25-b.ONONONCn-33Cn-33Underorque Detection Time Chart3-23
• Properly setting the value of Sn-12 (Torque Detection 1 Selection) and Sn-69(Torque Detection 2 Selection) and will allowa. Enable only during frequency agreement. Continue operation even after detection.b. Enable only during frequency agreement. Stop operation after detection.c. Enable at anytime. Continue operation even after detection.d. Enable at anytime. Stop operation after detection.(30) Carrier Frequency Setting (Cn-34)• Lower the carrier frequency can decrease the noise interference and leakagecurrent. Its setting is shown below.Carrier frequency(kHz) = 2.5kHz* Cn-34 settingCn-34 =1 2 3 4 5 6*(2.5 kHz) (15 kHz)Carrier frequencyAudio noise(louder)(insensible)*factory setting• The output frequency does not need to be adjusted, except in the following cases.a. If the wiring distance between the inverter and motor is long, lower the carrierfrequency as shown below to allow less leakage current.Wring distance < 100ft. 100-165ft. 166-328ft. > 329ft.Carrier frequency (Cn-34)
same time with the speed search command. A typical operation sequence isshown below.Ry1Ry1Ry2Speed search commandRWD/REV run command3. When the speed search and DC injection braking are set, set the Min.baseblock time (Cn-37). For the Min. baseblock time, set the time longenough to allow the motor’s residual voltage to dissipate. If an overcurrent isdetected when starting a speed search or DC injection braking, raise thesetting Cn-37 to prevent a fault from occurring. As a result, the Cn-37 settingcannot be set too small.(35) Low Voltage Alarm Detection Level (Cn-39)• In most cases, the default setting Cn-39 need not be changed. If an external ACreactor is used, decrease the low voltage alarm detection level by adjusting Cn-39setting smaller. Be sure to set a main-circuit DC voltage so that a main circuitundervoltage is detected.(36) Slip Compensation Primary Delay Time (Cn-40)• In most cases, the setting Cn-40 need not be changed. If the motor speed is notstable, increase the Cn-40 setting. If the speed response is slow, decrease the settingof Cn-40.(37) S-curve Characteristic Time at Acceleration Start (Cn-41)(38) S-curve Characteristic Time at Acceleration End (Cn-42)(39) S-curve Characteristic Time at Deceleration Start (Cn-43)(40) S-curve Characteristic Time at Deceleration End (Cn-44)• Using the S-curve characteristic function for acceleration and deceleration canreduce shock to the machinery when stopping and starting. With the inverter, S-curve characteristic time can be set respectively for beginning acceleration, endingacceleration, beginning deceleration and ending deceleration. The relation betweenthese parameters is shown in Fig. 27.3-26
RuncommandONOFFOutputfrequencyS2S3S1Cn-42Cn-43S4Cn-41Cn-44Fig. 27. S curve• After the S-curve time is set, the final acceleration and deceleration time will be asfollows:(Cn-41) + (Cn-42)•Acc. time = selected Acc. Time 1 (or 2) +2(Cn-43) + (Cn-44)• Dec. time = selected Dec. Time 1 (or 2) +2(41) PG Parameter (Cn-45)• The parameter is set in the unit of pulse/revolution. The factory setting is 0.1 P/R.(42) Pole Number of Motor (Cn-46)• Cn-45 and Cn-46 must meet the following relationship:2 * Cn-45 * Cn-02< 32767Cn-46• If not, an error message “Input Error” will be displayed(43) ASR Proportion Gain 1 (Cn-47)(44) ASR Integral Gain 1 (Cn-48)• Set the proportion gain and integral time of the speed control (ASR)(45) ASR Proportion Gain 2 (Cn-49)(46) ASR Integral Gain 2 (Cn-50)• Use these constants to set different proportional gain and integral time settings forhigh-speed operation.Time3-27
Proportional gainCn-49Integral timeCn-50Cn-470 % 100 %OutputfrequencyCn-48Fig. 28.0 % 100 %Outputfrequency(47) ASR Upper Bound (Cn-51)(48) ASR Lower Bound (Cn-52)• These settings of Cn-51 and Cn-52 will limit the ASR range.(49) Excessive Speed Deviation Detection Level (Cn-53)• This parameter set the level of detecting PG speed deviation. The value of Cn-02 isreferred as 100%, the default unit setting is 1%.(50) Overspeed Detection Level (Cn-54)• Set this parameter for detecting overspeed. The value of Cn-02 is referred as 100%,the default unit setting is 1%. Please refer to the setting of Sn-43.(51) PID Integral Upper Bound (Cn-55)(52) PID Primary Delay Time Constant (Cn-56)• Please refer to Fig. 14 “Block diagram for PID control in inverter”• The parameter Cn-55 prevents the calculated value of the integral control of PIDfrom exceeding the fixed amount. The value is limited within 0-109% of Max.output frequency (100%). Increase Cn-55 will improve the integral control. Ifhunting cannot be reduced by decreasing the Bn-18 or increasing Cn-56, Cn-55 hasto decrease. If the setting of Cn-55 is too small, the output may not match the targetsetting.• The parameter Cn-56 is the low-pass filter setting for PID control output. If theviscous friction of the mechanical system is high, or if the rigidity is low, causingthe mechanical system to oscillate, increase the setting Cn-56 so that it is higherthan the oscillation period. It will decrease the responsiveness, but it will preventthe oscillation.(53) Motor Line-to-Line Resistance R1 (Cn-57)• Set the motor’s terminal resistance (including the motor external cable resistance)in Ω unit.• The default setting depends upon the type of inverter (but do not include the motorexternal motor cable resistance).3-28
• This value will be automatically set during autotuning. See “Motor parameterautotuning selection” on page 3-73.• Increase the setting when the generating torque is not large enough at low speed.• Decrease the setting when the generating torque is extremely high and causeovercurrent trip at low speed.(54) Motor Rotor Equivalent Resistance R2 (Cn-58)• Set the motor’s rotor Y-equivalent model resistance in unit.• The default setting depends upon the type of inverter. Normally this value isn’tshown on the motor’s nameplate, so it might be necessary to contact motormanufactor.• This value will be automatically set during autotuning. See “Motor parameterautotuning selection” on page 3-73.(55) Motor Leakage Inductance Ls (Cn-59)• Set the motor’s rotor Y-equivalent model leakage inductance in mH unit.• The default setting depends upon the type of inverter.• This value will be automatically set during autotuning. See “Motor parameterautotuning selection” on page 3-73.(56) Motor Mutual Inductance Lm (Cn-60)• Set the motor Y-equivalent model mutual inductance in mH unit.• The default setting depends upon the type of inverter.• This value will be automatically set during autotuning. See “Motor parameterautotuning selection” on page 3-73.Note: The Induction Motor Y-equivalent modelR1LsIqIdLmR2ss : slip(57) Slip Compensation Gain (Cn-61)• The parameter Cn-61 improves speed accuracy while operating with a load.• Usually, the setting Cn-61 need not be changed. Adjust the setting if the speedaccuracy is needed to improve.• When actual speed is low, increase the set value.• When actual speed is high, decrease the set value.3-29
3.4 System Parameters Sn-□□FunctionCapacitySettingV/F CurveOperatorStatusOperationControlModeSelectionParameterNo.Sn-01Sn-02Sn-03Sn-04Sn-05Sn-06Sn-07Sn-08Sn-09NameInverter CapacitySelectionV/F CurveSelectionOperator DisplayRun SourceSelectionFrequencyCommandSelectionStoppingMethodSelectionPriority ofStoppingProhibition ofREV RunOutput FrequencyUp/Down FunctionLCD display(English)Sn-01= 01220V 1HPSn-02= 01V/F curveSn-03= 00Setting ValidSn-04= 0Run sourceOperatorSn-05= 0Ref. Cmd.OperatorSn-06= 0Dec. StopSn-07= 0Stop Key ValidSn-08= 0Allow ReverseSn-09= 0Inhibit UP/DOWNDescriptionFactorySettingRef.PageInverter capacity selection *1 3-390~14 : 15 fixed V/F curve pattern15 : arbitrary V/F pattern selection0 : An-□□, Bn-□□, Cn-□□, Sn-□□ setting& reading enabled1 : An-□□, setting & reading enabledBn-□□,Cn-□□,Sn-□□ reading only2~5 : reserved6 : clear fault message7 : 2-wire initialization (230V/460V)8 : 3-wire initialization (230V/460V)9 : 2-wire initialization (200V/415V)10 : 3-wire initialization (200V/415V)11 : 2-wire initialization (200V/380V)12 : 3-wire initialization (200V/380V)13~15 : reservedRun source0 : Operator1 : Control terminal2 : RS-485 communicationFrequency Command0 : Operator1 : Control circuit terminal2 : RS-485 communication0 : Deceleration to Stop1 : Coast to Stop2 : Whole_range braking stop3 : Coast to Stop with Timer(restart after time Bn-02)If operation command from control terminalor RS-485 communication port0 : operator stop key effective1 : operator stop key not effective0 : reverse run enabled1 : reverse run disabled0 : Reference frequency is changedthrough the key ”UP/DOWN” pressing,later followed by key “EDIT/ENTER”pressing, and then this output freq. willbe acknowledged.1 : reference frequency will beacknowledged immediately after the key”UP/DOWN” pressing.0000003-403-433-433-453-30
FunctionOperationControlModeSelectionProtectionCharacteristic.selectionParameterNo.Sn-10Sn-11Sn-12Sn-13Sn-14Sn-15NameFrequencyCommandCharacteristicsSelectionScanning Times atInput TerminalTorque Detection1 SelectionOutput VoltageLimit SelectionStall PreventionDuring Acc.FunctionSelectionStall PreventionDuring Dec.FunctionSelectionLCD display(English)Sn-10= 0Ref. Cmd. Fwd.Char.Sn-11= 0Scan Time 5 msSn-12= 0Tq.Detect InvalidSn-13= 0V Limit InvalidSn-14= 1Acc. Stall ValidSn-15= 1Dec. Stall ValidDescription0 : Reference command has forwardcharacteristics(0~10V or 4~20mA/0~100%1 : Reference command has reversecharacteristics(10~0V or 20~4mA/0~100%)0 : scan and confirm once per 5 ms1 : continuously scan and confirm twice per10 msOption 5-8 are available for 74.03 and latersoftware version only.0 : Torque detection function 1 is noteffective.1 : Overtorque is detected only atfrequency agree. Continue operationafter detection.2 : Overtorque is detected only atfrequency agree. Stop operation afterdetection.3 : Overtorque is detected during running(Accel.,Decel. included). Continueoperation after detection.4 : Overtorque is detected during running(Accel., Decel included). Stop operationafter detection.5 : Undertorque is detected only atfrequency agree. Continue operationafter detection.6 : Undertorque is detected only atfrequency agree. Stop operation afterdetection.7 : Undertorque is detected during running(Accel.,Decel. included). Continueoperation after detection.8 : Overtorque is detected during running(Accel., Decel included). Stop operationafter detection.0 : V/F output voltage is limited1 : V/F output voltage is not limited0 : invalid (Too much a torque may causethe stall)1 : valid (stop acceleration if currentexceeds Cn-25 setting)0 : invalid (installed with external brakeunit)1 : valid (no external brake unit used)FactorySetting000011Ref.Page3-463-473-483-31
FunctionProtectionCharacteristic.selectionProtectionCharacteristic.SelectionParameterNo.Sn-16Sn-17Sn-18Sn-19Sn-20Sn-21Sn-22Sn-23Sn-24NameStall PreventionDuring RunningFunction SelectionFault RetrySettingOperationSelection AtPower LossZero SpeedBraking OperationSelectionExternal FaultContact Contact SelectionExternal FaultContact DetectionSelectionExternal FaultOperationSelectionMotor OverloadProtectionSelectionFrequencyCommandCharacteristicsSelection atExternal AnalogInput TerminalLCD display(English)Sn-16= 1Run Stall ValidSn-17= 0Retry No O/PSn-18= 0PwrL_to_ON StopO/PSn-19= 0Z_braking InvalidSn-20= 0Term.3 NO_Cont.Sn-21= 0All Time Ext. FaultSn-22= 1Ext. Fault Free runSn-23= 1Cold Start OverLoadSn-24= 0~ Cmd. VINDescription0 : invalid1 : valid –Deceleration time1 for stallprevention during running (no externalbrake unit used)2 : valid –Deceleration time2 for stallprevention during running (no externalbrake unit used)0 : Do not output fault retry.(The fault contact does not operate.)1 : Output fault retry.(The fault contact operates.)0 : stop running1 : continue to run(analog) Speed reference is 0 duringrunning on, the braking function selection0 : invalid1 : valid0 : A-contact (normally open input)1 : B-contact (normally close input)0 : detect all time1 : detect only during operation0 : dec. to stop (upon dec. time1 Bn-02)1 : coast (free run) to stop2 : dec. to stop (upon dec. time1 Bn-04)3 : continue operatingElectronically motor overload protectionselection0 : electronically motor overload protectioninvalid1 : standard motor cold start overloadprotection characteristics2 : standard motor hot start overloadprotection characteristics3 : special motor cold start overloadprotection characteristics4 : special motor hot start overloadprotection characteristicsFrequency command characteristicsselection at external analog input terminal0 : voltage signal 0~10V (VIN)1 : current signal 4~20mA (AIN)2 : addition of voltage signal 0~10V andcurrent signal 4~20 mA (VIN+AIN)3 : subtraction of current signal 4~20mAand voltage signal 0~10V (VIN-AIN)FactorySetting10000011Ref.Page3-493-500 3-513-32
FunctionMultifunctionInputContactSelectionMultifunctionAnalogInputSelectionMultifunctionDigitalOutputSelectionMultifunctionAnalogOutputSelectionParameterNo.Sn-25Sn-26Sn-27Sn-28Sn-29Sn-30Sn-31Sn-32Sn-33Sn-34NameMulti-FunctionInput Terminal Function SelectionMulti-FunctionInput Terminal Function SelectionMulti-FunctionInput Terminal Function SelectionMulti-FunctionInput Terminal Function SelectionMulti-FunctionAnalog Input(AUX) FunctionSelectionMulti-FunctionOutput Terminal(RA-RB-RC)Function SelectionMulti-FunctionOutput Terminal(DO1) FunctionSelectionMulti-FunctionOutput Terminal(DO2) FunctionSelectionMulti-FunctionAnalog Output(AO1) FunctionSelectionMulti-FunctionAnalog Output(AO2) FunctionSelectionLCD display(English)Sn-25= 02Multi-Fun.Command1Sn-26= 03Multi-Fun.Command2Sn-27= 06Jog CommandSn-28= 07Acc. & Dec SwitchSn-29= 00Auxiliary Freq.Cmd.Sn-30= 13FaultSn-31= 00RunningSn-32= 01Zero SpeedSn-33= 00Term. AO1 Freq.Cmd.Sn-34= 01Term. AO2 O/PFreq.00~2501~2602~27DescriptionThe factory setting is multi-functioncommand1The factory setting is multi-functioncommand2The factory setting is jogcommand03~29The factory setting is Acc. & Dec.Interrupt00~1600~2500~2500~25Multi-function analog inputterminal (AUX) as Auxiliaryfrequency command. (factorysetting)Terminal (RA-RB-RC or R1A-R1B-R1C) as fault output (factorysetting)Terminal (DO1-DOG) as digitaloutput during running (factorysetting).Terminal (DO2-DOG or R2A-R2C)as digital output at zero speed(factory setting)0 : Freq. Cmd. (10.V/MAX frequencycommand, Cn-02)1 : Output frequency (10.V/MAX. outputfrequency)2 : Output current (10.V/input rated current)3 : Output voltage (10.V/input voltage, Cn-01)4 : DC voltage(10.V/400.V or 10.V/800.V)5 : External analog input commandVIN (0.~10.V/0.~10.V)6 : External analog input command AIN(0.~10.V/4.~20.mA)7 : Multi-function analog input (AUX)(10.V/10.V)8 : PID control input9 : PID control output110:PID control output211:Communication ControlFactorySetting02030607Ref.Page3-5100 3-6013000100013-633-673-33
Sn-35Pulse OutputMultiplierSelectionSn-35= 1Pulse Mul. 6When multi-function output terminal(DO1,DO2) is set as pulse signal output0:1F 1:6F 2:10F 3:12F 4:36F1 3-673-34
FunctionRS-485CommunicationFunctionParameterNo.Sn-36Sn-37Sn-38NameInverter AddressRS-485 Comm.Baud Rate SettingRS-485 Comm.TransmissionParity SettingLCD display(English)Sn-36= 01Inverter AddressSn-37= 1Baud rate 2400Sn-38= 0Reversed BitDescriptionFactorySettingInverter address can be set as 1~31 010 : 1200 bps1 : 2400 bps2 : 4800 bps3 : 9600 bps0 : no parity1 : even parity2 : odd parity10Ref.Page3-68PG SpeedControlSn-39Sn-40Sn-41Sn-42RS-485 Comm.Fault StopSelectionPG Speed ControlFunctionOperationSelection At PGOpen CircuitOperationSelectionAt PG LargeSpeed DeviationSn-39= 01st. Dec. stopSn-40= 0PG InvalidSn-41= 01st. Dec. StopSn-42= 01st. Dec Stop0 : deceleration to stop (Bn-02)1 : coast to stop2 : deceleration to stop (Bn-04)3 : continue to run0 : without speed control1 : with speed control2 : with speed control but no integrationcontrol during Acc/Dec.3 : with speed control and integrationcontrol during Acc/Dec.0 : deceleration to stop (Bn-02)1 : coast to stop2 : deceleration to stop (Bn-04)3 : continue to run0 : deceleration to stop (Bn-02)1 : coast to stop2 : deceleration to stop (Bn-04)3 : continue to run00003-69Sn-43OperationSelectionAt PG OverspeedDetectionDeviationSn-43= 01st. Dec. Stop0 : deceleration to stop (Bn-02)1 : coast to stop2 : deceleration to stop (Bn-04)3 : continue to run03-35
FunctionAuto_RunModeParameterNo.Sn-44Sn-45Sn-46Sn-47Sn-48Sn-49Sn-50NameOperation ModeSelection DuringAuto_RunAuto_Run ModeOperationSelection1Auto_Run ModeOperationSelection2Auto_Run ModeOperationSelection3Auto_Run ModeOperationSelection4Auto_Run ModeOperationSelection5Auto_Run ModeOperationSelection6LCD display(English)Sn-44= 0Auto_Run InvalidSn-45= 0Auto_Run StopSn-46= 0Auto_Run StopSn-47= 0Auto_Run StopSn-48= 0Auto_Run StopSn-49= 0Auto_Run StopSn-50= 0Auto_Run StopDescription0 : Auto_Run mode not effective1 : Auto_Run mode for one single cycle.(continuing running from the unfinishedstep if restarting)2 : Auto_Run mode be performedperiodically (continuing running from theunfinished step if restarting)3 : Auto_Run mode for one single cycle,then hold the speed of final step to run.(continuing running from the unfinishedstep if restarting)4 : Auto_Run mode for one single cycle.(starting a new cycle if restarting)5 : Auto_Run mode be performedperiodically (starting a new cycle ifrestarting)6 : Auto_Run mode for one single cycle,then hold the speed of final step to run.(starting a new cycle if restarting)0 : stop (Bn-02)1 : forward2 : reverseFactorySetting0000000Ref.Page3-703-36
FunctionAuto_RunMode*2SensorlessVectorControlParameterNo.Sn-51Sn-52Sn-53Sn-54Sn-55Sn-56Sn-57Sn-58Sn-59Sn-60Sn-61Sn-62Sn-63Sn-64Sn-65Sn-66Sn-67NameAuto_Run ModeOperationSelection7Auto_Run ModeOperationSelection8Auto_Run ModeOperationSelection9Auto_Run ModeOperationSelection10Auto_Run ModeOperationSelection11Auto_Run ModeOperationSelection12Auto_Run ModeOperationSelection13Auto_Run ModeOperationSelection14Auto_Run ModeOperationSelection15Auto_Run ModeOperationSelection16Applied TorqueModeLanguageSelectionParameter CopyPID FunctionBrake ResistorProtectionMotor ParametersAutotuningSelectionControl ModeSelectionLCD display(English)Sn-51= 0Auto_Run StopSn-52= 0Auto_Run StopSn-53= 0Auto_Run StopSn-54= 0Auto_Run StopSn-55= 0Auto_Run StopSn-56= 0Auto_Run StopSn-57= 0Auto_Run StopSn-58= 0Auto_Run StopSn-59= 0Auto_Run StopSn-60= 0Auto_Run StopSn-61= 0Const. Tq. LoadSn-62= 0Language: EnglishSn-63=0Not LoadSn-64=0PID InvalidSn-65=0Protect InvalidSn-66=0AUTO TUNE SELSn-67=0CNTRL MODESEL0 : stop (Bn-02)1 : forward2 : reverseDescription0 : constant torque1 : variable(quadratic) torque0 : English1 : Traditional Chinese0 : not loaded (copied)1 : upload from digital operator to inverter2 : download from inverter to digitaloperator3 : inspect the EEPROM of digital operator4 : inspect the EEPROM of inverter0 : PID invalid1 : PID valid0 : Braking resistor protection invalid1 : Braking resistor protection valid0 : Autotuning invalid1 : Autotuning valid0 : V/F control mode (include V/F controlwith pulse generator feedback)1 : Sensorless Vector Control ModeFactorySetting00000000000000000Ref.Page3-703-723-733-733-37
FunctionParameterNo.NameLCD display(English)DescriptionThe very parameter is available for 30.15and later versionFactorySettingRef.Page–––1: Output phase lose protectionfunction valid–––0: Output phase lose protectionfunction invalid––1–: Reserved––0–: ReservedSn-68Control selectionSn-68=0000Control selection(Bit3 function is available for 30.16 andlater version)–1––: ±10V analog voltage input function isvalid–0––: ±10V analog voltage input function isinvalid0 3-73OperationControlModeSelectionSn-69 *3Torque Detection2 SelectionSn-69= 0Tq.Detect Invalid1–––: Frequency Up/Down hold functionvalid0–––: Frequency Up/Down hold functioninvalid* only 4P101C01301 control base boardsupports input of ±10V analog voltage.0 : Torque detection function 2 is noteffective.1 : Overtorque is detected only atfrequency agree. Continue operationafter detection.2 : Overtorque is detected only atfrequency agree. Stop operation afterdetection.3 : Overtorque is detected during running(Accel.,Decel. included). Continueoperation after detection.4 : Overtorque is detected during running(Accel., Decel included). Stop operationafter detection.5 : Undertorque is detected only atfrequency agree. Continue operationafter detection.6 : Undertorque is detected only atfrequency agree. Stop operation afterdetection.7 : Undertorque is detected during running(Accel.,Decel. included). Continueoperation after detection.8 : Overtorque is detected during running(Accel., Decel included). Stop operationafter detection.0 3-473-38
FunctionParameterNo.NameLCD display(English)DescriptionFactorySettingRef.PageSn-70 *3Engineering UnitSn-70= 0Unit : NONE0 : NONE1 : FPM (feet per minute)2 : CFM (cubic feet per minute)3 : PSI (pounds per square inch)4 : GPH (gallons per hour)5 : GPM (gallons per minute)6 : in7 : ft8 : /s (units per second)9 : /m (units per minute)10 : /h (units per hour)11 : °F12 : inW (inches in water column)13 : HP14 : m/s (meters per second)15 : MPM (meters per minute)16 : CMM (cubic meters per minute)17 : W18 : kW19 : m20 : °C0 3-74*1. The default setting will depend upon the different inverter capacity.*2. Sensorless vector control is available after the version of 30.00.*3. These parameters are available for 74.03 and later software version only.3-39
(3) Inverter capacity selection (Sn-01)• The inverter capacity has already been set at factory according to the followingtables. Whenever the control board is replaced, the setting Sn-01 must be set againaccording to the following tables.• Whenever the setting Sn-01 has been changed, the inverter system parametersettings should be changed based upon the constant torque (CT) load (setting of Sn-61= 0) or variable torque (VT) load (Sn-61= 1).Table 10 230V Class Inverter Capacity SelectionSn-01 setting 001 002 003 004 005 006CT(Sn-61=0)VT(Sn-61=1) CT VT CT VT CT VT CT VT CT VT CT VTItem nameInverter rated capacity (KVA) 2 2.7 4 7.5 10.1 13.7Inverter rated current (A) 4.8 6.4 9.6 17.5 24 32Max. applicable capacity (HP) 1 1 2 2 3 3 5.4 7.5 7.5 10 10 10Motor ratedCn-09current (A)3.4 3.4 6.1 6.1 8.7 8.7 14.6 20.1 20.1 25.1 25.1 25.1Motor lineCn-12impedance (Ω)5.732 5.732 2.407 2.407 1.583 1.583 0.684 0.444 0.444 0.288 0.288 0.288Core loss torqueCn-13compensation (W)64 64 108 108 142 142 208 252 252 285 285 285Cn-34 Carrier freq.(kHz) 10 10 10 5 10 10 10 5 10 10 10 10Min. baseblockCn-37time (sec)0.5 0.5 0.5 0.5 0.5 0.5 0.5 0.7 0.7 0.7 0.7 0.7Sn-02 V/F curve 01 07 *1 01 07 *1 01 07 *1 01 07 *1 01 07 *1 01 07 *1Max. carrier freq. (kHz) 15 10 15 5 15 15 15 5 15 10 15 15Factory SettingSn-01 setting 007 008 009 010 011CT(Sn-61=0)VT(Sn-61=1) CT VT CT VT CT VT CT VT CT VTItem nameInverter rated capacity (KVA) 20.6 27.4 34 41 54Inverter rated current (A) 48 64 80 96 130Max. applicable capacity (HP) 15 20 20 25 25 25 30 40 40 40Motor ratedCn-09current (A)36.7 50.3 50.3 62.9 62.9 62.9 72.9 96.7 96.7 96.7Motor lineCn-12impedance (Ω)0.159 0.109 0.109 0.077 0.077 0.077 0.060 0.041 0.041 0.041Core loss torqueCn-13compensation (W)370 471 471 425 425 425 582 536 536 536Cn-34 Carrier freq.(kHz) 10 5 10 5 10 10 10 5 10 10Min. baseblockCn-37time (sec)0.7 0.7 0.7 0.7 1.0 1.0 1.0 1.0 1.0 1.0Sn-02 V/F curve 01 07 *1 01 07 *1 01 07 *1 01 07 *1 01 07 *1Factory SettingMax. carrier freq. (kHz) 10 5 10 5 10 10 10 5 10 103-40
Table 11 460V Class Inverter Capacity SelectionSn-01 setting 021 022 023 024 025 026 027CT(Sn-61=0)VT(Sn-61=1)CT VT CT VT CT VT CT VT CT VT CT VT CT VTItem nameInverter rated capacity (KVA) 2.2 3.4 4.1 7.5 10.3 12.3 20.6Inverter rated current (A) 2.6 4 4.8 8.7 12 15 24Max. applicable capacity (HP) 1 1 2 2 3 3 5.4 7.5 7.5 10 10 15 15 20Factory SettingMotor rated currentCn-09(A)1.7 1.7 2.9 2.9 4 4 7.3 10.2 10.2 12.6 12.6 18.6 18.6 24.8Motor lineCn-12impedance (Ω)22.927 22.927 9.628 9.628 6.333 6.333 2.735 1.776 1.776 1.151 1.151 0.634 0.634 0.436Core loss torqueCn-13compensation (W)64 64 108 108 142 142 208 252 252 285 285 370 370 471Cn-34 Carrier freq. (kHz) 10 5 10 5 10 10 10 5 10 10 10 5 10 5Min. baseblock timeCn-37(sec)0.5 0.5 0.5 0.5 0.5 0.5 0.5 0.7 0.7 0.7 0.7 0.7 0.7 0.7Sn-02 V/F curve 01 07 *1 01 07 *1 01 07 *1 01 07 *1 01 07 *1 01 07 *1 01 07 *1Max. carrier freq. (kHz) 15 5 15 5 15 15 15 5 15 10 15 5 10 5Sn-01 setting 028 029 030 031 032 033 034CT(Sn-61=0)VT(Sn-61=1)CT VT CT VT CT VT CT VT CT VT CT VT CT VTItem nameInverter rated capacity (KVA) 27.4 34 41 54 68 82 110Inverter rated current (A) 32 40 48 64 80 96 128Max. applicable capacity (HP) 20 25 25 30 30 30 40 50 50 50 60 75 75 100Factory SettingMotor rated currentCn-09(A)24.8 31.1 31.1 36.3 36.3 36.3 48.7 59.0 59.0 59.0 70.5 80.0 80.0 114Motor lineCn-12impedance (Ω)0.436 0.308 0.308 0.239 0.239 0.239 0.164 0.133 0.133 0.133 0.110 0.074 0.074 0.027Core loss torqueCn-13compensation (W)471 425 425 582 582 582 536 641 641 641 737 790 790 1800Cn-34 Carrier freq. (kHz) 10 5 10 5 10 10 10 5 10 10 10 5 10 5Min. baseblock timeCn-37(sec)0.7 0.7 1.0 1.0 1.0 1.0 1.0 1.0 1.0 1.0 1.0 1.0 1.0 1.0Sn-02 V/F curve 01 07 *1 01 07 *1 01 07 *1 01 07 *1 01 07 *1 01 07 *1 01 07 *1Max. carrier freq. (kHz) 10 5 10 5 10 10 10 5 10 10 10 5 10 5*1 Use the variable torque patterns when there is a quadratic or cubic relationship between the speedand load, such as in fan or pump applications. The user can properly choose the desired (V/f)patterns (Sn-02=04, 05, 06, or 07) based upon the load torque characteristics.*2 In the fan or pump applications, the load torque have a quadratic or cubic relationship between thespeed and load. The inverter capacity rating can be increased to a value that doubles its ownspecified capacity rating in some special case. But, due to the real hardware limitation, 230V 1HP,2HP, 3HP, 10HP, 25HP, 40HP and 460V 1HP, 2HP, 3HP, 30HP, 50HP can not be adapted any largercapacity.(4) V/F curve selection (Sn-02)• Set the inverter input voltage (Cn-01) first to match the power supply voltage. TheV/f curve can be set to ant of the following.Sn-02 = 00~14: one of 15 pre-set curve patterns= 15: V/F pattern can be set by the user through setting of Cn-01~Cn-083-41
General PurposeVariable Torque CharacteristicTable 12 V/F curve of 1~2 HP compact size, 230V Class MA inverter *Specifications Sn-02 V/F Pattern † Specifications Sn-02 V/F Pattern †60Hz50Hz60Hz50Hz 0060HzSaturation50HzSaturation01150272Hz 03(V)23015.58.20(V)23015.58.201.3 2.51.5 3(V)23015.58.201.5 3(V)230(00)(02)50(01),(15)(03)VariableTorque 1 04 (05)57.540.2VariableTorque 2 05 8.27.40(V)2301.3 25VariableTorque 3 06 (07)57.540.2VariableTorque 4 07 8.27.401.5 30(Hz)(Hz)50 60(Hz)60 72(04)(06)5060(Hz)(Hz)High Staring Torque ‡Rated Output Operation (Machine Tool)50Hz60HzLowStartingTorqueHighStartingTorqueLowStartingTorqueHighStartingTorque0809101190Hz 12120Hz 13180Hz 14(V)230(09)16.716.18.58.30 1.3 2.5(V)230(11)16.716.18.58.30 1.5 3(V)23015.58.201.5 3(V)23015.58.201.5 3(V)230* These values are for the 230V class; double the values for 460V class inverters.†‡15.58.201.5 3(12)(13)(14)(08)(10)5060(Hz)(Hz)(Hz)60 90(Hz)60 120(Hz)60 180Consider the following items as the conditions for selecting a V/f pattern.They must be suitable for(1) The voltage and frequency characteristic of motor.(2) The maximum speed of motor.Select high starting torque only in the following conditions.(1) The power cable length is long [492ft (150m) and above].(2) Voltage drop at startup is large.(3) AC reactor is inserted at the input side or output side of the inverter.(4) A motor with capacity smaller than the maximum applicable inverter capacityis used.3-42
General PurposeVariable Torque CharacteristicTable 13 V/F curve of 3~40 HP, 230V Class MA inverter *Specifications Sn-02 V/F Pattern † Specifications Sn-02 V/F Pattern †60Hz50Hz60Hz50Hz 0060HzSaturation50HzSaturation01150272Hz 03220147.50220147.50220147.50220(V)1.3 2.5(V)1.5 3(V)1.5 3(00)(02)(03)VariableTorque 1 04(05)5538.5VariableTorque 2 05 7.56.80220(V)1.3 25VariableTorque 3 06(07)5538.5VariableTorque 4 07 7.56.80(V)1.5 30(01),(15)5060(04)(06)5060725060(Hz)(Hz)(Hz)(Hz)(Hz)High Staring Torque ‡Rated Output Operation (Machine Tool)50Hz60HzLowStartingTorqueHighStartingTorqueLowStartingTorqueHighStartingTorque0809101190Hz 12120Hz 13180Hz 14220(V)(09)15.214.67.77.60 1.3 2.5220(V)(11)15.214.67.77.60 1.5 3(V)220* These values are for the 230V class; double the values for 460V class 3~75HPinverters.† Consider the following items as the conditions for selecting a V/f pattern.They must be suitable for(1) The voltage and frequency characteristic of motor.(2) The maximum speed of motor.‡ Select high starting torque only in the following conditions. Normally, the selection ifnot required.(1) The power cable length is long [492ft (150m) and above].(2) Voltage drop at startup is large.(3) AC reactor is inserted at the input side or output side of the inverter.(4) A motor with capacity smaller than the maximum applicable inverter capacity isused.147.50220147.50220147.501.5 3(V)1.5 3(V)1.5 3(12)(13)(14)(08)(10)6050609060 12060 180(Hz)(Hz)(Hz)(Hz)(Hz)3-43
(5) Operator Display (Sn-03)• Parameter code (Sn-03= 0 or 1)Set the parameter Sn-03 as 0 or 1 to determine the access status as follows.Sn-03DRIVE modePRGM modeSet Read Only Set Read Only0 An, Bn Sn, Cn An, Bn, Sn, Cn -1 An Bn, Sn, Cn An Bn, Sn, Cn• Initialized setting of parameter (Sn-03= 7~12)Except the parameter of Sn-01~02 and Sn-61, the parameter groups of An-□□,Bn-□□, Cn-□□ and Sn-□□ can be initialized as factory setting according to thedifferent input voltage. At the same time, the terminal ~ can be set as 2-wireor 3-wire operation mode under different setting of Sn-03. Please see 2-/3-wireoperation mode on page 3-53.(6) Run Source Selection (Sn-04)• The parameter is used to select the source of run command.Sn-04 = 0 : digital operator= 1 : control circuit terminal= 2 : RS-485 communication• If Sn-04 is set as 1, the run source is from the control circuit terminal. Under theinitial setting of 2-wire operation (through setting of Sn-03=7 or 9 or 11), the runsource will be FWD/STOP, REV/STOP.• If Sn-04 is set as 1, the run source is from the control circuit terminal. Under theinitial setting of 3-wire operation (through setting of Sn-03=8 or 10 or 12), the runsource will be RUN, STOP, FWD/ REV.• For more details, see “2-/3- wire operation” on page 3-53.(7) Frequency Command Setting Method Selection (Sn-05)• The parameter is used to select the source of frequency command.Sn-05 = 0 : digital operator= 1 : control circuit terminal= 2 : RS-485 communication(8) Stopping Method Selection (Sn-06)• Setting the stopping method used when a stop command is executed.Setting0 Deceleration to stop1 Coast to stopFunction2 DC braking stop: Stops faster than coast to stop, without regenerative operation.3 Coast to stop with timer: Run sources are disregarded during decel. time.3-44
• The following diagrams show the operation of each stopping method.a) Deceleration to Stop (Sn-06= 0)Deceleration to a stop at a rate set with the selected deceleration time.b) Coast to Stop (Sn-06= 1)After the stop command is executed, run source is disregarded until the Min.baseblock time Cn-37 has elapsed.RuncommandOutputfrequencyONDC injectionbeginning frequency(Cn-14)OFFDec timeFig. 29. Deceleration to stopDC injectionbraking timeRuncommandOutputfrequencyc) Whole Range DC Injection Braking Stop (Sn-06= 2)RunComm.O/P Freq.ONOFFMin. baseblock time(Cn-37)DEC timeDC injectionbraking timeDC injectionbraking timeONOFFThe inverter output is shut off when the stopcommand is inputCn-16 * 10Fig. 30. Coast to StopDC injection brakingtime at Run Source off(Cn-16)10 % 100 %O/P freq. when the stop command is inputFig. 31. Whole range DC Injecting Braking Stop• After the stop command is input and the minimum baseblock time (Cn-37) haselapsed, DC injection braking is applied and the motor stopped.• The DC injection braking time depends upon the output frequency when the stopcommand is input and the “DC injection time at stop” setting (Cn-16) as shown inFig. 31.• Lengthen the minimum baseblock time (Cn-37) when an overcurrent (OC) occursduring stopping. When the power to an induction motor is turned OFF, the counterelectromotiveforce generated by the residual magnetic field in the motor can causean overcurrent to be detected when DC injection braking stop is applied.3-45
d) Coast to Stop with Timer (Sn-06= 3)Run SourceOutputfrequencyON OFF ON OFF ONDeceleration time(T1 time)(Bn-02 orBn-04)Input Stop Command.,inverter stop OutputT1100 % (Max frequency)Output frequency at Run Source offFig. 32. Coast to Stop with Timer• After the stop command is executed, run sources are disregarded until the time T1has elapsed. The time T1 depends upon the output frequency when the stopcommand is executed and upon the deceleration time (Bn-02 or Bn-04).(9) Priority of Stopping (Sn-07)• This parameter enable or disable the STOP key on the digital operator when the runsource is from an control circuit terminal or RS-485 communicate port while themotor is running.Sn-07 = 0 : enabled. (The STOP key is enabled at all time during running)= 1 : disabled (The STOP key is disabled when the run source is fromcontrol terminal or RS-485 port)(10) Prohibition of REV Run (Sn-08)• While the parameter Sn-08 is set as 1. The reverse run of motor is not allowed(11) Output Frequency UP/DOWN Function (Sn-09)• The output frequency can be increased or decreased (UP/DOWN) through digitaloperatorSn-09 = 0 : Change output frequency through the ( / ) key. Thefrequency command will be accepted only after the key EDITENTERhas beenpressed.= 1 : Change output frequency through the ( / ) key. Thefrequency command can be recalled even restarting the inverter if theEDITENTERkey has been pressed at that time.• The output frequency can be changed (increasing (UP) or decreasing (DOWN))through either the LCD digital operator or external multi-function input terminal(terminals ~).(12) Frequency Command Characteristics Selection (Sn-10)3-46
0%100%-10V+10V-100%+10V (20mA)0%0V100%-10V0V (4mA)0%100%30.16 previous or later version set Sn-68=–0––The positive and negative characteristics of analog frequency command (0~10V/4~20mA) is as follow diagram:+10V (20mA)0V (4mA)0%100%Positive input characteristicsNegative input characteristics30.17 previous or later version set Sn-68=–1––:The positive and negative characteristics of analog current input is similar to abovedescription, while of analog voltage input is as follow diagram:Positive input characteristics Negative input characteristicsAmong Sn-68 set, ‘–’ represents 0 or 1.Only 4P101C01301 control board supports input of -10V~+10V analog voltage.(13) Scan Time at Input Terminal (Sn-11)3-47
• Setting of scan frequency of input terminal (Forward/Reverse, multi-function input)Sn-11 = 0 : Scan input terminals every 5ms.= 1 : Scan input terminals every 10ms.3-48
(14) Torque Detection 1 Selection (Sn-12)(15) Torque Detection 2 Selection (Sn-69)• The parameter Sn-69 and settings 5-8 of Sn-12 are available for 74.03 and latersoftware versions.• The inverter supports 2 sets of torque detection function. Each of them can set asovertorque detection or undertorque detection.• While Torque Detection 1 is enabled by Sn-12, be sure to set the values of theTorque Detection Level1 1 (Cn-32) and Torque Detection Time 1 (Cn-33). WhileTorque Detection 2 is enabled by Sn-69, be sure to set the values of the TorqueDetection Level1 2 (Cn-62) and Torque Detection Time 2 (Cn-63).• An overtorque condition is detected when the Overtorque Detection is enabled, andthe current exceeds the Torque Detection Level for longer than the TorqueDetection Time.• An undertorque condition is detected when the Undertorque Detection is enabled,and the current is lower than the Torque Detection Level for longer than the TorqueDetection Time.Sn-12,Sn-69FunctionDisplay0 Torque detection disabled1Detect overtorque only during speed agree. “Over Torque 1” orContinue operation after detection. (Minor fault) “Over Torque 2” blinks2Detect overtorque only during speed agree. “Over Torque 1” orStop output after detection (Fault)“Over Torque 2” lights3Detect overtorque at any time. Continue “Over Torque 1” oroperation after detection. (Minor fault)“Over Torque 2” blinks4Detect overtorque at any time. Stop output after “Over Torque 1” ordetection (Fault)“Over Torque 2” lights5Detect undertorque only during speed agree. “Under Torque 1” orContinue operation after detection. (Minor fault) “Under Torque 2” blinks6Detect undertorque only during speed agree. “Under Torque 1” orStop output after detection (Fault)“Under Torque 2” lights7Detect undertorque at any time. Continue “Under Torque 1” oroperation after detection. (Minor fault)“Under Torque 2” blinks8Detect undertorque at any time. Stop output “Under Torque 1” orafter detection (Fault)“Under Torque 2” lights(16) Output Voltage Limitation Selection (Sn-13)• In low speed region, if the output voltage from V/f pattern is too high, the inverterwill be driven into fault status. As a result, the user can use this option to set theupper bound limit of output voltage.3-49
OutputVoltage250V40VOutput Voltage Bound(double the value for 440V class)5V0Output FrequencyCn-04 Cn-0440 (Output frequency at Max. output voltage)Fig. 33. Output voltage limit(17) Stall Prevention Selection During Acceleration (Sn-14)Sn-14 = 0 : Disabled (Accelerate according to the setting. Stall may occurs withlarge load)= 1 : Enabled (Stop acceleration if Cn-25 setting is exceeded. Accelerateagain when current recovers)• Please refer to “Stall prevention level during acceleration” on page 3-20.(18) Stall Prevention Selection During Deceleration (Sn-15)• If external braking resistor unit is installed, the Sn-15 setting must be disabled (Sn-15= 0).• If no external braking resistor unit is installed, the inverter can provide about 20%regenerative braking torque. If the load inertia is so large that it exceeds theregenerative braking torque, the parameter Sn-15 is set as “1”. When setting Sn-15= 1 (enabled) is selected, the deceleration time (Bn-02 or Bn-04) is extended sothat a main circuit overvoltage does not occur.OutputFrequencyDeceleration time is extendedto avoid overvoltage tripDeceleration Time (setting value)timeFig. 34. Stall prevention function during deceleration (Sn-15= 1)3-50
(19) Stall Prevention Selection during Running (Sn-16)Sn-16 = 0 : Disabled (Stall may occur when a large load is applied)= 1 : Enabled (Deceleration will start if the motor current is larger than thestall prevention level during running and continues for more than100ms. The motor is accelerated back to the reference frequency againwhen the current falls below this level Cn-26).• Please refer to “Stall prevention level during running” on page 3-20.(20) Operation Selection at Fault Contact during Fault Retrying (Sn-17)Sn-17 = 0 : Do not output fault restart. (The fault contact does not work)= 1 : Output fault restart. (The fault contact operates)• Please refer to “Number of auto restart attempt” on page 3-19.(21) Operation Selection at Power Loss (Sn-18)• This parameter specifies the processing to be performed when a momentary powerloss occurs (within 2 sec)Sn-18 = 0 : When power loss ride through is enabled, operation will be restartedafter a speed search envoked if the power is restored within the allowedtime.= 1 : When power loss ride-through is disabled the inverter will stop after amomentary power loss. An undervoltage fault will be detected then. Ifthe power is interrupted for more than 2 seconds, the fault contactoutput will operate and the motor will coast to stop.(22) Zero Speed Braking Selection (Sn-19)• The run-source and frequency command is input from control circuit under thesetting of Sn-04=1 & Sn-05=1, If Sn-19 is enabled, the blocking torque will begenerated in DC-braking mode when the frequency command is 0V and forward –run source is “ON”.• A time-chart shows the above action as below. The zero-braking selection Sn-19 isset to 1 and the DC-braking current Cn-15 is limited within 20% of rated current.Run¡þStop signal(external terminal)OFFONOFFtFrequency command(external terminal)DC injectionbraking (20% Max.)Fig. 35. Zero speed braking operation selectiontt3-51
(23) External Fault Contact Contact Selection (Sn-20)Sn-20 = 0 : Input signal is from A-contact. (Normal-open contact)= 1 : Input signal is from B-contact. (Normal-close contact)(24) External Fault Contact Detection Selection (Sn-21)Sn-21 = 0 : Always detects.= 1 : Detect only during running.(25) Detection Mode Selection of External Fault (Sn-22)• An external fault is detected (at terminal ), the following operation will beperformed based upon the setting of Sn-22Sn-22 = 0 : Decelerate to stop with the specified deceleration time Bn-02.= 1 : Coast to stop.= 2 : Decelerate to stop with the specified deceleration time Bn-04.= 3 : Continue running with no regard of external fault.(26) Motor Overload Protection Selection (Sn-23)Sn-23 = 0 : Electronic overload protection disable.Sn-23 = 1~4 : Electronic overload protection enabled. The electronic thermaloverload is detected according to the characteristic curves ofprotection operating time. vs. motor rated current setting (Cn-09).Sn-23 = 1 : The overload is detected according to the standard motor cold start curve.= 2 : The overload is detected according to the standard motor hot start curve.= 3 : The overload is detected according to the specific motor cold start curve.= 4 : The overload is detected according to the specific motor hot start curve.• Disable the motor protection function (setting 0) when 2 or more motors areconnected to a single inverter. Use another method to provide overload protectionseparately to each motor, such as connecting a thermal overload relay to the powerline of each motor.• The motor overload protection function should be set as Sn-23= 2 or 4 (hot startprotection characteristic curve) when the power supply is turned on or offfrequently, because the thermal values is reset each time when the power is turnedoff.• For the motor without forced cooling fan, the heat dissipation capability is lowerwhen in the low speed operation. The setting Sn-23 can be either ‘1’ or ‘2’.• For the motor with forced cooling fan, the heat dissipation capability is notdependent upon the rotating speed. The setting Sn-23 can be either ‘3’ or ‘4’.• To protect the motor from overload by use of electronic overload protection, be sureto set the parameter Cn-09 according to the rated current value shown on the motornameplate.3-52
Overload Protect Time (min)Low Speed(60 Hz)100% 150% 200%Cold StartHot StartMotor Load Current (%)(Cn-09 = 100%)Fig. 36. Motor overload protection curve (Cn-09 setting = 100%)(27) Frequency Characteristics Command Selection at External Analog Input Terminal(Sn-24)Sn-24 = 0 : Frequency command is input at VIN terminal (0~10V)= 1 : Frequency command is input at AIN terminal (4~20mA)= 2 : Frequency command is the addition (VIN + AIN) at VIN (0~10V) andAIN (4~20mA) terminal.= 3 : Frequency command is the combination (VIN - AIN) at VIN (0~10V)and AIN (4~20mA) terminal. If the value (VIN - AIN) is negative, thereference command will take ‘0’ as a result.• On inverter with 4P101C01301control board, if Sn-68=–1––and Sn-05=1 VINallowing input ±10V, set Sn-24 to select main frequency:Sn-24 = 0 : frequency command is controlled by VIN(-10~+10V) input.(Corresponding main frequency: -10V ~ +10V→ Reverse frequency100% ~ forward frequency100%)= 1 : frequency command in controlled by AIN(4~20mA) input.(the status of forward/ reverse is set by user)= 2 : frequency command is controlled by VIN and AIN, the sum of both(VIN + AIN).= 3 : frequency command is controlled by VIN and AIN, the balance of both(VIN - AIN).(When (VIN + AIN) < 0 or (VIN - AIN) < 0, main frequency switchedto reverse status.Sn-24 = 0、2、3, forward or reverse is control by main frequency command polar.(28) Multi-Function Input Terminal Function Selection (Sn-25)(29) Multi-Function Input Terminal Function Selection (Sn-26)(30) Multi-Function Input Terminal Function Selection (Sn-27)(31) Multi-Function Input Terminal Function Selection (Sn-28)• The settings and functions for the multi-function input are listed in Table 14.3-53
Table 14 Multi-Function Input SettingSetting Function LCD Display Description00 Forward/Reverse command 3_Wire Run 3-wire operation mode012-wire key-pressing inputstop command2_Wire Stop Key 2-wire operation mode02 Multi-speed command 1 Multi-Fun. Command 103 Multi-speed command 2 Multi-Fun. Command 204 Multi-speed command 3 Multi-Fun. Command 305 Multi-speed command 4 Multi-Fun. Command 4Multi-speed frequency command selection06 Jogging Jog Command ON: select jogging frequency07Acc/Dec time switchOFF: the first stage Acc/Dec time (Bn-01, Bn-02),Acc.&Dec. SwitchcommandON: the second stage Acc/Dec time (Bn-03, Bn-04),08External base-blockcommand A-contact)Ext.B.B. NO_Cont ON: inverter output baseblock09External base-blockcommand (B-contact)Ext.B.B. NC_Cont OFF: inverter output baseblock10 Inhibit Acc/Dec command Inhibit Acc&Dec Inhibit Acc/Dec (hold frequency)11 Inverter overheat warning Over Heat Alarm ON: blink show overheat (inverter can proceed running)12 FJOG Forward Jog ON: forward jog13 RJOG Reverse Jog ON: reverse jog14 PID integration reset I_Time Reset ON: Reset PID integration15 PID control invalid PID Invalid ON: PID control not effective16 External fault (A-contact) Ext.Fault NO_Cont ON: External fault input (normally open)17 External fault (B-contact) Ext.Fault NC_Cont OFF: External fault input (normally close)18 Multi-function analog input ~ Input Valid ON: multi-function analog input (AUX) effective19 Timer function input Timer Function ON: ON-delay/OFF-delay timer input20 DC braking command DC Brakin CommandON: DC injection braking applied when the frequencyoutput is less than the DC injection start frequency21 Speed search 1 command Max Freq. Sp_Search ON: speed search is performed from max. output frequency22 Speed search 2 command Set Freq. Sp_Search ON: speed search is performed from reference frequency23 Local/Remote control I Operator ControlON: local mode control (through LCD operator)OFF: Run Source and Frequency Command is determinedaccording to (Sn-04, Sn-05) setting24 Local/Remote control II Ext. Term. ControlON: local mode control (through control circuit terminal)OFF: Run Source and Frequency Command is determinedaccording to (Sn-04, Sn-05) setting25RS-485 communicationPLC application extension use. (Please refer toComm. Controlapplication“RS-485 MODBUS/PROFIBUS Application <strong>Manual</strong>”)26 speed control without PG PG Invalid ON: Speed control without PG27Reset integration of speedcontrol with PGI_Time Invalid ON: Reset integration of speed control with PG28Frequency Up/DownOnly Sn-28 can be set as Sn-28=28, terminalUP/DOWN Function used as upfunctioncmd. and terminal used as down cmd. when Sn-28=2829 Force operation signal Force Run Only Sn-28 can be set as Sn-28=29Note: An error message of “Multi-Fun. Parameter” / “Setting Error” will be displayed if:• Setting combination of (Sn-25~Sn28) is not organized in monotonicallyincreasing order.• Setting 21, 22 (both for speed search command) are set at the same time.3-54
• Forward/Reverse Change (setting : 00)• Under 3-wire initialization mode (Sn-03= 8 or 10 or 12),the multi-functioninput terminals ~ have setting “00”, the inverter will be in the 3-wire modeoperation. As shown in Fig. 37, the Forward/Reverse change mode is set at theterminal .Stop(B contact)Run(A contact)125SCRun Command(ON : run)Stop Command(OFF : stop)FWD/REV Cmd.(multi-func.input terminal)RUN cmd.STOP cmd.FWD/REVcmd.MotorSpeedOFF (FWD)> 50 msON or OFFON (REV)STOP FWD REVFig. 37. 3-wire mode connection Fig. 38. Operation sequence in 3-wire modediagram• Input STOP Command during 2-Wire Mode Operation (setting : 01)• Under a standard 2-wire initialization mode as shown in Fig. 39(a), S1 and S2 cannot be both “ON” at the same time.When S1= “ON” and S2= “OFF”, the motor is FWD running. When S1=”OFF” andS2= “ON”, the motor is REV running. When S1= “OFF” and S2= “OFF”, the motorstops running.• When Sn-25= ‘01’, the 2-wire operation mode has its self-sustaining function.Only through the multi-function input terminal, the operator can stop theinverter after pressing the “STOP” key as shown in Fig. 39(b). As shown in Fig.39(b), the switches S1, S2 and S3 do not need to be the self-sustaining switches.When S1 is depressed “ON”, the motor will be forward running. After S3 isdepressed “ON”, the motor will stop. When S2 is depressed “ON”, the motor willbe reverse running. After S3 is depressed “ON”, the motor will stop.OFF(stop)STOPFWDS1S2OFFONOFF12ONSCFWD_RUN/STOPREV_RUN/STOPS1S2S3125SCFWD_RUNRWD_RUNSTOPNote : 1.(a)(b)Fig. 39. 2-wire mode connection diagramFor the other setting value (except “00”, “01”), the external operation mode isdefaulted as 2-wire mode and no self-sustaining function. (that is, the inverterwill stop when contact and are not close.)。3-55
2. Under the 2-wire mode, the error message “Freq. Comm. Error” will be displayedin the digital operator when terminal and are both ON at the same time, theinverter will stop. After the above case cleared, the inverter will return normal.• Multi-Step Speed Command 1 (Setting : 02)• Multi-Step Speed Command 2 (Setting : 03)• Multi-Step Speed Command 3 (Setting : 04)• Multi-Step Speed Command 4 (Setting : 05)• Jog Frequency Selection (Setting : 06)• There are 16 (maximum) step speed command selection from the combination ofthe Multi-Step Speed Command and jog frequency command.• Multi-Step Speed command 1~4 and Jog Frequency Selection Setting Table.Terminal Terminal Terminal Terminal (Sn-28= 05) (Sn-27= 04) (Sn-26= 03) (Sn-25= 02)Multi-step speed Multi-step speed Multi-step speed Multi-step speedSelected frequencycmd. 4cmd. 3cmd. 2cmd. 10 0 0 0 Freq. Cmd. 1 (An-01) *10 0 0 1 Freq. Cmd. 2 (An-02) *20 0 1 0 Freq. Cmd. 3 (An-03)0 0 1 1 Freq. Cmd. 4 (An-04)0 1 0 0 Freq. Cmd. 5 (An-05)0 1 0 1 Freq. Cmd. 6 (An-06)0 1 1 0 Freq. Cmd. 7 (An-07)0 1 1 1 Freq. Cmd. 8 (An-08)1 1 1 1 Freq. Cmd. 16 (An-16)Note: “0” : terminal is “OFF” “1” : terminal is “ON”• An example shows the operation sequence of a multi-step speed and jog commandis as below.Freq.CommandTerminalFWD-REV 1Multi-speed 5Multi-speed 6Multi-speed 7JOG8Freq.*2 Cmd.3*1Aux. Freq. (An-03)Ref. Freq.(An-02)(An-01)OFFONOFFOFFONFreq.Cmd.4(An-04)Freq.Cmd.5(An-05)ONFreq.Cmd.6(An-06)OFFFreq.Cmd.7(An-07)ONFreq.Cmd.8(An-08)Freq.Cmd.16(An-16)Fig. 40. Time chart for multi-step speed and jog commandONOFFtime3-56
*1 When the parameter Sn-05= 0, the reference command is input by the setting of An-01.Instead, when the parameter Sn-05= 1, the reference command is input from analogcommand through the terminal VIN and AIN.*2 If the parameter Sn-29= 0, the auxiliary frequency (the 2nd step frequency setting: AUXfrequency) is input from the AUX terminal. If the parameter Sn-29 ≠ 0, the 2nd stepfrequency setting is determined by the parameter of An-02.• Acceleration Time And Deceleration Time Change (Setting : 07)• The acceleration time and deceleration time can be changed through the controlcircuit terminal ~ as described on page 3-4.• External Baseblock (A Contact) (Setting : 08)• External Baseblock (B Contact) (Setting : 09)• With either of these settings, the multi-function input terminal controls itsinverter baseblock operation.• During running: As an external baseblock signal is detected, the digital operatorwill display a “B.B. Alarm”. Then, the inverter output is blocked. After thebaseblock signal is cleared, the motor will resume running according to its thenreference signal.• During deceleration : An external baseblock signal is input, the digital operatorwill display “ B.B. Alarm”, the inverter is blocked from output and the outputfrequency will drop to zero. The motor will then coast to stop freely. After thisexternal baseblock signal is cleared, the inverter will stay in stop mode.• Acceleration and Deceleration Ramp Hold (Setting : 10)• With this setting, the signal of Acceleration/deceleration ramp hold (input fromthe multi-function input terminals) will pause the Acceleration/deceleration ofmotor and maintain the then output frequency. The motor will coast to stop if anOFF command is input while the acceleration / deceleration ramp hold input isON, the then output frequency will be memorized and the command ofAcceleration/deceleration ramp hold is released.FWD/REVACC/DECprohibitationfrequencycommandOFFONOFFONOFFONOFFONoutputfrqquencyHOLDHOLDFig. 41. Acceleration and deceleration ramp hold3-57
• Inverter Overheat Alarm (Setting : 11)• When the inverter detects a overheat signal “ON”, the digital operator willchange its display as “Overheat Alarm”. And the inverter still maintains itsoperation. When the overheat signal is “OFF”, the digital operator will restore itsprevious display automatically. No RESET-key pressing is required.• FJOG Command (Setting : 12)• RJOG Command (Setting : 13)• The jogging can be performed in forward or reverse rotation.Setting = 12:FJOG command “ON”: Run forward at the jog frequency (An-17).= 13:RJOG command “ON”: Run reverse at the jog frequency (An-17).• The forward jog and reverse jog commands have priority over other frequencycommand commands.• The inverter will stop running with the stopping method set by the setting of Sn-06 if the forward jog and reverse jog commands are both ON for more than 500ms.• PID Integral Reset (Setting : 14)• In the application of PID control, the integral can be reset to zero (ground)through the multi-function input terminal ~ (Sn-25~28= 14).• PID Control Invalid (Setting : 15)OFF PID control valid (close-loop)ON PID control invalid (open-loop)• This setting can be used in the changeover of test run. To disable the PID function(PID control invalid is “ON”),an open-loop operation or jog operation can beperformed in the test. The system can be set up properly after some test runs.Then, the system can be changed into PID control mode. Moreover, if thefeedback signal is not usable, the PID function is disabled through this setting.• The setting of Sn-64 can be used to enable or disable the PID function.• External Fault Contact A (Setting : 16)• External Fault Contact B (Setting : 17)• The external fault input terminal is set to “ON”, an external fault then occurs. Ifthe external input terminal is set for the external fault input terminal use, amessage of “Fault Ext. Fault 6” will be displayed.• There are 5 terminal to be assigned as external fault inputs, they are terminal ,, , , • When an external fault occurs, the inverter will be blocked from output and themotor will coast to stop.3-58
• Multi-Function Analog Input Setting (Setting : 18)• To disable or enable the multi-function analog input at AUX terminal iscontrolled by the input signal at an external terminal. When the PID function isenabled, the original AUX function will be disabled.• Timer Function Input Terminal (Setting : 19)• Refer to the setting of timer function output terminal on page 3-66.• DC Injection Braking Command (Setting : 20)• DC injection braking is used to prevent the motor from rotating due to inertia orexternal forces when the inverter is stopped.• The DC injection braking will be performed and the inverter will be stopped ifthe DC injection braking input is ON.If a run source or jog command is input, the DC injection braking will be clearedand the motor will begin to run.Run CommandDC injectionbraking CommandOFFOFFONONOutputfrequencyDC brakingMin. Output freq.DC brakingDC braking start freq.Fig. 42. Time chart for DC injection braking command• Speed Search 1 (Setting : 21)• Speed Search 2 (Setting : 22)• Refer to ‘speed search’ function on page 3-24.• LOCAL/REMOTE Control 1 (setting : 23)Remote ControlRun command and frequency command is performed through control circuit input orOFFRS-485 communication port. (It will be set by the combination of settings of Sn-04and Sn-05.) The REMOTE-REF,SEQ LED light is ON.Local ControlON Run command and frequency command is performed through digital operator. TheREMOTE-REF,SEQ LED light is OFF.• To change the operation mode from LOCAL to REMOTE mode is effective onlywhen the inverter is in STOP mode.3-59
• LOCAL/REMOTE Control 2 (setting : 24)Remote ControlRun command and frequency command is performed through control circuit input orOFFRS-485 communication port. (It will be set by the combination of settings of Sn-04and Sn-05.) The REMOTE-REF,SEQ LED light is ON.Local ControlON Run command and frequency command is performed through control circuitterminal. The REMOTE-REF,SEQ LED light is OFF.• To change the operation mode from LOCAL to REMOTE mode is effective onlywhen the inverter is in STOP mode.• RS-485 Communication Application (Setting : 25)• The multi-function input terminals ~ can be used as the extension contactterminals of PLC with the command communicated through the RS-485 port.(Please refer to the “RS-485 MODBUS/PROFIBUS APPLICATIONMANUAL”)• PG-Less Speed Control Action (Setting : 26)• Reset Integration of Speed Control with PG (Setting : 27)• When PG feedback is used, the integral control (to add the PG feedback compensation)can be disabled or enabled from the external terminals. And, user can usethe external terminals to clear the integral value.frequencycommanddetectedrotor speedsoft startramplimitCn-47, 49gainintegraltimeTsCn-48, 50limiterCn-51Cn-52Cn-51, 52Fig. 43. PG speed control block diagramoutput freq.(optional)PG speed feedback3-60
• Frequency UP/DOWN Function (Setting : 28)• The inverter can use either the digital operator or external multi-function inputterminals (terminal or) to change the output frequency upward or downward.• By setting the parameters of (Sn-04= 1,Sn-05= 1), firstly the run source andfrequency command is set through the control circuit terminals. Secondly, set theparameter Sn-28 = 28 (terminal will now have the function “UP”, its originalfunction is disabled). Then, terminal and can be used for “UP” and“DOWN” function to control /change the output frequency.• Operation sequence as below:Control circuit terminal : UP function ON OFF OFF ONControl circuit terminal : DOWN function OFF ON OFF ONOperation statusterminalterminalterminalor1 278FWD / REVUPDOWNupper limitACC(UP)DEC(DOWN)Constant(HOLD)output freq.lower limitD1 H U H D H U H D D1 H U U1 H D D1 HU = UP (ACC) status U1 = bounded from upper_limit while ACCD = DOWN (DEC) status D1 = bounded from lower_limit while DECH = HOLD (Constant) statusFig. 44. Time chart of output frequency with the UP/DOWN functionConstant(HOLD)• Only set through parameter Sn-28• When the frequency UP/DOWN function is being used, the output frequency willaccelerate to the lower_limit (Cn-19) if a run command is pressed.• If under HOLD state, 4th bit of Sn-68 is set to 1 power supply OFF, the invertercan remember output frequency as power supply OFF. When resupplying thepower and operation command ON, the inverter will run at the rememberedoutput frequency.• Under auto operation mode, UP/DOWN operation is unavailable.• When the UP/DOWN function and jog frequency command are both assigned tomulti-function inputs, the jog frequency command input has the highest priority.• Under UP/DOWN operation, PID is unavailable.• Forced Run (Setting : 29)• Only set through parameter Sn-28. It is for special use (smoke fan, etc.)3-61
(32) Multi-Function Analog Input Function Selection (Sn-29)• The settings and functions for the multi-function analog input (terminal AUX) arelisted in Table 15.Table 15 Multi-function analog input function listSetting Function LCD Display Description (100% output corresponds to 10 V level)00Auxiliary frequencycommandAuxilary Freq.Cmd. (Max. output frequency)01Frequency commandgain (FGAIN)<strong>Instruction</strong> gain 1 Total gain =(Bn-05, Bn-07) ×FGAIN02Frequency command bias1 (FBIAS1)Cmd. Bias 1 Total bias =(Bn-06, Bn-08) + FBIAS103Frequency command bias2 (FBIAS2)Cmd. Bias 2 Total bias =(Bn-06, Bn-08) + FBIAS204 Torque detection level 1 Tq. Detect Level 1According to analog input voltage (0~10V), change040506Overtorque detectionlevelOutput frequency bias(VBIAS)Scaling of ACC/DECtime(TK)Over Tq. LevelOutput VoltageAcc&Dec Coeff07 DC injection braking DC Brakin current080910Stall prevention levelduring runningPID control referenceinputFrequency commandlower limitRun Still LevelPID CommandFreq. Cmd. LowBound11 Jump frequency setting4 Freq Jump 4torque detection 1 level (setting of Cn-32 is disabled)According to analog input voltage (0~10V), changeovertorque detection level (setting of Cn-32 isdisabled)Total output voltage= V/F pattern voltage + VBIASReal ACC/DEC time= ACC/DEC time (Bn-0~24) / TKAccording to analog input voltage (0~10V), changethe level of DC injection current (0-100%).(inverter rated current=100%, the setting of DCinjection current Cn-15 is disabled )According to analog input voltage (1.5V~10V),change the level of stall prevention during running(30%~200%)(inverter rated current=100%, the setting Cn-26 isdisabled.)Multi-function analog input (terminal AUX) used as PIDcontrol reference input (0~10V). Please refer to “PIDCONTROL BLOCK DIAGRAM” on page 3-7.Change the frequency command lower-limit (0-100%)value according to the then analog input voltage(0~10V)(Max. output frequency (Cn-02) corresponds to the100% analog output. The actual lower-limit isdetermined by the maximum of Cn-19 and the valuecorresponding to the multi-function analog inputterminal).Set the jump frequency 4, according to analog inputvoltage (0~10V), while Cn-20~Cn-23 can be used toset the jump frequency 1~3 and their jump frequencywidth.3-62
1213141516RS-485 communicationapplicationComm. ControlFrequency instructiongain 2 (FGAIN) *1<strong>Instruction</strong> gain2Frequency instructionbias3 (FBIAS1) *1<strong>Instruction</strong> bias 3Frequency instructionbias 4 (FBIAS2) *1 <strong>Instruction</strong> bias 4Torque detection level 2(for 74.03 and later Tq. Detect Level 2software version only)The analog value of AUX (0-1024/0-10V) can be readthrough RS-485 communication.With Bn-05, 06 (or Bn-07, 08) set, adjust analogfrequency instruction gain and bias ( gain and biasadjustment is similar to 7200GA)According to analog input voltage (0~10V), changetorque detection 2 level (setting of Cn-62 is disabled)*1: 30.14 later version software will provide such function.• Analog input AUX can provided two groups of gain and bias as Sn-29 = 1~3 and13-15. When Sn-29 = 13~15, the adjustment of gain and bias is similar to GAseries. The following is the block diagrams: (Following is new diagram)Analog FrequencyCommandBn-05, 07x FGAINFrequency CommandBn-06, 08+ FBIAS1(FBIAS2)0% 100%Analog FrequencyCommandBn-05, 07FGAIN2Frequency CommandBn-06, 080% 100%FBIAS3 (FBIAS4)3-63
•Multi-function analog input characteristics(1) Sn-29 = 00 (2) Sn-29 = 01,13Aux. Freq.Command(5) Sn-29 = 04,16 (6) Sn-29 = 05VBAIS100%(7) Sn-29 = 06 (8) Sn-29 = 07ReductionCoefficient100%0%0V10VMulti-function Analog Input1010V 1V10VMulti-function Analog InputFGAINDC BrakingCurrent2.001.00(3) Sn-29 = 02,14 (4) Sn-29 = 03,15FBAIS1torqueDetection 1,20%0V10VMulti-function Analog Input0%0V10VMulti-function Analog Input100%(9) Sn-29 = 08 (10) Sn-29 = 09Stall PreventionLevel(11) Sn-29 = 10 (12) Sn-29 = 11Freq. CommandLower Limit10%200%0%0V10VMulti-function Analog InputReal ACC/DEC Time =200%30%100%ACC/DEC Time (Bn-01~04)Reduction Coefficient (TK)0V 1.5V10VMulti-function Analog Input0%0V10VMulti-function Analog InputFBAIS2JumpFrequency 410%0V 0V 10VMulti-function Analog Input0%0V 5V 10V-10%Multi-function Analog Input0%0V10VMulti-function Analog InputMulti-function analog input (terminalAUX) used as PID control referenceinput (0~10V). Please refer to "PIDCONTROL BLOCK DIAGRAM"on page 3-9 and App-3.100%0%0VMulti-function Analog Input(13) Sn-29=12 : For RS-485 communication use. The analog value of AUX (0-1024/0-10V) can be read through RS-485 communication. (Please refer to ‘RS-485 MODBUS/PROFIBUS Application <strong>Manual</strong>’)(14) Multi-Function Output Terminal (RA-RB-RC or R1A-R1B-R1C) Function10V3-64
Selection (Sn-30)(15) Multi-Function Output Terminal (DO1-DOG) Function Selection (Sn-31)(16) Multi-Function Output Terminal (DO2-DOG or R2A-R2C) Function Selection(Sn-32)Multi-function output terminal setting and its function as shown in Table 16.Table 16 Multi-function output terminal functionSetting Function LCD Display Description00 During running Running ON : During running01 Zero speed Zero Speed ON : Zero speed02 Frequency agree Frequency Arrive Speed agree width: Cn-3103 Setting frequency agree Agreed F ArriveON : output frequency = ±Cn-29,Speed agree width: Cn-3104 Output frequency detection1 Freq. Det. 1ON : while ACC, -Cn-29output freq.Cn-29while DEC, -Cn-30output freq.Cn-30Speed agree width: Cn-3105 Output frequency detection2 Freq. Det. 2ON : while ACC, output freqCn-29(or-Cn-29)while DEC, output freqCn-30(or-Cn-30)Speed agree width: Cn-3106 Inverter ready Run Ready OK! ON : READY07 Undervoltage detected Low Volt Detect ON : Undervoltage detected08 Output baseblocked Output B.B. ON : Output baseblocked09 Run source mode Run Source Operator ON : Run source from digital operator (Local mode)10 Frequency command mode Ref. Cmd. OperatorON : Frequency command from digital operator(Local mode)11 Torque Detection 1, Contact A Tq. Detect 1 NO_Cont ON : Torque detection 1 detected, (Contact A)12 Frequency command Invalid Freq. Cmd. Invalid ON : Frequency command Invalid13 Fault Fault ON : Fault14 Pulse signal output Pulse Mul. Output Only set by Sn-31, Sn-32 (terminal DO1-DOG)15 Undervoltage alarm Low Volt Alarm ON : Undervoltage alarm16 Inverter overheat Inverter Over Heat ON : Inverter Overheat17 Motor overload Motor Over Load ON : Motor Overload18 Inverter Overload Inverter Over Load ON : Inverter Overload19 Fault retry Fault Retry ON : Retry20 RS-485 communication fault RS-485 Fault ON : RS-485 communication fault21 Timer function output Timer Function Signal delay output (.vs. timer function input)22RS-485 CommunicationApplicationComm. ControlExtension Output Contact application(Please refer to MA7200 RS-485 MODBUS /PROFIBUSApplication <strong>Manual</strong>’)23 Torque Detection 1, Contact B Tq. Detect 1 NC_Cont ON : Torque detection 1 detected, (Contact B)24 Torque Detection 2, Contact A Tq. Detect 2 NO_Cont ON : Torque detection 2 detected, (Contact A)25 Torque Detection 2, Contact B Tq. Detect 2 NC_Cont ON : Torque detection 2 detected, (Contact B)3-65
• During Running (Setting:00)OFF Run source OFF, inverter is off.ONRun source ON, or Run source OFF but residues output exists• Zero Speed (Setting : 01)OFF Output frequency ≧ MIN. output frequency (Cn-07)ONOutput frequency < MIN. output frequency (Cn-07)• Frequency Agree : (Setting : 02)• Setting Frequency Agree : (Setting : 03)• Output Frequency Detected 1 : (Setting : 04)• Output Frequency Detected 2 : (Setting : 05)• Refer frequency detection function on page 3-22.• Inverter Ready (Setting : 06)• Undervoltage Detected (Setting : 07)• When the DC link voltage of main circuit is lower than the UNDERVOLTAGEDETECTION LEVEL (Cn-39), the output contact is in ‘ON’ state.• Output Blocked (Setting : 08)• Run Command Mode (Setting : 09)Remote Mode(Sn-04 = 1,2, or multi-function input terminal ~ is set as Local/remote control IOFFmode or Local/remote control II mode and contact terminal is OFF). Remote-SEQLED is light in LCD digital operatorLocal Mode(Sn-04 = 0 multi-function input terminal ~ is set as Local/remote control I modeONand contact terminal is ON).Remote-SEQ LCD is OFF, run command is from LCDdigital operator• Frequency Command Mode (Setting : 10)Remote mode(Sn-05 = 1,2,or multi- function input terminal ~ is set as Local/remote control IOFFmode or Local/remote control II mode and contact terminal is OFF). Remote-REFLED is light in LCD digital operatorLocal mode(Sn-05 = 0 multi- function input terminal ~ is set as Local/remote control I modeONand contact terminal is ON). Remote-REF LED is OFF, run command is from LCDdigital operator3-66
• Overtorque Detected (Setting : 11)• See page 3-23,3-47 for torque detection function.• Frequency Command Missing (Setting : 12)• Run source is ON and frequency command is 0, the output at the multi-functionoutput terminal is ON.• Fault (Setting : 13)• If a fault occurs, the multi-function output terminal is ON. However, no responsewill occur if a communication fault occurs.• Pulse Signal Output (Setting : 14)• Only multi-function output terminal DO1-DOG (Setting Sn-31) can be set as thepulse signal output.• DO1 is a photo-coupler output, its pulse output frequency is set by parameter Sn-35.• Its wiring is:DO1+V (12V or 24 V)DO2DOG1KΩ+-pulsetimerpulse duty (T1=T2)T1Fig. 45. Pulse signal output• Undervoltage Alarm (Setting : 15)• If the main circuit DC bus voltage is below the undervoltage alarm detected level,the multi-function output terminal is ON.• Undervoltage alarm detected level : 230V Class : 240VDC460V Class : 460VDC• Inverter Overheat (Setting : 16)• See Page 4-2. If the cooling fin is overheat, the multi-function output terminal isON.• Motor Overload (Setting : 17)• See “Motor overload protection selection” on page 3-50. If the motor hasoverload fault, the multi-function output terminal is ON.• Inverter Overload OL2 (Setting : 18)• If the inverter has overload fault, the multi-function output terminal is ON. Seepage 4-2.T23-67
• Fault Retry (Setting : 19)• See “Fault restart function” (Cn-24) on page 3-19. Upon restart, the multifunctionoutput terminal is ON.• RS-485 Communication Fault (Setting : 20)• See page 4-2.• Timer Function Output (Setting : 21)• If the multi-function input terminals ~ are set as the timer input terminals(Sn-25 - 28 = 19), the signal will be output through the corresponding multifunctionoutput terminals with the specified ON-delay and OFF-delay, as shownbelow. See “Timer function” on page 3-9.input terminal5 ~ 8output terminalON delayOFF delay(Bn-37)(Bn-38)Fig. 46. The input/output signal in ‘Timer’ function application• RS-485 Communication Application (Setting : 22)• In the application that the control commands are executed through the RS-485communication port, the multi-function output terminals can be used as the PLCExtension Output Contact Terminals. For more details, Please refer to ‘RS-485MODBUS/PROFIBUS Application <strong>Manual</strong>’.• Torque Detection 1, Contact B (Setting : 23)• Torque Detection 2, Contact A (Setting : 24)• Torque Detection 2, Contact B (Setting : 25)• These settings are available for 74.03 and later software version only.• See page 3-23, 3-47 for torque detection function.3-68
(33) Multi-Function Analog Output (Terminal AO1) Selection (Sn-33)(34) Multi-Function Analog Output (Terminal AO2) Selection (Sn-34)• The multi-function analog output can be set to monitor the following 12 statusitems as shown below :Sn-33, Sn-34SettingMonitored contentsInputDescription00 Frequency Command 0 ~ max. frequency01 Output Frequency 0 ~ max. frequency02 Output Current 0 ~ rated current03 Output Voltage 0 ~ rated voltage04 DC Voltage230V class 0~400V460V class 0~800VOutput05 VIN Analog Command 0 ~ 10 V060708091011AIN Analog CommandAUX Analog CommandPID InputPID Output1PID Output2Comm. Control4 ~ 20 mA0 ~ 10 V0 ~ max frequency0 ~ max frequency0 ~ max frequency0~100% *1 0~10VNote :*1: When the setting of Sn-33~34= ‘11’, the multi-function output terminals AO1, AO2 arecontrolled through RS-485 port either by MODBUS or PROFIBUS protocol. Please refer to“RS-485 MODBUS/PROFIBUS Application <strong>Manual</strong>”• The output gain (Bn-14 and Bn-15) will determine the output voltage at multifunctionanalog output at AO1, AO2 terminal. The specified multiple of 10V willcorrespond to the 100% output monitored value.(35) Pulse Output Multiplication-Gain Selection (Sn-35)• If the multi-function output terminal (DO1) be set as pulse output (when Sn-31 orSn-32= 14), the final output pulse frequency is the multiple (according to Sn-35) ofthe inverter output frequency. Refer to Fig. 45 for pulse signal output.• Ex1: when Sn-35= 0, the inverter output frequency is 60Hz, the output pulsefrequency is 60 Hz (duty = 50%).3-69
• Different settings of Sn-35 and their corresponding multiple numbers as shownbelow :Sn-35 setting Pulse output frequency Applicable freq. range0 1F: 1 ×inverter output frequency 3.83~400.0Hz1 6F: 6 ×inverter output frequency 2.56~360.0Hz2 10F:10 ×inverter output frequency 1.54~210.0Hz3 12F:12 ×inverter output frequency 1.28~180.0Hz4 36F:36 ×inverter output frequency 0.5 ~ 60.0Hz(36) Inverter Station Address (Sn-36)(37) RS-485 Communication Baud Rate Setting (Sn-37)(38) RS-485 Communication Parity Setting (Sn-38)(39) RS-485 Stopping Method After Communication Error (Sn-39)• The MA7200 inverter has a built-in RS-485 port for monitoring inverter status andreading the parameter setting. Under the remote mode operation, the inverter statusand the parameter settings can be monitored. Moreover, the user can change theparameters setting to control the motor operation.• MA7200 will use MODBUS protocol to communicate with external units by meansof the cable line form RS-485 port.• Parameter definition is as follows:• Sn-36 : inverter station address, setting range 1~31.• Sn-37 = 0: 1200bps (bps: bit / sec)= 1: 2400bps= 2: 4800bps= 3: 9600bps• Sn-38 = 0: no parity= 1: even parity= 2: odd parity• Sn-39 = 0: Deceleration to stop with Bn-02 (deceleration time), when RS-485has communication error.= 1: Coast to stop= 2: Deceleration to stop with Bn-04 (deceleration time), when RS-485has communication error.= 3: Continue to run (will stop if the key stop is pressed)• Every data stream has a data length of 11 bits : 1 start bit,8 data bits,1 parity bitand 1 stop bit. If Sn-38=0, the parity bit is 1.3-70
• 3 different commands are used for communication between the inverter andexternal units:a. Read command: external units to read the memory address of the inverter.b. Write command: external units to write the memory address of the inverter inorder to control the inverter.c. Circuit test command: To test the communication status between the inverterand external units.• The change of setting Sn-36, Sn-37, Sn-38 will be effective in the next start timeafter turning off the inverter.• Do not make the DRIVE/PRGM changeover while writing the date into the inverterthrough RS-485 port.• For more details of RS-485 communication, refer to“RS-485 MODBUS/PROFIBUS Communication Application <strong>Manual</strong>”.(40) PG Speed Control Settings (Sn-40)Sn-40 = 0 : Disable speed control function.= 1 : Enable speed control.= 2 : Enable speed control. No integral action during ACC/DEC.= 3 : Enable speed control. Integral action is enabled.(41) Operation Selection at PG Opens (Sn-41)Sn-41 = 0 : deceleration to stop (Bn-02)= 1 : coast to stop }Display “PG Open” alarm.= 2 : deceleration to stop (Bn-04)= 3 : continue to runBlinking display “PG Open” alarm.(42) Operation Selection at PG Speed Deviation Over (Sn-42)Sn-42 = 0 : deceleration to stop (Bn-02)= 1 : coast to stop= 2 : deceleration to stop (Bn-04)= 3 : continue to run(43) Overspeed Detection (Sn-43)Sn-43 = 0 : deceleration to stop (Bn-02)= 1 : coast to stop= 2 : deceleration to stop (Bn-04)= 3 : continue to run}Display “Sp. Deviate Over” faultmessage.Blinking display “Sp. Deviate Over”alarm}Display “Over Speed” fault message.Blinking display “Over Speed” alarm.3-71
(44) Auto_Run Mode Selection (Sn-44)(45) Auto_Run Mode Setting Selection (Sn-45~Sn-60)• A PLC operation mode is ready to use with the following setting of the multi-stepfrequency command1~16 (An-01~An-16), Auto_Run mode time setting (Bn-21~Bn-36) under the auto_run mode selection (Sn-44). The FWD/REV directioncan be set with the setting of Sn45~60.• Under auto operation mode, to set operation direction by operator, multi-functioninput terminal or RS-485 are all invalid.• Under auto operation mode, preset frequency by multifunction inputterminal~, and frequency UP/DOWN function is invalid. But if input JOGcommand as FJOG, RJOG, they will be prior to others. (refer to Sn-25~28) .• Some example in auto_run mode:(A) Single Cycle Running (Sn-44= 1, 4)The inverter will run for a single full cycle based upon the specified setting mode.Then, it will stop.For example :Sn-44=1 Sn-45~47=1(FWD) Sn-48=2(REV) Sn-49~60=0An-01=15Hz An-02=30Hz An-03=50Hz An-04=20HzBn-21=20s Bn-22=25s Bn-23=30s Bn-24=40sAn-05~16=0Hz Bn-25~36=0sFreq.50 Hz30 Hz15 HzAn-01An-02An-0320 HzAn-0420s 25s 30s 40s(Bn-21) (Bn-22) (Bn-23) (Bn-24)(B) Periodic Running (Sn-44=2, 5)The inverter will repeat the same cycle periodically.For example :Sn-44 = 2An-01~16, Bn-21~36, Sn-45-60 : same setting as the example (A)3-72
Freq.50 Hz30 Hz15 HzAn-01An-02An-03An-01An-02An-0320 HzAn-0420s 25s 30s 40s(Bn-21) (Bn-22) (Bn-23) (Bn-24)20s(Bn-21)An-0425s 30s 40s(Bn-22) (Bn-23) (Bn-24)(C) Auto_Run Mode for Single CycleThe speed of final step will be held to run.For example :Sn-44 = 3Sn-45~48 = 1 (FWD) Sn-49~60 = 0An-01~16, Bn-21~36 : same setting as the example (A)Freq.50 HzAn-0330 HzAn-02An-04 (20Hz)15 HzAn-0120s 25s 30s 40s(Bn-21) (Bn-22) (Bn-23) (Bn-24)• Sn-44 = 1~3 : If the inverter stops and re-starts again, it will continue runningfrom the unfinished step, according to the setting of Sn-44.= 4~6 : If the inverter stops and re-starts again, it will begin a new cycleand continue running according to the setting of Sn-44.3-73
1~3 4~6RunCommand run stopOutput FrequencyRunCommandOutputFrequencyrunstoprunContinue running fromunfinished stepOutputFrequencyrunbegin a new cycletimetime• ACC/DEC time follow the setting of Bn-01, Bn-02 in Auto_Run Mode.• If the setting values of Bn-21~Bn-36 are all zero, the Auto_Run Mode is disabled.(46) Applied Torque Load (Sn-61)• Select either the constant torque load (Sn-61=0) or varied torque load (Sn-61=1).The inverter will automatically choose the proper V/F pattern and change theinverter overload protection curve. (See page 3-39 for ‘INVERTER CAPACITYSELECTION’).(47) LCD Language Displayed Selection (Sn-62)• Sn-62 = 0 : English= 1 : Chinese(48) Parameter Copy (Sn-63)• JNEP-31 LCD digital operator can upload the parameter settings from the LCDdigital operator to inverter and download parameter settings from the inverter to theLCD digital operator.• LCD digital operator will check its EEPROM or the inverter’s EEPROM under thefollowing settings.• Sn-63 = 0 : NO action= 1 : Upload data (LCD digital operator →inverter). During this period, theLED on the LCD digital operator will light sequentially in the CWsense.= 2 : Download data (inverter →LCD digital operator). During this period,the LED on the LCD digital operator will light sequentially in theCCW sense.= 3 : Verification check on LCD’s EEPROM; during this period the LEDwill be switch-on between 2 groups.= 4 : Verification check on inverter’s EEPROM; during this period the LEDwill not light.3-74
• Please follow the below steps to implement the action of parameter copy betweendifferent inverters (either upload or download).Step 1: Check the contents of (LCD) digital operator EEPROM (Sn-63=’03’), thencheck the contents of inverter’s EEPROM (Sn-63=’04’). Make sure thatboth EEPROM function properly.Step 2: Download and copy the inverter’s parameter settings to LCD digitaloperator EEPROM (Sn-63=2).Step 3: Upload and copy the parameter settings of LCD digital operator to otherinverter’s EEPROM (Sn-63=1).(49) PID Function Selection (Sn-64)• To enable PID control, set Sn-64=1. Otherwise, set Sn-64=0 to disable PID controlfunction. Moreover, it is possible to use the multi-function terminals ○5 ~○8 toenable/disable PID control.(50) Braking Resistor Protection Selection (Sn-65)• Sn-65 = 0 : External braking resistor protection invalid= 1 : External braking resistor protection valid• Whenever the external braking resistor is used, be sure that the parameter ‘Sn-65 =1’ is set.(51) Motor Parameter Autotuning Selection (Sn-66)• The AUTOTUNE feature can be used to identify and store the motor’s parameters• Sn-66 = 0 : Autotuning Disable= 1 : Autotuning Enable(52) Control Mode Selection (Sn-67)• Select one of the two control modes• Sn-67 = 0 : V/F Control Mode (include V/F control with PG feedback)= 1 : Sensorless Vector Control Mode*1Sensorless Control1. Set Sn-67 = 1 for sensorless vector control.2. Set Sn-66 = 1 for autotuning.*1. For output frequency less than 1.5Hz in sensorless vector control, set Sn-02=15 and then change Cn-07 to required frequency.(53) Control selection (Sn-68)• The set method adopts bit edit, each bit represents one item of function. One bit isset to 0 indicates such function is unavailable, while 1 is available.• Bit 1(–––Y) is corresponding to phase lose protection function. If ON the function,the inverter will stop output when output terminals phase-lose.• Bit 2 (––Y–) is reversed with no function.3-75
• Bit 3(–Y––) is set to allow ±10V analog voltage input. If the bit is set to 1, theanalog voltage input terminal (Vin) can input -10V~+10V. If it is set to 0, theanalog input terminal (Vin) is default as 0V, that is the voltage is less that 0V is notacceptable. Start PID control (Sn-64=1~8), to set the bit, feedback signal ±10V isacceptable. The function on 30.16 later versions and with 4P101C01301 controlboard is available. The previous version or with not 4P101C01301, the bit iswithout such function.• Bit 4(Y–––) is set to remember output frequency UP/DOWN function under HOLDstate. If the bit is set to 1, to remember the output frequency the latest OFF theinverter. If 0, the function is available. Please refer to Sn-28=28 parametersdescription for frequency UP/DOWN function(54) Torque Detection 2 Selection (Sn-69)- See Page 3-47(55) Engineering Unit (Sn-70)• The parameter is available for 74.03 and later software version only.• The inverter supports following engineering unit for frequency command,frequency display and PID feedback display.• Sn-70 = 0 : NONE1 : FPM (feet per minute)2 : CFM (cubic feet per minute)3 : PSI (pounds per square inch)4 : GPH (gallons per hour)5 : GPM (gallons per minute)6 : in7 : ft8 : /s (units per second)9 : /m (units per minute)10 : /h (units per hour)11 : °F12 : inW (inches in water column)13 : HP14 : m/s (meters per second)15 : MPM (meters per minute)16 : CMM (cubic meters per minute)17 : W18 : kW19 : m20 : °C• The function is enabled while LCD Digital Operator Display (Cn-28) is in the rangefrom 40 to 39999.3-76
3.5 Monitoring parameters Un-□□ParameterNo.Un-01Un-02Un-03Un-04Un-05Un-06Un-07Un-08Un-09Un-10NameFrequencyCommandOutputFrequencyOutput CurrentOutput VoltageMain Circuit DCVoltageExternal AnalogCommand VINExternal AnalogCommand AINMulti-FunctionAnalog InputCommand AUXExternal AnalogOutput AO1External AnalogOutput AO1LCD display(English)Un-01=60.00HzFrequencyCommandUn-02=60.00HzOutput FrequencyUn-03=12.5AOutput currentUn-04=220.0VOutput VoltageUn-05=310.0VDC VoltageUn-06=100%Voltage ~Cmd.Un-07=100%Current ~Cmd.Un-08=100%Multi_Fun ~Cmd.Un-09=100%Term.AO1 OutputUn-10=100%Term.AO2 OutputUnit0.01Hz0.01HzDescriptionDisplay frequency command.The displayed unit is determined by Cn-28.Display output frequency.The displayed unit is determined by Cn-28.0.1A Display inverter output current.0.1V0.1VDisplay output voltage command ofinverterDisplay DC voltage of inverter maincircuit.Multi-functionAnalog Output Level10V/MAX. OutputFrequency10V/MAX. OutputFrequency10V/Inverter RatedCurrent10V/230V or10V/460V10V/400V or10V/800V0.1% - 10V/100%0.1% - 20mA/100%0.1% - 10V/100%0.1% - 10V/100%0.1% - 10V/100%0 0 0 0 0 0 0 0 0:OPEN1:CLOSEUn-11Input TerminalStatusUn-11= 00000000I/P Term. Status-Input terminal 1Input terminal 2Input terminal 3Input terminal 4Input terminal 5Input terminal 6Input terminal 7Input terminal 8-0 0 0 0 0 0 0 00:OPEN1:CLOSEUn-12Output TerminalStatusUn-12= 00000000O/P Term. Status-Relay ContactRA-RC (or R1A-R1C)Photo-ContactDO1-DOGPhoto-ContactDO2-DOG(or R2A-R2C)ReservedReservedReservedReservedReserved-Note : Term. is terminal abbrev.3-77
ParameterNo.Un-13Un-14Un-15NameAmount of PG SpeedFeedbackAmount of PG SpeedCompen.PID Control InputUn-16 PID Control Output 1Un-17 PID Control Output 2Un-18 Fault Message 1Un-19 Fault Message 2Un-20 Fault Message 3Un-21 Fault Message 4Un-22Un-23Un-24Un-25Un-26Un-27Un-28Un-29Un-30Un-31Un-32Un-33Un-34The Parameter OfTime Period BetweenLast Fault And TheNearest Fault.Frequency CommandWhile Fault OccurredOutput Freq. WhileFault OccurredOutput Current WhileFault OccurredOutput Voltage WhileFault OccurredDC Voltage WhileFault OccurredI/P Terminal StatusWhile Fault OccurredO/P Terminal StatusWhile Fault OccurredTime Elapsed AfterPower-OnTime Elapsed AfterRunEPROM S/WVersionFeedbackMotor SpeedPID Feedback Display*1LCD display(English)Un-13= 100.0%PG Feedback.Un-14= 100.0%PG Compen.Un-15= 100%PID InputUn-16= 100%PID Output1Un-17= 00%PID Output2OvercurrentMessage1OvercurrentMessage2OverheatMessage3OvertorqueMessage4Un-22= 2400HrLast Fault Run TimeUnitDescription0.1% 100.0%=MAX. output frequency0.1% 100.0%=MAX. output freq.0.1% 100.0%=MAX. output freq.0.1% 100.0%=MAX. output freq.0.1% 100.0%=MAX. output freq.Multi-functionAnalog Output Level10V/MAX. OutputFrequency10V/MAX. OutputFrequency10V/Max. outputfrequency10V/Max. outputfrequency10V/Max. outputfrequency- Fault message occurred now ----1HrFault message occurredlast timeFault message occurredlast two timeFault message occurredlast three timeThe value of ‘Run Elapse Time’parameter will be cleared after faulthas been cleared.Un-23= 60.00HzLast Fault Freq.Cmd.0.01Hz - -Un-24= 60.00HzLast Fault O/P Freq.0.01Hz - -Un-25= 12.5ALast Fault O/P I0.1A - -Un-26= 220.0VLast Fault O/P V0.1V - -Un-27= 310.0VLast Fault O/P V0.1V - -Un-28= 00000000Same as Un-11,-Last Fault I/P Term.display terminal status-Un-29= 00000000Same as Un-12,-Last Fault O/P Term. display terminal status-Un-31= 00002HrDisplay total time elapsed1HrP Elapsed Timeafter power ON-Un-31= 00002HrDisplay total time elapsed1HrR Elapsed Timeafter pressing RUN-Un-32= 00001Soft Number- -Manufacturing use- -Un-33= 00000rpmDisplay motor speed while PG1rpmMotor Speedfeedback is set.Un-34= 00000PID Feedback1*2 Displays PID feedback signal*1. The parameters are available for 74.03 and later software version only.*2. The unit can be changed through parameter Cn-28 and Sn-70.----10V/MAX. MotorSpeed3-78
(1) Frequency Command (Un-01)(2) Output Frequency (Un-02)(3) Output Current (Un-03)(4) Output Voltage (Un-04)(5) Main Circuit DC Voltage (Un-05)• Through the settings of Sn-33, Sn-34, the above contents can be displayed at themulti-function analog output terminals (AO1, AO2) in different voltage level of(0~10V)(6) External Analog Command VIN (Un-06)• The parameter can monitor the external analog terminal voltage VIN(0~100%/0~10V). The voltage can be output through the multi-function analogoutput terminal AO1, AO2 (Sn-33=05 or Sn-34=05). The output voltage is the PIDfeedback voltage when the PID function is used. Please refer to page 3-7, “PIDcontroller block diagram”.(7) External Analog Command AIN (Un-07)• The parameter can monitor the external analog terminal current AIN(0~100%/0~20mA). The current can be output through the multi-function analogoutput terminal AO1, AO2 (Sn-33=06 or Sn-34=06). The output current is the PIDfeedback voltage when the PID function is used. Please refer to page 3-7, “PIDcontroller block diagram”.(8) Multi-Function Analog Input Command AUX (Un-08)• The parameter can monitor the multi-function analog input terminal AUX voltage(0~100%/0~20mA). The voltage can be output through the multi-function analogoutput terminal AO1, AO2 (Sn-33=07 or Sn-34=07). The output voltage is the PIDtarget voltage (reference) when the PID function is used. Please refer to page 3-7,“PID controller block diagram”.(9) External Analog Output AO1, AO2 (Un-09, Un-10)• The parameter can monitor analog output terminal AO1, AO2 voltage (0~10V).Their output gain can be adjusted through the setting of parameters Bn-14 or Bn-15.Their outputs are determined and varied proportionally according to the setting of(Sn-33 or Sn-34).(10) Input Terminal Status (Un-11)• The parameter will monitor the status of input terminal ○1 ~○8 : ‘ON’ or ‘OFF’.(11) Output Terminal Status (Un-12)• The parameter will monitor the status of input terminal RA-RC or R1A-R1C, DO1-DOG, DO2-DOG or R2A-R2C : ‘ON’ or ‘OFF’.3-79
(12) PG Speed Feedback and PG Speed Compensation (Un-13, Un-14)• These parameters will monitor the PG speed feedback and PG speed compensationsignal if PG feedback function is used.(13) PID Control Input (Un-15)(14) PID Control Output1 (Un-16)(15) PID Control Output2 (Un-17)• The values in Fig. 12 (on page 3-7) can be monitored through the parameters of Un-15, Un-16 and Un-17. Moreover, the multi-function analog output terminal AO1,AO2 can be used to monitor the output value through the proper setting of Sn-33and Sn-34.(16) Message 1 (Un-18)(17) Message 2 (Un-19)(18) Message 3 (Un-20)(19) Message 4 (Un-21)• These parameters are used to display the fault messages whenever the faultoccurred. The user can take proper action for trouble-shooting based upon thedisplayed message.(20) The Cumulative Operation Time Setting (Un-22)• The parameter is used to count the elapsed time from the previous fault to the latestfault occurred recently. Its setting range is 0~65536 Hr. After the fault have beencleared and system reset again, the Un-22 will be cleared to zero and counted again.(21) The Frequency Command While Last Fault Occurred (Un-23)(22) The Output Frequency While Last Fault Occurred (Un-24)(23) The Output Current While Last Fault Occurred (Un-25)(24) The Output Voltage While Last Fault Occurred (Un-26)(25) The DC Voltage While Last Fault Occurred (Un-27)(26) The Input Terminal Status While Last Fault Occurred (Un-28)(27) The Output Terminal Status While Last Fault Occurred (Un-29)• The above parameters will display the inverter status when the fault occurred lately.The contents of parameters Un-23~29 will be cleared after the faults have beencleared and the system reset again.(28) The Cumulative Time Whenever The Input Power Is On (Un-30)• The parameter will record the cumulative operation time from power-on to poweroff.Its value is 0~65535 Hr. If the value exceed 65535, it will restart from 0 again.3-80
(29) The Cumulative Run Time Whenever The Output Power Is On (Un-31)• The parameter will record the cumulative operation time from power-on to poweroff.Its value is 0~65535 Hr. If the value exceeds 65535, it will restart from 0 again.(30) The EPROM Software Version (Un-32)• The parameter will specify the updated software version in this inverter.(31) Motor Speed While PG Feedback Is Set. (Un-33)• While PG feedback control is set, the motor speed can be monitored through Un-33.(32) PID Feedback Display (Un-34)• While PID Function is enabled, the PID feedback signal can be monitored throughUn-34. While PID Function is not enabled, the Un-34 will be zero.• The display content can be set by Cn-28, Sn-70, Bn-45 and Bn-46.Cn-28 sets the decimal point position of Un-34.Sn-70 sets the unit of Un-34.Bn-45 is the equivalent value displayed for 0% PID Feedback.Bn-46 is the equivalent value displayed for 100% PID Feedback.• Before monitoring PID feedback signal, be sure to set the value of Cn-28, Sn-70,Bn-45 and Bn-46.3-81
4.Fault display and troubleshooting4.1 GeneralThe MA7200 have the protective and warning self-diagnostic functions. If faultoccurs, the fault code is displayed on the digital operator. The fault contact output(RA-RB-RC or R1A-R1B-R1C, DO1, DO2 or R2A-R2C) operates, and the invertershut off to stop the motor. If warning occurs, the digital operator will display thewarning code. However, the fault-contact output does not operate. (Except somecertain cases, see page on ‘Warning and Self-Diagnosis Functions’). The digitaloperator will return to its previous status when the above warning is clear.• When a fault has occurred, refer to the following table to identify and to clear thecause of the fault.• Use one of the following methods to reset the fault after restarting the inverter.1. Stop the inverter.2. Switch the fault reset input at terminal signal or press the RESET key on thedigital operator.3. Turn off the main circuit power supply and turn on again.4-1
4.2 Error Message and Troubleshooting(A) Protective FunctionLCD Display(English)Fault ContentsFault ContactOutputFaultDC Volt. LowThe main circuit DC voltage becomes lower than the low voltagedetection level (Cn-34).OperationFaultOver CurrentFaultGround FaultFaultOver VoltageFaultOver HeatFaultMotor Over LoadThe inverter output current becomes approx. 200% and above theinverter rated current.A ground fault occurs at the inverter output side and the ground-faultcurrent exceeds approx. 50% of the inverter rated current.The main circuit DC voltage becomes excessive because ofregeneration energy caused by motor decelerating.The temperature of the cooling fin reaches the detection level.Motor overload is detected by the electronic thermal relay.(motor protection)OperationOperationOperationOperationOperationFaultInverter Over LoadThe electronic thermal sensor detects inverter overload while theoutput current exceeds 112% of rated value. (inverter protection)OperationFaultOver TorqueFaultExt. Fault3FaultExt. Fault5FaultExt. Fault6FaultExt. Fault7FaultExt. Fault8FaultInverter EEPROMFaultInverter A/DFaultPG Over Sp.FaultPG OpenFaultSp.Deviat OverFaultRS-485 InterruptOver torque is detected while the output current is larger than orequal to the setting of Cn-26. (machine protection)External fault signal External fault signal External fault signal External fault signal External fault signal EEPROM faultEEPROM (BCC, no.) is bad.A/D converter (inside the CPU) faultExcessive PG speed faultPG is open-circuitExcessive speed deviationMODBUS Communication fault occurs .The inverter remainsoperating.OperationOperationOperationOperationOperationOperationoperation4-2
Error Causes• Power capacity is too small.• Voltage drop due to wiring resistance.• A motor of large capacity connected to the same powersystem has been started.• Defective electromagnetic contractor.• Extremely rapid accel.• Short-circuit or ground- fault at the inverter output side.• Motor of a capacity greater than the inverter ratinghas been started.• High-speed motor and pulse motor has been started.• Motor dielectric strength is insufficient.• Load wiring is not proper.• Insufficient deceleration time.• High input voltage compared to motor rated voltage.• Defective cooling fan.• Ambient temperature rise• Clogged filter.• Overload, low speed operation or extended accel. time.• Improper V-f characteristic setting• Improper rated current (Cn-09) setting• Machine errors or overloadAction to Be Taken• Check the source voltage and wiring.• Check the power capacity and power system.• Extend the accel. time.• Check the load wiring.• Check the motor wiring impedance and the loadwiring.• Extend the accel. time.• Use a braking resistor.• Check for the fan, filter and the ambienttemperature.• Measure the temperature rise of the motor.• Decrease the output load.• Set proper V/f characteristic.• Set proper V/f characteristic.• Set proper rated current (Cn-09)• If inverter is reset repetitively before faultremoved, the inverter may be damaged.• Check the use of the machine.• Set a higher protection level (Cn-32).• Fault input of external signal , , , and .• Identify the fault signal using Un-11.• Disturbance of external noise• Excessive impact or vibration• Reset NVRAM by running Sn-03.• Replace the control board if the fault can’t becleared.• Improper setting of ASR parameter or over-speedprotection level.• Check the parameters of ASR and theprotection level.• The PG wiring is not properly connected or opencircuit.• Check the PG wiring.• Improper setting of ASR parameter or speeddeviation level.• Check parameters of ASR and speed deviationlevel.•External noise•Check the parameter setting, including Sn-01, Sn-02.•Excessive vibration or impact Communication wire •Check if the comm. wire is not properly contacted.•Not properly contacted•Restart, if fault remains, please contact to us.4-3
(B). Warning and Self-Diagnosis FunctionsLCD Display(English)(blinking)AlarmDC Volt. Low(blinking)AlarmOver Voltage(blinking)AlarmOver Heat(blinking)AlarmOver Torque-(blinking)AlarmExternal Fault(blinking)AlarmRS-485 InterruptFault ContentsThe main circuit DC voltage becomes lower than the lower undervoltagelevel before the motor starts.The main circuit DC voltage becomes higher than the lower undervoltagelevel before the motor starts.The thermal protection contact is input to the external terminal.Over torque is detected while the output current is larger than or equal to thesetting of Cn-26. However, the Sn-12 has been set such that the invertercontinue to run and disregard the over-torque warning.Stall prevention operates while acceleration.Stall prevention operates while runningStall prevention operates while deceleration.Forward and reverse rotation commands are simultaneously detectedfor a period of time exceeding 500ms. (The inverter is stoppedaccording to the stop method preset by Sn-04.)MODBUS Communication fault occurs. The inverter remainsoperating.Fault ContactOutputNo operationNo operationNo operationNo operationNo operationNo operationNo operationComm. Fault Transmission fault of digital operator No operation(blinking)AlarmB.B.AlarmInput ErrorExternal B.B. signal (terminal ) is input (The inverter stops and themotors stops without braking)Improper inverter capacity (Sn-01) setting.Improper setting of multi-function input signal (Sn-25, 26, 27 and28).No operationNo operationNo operation(blinking)AlarmOver Speed(blinking)AlarmPG OpenAlarmSp.Deviat OverImproper setting of V/F characteristic (Cn-02~08)Improper setting of Cn-18, Cn-19Excessive speed (operation remains)PG Open-circuit (operation remains)Excessive speed deviation (operation remains)4-4No operationNo operationNo operationNo operationNo operationLoad Fail Error during upload and download (operation remains) No operationEEPROM Fault Operator EEPROM error. No operationUpload ErrorDownload ErrorAlarmAuto Tun-ErrorData incorrect during Communication from the operator to theinverter.Data incorrect during Communication from the inverter to theoperator.Motor parameter autotuning errorNo operationNo operationNo operation
Error Causes•Input voltage drop•Input voltage rise•Overload•Cooling fan fault. Ambient temperature rises.•Clogged filter.•Machine error or overload•Insufficient Accel./Decel. Time•Overload•Excessive load impact occurs while operating•Operation sequence error•3-wire/2-wire selection error•External noise•Excessive vibration or impact on Communication wire•Not properly contacted•Comm. between digital operator and inverter has notbeen established after system starts for 5 seconds.•Communication is established after system starts, buttransmission fault occurs for 2 seconds.•External B.B. signal is input.•Inverter KVA setting error.•The value of Sn-25~Sn-28 is not in ascending order (Ex.Sn-25= 05, Sn-28= 02, those are improper setting).•Set speed search command of 21 and 22 simultaneously.•The values of Cn-02~Cn-08 do not satisfyFmax ≥ FA ≥ FB ≥ Fmin.•Upper limit and lower limit setting is incorrect.•Improper ASR parameter setting or over-torqueprotection level.•The circuit of PG is not properly connected or opencircuit.4-5Action to Be Taken•Measure the main circuit DC voltage, if thevoltage is lower allowance level, regulate theinput voltage.•Measure the main circuit DC voltage, if thevoltage is higher than allowance level, regulatethe input voltage.•Check for the fan, filter and the ambienttemperature.•Check the use of the machine.•Set a higher protection level (Cn-32).•Increase Accel./Decel. Time.•Check the load.•Check the circuit of system•Check the setting of system parameters Sn-25,26, 27, and 28.•Check the parameter setting, including Sn-01, Sn-02.•Check if the comm. wire is not properly contacted.•Restart, if fault remains, please contact to us.•Re-plug the connector of the digital operators.•Replace the control board.•After external BB signal is removed, execute thespeed search of the inverter.•Set proper KVA value. Be aware of thedifference of 230V and 460V•Set these values by order (the value of Sn-25must be smaller than those of Sn-26, 27, 28)•Command 21 and 22 can not be set on two multifunction-inputcontacts simultaneously.•Change the settings.•Change the settings.•Check the ASR parameter and over-torqueprotection level.•Check the wiring of PG.•Improper ASR parameter setting or over-torqueprotection level.•Check the ASR parameter and over-torqueprotection level.•Bad communication during operator and inverter.•The connector is not properly connected.•Check if the connector is not properly connected.•Operator EEPROM error.•Disable load function of operator.•Replace the operator.•Incorrect inverter data format•Communication noise.•Download the data to the operator again.•Check if the connector is not properly connected.•Communication noise•Inverter capacity and motor rating are not properly matched.•The wiring between inverter and motor is disconnected.•Motor load unbalance.•Check if the connector is not properly connected.•Correct the inverter/motor capacity ratio, wiringcable and motor load.
APPENDIXA. Adjusting PID ControllerUse the following procedure to activate PID control and then adjust it whilemonitoring the response.1. Enable PID control. (Sn-64 = 1)2. Increase the Proportional gain Bn-17 as far as possible without creatingoscillation.3. Decrease the Integral Time Bn-18 as far as possible without creatingoscillation.4. Increase the Derivative Time Bn-19 as far as possible without creatingoscillation.The Proportional, Integral and Derivative control function provides closed-loopcontrol, or regulation, of a system process variable (pressure, temperature, etc.).This regulation is accomplished by comparing a feedback signal with a referencesignal, which results in an error signal. The PID control algorithm then performscalculations, based upon the PID parameter settings (Bn-16 through Bn-20 on Page3-2), on this error signal. The result of the PID algorithm is then used as the newfrequency reference, or is added to the existing speed reference.The PID target value can come from the frequency command (from operator) or aMulti-Function Analog Input.Select the PID Control Feedback signal from external terminal AIN for a currentsignal (4-20mA DC) or from VIN for a voltage (0-10 VDC).The Proportional Gain is the value by which the error signal is multiplied togenerate a new PID controller output. A higher setting will result in a system withquicker response. A lower setting will result in a more stable yet slower system.The Integral Time is a parameter that determines how fast the PID controller willseek to eliminate any steady-state error. The smaller the setting, the faster the errorwill be eliminated. To eliminate the integral function entirely, set this parameter to0.0 seconds. A lower setting will result in a more responsive system. A highersetting will result in a more stable yet slower system.The Integral Upper Limit parameter will limit the effect that the integrator can have.It works if the PID controller output is positive or negative. It can also be used toprevent integrator “wind-up.”The Derivative Time is a parameter that can be adjusted to increase system responseto fast load or reference changes, and to reduce overshoot upon startup. Toeliminate the differential function entirely, set this parameter to 0.00 seconds.The PID Output Limit (Cn-51, Cn-52) parameter can be used to set the maximumeffect the PID controller will have on the system. It will also limit the PID outputwhen it is either positive or negative.App-1
NOTE : When the PID output limit is reached, the integrator will hold and not change invalue until the PID output is less than the PID output limit.The PID Bias (Bn-20) parameter will add a fixed percentage to the PID output. Itcan be used to tune out small system offsets.NOTE : This parameter is set as a percentage of maximum output frequency.OutputThe above parameters are factory set for optimum results for most applications, andgenerally do not need to be changed.The PID Primary Delay Time parameter adds a filter to the PID output to keep itfrom changing too quickly. The higher the setting, the slower the PID output willchange.All of these parameters are interactive, and will need to be adjusted until the controlloop is properly tuned, i.e. stable with minimal steady-state error. A generalprocedure for tuning these parameters is as follows:1. Adjust Proportional Gain until continuous oscillations in the ControlledVariable are at a minimum.2. The addition of Integral Time will cause the steady-state error to approachzero. The time should be adjusted so that this minimal error is attained as fastas possible, without making the system oscillate.3. If necessary, adjust Derivative Time to reduce overshoot during startup. Theinverter’s acceleration and deceleration rate times can also be used for thispurpose.Before If overshoot occurs, shorten the derivative time (D) andlengthen the integral time (I).AfterOutputAfterBeforeTimeTo rapidly stabilize the control conditions even whenovershooting occurs, shorten the integral time (I) andlengthen the derivative time (D).TimeOutputAfterBeforeIf oscillation occurs with a longer cycle than the integraltime (I) setting, then the integral operation is strong.The oscillation will be reduced as the integral time (I) islengthened.OutputAfterBeforeTimeTimeIf oscillation cycle is short and approx. the same as thederivative time (D) setting, then the derivativeoperation is strong. The oscillation will be reduced asthe derivative time (D) is shortened. If even setting thederivative time (D) to 0.00 cannot reduce oscillation,then either decreases the proportional gain (P) or raisethe PID primary delay time constant.App-2
B. Supplementary on PID Control Block DiagramA PID Control Block Diagram is:TargetPIDPrimaryDelayFrequencyCommandNote :FeedbackSignalBn-16Fig. 47. PID Control Block Diagram1. A target signal may come from the LCD Digital Operator, RS-485 Port orMulti-Function Analog Input Terminal-AUX Setting. (upon Sn-05 setting).2. The detected signal can be input either from terminal VIN (Sn-24=0, VoltageCommand 0~10V) or from terminal AIN (Sn-24=1, Current Command4~20mA).3. If the target signal is from the terminal AUX, please use the wiring diagramindicated below: (Sn-05=01, Sn-29=09).0 ~ +10V0 ~ +10V4 ~ 20 mA+12VAUX (Sn-29 = 09 for PID target)VIN Ref. Com. (Sn-24=0)(PID feedback)AIN Ref. Com. (Sn-24=1)GNDFig. 48. PID Wiring Diagram4. Refer to Pages 3-7 to 3-9 for more details about PID use.App-3
C. Wiring for PG Feedback UseThe MA7200 inverter has a built-in PG interface, no external PG feedback optioncard is needed. An independent DC source of +12V should be provided from anexternal source.IP12P IG12EA(+)A(-)R/L1S/L2T/L3MA7200TP1OPEN IP12PULL UPU/T1V/T2W/T3EIMEncoderPGPPower SupplyAC 200~240V50/60Hz(L)(N)FG+12V0V1234PNote :Fig. 49. Wiring of PG feedbackP1. : Isolated twisted cable wire.2. Notation for PG terminalsTerminalFunctionA(+) PG signal input terminal.The voltage level is (H: 4~12V, L: ≤1V).A(-) Its Max. frequency is < 32767 HzIP12 Terminals feed in the (+12)VDC external powerIG12 source (+12V± 10%, the Max. current is 40mA)+12V(+12)V DC source (+12V± 10%, min. 0.5A)0VE Inverter ground.3. Please refer to page 3-27 and 3-69 for more details on PG feedback.4. The A(+), A(-), IP12, IG12 terminals are integrated as CN2 in compactversion. (see page 1-9~1-10). The code No. of the wire is 4H339D0250001.5. The PG interface only allows the open-collector interface drive orcomplementary interface drive.6. The short pin of TP1 set to PULL UP position for open-collector interface(factory setting) and set to OPEN position for complementary interface. ThePG interface only allows the open-collector interface drive or complementaryinterface drive.7. The shielded twisted-pair cable wire should be used between the inverter andPG, its length should be less than 150 feet.App-4
D. RS-485 Communication Interface• MA7200 RS-485 interface (terminal S(+), S(-)) can provide MODBUSprotocol for communication. PROFIBUS protocol for communication ispossible with an optional PROFIBUS Communication Card (MA-SP).• Wiring diagram of MODBUS and PROFIBUS-DP:(a) MODBUS Protocol CommunicationMA7200M1S(+)S(-)EP220 ΩRS-485CONTROLLERMA7200.M2S(+)S(-)EPDATA(+)DATA(-)TxRxRxTxRS-232CONTROLLERRS-485/RS-232Conversion CKTMA7200.S(+)S(-)E220 ΩPM31Fig. 50. Wiring for MODBUS Protocol CommunicationNote :1. A Host Controller with RS-485 interface can communicate with theMA7200 unit through RS-485 interface connection directly. If the HostController does not provide the RS-485 port and its RS-232 port isavailable, an RS-485/RS-232 conversion card should be used to connectbetween this Host Controller and the MA7200 unit.2. A MODBUS Host Controller can drive the network with no more than 31inverters connected, using MODBUS communication standard. If theinverter (e.g., MA7200) is at the end of the network, it must haveterminating resistors 220Ω at both terminals. All other inverters in thesystem should not have terminators.3. Please refer to “MA7200 RS-485 MODBUS Communication Application<strong>Manual</strong>”.App-5
(b) PROFIBUS Protocol CommunicationThe optional MA-SP PROFIBUS Communication Card supports thePROFIBUS protocol. The optional MA-SP PROFIBUS Communication Cardcan be placed at the control board. An independent 24V DC Power Supply isneeded for all MA-SP option cards.MA7200S(+)S(-)M1PMA-SPTB1TB21 123 245 3P220 ΩPROFIBUS-DPCONTROLLERMA7200S(+)S(-)M2PTB112345MA-SP123TB2PMA7200S(+)S(-)M31PMA-SPTB11 123 245220 Ω 3TB2PDC24VFig. 51. Wiring for PROFIBUS Protocol CommunicationNote : 1. Code No. : 4H300D02900092. The optional MA-SP card will consume about 2.4W(=24.0V*0.1A). Selectthe proper DC power supply to meet your system capacity based upon thestation number.3. A maximum of 31 PROFIBUS-DP stations (nodes) may be contained withina single network segment. If the drive is at the end of the network, it musthave 220Ω between terminals (S-, S+).4. For more details, refer to the “MA7200 PROFIBUS-DP CommunicationApplication <strong>Manual</strong>”.App-6
E. SINK/SOURCE Typical Connection Diagram• The UL/CUL Standard Type Control Board (Code No. : 4P101C0060002)Terminal ~ can be set as Sink or Source Type Input Interface. Typicalconnection examples are shown below.(a) SINK Type Input Interface: The short pin of TP2 is set to SINK position.• Transistor (Open-collector) used for operation signal.TP2SINK1 ~ 824VGSOURCE• NPN Sensor (Sink) used for operation signal.TP224VSINKSOURCENPN1 ~ 824VG(b) SOURCE Type Input Interface : The short pin of TP2 is set to SINK position.• Transistor (Open-collector) used for operation signal.TP2SINK24V1 ~ 8SOURCE• PNP Sensor (Source) used for operation signal.PNPTP224VSINKSOURCE1 ~ 824VGApp-7
F. RS-232C Serial Communications Connection DiagramThe LCD Digital Operator uses RS-232C Serial Communication through connectorCN1 to communicate with control board. Using the CN1 port on the control board,the parameters can be monitored and updated by using a suitable PC programmingtool.The CN1 port is a non-isolated RS-232C port with a baud rate of 2400 bps. Contactyour TECO-Westinghouse factory representative or distributor for furtherinformation.• The pin definitions of CN1−6 pin telephone jack6 5 4 3 2 1PinSignal Definition1 LCD/PC selection2 5V3 Rx4 Tx5 0V6 Reserved (-5V, for LCD display)• Typical connection diagramCN1Tx 4Rx 352RxTx12345PC678916DB9ConnectorFig. 52. RS232-C Typical Connection DiagramApp-8
G. Sensorless Vector Control Set-upThe MA7200 has two standard two selectable control modes, V/F Control Mode(Sn-67=0) and Sensorless Vector Control Mode (Sn-67=1). When the SensorlessVector Control Mode is selected, be sure that the inverter capacity and the motorrating are suitably matched.The AUTOTUNE feature can be used to identify and store the important motorparameters for the Sensorless Vector Control Mode.Refer to pages 3-28, 3-29 and 3-73 for more details about Sensorless VectorControl.• The Sequence of Motor Parameter Autotuning:1. Disconnect the motor load and make sure that the wiring between the inverterand the motor is suitable. The difference between inverter capacity and motorrating should not be greater than two frame sizes.PRGM2. Switch to PRGM operation mode by pressing the Digital Operator DRIVE key.3. Input the Motor Rated Voltage Data to parameter Cn-03 (Max. OutputVoltage) and the Motor Rated Frequency to parameter Cn-04 (Max. VoltageFrequency) using data from motor’s nameplate. Enable Sensorless VectorControl Mode (Sn-67= 1).4. Enable the Autotuning Function by setting Sn-66= 1.5. Switch to DRIVE operation mode by pressing the PRGMDRIVE key, then run theinverter by pressing the RUN key.6. The inverter system immediately enters into the autotuning operation untilcompleting the autotuning procedure (normally about 25 seconds). Theinverter then returns to a stopped condition. Press the STOP key to stop theparameter autotuning operation if an abnormality occurs during autotuningoperation.7. Finally, press the STOP key to return the system to normal operation mode. Thevalue of motor parameter will be automatically stored in these parameters: Cn-57(Motor Line-to-Line Resistance R1), Cn-58 (Motor Rotor Equivalent ResistanceR2), Cn-59 (Motor Leakage Inductance Ls) and Cn-60 (Mutual Inductance Lm).App-9
• The Operations and Adjustments of Sensorless Vector Control :1. Make sure the inverter capacity and motor rating is suitably matched. Use theAUTOTUNE feature to identify and store the motor parameters in the firsttime sensorless vector operation after installation, and key in the Motor RatedVoltage data into Cn-03 and the Motor Rated Frequency into Cn-04 accordingto the motor nameplate.2. Enable the Sensorless Vector Control Mode by setting Sn-67= 1.3. Increase setting Cn-57 to increase the generating torque at low speed.Decrease setting Cn-57 to reduce the generating torque to avoid overcurrenttrip at low speed.4. Adjust setting Cn-61 if the speed accuracy needs to improve. When the actualspeed is low, increase the set value and when the actual speed is high,decrease the set value.5. If the motor speed is not stable or the load inertia is too large, increase theCn-40 (Slip Compensation Primary Delay Time) setting.If the speed response is slow, decrease the setting of Cn-40.App-10
H. Notes for Circuit Protection and Environmental Ratings• Circuit ProtectionThe MA7200 is “suitable for use in a circuit capable of delivering not morethan rms symmetrical amperes V maximum.” Where the rms valuesymmetrical amperes and V maximum are to be as follows:Device Rating Short CircuitVoltage HP Rating (A)1.5 ~ 50 5,000230V51 ~ 100 10,000460V1.5 ~ 50 5,00051 ~ 200 10,000MaximumVoltage (V)240V480V• Environmental RatingsThe MA7200 is intended for use in pollution degree 2 environments.• Field Wiring Terminals and Tightening TorqueThe wiring terminals and tightening torque are listed as follows.(Main Circuit Terminal Specifications – use 140/167°F(60/75°C) copperwire only).App-11
(A) 230V Class (NEMA1)CircuitMainCircuitControlCircuitInverterRating(HP)12357.5101520253040AllseriesTerminals MarkCable Size(AWG)TerminalsTighteningTorque(Pound-inch)L1, L2, L3, T1, T2, T3, B1/P, B2, 14 ~ 10 M4 1014 ~ 10 M4 10L1, L2, L3, T1, T2, T3, B1/P, B2 , 14 ~ 10 M4 1012 ~ 10 M4 10L1, L2, L3, T1, T2, T3, B1/P, B1/R, B2, 12 ~ 10 M4 1012 ~ 10 M4 10L1, L2, L3, T1, T2, T3, B1/P, B1/R, B2, 12 ~ 10 M4 1010 M4 10L1, L2, L3, T1, T2, T3, B1/P, B1/R, B2, 8 M4 1010 ~ 8 M4 10L1, L2, L3, T1, T2, T3, B1/P, B1/R, B2, 8 M4 1010 ~ 8 M4 10L1, L2, L3, T1, T2, T3, B1/P B2, 8 ~ 6 M6 3010 ~ 8 M6 35L1, L2, L3, T1, T2, T3, B1/P, B2, 8 ~ 6 M6 3010 ~ 8 M6 35L1, L2, L3, T1, T2, T3, , 4 M6 356 M6 35L1, L2, L3, T1, T2, T3, , 2 M8 786 M10 156L1, L2, L3, T1, T2, T3, , 2/0 M8 784 M10 156~, 15V, VIN, AIN, AUX, AO1, AO2RA, RB, RC, DO1, DO2, (or R2A, R2C)24~14 M2.6 4App-12
(B) 460V Class (NEMA1)CircuitMainCircuitControlCircuitInverterRating(HP)12357.5101520253040506075AllseriesTerminals MarkCable Size(AWG)TerminalsTighteningTorque(Pound-inch)L1, L2, L3, T1, T2, T3 14 ~ 10 M4 1014 ~ 10 M4 10L1, L2, L3, T1, T2, T3 14 ~ 10 M4 1014 ~ 10 M4 10L1, L2, L3, T1, T2, T3, B1/P, B2, 14 ~ 10 M4 1014 ~ 10 M4 10L1, L2, L3, T1, T2, T3, B1/P, B2, 14 ~ 10 M4 1012 ~ 10 M4 10L1, L2, L3, T1, T2, T3, B1/P, B1/R, B2, 12 ~ 10 M4 1012 ~ 10 M4 10L1, L2, L3, T1, T2, T3, B1/P, B1/R, B2, 10 M4 1010 M4 10L1, L2, L3, T1, T2, T3, B1/P, B2, 10 ~ 8 M6 1512 ~ 10 M6 35L1, L2, L3, T1, T2, T3, B1/P, B2, 10 ~ 8 M6 1512 ~ 10 M6 35L1, L2, L3, T1, T2, T3, , 8 M6 358 M6 35L1, L2, L3, T1, T2, T3, , 6 M6 358 M6 35L1, L2, L3, T1, T2, T3, , 4 M8 788 M10 156L1, L2, L3, T1, T2, T3, , 4 M8 786 M10 156L1, L2, L3, T1, T2, T3, , 2 M8 786 M10 156L1, L2, L3, T1, T2, T3, , 2/0 M8 784 M10 156~, 15V, VIN, AIN, AUX, AO1, AO2RA, RB, RC, DO1, DO2, (or R2A, R2C)24~14 M2.6 4App-13
(C) 230V Class (NEMA4)CircuitInverterTighteningCable SizeRatingTerminals MarkTerminals Torque(AWG)(HP)(Pound-inch)1L1, L2, L3, T1, T2, T3, B1/P, B1/R, B2, 14 ~ 10 M4 1014 ~ 10 M4 102L1, L2, L3, T1, T2, T3, B1/P, B1/R, B2, 14 ~ 10 M4 1012 ~ 10 M4 103L1, L2, L3, T1, T2, T3, B1/P, B1/R, B2, 12 ~ 10 M4 1012 ~ 10 M4 10L1, L2, L3, T1, T2, T3, B1/P, B1/R, B2, 12 ~ 10 M4 105Main10 M4 10CircuitL1, L2, L3, T1, T2, T3, B1/P, B1/R, B2, 8 M4 107.510 ~ 8 M4 1010L1, L2, L3, T1, T2, T3, B1/P, B1/R, B2, 8 M4 1010 ~ 8 M4 1015L1, L2, L3, T1, T2, T3, B1/P B2, 4 M6 358 M6 3520L1, L2, L3, T1, T2, T3, B1/P, B2, 2 M6 358 M6 35Control All ~, 15V, VIN, AIN, AUX, AO1, AO2Circuit series RA, RB, RC, DO1, DO2, (or R2A, R2C)24~14 M2.6 4(D) 460V Class (NEMA4)CircuitInverterTighteningCable SizeRatingTerminals MarkTerminals Torque(AWG)(HP)(Pound-inch)1L1, L2, L3, T1, T2, T3, B1/P, B1/R, B2, 14 ~ 10 M4 1014 ~ 10 M4 102L1, L2, L3, T1, T2, T3, B1/P, B1/R, B2, 14 ~ 10 M4 1014 ~ 10 M4 103L1, L2, L3, T1, T2, T3, B1/P, B1/R, B2, 14 ~ 10 M4 1014 ~ 10 M4 10L1, L2, L3, T1, T2, T3, B1/P, B1/R, B2, 14 ~ 10 M4 105Main12 ~ 10 M4 10CircuitL1, L2, L3, T1, T2, T3, B1/P, B1/R, B2, 12 ~ 10 M4 107.512 ~ 10 M4 1010L1, L2, L3, T1, T2, T3, B1/P, B1/R, B2, 10 M4 1010 M4 1015L1, L2, L3, T1, T2, T3, B1/P, B1/R, B2, 12 ~ 10 M6 3512 ~ 10 M6 3520L1, L2, L3, T1, T2, T3, B1/P, B1/R, B2, 10 M6 3510 M6 35Control All ~, 15V, VIN, AIN, AUX, AO1, AO2Circuit series RA, RB, RC, DO1, DO2, (or R2A, R2C)24~14 M2.6 4App-14
I. Spare Parts(A) 230V Class (NEMA1)INVERTER & PARTS NAMEHP MODEL SPEC.CONTROL PCBOARDPOWERBOARDPower Module(IGBT)Diode Module1 MA7200-2001-N12 MA7200-2002-N13 MA7200-2003-N15 MA7200-2005-N17.5 MA7200-2007-N110 MA7200-2010-N115 MA7200-2015-N120 MA7200-2020-N125 MA7200-2025-N130 MA7200-2030-N140 MA7200-2040-N1MODEL - - CM15MDL-12HCODE 4P101C0120005 *1 4P106C01600A1 277830540Q’TY 1 1 1MODEL - - CM20MDL-12HCODE 4P101C0120005 *1 4P106C0160003 3K3A2471Q’TY 1 1 1MODEL - - 7MBR30SA060CODE 4P101C0130001 *2 4P106C01800B1 3K3A2624Q’TY 1 1 1MODEL - - 7MBR50SA060CODE 4P101C0130001 *2 4P106C01800C9 3K3A2627Q’TY 1 1 1MODEL - - 7MBP50RA060 DF75LA80CODE 4P101C0130001 *2 4P106C0210001 277831660 4M903D1480016Q’TY 1 1 1 1MODEL - - 7MBP75RA060 DF75LA80CODE 4P101C0130001 *2 4P106C0220006 277831678 4M903D1480016Q’TY 1 1 1 1MODEL - - 7MBP100RTA060 DF100BA80CODE 4P101C0130001 *2 4P106C01500A6 277831694 277192209Q’TY 1 1 1 1MODEL - - 7MBP160RTA060 DF150BA80CODE 4P101C0130001 *2 4P106C01500B4 277831708 277192179Q’TY 1 1 1 1MODEL - - MIG200J6CMB1W SKKH42/16ECODE 4P101C0130001 *2 4P106C03300B2 277830086 277112311Q’TY 1 1 1 3MODEL - - SKM195GB063DN SKKH57/16ECODE 4P101C0130001 *2 4P106C04000A2 277810654 277112329Q’TY 1 1 3 3MODEL - - SKM300GB063DN SKKH72/16ECODE 4P101C0130001 *2 4P106C04000A2 277810662 277112337Q’TY 1 1 3 3*1 : For old version, code no. is 4P101C0040001.*2 : For old version, code no. is 4P101C0060002.App-15
INVERTER & PARTS NAMEHP MODEL SPEC.COOLING FANResistor1 MA7200-2001-N12 MA7200-2002-N13 MA7200-2003-N15 MA7200-2005-N17.5 MA7200-2007-N110 MA7200-2010-N115 MA7200-2015-N120 MA7200-2020-N125 MA7200-2025-N130 MA7200-2030-N140 MA7200-2040-N1MODEL KD1204PFBX N20SP-12-Y2CODE 4M903D0880002 3M903D1820000Q’TY 1 1MODEL KD1204PFBX N20SP-12-Y2CODE 4M903D0880002 3M903D1820000Q’TY 1 1MODEL AFB0624H 8W/12ΩCODE 4H300D0190012 4M903D0180086Q’TY 1 2MODEL AFB0624H 8W/12ΩCODE 4H300D0190012 4M903D0180086Q’TY 1 2MODEL AFB0824VH 8W/6.2Ω 8W/6.2ΩCODE 4H300D0200018 4M903D0180078 4M903D2330018Q’TY 1 1 1MODEL AFB0824VH 8W/6.2Ω 8W/6.2ΩCODE 4H300D0200018 4M903D0180078 4M903D2330018Q’TY 1 1 1MODEL AFB0824SH-B 60W/2.2ΩCODE 4H300D3340007 3H300D2350005Q’TY 1 1MODEL AFB0824SH-B 60W/2.2ΩCODE 4H300D3340007 3H300D2350005Q’TY 1 1MODEL PMD2408PMB1-A KD2406PTB1 60W/120ΩCODE 4H300D6050000 4H300D6060013 3K3A4880Q’TY 2 1 1MODEL PSD2412PMB1 KD2406PTB1 60W/120ΩCODE 4H300D6040004 4H300D6060021 3K3A4880Q’TY 2 1 1MODEL PSD2412PMB1 KD2406PTB1 60W/120ΩCODE 4H300D6040004 4H300D6060021 3K3A4880Q’TY 2 1 1App-16
INVERTER & PARTS NAMEHP MODEL SPEC.Relay DCCT Capacitor OPERATOR1 MA7200-2001-N12 MA7200-2002-N13 MA7200-2003-N15 MA7200-2005-N17.5 MA7200-2007-N110 MA7200-2010-N115 MA7200-2015-N120 MA7200-2020-N125 MA7200-2025-N130 MA7200-2030-N140 MA7200-2040-N1MODEL 0Z-SS-112LM LX-7.5 330uF/400V JNEP-36 *3CODE 271608055 3K3A2468 3K3A1868 4H300C0050000 *3Q’TY 1 2 3 1MODEL 0Z-SS-112LM HY-10P 330uF/400V JNEP-36 *3CODE 271608055 273014331 3K3A1868 4H300C0050000 *3Q’TY 1 2 4 1MODEL 841-S-1A-D-H-24VDC SY-15T 470uF/400v JNEP-36 *3CODE 271608969 3M903D1420001 4M903D0300022 4H300C0050000 *3Q’TY 1 3 4 1MODEL 841-S-1A-D-H-24VDC SY-25T2 470uF/400v JNEP-36 *3CODE 271608969 3M903D3860009 4M903D0300022 4H300C0050000 *3Q’TY 1 3 4 1MODEL 841-S-2A-D-H-24VDC HY37-P 1500uF/400V JNEP-36 *3CODE 271608977 4M903D1020015 4M903D0310010 4H300C0050000 *3Q’TY 1 3 2 1MODEL 841-S-2A-D-H-24VDC HY50-P 1800uF/400V JNEP-36 *3CODE 271608977 4M903D1020023 4M903D0310010 4H300C0050000 *3Q’TY 1 3 2 1MODEL G7J-4A-B-DC24V HC-PT075V4B15 3300uF/400V JNEP-36 *3CODE 3K3A2390 3M903D4030034 4M903D0310061 4H300C0050000 *3Q’TY 1 1 2 1MODEL G7J-4A-B-DC24V HC-PT100V4B15 4400uF/400V JNEP-36 *3CODE 3K3A2390 3M903D4030042 4M903D0310052 4H300C0050000 *3Q’TY 1 1 2 1MODEL 942H-2C-24-DS L08P150D15 400V/6800uF JNEP-36 *3CODE 4M903D2800006 4M903D3960031 4M903D4110007 4H300C0050000 *3Q’TY 1 3 2 1MODEL 942H-2C-24-DS CT/Board CAP./Board JNEP-36 *3CODE 4M903D2800006 4P108C00800A2 4P108C0050008 4H300C0050000 *3Q’TY 1 1 1 1MODEL 942H-2C-24-DS CT/Board CAP./Board JNEP-36 *3CODE 4M903D2800006 4P108C0090000 4P108C0060003 4H300C0050000 *3Q’TY 1 1 1 1*3 : For old version, code no. is 4H300C0020003 (JNEP-31V).App-17
(B) 460V Class (NEMA1)INVERTER & PARTS NAMEHP MODEL SPEC.1 MA7200-4001-N12 MA7200-4002-N13 MA7200-4003-N15 MA7200-4005-N17.5 MA7200-4007-N110 MA7200-4010-N115 MA7200-4015-N120 MA7200-4020-N125 MA7200-4025-N130 MA7200-4030-N140 MA7200-4040-N150 MA7200-4050-N160 MA7200-4060-N175 MA7200-4075-N1CONTROL PCBOARD*1 : For old version, code no. is 4P101C0040001.*2 : For old version, code no. is 4P101C0060002.POWERBOARDPower Module(IGBT)Diode ModuleMODEL - - CM10MDL-24HCODE 4P101C0120005 *1 4P106C0250002 3K3A2473Q’TY 1 1 1MODEL - - CM10MDL-24HCODE 4P101C0120005 *1 4P106C02500A1 3K3A2473Q’TY 1 1 1MODEL - 7MBR15SA120CODE 4P101C0130001 *2 4P106C0240007 277831643Q’TY 1 1 1MODEL - - 7MBR25SA120CODE 4P101C0130001 *2 4P106C02400A5 277831651Q’TY 1 1 1MODEL - 7MBP50RA120 6RI30G-160CODE 4P101C0130001 *2 4P106C0110006 277831686 277191067Q’TY 1 1 1 1MODEL - 7MBP50RA120 6RI30G-160CODE 4P101C0130001 *2 4P106C0110006 277831686 277191067Q’TY 1 1 1 1MODEL - 7MBP75RA120 DF75AA160CODE 4P101C0130001 *2 4P106C0150008 277831538 277192128Q’TY 1 1 1MODEL - 7MBP75RA120 DF75AA160CODE 4P101C0130001 *2 4P106C0150016 277831538 277192128Q’TY 1 1 1 1MODEL - MIG100Q6CMB1X SKKH42/16ECODE 4P101C0130001 *2 4P106C0330006 277830094 277112311Q’TY 1 1 1 3MODEL - MIG150Q6CMB1X SKKH42/16ECODE 4P101C0130001 *2 4P106C03300A4 277830108 277112311Q’TY 1 1 1 3MODEL - SKM145GB128DN SKKH42/16ECODE 4P101C0130001 *2 4P106C0400007 277810620 277112311Q’TY 1 1 3 3MODEL - CM200DY-24A SKKH57/16ECODE 4P101C0130001 *2 4P106C0400007 277810336 277112329Q’TY 1 1 3 3MODEL - SKM300GB128D SKKH72/16ECODE 4P101C0130001 *2 4P106C0410000 277810646 277112337Q’TY 1 1 3 3MODEL - SKM300GB128D SKKH92/16ECODE 4P101C0130001 *2 4P106C0410000 277810646 277112345Q’TY 1 1 3 3App-18
INVERTER & PARTS NAMEHP MODEL SPEC.1 MA7200-4001-N12 MA7200-4002-N13 MA7200-4003-N15 MA7200-4005-N17.5 MA7200-4007-N110 MA7200-4010-N115 MA7200-4015-N120 MA7200-4020-N125 MA7200-4025-N130 MA7200-4030-N140 MA7200-4040-N150 MA7200-4050-N160 MA7200-4060-N175 MA7200-4075-N1COOLING FANResistorMODEL KD1204PFBX 5W/40ΩCODE 4M903D0880002 3M112Z0010006Q’TY 1 2MODEL KD1204PFBX 5W/40ΩCODE 4M903D0880002 3M112Z0010006Q’TY 1 2MODEL AFB0624H 8W/120ΩCODE 4H300D0190004 4M903D0180060Q’TY 1 1MODEL AFB0624H 8W/120ΩCODE 4H300D0190004 4M903D0180060Q’TY 1 1MODEL AFB0824SH 10W/16Ω 10W/16ΩCODE 4H300D0200000 4M903D0190022 4M903D2330026Q’TY 1 1 1MODEL AFB0824SH 10W/16Ω 10W/16ΩCODE 4H300D0200000 4M903D0190022 4M903D2330026Q’TY 1 1 1MODEL AFB0824SH 80W/6.2 ΩCODE 4H300D1440004 3H300D2360001Q’TY 1 1MODEL AFB0824SH 80W/6.2 ΩCODE 4H300D1440004 3H300D2360001Q’TY 1 1MODEL EEB0824EHE ASB0624H-B 60W/240ΩCODE 4H300D5590001 4H300D6060013 3K3A4879Q’TY 2 1 1MODEL EEB0824EHE ASB0624H-B 60W/240ΩCODE 4H300D6050000 4H300D6060013 3K3A4879Q’TY 2 1 1MODEL PSD2412PMB1 KD2406PTB1 60W/240ΩCODE 4H300D6040004 4H300D6060021 3K3A4881Q’TY 2 1 1MODEL PSD2412PMB1 KD2406PTB1 60W/240ΩCODE 4H300D6040004 4H300D6060021 3K3A4881Q’TY 2 1 1MODEL PSD2412PMB1 KD2406PTB1 60W/240ΩCODE 4H300D6040004 4H300D6060021 3K3A4881Q’TY 2 1 1MODEL PSD2412PMB1 KD2406PTB1 60W/240ΩCODE 4H300D6040004 4H300D6060021 3K3A4881Q’TY 2 1 1App-19
INVERTER & PARTS NAMEHP MODEL SPEC.Relay DCCT Capacitor OPERATORMODEL RT444012 TB5A 4V 330uF/400V JNEP-36 *31 MA7200-4001-N1 CODE 4M903D1040008 4M903D2210012 3K3A1868 4H300C0050000 *3Q’TY 1 2 2 1MODEL RT444012 TB5A 4V 330uF/400V JNEP-36 *32 MA7200-4002-N1 CODE 4M903D1040008 4M903D2210012 3K3A1868 4H300C0050000 *3Q’TY 1 2 4 1MODEL 953-1A-24DG-DC24V HC-PSG075V4B15 330uF/400V JNEP-36 *33 MA7200-4003-N1 CODE 271603711 4M903D2220026 4M903D0300014 4H300C0050000 *3Q’TY 1 3 4 1MODEL 953-1A-24DG-DC24V HC-PSG125V4B15 560uF/400V JNEP-36 *35 MA7200-4005-N1 CODE 271603711 4M903D2220042 4M903D0300031 4H300C0050000 *3Q’TY 1 3 4 1MODEL 841-S-2A-D-H TC25A 4V 2200uF/400V JNEP-36 *37.5 MA7200-4007-N1 CODE 271608977 4M903D2210063 4M903D0310036 4H300C0050000 *3Q’TY 1 3 2 1MODEL 841-S-2A-D-H TC25A 4V 2200uF/400V JNEP-36 *310 MA7200-4010-N1 CODE 271608977 4M903D2210063 4M903D0310036 4H300C0050000 *3Q’TY 1 3 2 1MODEL G7J-4A-B-DC24V HC-PT0375V4B15 3300uF/400V JNEP-36 *315 MA7200-4015-N1 CODE 3K3A2390 3M903D4030018 4M903D0310061 4H300C0050000 *3Q’TY 1 1 2 1MODEL G7J-4A-B-DC24V HC-PT050V4B15 4400uF/400V JNEP-36 *320 MA7200-4020-N1 CODE 3K3A2390 3M903D4030026 4M903D0310052 4H300C0050000 *3Q’TY 1 1 2 1MODEL 942H-2C-24-DS L08P075D15 400V/6800uF JNEP-36 *325 MA7200-4025-N1 CODE 4M903D2800006 4M903D3960015 4M903D4110007 4H300C0050000 *3Q’TY 1 3 2 1MODEL 942H-2C-24-DS L08P100D15 400V/6800uF JNEP-36 *330 MA7200-4030-N1 CODE 4M903D2800006 4M903D3960023 4M903D4110007 4H300C0050000 *3Q’TY 1 3 2 1MODEL 942H-2C-24-DS CT/Board CAP./Board JNEP-36 *340 MA7200-4040-N1 CODE 4M903D2800006 4P108C0080004 4P108C0040002 4H300C0050000 *3Q’TY 1 1 1 1MODEL 942H-2C-24-DS CT/Board CAP./Board JNEP-36 *350 MA7200-4050-N1 CODE 4M903D2800006 4P108C00800A2 4P108C00400A1 4H300C0050000 *3Q’TY 1 1 1 1MODEL 942H-2C-24-DS CT/Board CAP./Board JNEP-36 *360 MA7200-4060-N1 CODE 4M903D2800006 4P108C0100005 4P108C0020001 4H300C0050000 *3Q’TY 1 1 1 1MODEL 942H-2C-24-DS CT/Board CAP./Board JNEP-36 *375 MA7200-4075-N1 CODE 4M903D2800006 4P108C0100005 4P108C00200A0 4H300C0050000 *3Q’TY 1 1 1 1*3 : For old version, code no. is 4H300C0020003 (JNEP-31V).App-20
(C) 230V Class (NEMA4)INVERTER & PARTS NAMEHP MODEL SPEC.ControlPC BoardPower BoardRectifierBoardMain CircuitTransistorMODEL - - - CM15MDL-12H1 MA7200-2001-N42 MA7200-2002-N43 MA7200-2003-N45 MA7200-2005-N47.5 MA7200-2007-N410 MA7200-2010-N415 MA7200-2015-N420 MA7200-2020-N4CODE 4P101C0120005 4P106C01600A1 - 277830540Q’TY 1 1 - 1MODEL - - - CM20MDL-12HCODE 4P101C0120005 4P106C0160003 - 277830558Q’TY 1 1 - 1MODEL - - - 7MBP50RA060CODE 4P101C01300014P106C04900B04P106C05000B5- 277831660Q’TY 1 1 - 1MODEL - - - 7MBP50RA060CODE 4P101C01300014P106C04900B04P106C05000B5- 277831660Q’TY 1 1 - 1MODEL - - - 7MBP50RA060CODE 4P101C0130001 4P106C01500C2 4P106C0480008 277831660Q’TY 1 1 1 1MODEL - - - 7MBP75RA060CODE 4P101C0130001 4P106C01500D1 4P106C0480008 277831678Q’TY 1 1 1 1MODEL - - - PM100RSE060CODE 4P101C0130001 4P106C01500A6 4P106C0470002 277820242Q’TY 1 1 1 1MODEL - - - PM150RSE060CODE 4P101C0130001 4P106C01500B4 4P106C0470002 277820251Q’TY 1 1 1 1App-21
INVERTER & PARTS NAMEHP MODEL SPEC.MainCircuit DiodeCooling Fan( inside )Cooling Fan( outside )OperatorMODEL - KD1204PFBX - JNEP-361 MA7200-2001-N42 MA7200-2002-N43 MA7200-2003-N4CODE - 4M903D0880002 - 4P303C00100B7Q’TY - 1 - 1MODEL - KD1204PFBX - JNEP-36CODE - 4M903D0880002 - 4P303C00100B7Q’TY - 1 - 1MODEL DB35-16 AD0424HB-G70(T) KD2406PTB1 JNEP-36CODE 4M903D4410001 4M903D4630001 4M903D4640006 4P303C00100B7Q’TY 1 1 2 1MODEL DB35-16 AD0424HB-G70(T) KD2406PTB1 JNEP-365 MA7200-2005-N47.5 MA7200-2007-N410 MA7200-2010-N415 MA7200-2015-N420 MA7200-2020-N4CODE 4M903D4410001 4M903D4630001 4M903D4640006 4P303C00100B7Q’TY 1 1 2 1MODEL VVZ 70-16 AFB0624H PMD2408PMB1-A(2)I55 JNEP-36CODE 277111331 4H300D0250009 4H300D0190004 4P303C00100B7Q’TY 1 1 2 1MODEL VVZ 70-16 AFB0624H PMD2408PMB1-A(2)I55 JNEP-36CODE 277111331 4H300D0250009 4H300D0190004 4P303C00100B7Q’TY 1 1 2 1MODEL VVZ110-12 AFB0624H PMD2408PMB1-A(2)I55 JNEP-36CODE 277111314 4H300D0250009 4H300D0190004 4P303C00100B7Q’TY 1 1 2 1MODEL VVZ175-12 AFB0624H PMD2408PMB1-A(2)I55 JNEP-36CODE 277111314 4H300D0250009 4H300D0190004 4P303C00100B7Q’TY 1 1 2 1App-22
(D) 460V Class (NEMA4)INVERTER & PARTS NAMEHP MODEL SPEC.ControlPC BoardPower BoardRectifier BoardMain CircuitTransistorMODEL - - - CM10MDL-24H1 MA7200-4001-N42 MA7200-4002-N43 MA7200-4003-N45 MA7200-4005-N47.5 MA7200-4007-N410 MA7200-4010-N415 MA7200-4015-N420 MA7200-4020-N4CODE 4P101C0120005 4P106C0250002 - 277840049Q’TY 1 1 - 1MODEL - - - CM10MDL-24HCODE 4P101C0120005 4P106C02500A1 - 277840049Q’TY 1 1 - 1MODEL - - - 7MBP25RA120CODE 4P101C01300014P106C04900114P106C0500017- 277831716Q’TY 1 1 - 1MODEL - - - 7MBP25RA120CODE 4P101C01300014P106C04900034P106C0500009- 277831716Q’TY 1 1 - 1MODEL - - - 7MBP50RA120CODE 4P101C0130001 4P106C0150016 4P106C0460007 277831686Q’TY 1 1 1 1MODEL - - - 7MBP50RA120CODE 4P101C0130001 4P106C0150016 4P106C0460007 277831686Q’TY 1 1 1 1MODEL - - - 7MBP75RA120CODE 4P101C0130001 4P106C0150008 4P106C0450001 277831538Q’TY 1 1 1 1MODEL - - - 7MBP75RA120CODE 4P101C0130001 4P106C0150016 4P106C0450001 277831538Q’TY 1 1 1 1App-23
INVERTER & PARTS NAMEHP MODEL SPEC.MainCircuit DiodeCooling Fan( inside )Cooling Fan( outside )OperatorMODEL - KD1204PFBX - JNEP-361 MA7200-4001-N42 MA7200-4002-N43 MA7200-4003-N4CODE - 4M903D0880002 - 4P303C00100B7Q’TY - 1 - 1MODEL - KD1204PFBX - JNEP-36CODE - 4M903D0880002 - 4P303C00100B7Q’TY - 1 - 1MODEL DB35-16 AD0424HB-G70(T) KD2406PTB1 JNEP-36CODE 4M903D4410001 4M903D4630001 4M903D4640006 4P303C00100B7Q’TY 1 1 2 1MODEL DB35-16 AD0424HB-G70(T) KD2406PTB1 JNEP-365 MA7200-4005-N47.5 MA7200-4007-N410 MA7200-4010-N415 MA7200-4015-N420 MA7200-4020-N4CODE 4M903D4410001 4M903D4630001 4M903D4640006 4P303C00100B7Q’TY 1 1 2 1MODEL VVZ40-16 AFB0624H PMD2408PMB1-A(2)I55 JNEP-36CODE 27711349 4H300D0250009 4H300D0190004 4P303C00100B7Q’TY 1 1 2 1MODEL VVZ40-16 AFB0624H PMD2408PMB1-A(2)I55 JNEP-36CODE 27711349 4H300D0250009 4H300D0190004 4P303C00100B7Q’TY 1 1 2 1MODEL VVZ 70-16 AFB0624H PMD2408PMB1-A(2)I55 JNEP-36CODE 277111331 4H300D0250009 4H300D0190004 4P303C00100B7Q’TY 1 1 2 1MODEL VVZ 70-16 AFB0624H PMD2408PMB1-A(2)I55 JNEP-36CODE 277111331 4H300D0250009 4H300D0190004 4P303C00100B7Q’TY 1 1 2 1App-24
J. Electrical Ratings For Constant Torque and Quadratic TorqueConstant Torque (150%, 1minute)Quadratic Torque (110%, 1minute)MA7200 ModelMax. Applic.Motor OutputHP (kW)Rated OutputCurrent(A)Max. SwitchingFreq.(kHz)Max. Applic.Motor OutputHP (kW)Rated OutputCurrent(A)Max. SwitchingFreq.(kHz)MA7200-2001-N1 1 (0.75) 4.8 A 15 1 (0.75) 5.6 A 10MA7200-2002-N1 2 (1.5) 6.4 A 15 2 (1.5) 7.6 A 5MA7200-2003-N1 3 (2.2) 9.6 A 15 3 (2.2) 9.8 A 15MA7200-2005-N1 5.4 (4) 17.5 A 15 7.5 (5.5) 22.7 A 5MA7200-2007-N1 7.5 (5.5) 24 A 15 10 (7.5) 32 A 10MA7200-2010-N1 10 (7.5) 32 A 15 10 (7.5) 32 A 15MA7200-2015-N1 15 (11) 48 A 10 20 (15) 56.7 A 5MA7200-2020-N1 20 (15) 64 A 10 25 (18.5) 70.9 A 5MA7200-2025-N1 25 (18.5) 80 A 10 25 (18.5) 80 A 10MA7200-2030-N1 30 (22) 96 A 10 40 (30) 108 A 5MA7200-2040-N1 40 (30) 130 A 10 40 (30) 130 A 10MA7200-4001-N1 1 (0.75) 2.6 A 15 1 (0.75) 2.9 A 5MA7200-4002-N1 2 (1.5) 4 A 15 2 (1.5) 4.6 A 5MA7200-4003-N1 3 (2.2) 4.8 A 15 3 (2.2) 4.9 A 15MA7200-4005-N1 5.4 (4) 8.7 A 15 7.5 (5.5) 12.5 A 5MA7200-4007-N1 7.5 (5.5) 12 A 15 10 (7.5) 15.4 A 10MA7200-4010-N1 10 (7.5) 15 A 15 15 (11) 22.7 A 5MA7200-4015-N1 15 (11) 24 A 10 20 (15) 30.3 A 5MA7200-4020-N1 20 (15) 32 A 10 25 (18.5) 38 A 5MA7200-4025-N1 25 (18.5) 40 A 10 30 (22) 44 A 5MA7200-4030-N1 30 (22) 48 A 10 30 (22) 48 A 10MA7200-4040-N1 40 (30) 64 A 10 50 (37) 71 A 5MA7200-4050-N1 50 (37) 80 A 10 50 (37) 80 A 10MA7200-4060-N1 60 (45) 96 A 10 75 (55) 108 A 5MA7200-4075-N1 75 (55) 128 A 10 100 (75) 140 A 5ItemConstant TorqueCommon detailsQuadratic TorqueOutput Overload 150% for 60s 110% for 60sOperation AmbientTemperatureAllowable VoltageFluctuation+14 ~ 104°F +14 ~ 104°F-15% ~ +10% -15% ~ +10%Output Frequency 0.5Hz ~ 400Hz 0.5Hz ~ 400HzV/F curve Dependent on parameter setting Quadratic (or Cubic) TorqueApp-25
K. Inverter Heat Loss(A) 200 to 230VModelMA7200- XXXX-N12001 2002 2003 2005 2007 2010 2015 2020 2025 2030 2040Inverter Capacity kVA 2 2.7 4 7.5 10.1 13.7 20.6 27.4 34 41 54Rated Current A 4.8 6.4 9.6 17.5 24 32 48 64 80 96 130Heat Loss WFin 11 13 30 40 66 77 86 121 145 246 335Inside Unit 65 77 185 248 409 474 529 742 889 1510 2059Total Heat Loss 76 90 215 288 475 551 615 863 1034 1756 2394(B) 380 to 460VModelMA7200- XXXX-N14001 4002 4003 4005 4007 4010 4015 4020 4025 4030 4040 4050 4060 4075Inverter Capacity kVA 2.2 3.4 4.1 7.5 10.3 12.3 20.6 27.4 34 41 54 68 82 110Rated Current A 2.6 4 4.8 8.7 12 15 24 32 40 48 64 80 96 128Heat Loss WFin 16 21 41 45 64 72 126 157 198 236 262 324 369 481Inside Unit 99 129 249 278 393 442 772 965 1218 1449 1608 1993 2270 2957Total Heat Loss 115 150 290 323 457 514 898 1122 1416 1685 1870 2317 2639 3438App-26
DISTRIBUTED BY:5100 NORTH IH-35 ROUND ROCK, TEXAS 78681www.tecowestinghouse.com 03/14/2005