EQ5 Quick Startup Guide Constant Torque - TECO-Westinghouse ...
EQ5 Quick Startup Guide Constant Torque - TECO-Westinghouse ...
EQ5 Quick Startup Guide Constant Torque - TECO-Westinghouse ...

You also want an ePaper? Increase the reach of your titles
YUMPU automatically turns print PDFs into web optimized ePapers that Google loves.
<strong>EQ5</strong> SERIES<strong>Quick</strong> Start <strong>Guide</strong>for <strong>Constant</strong> <strong>Torque</strong> ApplicationsPN <strong>EQ5</strong>QSCT, Revision: 0.02, April 4 th 2009
<strong>EQ5</strong> Drive <strong>Quick</strong> Start <strong>Guide</strong> for <strong>Constant</strong> <strong>Torque</strong> ApplicationsContentsPageIntroduction ................................................................................................................................. 31. <strong>EQ5</strong> Model Identification and Mounting ............................................................................... 42. Input Power and Motor Connection ...................................................................................... 73. Check Motor Rotation and Direction ..................................................................................... 84. Speed Reference Configuration ............................................................................................ 95. Run / Stop Configuration ..................................................................................................... 146. Digital Operator Panel .......................................................................................................... 187. Motor and Application Specific Settings ............................................................................ 21<strong>TECO</strong> <strong>Westinghouse</strong> Motor Company <strong>EQ5</strong> <strong>Quick</strong> Start <strong>Guide</strong> 2
<strong>EQ5</strong> Drive <strong>Quick</strong> Start <strong>Guide</strong> for <strong>Constant</strong> <strong>Torque</strong> ApplicationsIntroductionThis <strong>Quick</strong> Start <strong>Guide</strong> is a supplement to other documentation supplied with this equipmentand will help the user in properly wiring the <strong>EQ5</strong> and motor. This <strong>Quick</strong> Start guide is for usewith installing and setting up the <strong>EQ5</strong> drive for Industrial Applications (<strong>Constant</strong> torque, such asConveyor belts, Extruders, Punch Press, etc…)Warning / Danger: Improper wiring can and will cause bodily harm as well asdamage to the equipmentWhen installing the system be sure to follow good wiring practices and all applicable codes.Ensure that the mounting of the various components are secure and that the environment, suchas extreme dampness, poor ventilation etc. will not cause system degradation.Please read this quick start guide in combination with the <strong>EQ5</strong> Operations Manual(Document No. TWMC-<strong>EQ5</strong>OM provided with the <strong>EQ5</strong> thoroughly before attempting anyinstallation.<strong>TECO</strong> <strong>Westinghouse</strong> Motor Company <strong>EQ5</strong> <strong>Quick</strong> Start <strong>Guide</strong> 3
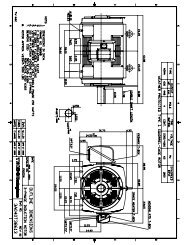
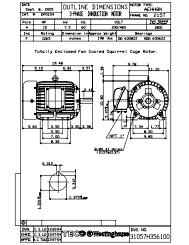
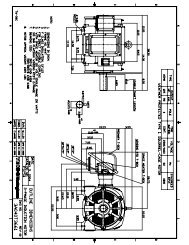
<strong>EQ5</strong> Drive <strong>Quick</strong> Start <strong>Guide</strong> for <strong>Constant</strong> <strong>Torque</strong> Applications1. <strong>EQ5</strong> Model Identification and MountingIt is essential to verify the <strong>EQ5</strong> drive nameplate and make sure that the <strong>EQ5</strong> drive has thecorrect rating so it can be used with your motor. Please check the <strong>EQ5</strong> nameplate informationas shown in the example below.• Check that the input voltage range meets the input power requirements.• Ensure that the <strong>Constant</strong> <strong>Torque</strong> FLA and Output Voltage rating on the <strong>EQ5</strong> drive labelmeets the motor requirements (nameplate).1.2 MountingMounting of the <strong>EQ5</strong> drive is extremely important for accessibility as well as for the environment.Various <strong>EQ5</strong> drive models are available and the mounting dimensions (footprint) may bedifferent. Because the mounting procedure is fairly extensive, it is beyond the scope of thisdocument, the user is referred to the <strong>EQ5</strong> Operations Manual (Document No. TWMC-<strong>EQ5</strong>OM)received with the <strong>EQ5</strong>, Chapter 2 Installation and Electrical Connections. Match the modelthat you received and follow the procedure described in the manual to ensure a safe andfunctional installation. In cases where the system has more than one <strong>EQ5</strong> drive, refer to theproper clearances required for adequate ventilation. Please pay particular attention to:• The clearances to be maintained around the enclosure for adequate ventilation.• The environmental specifications such as avoiding excessive dampness, extremetemperatures, chemical exposure, corrosive areas etc. to avoid damage to the equipmentand to maintain safety.<strong>TECO</strong> <strong>Westinghouse</strong> Motor Company <strong>EQ5</strong> <strong>Quick</strong> Start <strong>Guide</strong> 4
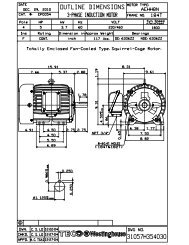
<strong>EQ5</strong> Drive <strong>Quick</strong> Start <strong>Guide</strong> for <strong>Constant</strong> <strong>Torque</strong> ApplicationsFig. 2 Removing the Surface Cover (for inverters rated 30HP/CT, 40HP/VT or less)For drives rated at 40HP/CT, 50HP/VT or more, first remove the six mounting screws, thenremove the cover (see Fig. 3).Fig. 3 Removing the Surface Cover (for inverters rated 40HP/CT, 50HP/VT or more)Removing the digital operatorAfter removing the cover, loosen the mounting screws of the digital operator and remove asshown in Fig.4.Fig. 4 Removing the Digital Operator (30HP/CT, 40HP/VT or less)<strong>TECO</strong> <strong>Westinghouse</strong> Motor Company <strong>EQ5</strong> <strong>Quick</strong> Start <strong>Guide</strong> 5
For drives rated at 40HP/CT, 50HP/VT or above, loosen the mounting screwsof the digital operator and remove using the finger holds on the digital operatorcase (see Fig. 5).Fig. 5 Removing the Digital Operator (40HP/CT, 50HP/VT and above)<strong>TECO</strong> <strong>Westinghouse</strong> Motor Company <strong>EQ5</strong> <strong>Quick</strong> Start <strong>Guide</strong> 6
2. Input Power and Motor ConnectionFig.6 below shows the electrical connections for the input power and motor terminalsfor various <strong>EQ5</strong> models. Verify the input power and motor terminals of the model youare installing. WITH POWER OFF, make the appropriate connections.Make sure to follow good wiring practices and all applicable codes. Ensurethat the equipment is grounded properly as shown.DANGER, LETHAL VOLTAGES ARE PRESENT- Before applying power to the<strong>EQ5</strong> Drive, ensure that the terminal cover is fastened and all wiringconnections are secure. After the power has been turned OFF, wait at leastfive minutes until the charge indicator extinguishes completely beforetouching any wiring, circuit boards or components.WARNING DO NOT CONNECT ANY OF THEFOLLOWING TERMINALS TO EARTH GROUNDDBR/L1 S/L2 T/L3INPUT POWERP1 P(+) N(-)G GU/T1 V/T2 W/T3MOTOR(R/L1)(S/L2)(T/L3)(U/T1)(V/T2)(W/T3)Connect tochassisgroundInputProtection(Fuse or CircuitBreaker)Connect tochassis groundTo change direction ofmotor rotation swap anytwo of the three motorleads (See Step 2)L1 L2 L3Use L1, L2 for1Ø Input Power *Use L1, L2, L3 for3Ø Input Power3Ø InductionmotorConnectframe toground* Make sure the drive is properly sized for single phase input. (consult factory)Fig. 6<strong>TECO</strong> <strong>Westinghouse</strong> Motor Company <strong>EQ5</strong> <strong>Quick</strong> Start <strong>Guide</strong> 7
3. Check Motor Rotation and DirectionThis test is to be performed solely from the <strong>EQ5</strong> keypad. Apply power to the <strong>EQ5</strong>drive after all the electrical connections have been made and protective covers havebeen re-attached. At this point, DO NOT RUN THE MOTOR, the keypad shoulddisplay as shown below in Fig. 3 and the speed reference 0.00 should be blinking.Hz A V % r/min m/min kW X10 X100STOP FWDPRG PRG MENUF / D LED SHIFTFWD REV STOP REM LOC COMM JOGJOG / NORMALPRGSHIFTFWDREVRUNRESETFUNCDATAREMOTE / LOCALSTOPNext use the and keys to set a speed reference of 5.00 Hz, thenpress theFWDbutton.The motor should now be operating at low speed running in forward (clockwise)direction.Next pressSTOPon the keypad to stop the motor.If the motor direction is incorrect, power down the <strong>EQ5</strong> drive.After the power has been turned OFF, wait at least five minutes until thecharge indicator extinguishes completely before touching any wiring, circuitboards or components.Using Safety precaution, and referring to Fig.6, swap any two of the three outputleads to the motor (U/T1, V/T2 and W/T3). After the wiring change, repeat Step 3and recheck motor direction.<strong>TECO</strong> <strong>Westinghouse</strong> Motor Company <strong>EQ5</strong> <strong>Quick</strong> Start <strong>Guide</strong> 8
4. Speed Reference ConfigurationThe <strong>EQ5</strong> offers users several choices to set the speed reference from differentsources. The most commonly used methods are described in the next sections.Frequency reference command is selected with parameter F01.F01 Frequency Command 1This function selects the method by which to set the output frequency.F 0 1 F R E Q C M D 1Setting Range: 0 to 114.1 Reference from Keypad (Default Setting, F01 = 0)Speed reference from digital operator (Keypad) is the default setting. Use theand keys to change the speed reference.Hz A V % r/min m/min kW X10 X100STOP FWDPRG PRG MENUF / D LED SHIFTFWD REV STOP REM LOC COMM JOGJOG / NORMALPRGSHIFTFWDREVRUNRESETFUNCDATAREMOTE / LOCALSTOP<strong>TECO</strong> <strong>Westinghouse</strong> Motor Company <strong>EQ5</strong> <strong>Quick</strong> Start <strong>Guide</strong> 9
4.2 Reference from External Analog Signal (0-10V / 4-20mA) (F01 = 1)Analog Reference: 0 – 10 VCommon T11Analog Input T12GConnect shield toground terminal- +0 – 10 VAnalog Input C1Common T11Connect shield toground terminalG+ -4 – 20 mA<strong>TECO</strong> <strong>Westinghouse</strong> Motor Company <strong>EQ5</strong> <strong>Quick</strong> Start <strong>Guide</strong> 10
Potentiometer (Speed Pot):GCOM+10VAnalog Input T12Connect shield toground terminalPotentiometer1 ~ 5K Ohm4.3 Reference from Serial Communication RS485 (H30 = 2 or 3)To set the speed reference for the <strong>EQ5</strong> via serial communication parameter H30 hasbe set to either a “1” for frequency command via serial communication only or to “3”for Run/Stop (Operation Command) and Frequency Reference (FrequencyCommand).Default Communication Setting is: Address “1”, 9600 Bits/sec, 1 Start Bit, 1 StopBit, and No Parity<strong>TECO</strong> <strong>Westinghouse</strong> Motor Company <strong>EQ5</strong> <strong>Quick</strong> Start <strong>Guide</strong> 11
H30Serial link (Function Select)The serial comm. link function uses RS485 Modbus RTU protocol and allows for:1) Monitoring (data monitoring, function data check).2) Frequency setting.3) Operation command (FWD, REV, and other commands for digital input)4) Write function data.H 3 0 L I N K F U N CSetting range: 0 to 3Set value Frequency command Operation command0 Disabled Disabled1 Enabled Disabled2 Disabled Enabled3 Enabled EnabledFrequency Reference Command Register<strong>EQ5</strong> Frequency Reference Register: 1797 (Decimal)Bit 0 – Bit 15: 0.00 ~ 120.00 HzExamples:Frequency Reference Command: 10.00 Hz (<strong>EQ5</strong> Address: 01)Command String (hexadecimal): 01 06 07 05 03 E8 98 01To set the frequency reference to 10.00, a value of ‘1000’ (03E8h) has to be send tothe <strong>EQ5</strong>Frequency Reference Command: 30.00 Hz (<strong>EQ5</strong> Address: 01)Command String (hexadecimal): 01 06 07 05 0B B8 9F FDTo set the frequency reference to 30.00, a value of ‘3000’ (0BB8h) has to be send tothe <strong>EQ5</strong>Frequency Reference Command: 60.00 Hz (<strong>EQ5</strong> Address: 01)Command String (hexadecimal): 01 06 07 05 17 70 96 AB<strong>TECO</strong> <strong>Westinghouse</strong> Motor Company <strong>EQ5</strong> <strong>Quick</strong> Start <strong>Guide</strong> 12
To set the frequency reference to 60.00, a value of ‘6000’ (1770h) has to be send tothe <strong>EQ5</strong>Note: The last 2 bytes of the command strings consist of a CRC16 checksum,please refer to the <strong>EQ5</strong> Operations Manual (Document No. TWMC-<strong>EQ5</strong>OM),chapter 8 for additional information.<strong>TECO</strong> <strong>Westinghouse</strong> Motor Company <strong>EQ5</strong> <strong>Quick</strong> Start <strong>Guide</strong> 13
5. Run / Stop ConfigurationThe <strong>EQ5</strong> offers users several choices to run and stop the drive from differentsources. The most commonly used methods are described in the next sections.Run/Stop Method is selected with parameter F02.F02Operation MethodThis function sets the operation command input method.F 0 2 O P RM E T H O D5.1 Run/Stop from Keypad (Default Setting, F02 = 0)Run from digital operator (Keypad) is the default setting.Use the Forward key (FWD) to run the drive in forward direction and the Reversekey (REV) to run the drive in reverse direction. (Note: to disable reverse direction setparameter H08 to 1)Use the Stop key (FWD) to stop the drive. (Note: Stop method can be set withparameter H07, default is ramp to stop)Hz A V % r/min m/min kW X10 X100STOP FWDPRG PRG MENUF / D LED SHIFTFWD REV STOP REM LOC COMM JOGJOG / NORMALPRGSHIFTFWDREVRUNRESETFUNCDATAREMOTE / LOCALSTOP<strong>TECO</strong> <strong>Westinghouse</strong> Motor Company <strong>EQ5</strong> <strong>Quick</strong> Start <strong>Guide</strong> 14
5.2 Run/Stop from External Switch / Contact or Pushbutton (F02 = 1)Use an external contact or switch to Run and Stop drive.Permanent Switch / ContactMomentary Contacts (Push Buttons)GConnect shield toground terminalSTARTPUSH BUTTONSTOPPUSH BUTTONNote: Stop method can be set with parameter H07, default is ramp to stop.<strong>TECO</strong> <strong>Westinghouse</strong> Motor Company <strong>EQ5</strong> <strong>Quick</strong> Start <strong>Guide</strong> 15
5.3 Run/Stop from Serial Communication RS485 (H30 = 2 or 3)To Run/Stop (Operation Command) the <strong>EQ5</strong> via serial communication parameterH30 has be set to either a “2” for Run/Stop via serial communication only or to “3”for Run/Stop (Operation Command) and Frequency Reference (FrequencyCommand).Default Communication Setting is: Address “1”, 9600 Bits/sec, 1 Start Bit, 1 StopBit, and No ParityH30Serial link (Function Select)The serial comm. link function uses RS485 Modbus RTU protocol and allows for:1) Monitoring (data monitoring, function data check).2) Frequency setting.3) Operation command (FWD, REV, and other commands for digital input)4) Write function data.H 3 0 L I N K F U N CSetting range: 0 to 3Set value Frequency command Operation command0 Disabled Disabled1 Enabled Disabled2 Disabled Enabled3 Enabled Enabled<strong>TECO</strong> <strong>Westinghouse</strong> Motor Company <strong>EQ5</strong> <strong>Quick</strong> Start <strong>Guide</strong> 16
Command Register<strong>EQ5</strong> Command Register: 1798 (Decimal)Bit 0: Run ForwardBit 1: Run ReverseBit 2 ~ Bit 15: Refer to <strong>EQ5</strong> AC Drive Operations Manual (chapter 8)Examples:Run Forward Command (<strong>EQ5</strong> Address: 01)Command String (hexadecimal): 01 06 07 06 00 01 A9 7FRun Reverse Command (<strong>EQ5</strong> Address: 01)Command String (hexadecimal): 01 06 07 06 00 02 E9 7EStop Command (<strong>EQ5</strong> Address: 01)Command String (hexadecimal): 01 06 07 06 00 00 68 BFNote: The last 2 bytes of the command strings consist of a CRC16 checksum,please refer to the <strong>EQ5</strong> Operations Manual (Document No. TWMC-<strong>EQ5</strong>OM),chapter 8 for additional information.<strong>TECO</strong> <strong>Westinghouse</strong> Motor Company <strong>EQ5</strong> <strong>Quick</strong> Start <strong>Guide</strong> 17
6. Digital Operator PanelThe Digital Operator has various functions for inputting, controlling, and displayingoperations such as frequency setting, run/stop command, confirming and changingfunction data, confirming status, and copying. Please review and become familiarwith each function before attempting to operate the drive. The Digital Operator canbe removed or inserted during inverter operation, however, if it is removed during akeypad operation (e.g., run/stop, frequency setting), the inverter will stop and initiatean alarm.6.1 Overview and NavigationAppearance of Digital OperatorControl Keys(valid during digital operator operation):Used for inverter run and stopLED Monitor:4-digit 7-segment display used to display data suchas setting frequency, output frequency and alarmcode.Auxiliary Information Indication for LED Monitor:Indicates selected units or multiple of themonitored data shown on the LED monitor and isdisplayed on the top line of the LCD monitor. The• symbol indicates selected units or multiplenumber. The symbol ▲ indicates there is an upperscreen not currently displayed.LCD Monitor:Used to display various items of information asoperation status and function data. An operationguide message, which can be scrolled, isdisplayed at the bottom of the LCD monitor. ThisLCD monitor has a backlight feature which turnson when the control power is applied or anykeypad key is pressed. It stays on approximately 5minutes after the last key stroke.Indication on LCD Monitor:Displays one of the following operation status:FWD: Forward operationREV: Reverse operationSTOP: StopDisplays the selected operation mode:REM: Terminal blockLOC: Keypad panelCOMM: Communication terminalJOG: Jogging modeThe symbol ▼ indicates there is a lower screen notcurrently displayed.Run LED :Operation Keys:Used for switching screens, data change,frequency setting, etc.<strong>TECO</strong> <strong>Westinghouse</strong> Motor Company <strong>EQ5</strong> <strong>Quick</strong> Start <strong>Guide</strong> 18
OperationKeySTOPPRGFunctions of Operation KeysMain FunctionUsed to switch the current screen display to the menu screen or switchto the initial display screen in the operation/trip mode.Used to switch the LED monitor or to determine the entered frequency,function code, or data.Used to change data, move the cursor up or down, or scroll the displayscreen.Used to move the cursor horizontally when changing data. When thiskey is pressed with the up or down key, the cursor moves to the nextparameter function block.Used to cancel the current input data and switch the display screen. If analarm occurs, this key is used to reset the trip status (valid only when thealarm mode initial screen is displayed).Used to switch normal operation mode to jogging operation mode or viceversa. The selected mode is displayed on the LCD screen.Switches the operating mode from digital operator to terminal blockoperation (Local / Remote), and vice versa. When these keys areSTOP+ RESET operated, function F01 data is automatically set to 3 if set at 0, orautomatically set to 0 if set from 1 thru 4. The selected mode isdisplayed on the LCD screen.6.2 Programming ParametersOn the program menu screen, select 1. DATA SET. The parameter select screenappears. Select the desired parameter and set value as follows.RUNFWDPRG PRG MENUF / D LED SHIFTThe parameter designations (function codes) consist of alphanumeric characterswith unique alphabetical letters assigned to each parameter group (see table on thenext page).<strong>TECO</strong> <strong>Westinghouse</strong> Motor Company <strong>EQ5</strong> <strong>Quick</strong> Start <strong>Guide</strong> 19
Parameter Designations and Corresponding GroupsParameter Group name RemarksF00 - F42 Fundamental FunctionsE01 - E47Extension TerminalFunctionsC01 - C33Control Functions ofFrequencyP01 - P09 Motor ParametersH03 - H39High PerformanceFunctionsA01 - A18Alternative MotorParametersU01 - U61 User Functionso01 - o55 Optional FunctionsCan be selected only with anoption connected.6.3 Monitoring Signals and StatusSelect 3. OPR MNTR on the program menu screen to display the current inverteroperating status.RUNFWDPRG PRG MENUF / D LED SHIFT<strong>TECO</strong> <strong>Westinghouse</strong> Motor Company <strong>EQ5</strong> <strong>Quick</strong> Start <strong>Guide</strong> 20
7. Motor and Application Specific SettingsIt is essential that before running the motor, the motor nameplate data matches themotor data in the <strong>EQ5</strong>.7.1 Set Motor Name Plate Data (P02, P03, F11)P02Motor 1 (Capacity)The nominal motor capacity is set at the factory. Please verify that the motor nameplate data matches the motor capacity shown in parameter P1. The setting shouldonly be changed when driving a motor with a different capacity.P 0 2 M 1 - C A PSetting values for models with nominal motor capacities of 30 HP or less: 0.01 to60 HPSetting values for models with nominal motor capacities of 40 HP or more: 0.01 to800 HPThe motor rated current is set at the factory based on the drive size. Please verifythat the motor FLA on the motor nameplate matches the motor rated current shownin parameter P3.P03Motor 1 (Rated Current)This function sets the rated current value of motor 1.P 0 3 M 1 - I rSetting range: 0.00 to 2,000AF11Electric Thermal O/L Relay (level)This function sets the operation current level for the electronic thermal O/L relay.Verify that the motor FLA on the motor nameplate matches the overload level shownin parameter F11F 1 1 0 L L E V E L 1Setting range is 20 to 135% of the rated current of the inverter.<strong>TECO</strong> <strong>Westinghouse</strong> Motor Company <strong>EQ5</strong> <strong>Quick</strong> Start <strong>Guide</strong> 21
7.2 Acceleration and Deceleration Time (F07 / F08)Acceleration and Deceleration times directly control the system dynamic response.In general, the longer the acceleration and deceleration time, the slower the systemresponse, and the shorter time, the faster the response. An excessive amount oftime can result in sluggish system performance while too short of a time may resultin system instability.The default values suggested normally result in good system performance for themajority of Fan and Pump applications. If the values need to be adjusted, cautionshould be exercised, and the changes should be in small increments to avoidsystem instability.F07 Acceleration Time 1F08 Deceleration Time 1These parameters set the acceleration and deceleration times of the outputfrequency from 0 to maximum frequency and from maximum frequency to 0.F 0 7 A C C T I M E 1F 0 8 D E C T I M E 1Setting range: 0.01 to 3600 Sec.Acceleration and deceleration times are represented by the three most significant(high order) digits. Set acceleration and deceleration times with respect to maximumfrequency. The relationship between the set frequency value andacceleration/deceleration times is as follows:FWDSTOPFWDSTOPOutput frequencyOutput frequencySet Frequency = Maximum FrequencySet Frequency < Maximum FrequencyNote: If the set acceleration and deceleration times are set too low, the torquelimiting function or stall prevention function can become activated if the load torqueand or inertia are relatively high. This will prolong the acceleration and ordeceleration times and not allow the set times to be followed. In this case theacceleration and or the deceleration times should be adjusted.<strong>TECO</strong> <strong>Westinghouse</strong> Motor Company <strong>EQ5</strong> <strong>Quick</strong> Start <strong>Guide</strong> 22
7.3 <strong>Torque</strong> Boost (F09, Default 0.1)IMPORTANT:THIS PARAMETER REQUIRES TO BE CHANGED FOR CONSTANT TORQUEAPPLICATIONS.This parameter sets the relationship between output frequency and output voltage.<strong>Constant</strong> torque applications have the same torque requirements at low speed aswell as at high speed.Initial SetupFor medium duty applications set parameter F09 to an initial value of 1.0.For heavy duty applications set parameter F09 to an initial value of 2.0.F09<strong>Torque</strong> BoostThis parameter sets the torque boost for motor 1.F 0 9 T R Q B O O S T 1Setting range: 0.0 to 20.0SettingrangeCharacteristics selectedAutomatic torque boost characteristic where the torque boost value of a0.0 constant torque load (a linear change) is automatically adjusted.The motor tuning (P04 / A13) should be set to "2" for this function to be valid.0.1 to 0.9 Square law reduction torque for fan and pump loads.1.0 to 1.9Proportional torque for middle duty loads between square lawreduction torque and constant torque (linear change).2.0 to 20.0 <strong>Constant</strong> torque (linear change).<strong>TECO</strong> <strong>Westinghouse</strong> Motor Company <strong>EQ5</strong> <strong>Quick</strong> Start <strong>Guide</strong> 23
Medium Duty ApplicationsV100%17%0Rated voltage 1#1.9Basefrequency 1#1.0fOutput frequencyOutput voltage<strong>EQ5</strong> 30HP or Less<strong>EQ5</strong> 40HP and aboveHeavy Duty ApplicationsOutput voltageV100%Output voltage10%0#20.0Rated voltage 1#2.0Output frequencyBasefrequency 1f<strong>EQ5</strong> 30HP or Less<strong>EQ5</strong> 40HP and aboveWarning: A larger than required torque boost value creates overexcitationat low speeds, continued operation may cause the motor tooverheat. Check the characteristics of the motor for additionalinformation.<strong>TECO</strong> <strong>Westinghouse</strong> Motor Company <strong>EQ5</strong> <strong>Quick</strong> Start <strong>Guide</strong> 24
<strong>TECO</strong> <strong>Westinghouse</strong> Motor Company <strong>EQ5</strong> <strong>Quick</strong> Start <strong>Guide</strong> 25