Cerapall® 6
Cerapall® 6
Cerapall® 6

Create successful ePaper yourself
Turn your PDF publications into a flip-book with our unique Google optimized e-Paper software.
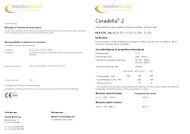
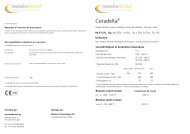
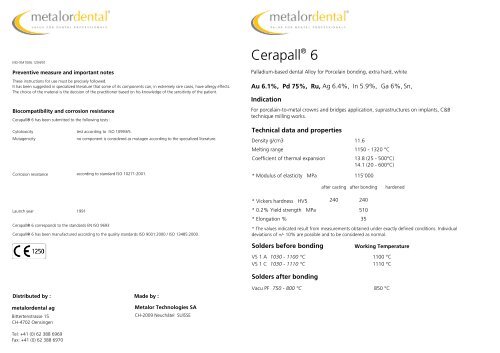
MD-XM1006.1204/01Preventive measure and important notesThese instructions for use must be precisely followed.It has been suggested in specialized literature that some of its components can, in extremely rare cases, have allergy effects.The choice of the material is the decision of the practitioner based on his knowledge of the sensitivity of the patient.Biocompatibility and corrosion resistance<strong>Cerapall®</strong> 6 has been submitted to the following tests :Cytotoxicity test according to ISO 10993/5.Mutagenicityno component is considered as mutagen according to the specialized literature.Corrosion resistance according to standard ISO 10271:2001.Cerapall ® 6Palladium-based dental Alloy for Porcelain bonding, extra hard, whiteAu 6.1%, Pd 75%, Ru, Ag 6.4%, In 5.9%, Ga 6%, Sn,IndicationFor porcelain-to-metal crowns and bridges application, suprastructures on implants, C&Btechnique milling works.Technical data and propertiesDensity g/cm311.6Melting range 1150 - 1320 °CCoefficient of thermal expansion13.8 (25 - 500°C)14.1 (20 - 600°C)* Modulus of elasticity MPa 115'000after casting after bondinghardenedLaunch year 1991<strong>Cerapall®</strong> 6 corresponds to the standards EN ISO 9693<strong>Cerapall®</strong> 6 has been manufactured according to the quality standards ISO 9001:2000 / ISO 13485:2000.* Vickers hardness HV5* 0.2% Yield strength MPa* Elongation %240 24051035* The values indicated result from measurements obtained under exactly defined conditions. Individualdeviations of +/- 10% are possible and to be considered as normal.Solders before bondingVS 1 AVS 1 C1030 - 1100 °C1030 - 1110 °CWorking Temperature1100 °C1110 °CSolders after bondingDistributed by :Made by :Vacu PF750 - 800 °C850 °Cmetalordental agBittertenstrasse 15CH-4702 OensingenMetalor Technologies SACH-2009 Neuchâtel SUISSETel: +41 (0) 62 388 6969Fax: +41 (0) 62 388 6970
INSTRUCTIONS FOR USECerapall ® 6Waxing upThe ultimate thickness of the cast metal coping should not be less than 0,3 mm.Therefore: Consideration must be given to this fact at the wax-up stage, long span frameworks require structuralreinforcement to ensure stability and anticipated solder joints should be of adequate surface area to provide sufficientstability to the frame.SpruingWax sprues of no less than ø 3.5 mm are required. Direct (ø 3.5 mm) and cross bar (ø 5 mm) spruing produce excellentresults. Feeder sprues to heavy pontics should be of at least ø 4 mm. Air vents (ø 1 mm) may be used to advantage. Waxpatterns should be set outside the thermal centre, i.e. near the casting ring wall and about 5 mm from the end. For individualcopings and small bridges (up to three units) , use of the circular sprue provides ideal positioning of the wax patterns andensure controlled solidification of the frameworks.InvestingWhen using steel casting rings always use refractory liner in order to allow free expansion of the investment. All regular orphosphate-bonded (e.g. Univest®Plus) investments for precious metal alloys may be used. Follow the proceduresrecommended by the manufacturer.PreheatingObserve manufacturer's recommendations with regard to setting times, temperature levels etc.On reaching the end temperature a soaking period of 20 to 45 min. is advisable depending on the size of the cylinder.Preheating temperature : 850°CCruciblesGlaze the crucible before first use with a recommended flux (e.g. Borax / Boric acid).The following crucibles can be used :Ceramic crucibleRe-meltingWhen melting down thoroughly cleaned casting buttons, add at least 1/3 of new alloy. The used copings have to be clean,free of investment and flux residue.MeltingIt is important, when using a torch for melting (for inst. Meteor type "O") that the recommended propane (approx. 0.5 bar or7.25 psi) / oxygen (approx. 1.0 bar or 14.5 psi) mixture and pressure are observed.Before melting add a pinch of flux to the alloy. Once the alloy has completely melted, continue heating for a further approx.5 sec. before releasing the casting machine arm.When melting by induction or resistance heating, the power must be maintained for an additional approx. 5 sec.Flux : boric acidCeramic crucible : Casting temperature 1450°CCoolingBench cool the casting ring.Devesting / CleaningClean by blasting with glass beads or pure aluminium oxide (Al2O3) particle size (50 µm to 125 µm) at 1.5 to 2.0 bar (21.7 to29 psi) pressure.PicklingFollowing casting or soldering, the frame at room temperature may be pickled in hot Desoxid for at least 2 min. - Desoxid II(63%).FinishingTrim the framework first preferably using carbide burs and then fine grinding points at low speed. Blasting is done using purealuminium oxide (approx. 110µm).Recommended grinding points : Cerasiv Blue (5'000 - 10'000 rpm)Pressure : 1.0 - 2.0 barCleaningFrameworks must be cleaned preceding oxidation either in boiling water for 10 min. (distilled water is recommended) - in anultrasonic unit for 5 min. - or with a steam cleaner.Gilding (Aurofilm® 2000)The application of a gilding layer of Aurofilm is possible according to the instructions for use. Aurofilm should be fired in aceramic oven.Firing temperature : 920°C - 940°COxidation10 min. without vacuum to 950°C and bench cool.The framework should have a uniform light grey appearance.Porcelain applicationPorcelain or resin applications are subject to the manufacturers instructions. The alloy is compatible with most knownporcelain brands. Consider the CTE of the alloy in conjunction with the cooling recommendation of the porcelainmanufacturer. Paste opaques should be pre-dried for approx. 10 min before firing at manufacturers recommendation.Pre-drying temperature : 300 - 400°C.Excellent results have been obtained with the following porcelains (in alphabetical order), with a normal cooling cycle :Carat, dSign, Omega 900, Vintage Halo,Soldering / LaserWe recommend using a propane/oxygen torch (Meteor Type "L") for soldering and a flux like Fluxor. During soldering weardark goggles for protection.The design of the soldering block is a compromise between minimising its thermal mass whilst retaining sufficient strength toavoid its fracturing during soldering. Leave a parallel gap of 0.1-0.2 mm between surfaces to be soldered and sufficient areato ensure adequate strength of the joint.For soldering after bonding, it is recommended to first coat the surfaces to be soldered with VS 1 A.Heat treatmentsSelf-hardened by slow (bench-) cooling of the casting ringHardened °C / min. - let bench-coolPolishingThe oxide layer may be removed in Desoxid. Thorough rubberwheeling ensures easy polishing. For best prepolishing results,soft brushes, felts and cotton wheels are employed using Legabril Diamond diamond-paste. "Whiting chalk" (chalk-powder)mixed with water on soft brushes or cotton wheels may be used for final high polish.