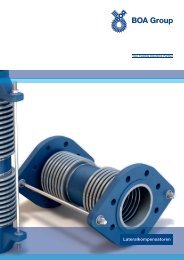
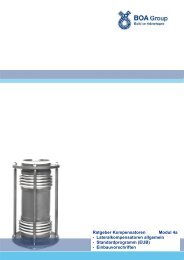
Module 2a Axial Exp.Joints BOA AG General - BOA Group
Module 2a Axial Exp.Joints BOA AG General - BOA Group
Module 2a Axial Exp.Joints BOA AG General - BOA Group

You also want an ePaper? Increase the reach of your titles
YUMPU automatically turns print PDFs into web optimized ePapers that Google loves.
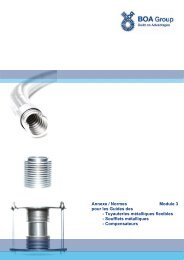
Example for Diagram 3Order is placed for an axial expansion joint to be installed in a pipeline of 22 m length.Lowest temperature: –15°C.Highest temperature: +165°C.Max. expansion corresponding to 180°C heating = 50 mm.The expansion joint shall be restrained by 50% of this expansion = prerestrained by 25 mm, i.e. pulled apart.The remaining 50% = 25 mm will be compressed in operation mode.Special attention must be given to the restraint during installation. The temperature shall not be –15°C, but +20°C.This results in a corresponding expansion of the pipeline of 9 mm (see diagram 3), by which the expansion joint must be less prerestrained:25-9 = 16 mm.The prerestraint diagram (3) allows to determine the correct prerestraint value without intermediate calculation:1. Temperature difference between installation and lowest temperature: –15°C to +20°C = 35°C.2. Length of the pipe section to be compensated for: = 22 m.3. Draw a straight line from point "22 m pipe length“ to the "0°C" point.4. Draw a vertical line from the "35°C" point towards the beam coming from "22 m".5. Draw a horizontal line from this intersection to the line "Thermal expansion of pipeline in mm"; the result is, as stated above, 9 mm.6. Draw a straight line from the "9 mm" point to "Total anticipated movement" = 50 mm, and lengthen the connecting straight line to"Prerestraint of the expansion joint in mm".This results in a prerestraint value of 16 mm, which is the value by which the axial expansion joint must be pulled apart during installation.Installation of an expansion joint with flanges Align pipe axes and flange bolt holes.- ensure flanges are parallel- ensure gaskets are centred- tighten bolts crosswise. Make sure the expansion joint is not exposed to torsion during installation. After installation, check if the bellows convolutions are free of dirt.correctcorrectwrongwrongwrongFig. 914