download manual - noimmo
download manual - noimmo
download manual - noimmo
- No tags were found...

You also want an ePaper? Increase the reach of your titles
YUMPU automatically turns print PDFs into web optimized ePapers that Google loves.
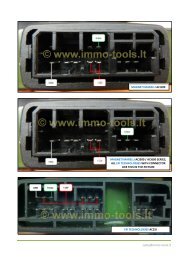
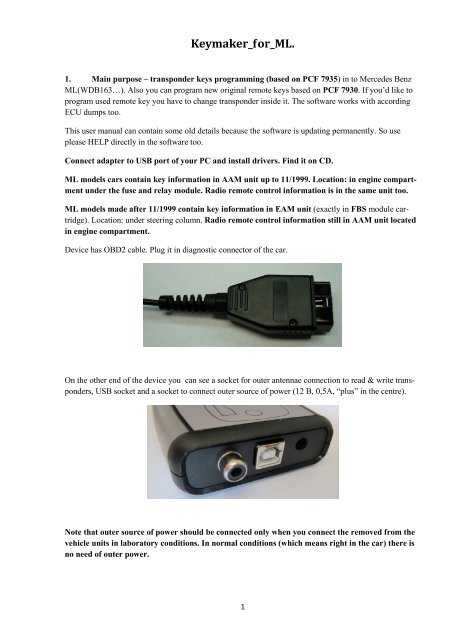
Keymaker_for_ML.1. Main purpose – transponder keys programming (based on PCF 7935) in to Mercedes BenzML(WDB163…). Also you can program new original remote keys based on PCF 7930. If you’d like toprogram used remote key you have to change transponder inside it. The software works with accordingECU dumps too.This user <strong>manual</strong> can contain some old details because the software is updating permanently. So useplease HELP directly in the software too.Connect adapter to USB port of your PC and install drivers. Find it on CD.ML models cars contain key information in AAM unit up to 11/1999. Location: in engine compartmentunder the fuse and relay module. Radio remote control information is in the same unit too.ML models made after 11/1999 contain key information in EAM unit (exactly in FBS module cartridge).Location: under steering column. Radio remote control information still in AAM unit locatedin engine compartment.Device has OBD2 cable. Plug it in diagnostic connector of the car.On the other end of the device you саn see a socket for outer antennae connection to read & write transponders,USB socket and a socket to connect outer source of power (12 B, 0,5A, “plus” in the centre).Note that outer source of power should be connected only when you connect the removed from thevehicle units in laboratory conditions. In normal conditions (which means right in the car) there isno need of outer power.1
When OK appears in the bottom left window the window looks like thisWhen the writing is finished we recommend some testing – press Connect then Rd Key N and make surethat the new key has number 36
Press Connect and tick the absent key you want to block(key number 1 in our example)You can see that Apply button has become active – press it!7
6. Repair button.Sometimes when the accumulator is low the key which was placed in the ignition lock to start the enginestops normal functioning. Start Error message appears on the dashboard when you start the ignition. It’s acommon case with older vehicles (AAM keys). It’s less common with newer vehicles (FBS keys (a cartridgeinside an EAM ECU). When you press Repair button the relevant ECU’s EEPROM is correctedautomatically and this “lost” key starts its normal functioning! This button is efficient both for older andnewer types of vehicles.7. AAM work.Let’s assume you deal with a vehicle up to 11/1999 year of production. Connect the cable to the diagnosticssocket of the car and press Connect. You see the following.Here you additionally see Valid radio window, according to the information in the window you can makea conclusion that there are two keys (of all the three “active” keys) positioned 2 and 3 which have remotecontrol programming of the central lock radiochannel.Otherwise your work with AAM is identical to FBS work described above.8
8. EEPROM bookmark. Choosing this bookmark you can see the following windowThe interface is quite simple and hardly requires explanation. When the ECU you want to read is chosenyou can read EEPROM field, as well as write and verify it. You can stop the reading process at any momentby pressing Esc button on your computer. After you press Read Full all the data from the processoris read which takes a lot of time!9. Radio Code bookmark.To write the radio channel you must have a written transponder. Then you simply follow the instructionson the screen.9