WSP Immobilizer Emulator for Sprinter-Vito. - noimmo
WSP Immobilizer Emulator for Sprinter-Vito. - noimmo
WSP Immobilizer Emulator for Sprinter-Vito. - noimmo

Create successful ePaper yourself
Turn your PDF publications into a flip-book with our unique Google optimized e-Paper software.
<strong>WSP</strong> <strong>Immobilizer</strong> <strong>Emulator</strong><strong>for</strong> <strong>Sprinter</strong>-<strong>Vito</strong>.Manual.www.<strong>noimmo</strong>.lt
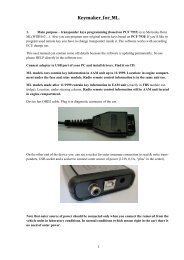
This product is intended <strong>for</strong> installation INSTEAD original <strong>WSP</strong> immobilizer. It emulates CAN buscommunication between <strong>WSP</strong> immo box and ECU (supported systems: CDI1 and CDI2).ECU EEPROM data changes require be<strong>for</strong>e the installation of emulator.We recommend to use it in case of «Start Error» reporting on Instrument Cluster.Pic.1. <strong>WSP</strong> <strong>Emulator</strong> general view.Modify ECU EEPROM data be<strong>for</strong>e emulator installing: you can do it manually or with our MB Keyprog-2device and CR1-CR2 READER software.The software reads and writes EEPROM areas of ECU CR1 and CR2 on <strong>Vito</strong> (638 model) and <strong>Sprinter</strong>(models 901.6, 902.6, 903.6, 904.6, 905.6) .2www.<strong>noimmo</strong>.lt
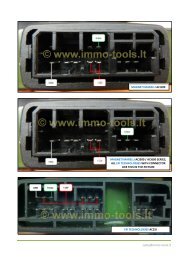
Use please the connector like in picture below:Connectors purposes1 – OBDII female – connect it to the OBDII male cable of MB Keyprog2 device.Set micro switches to position as in the picture:2 – 38 pin connector – <strong>for</strong> 38 pin DLC of <strong>Vito</strong> model3 – 14 pin connector - <strong>for</strong> 14 pin DLC of <strong>Sprinter</strong> model4 – OBDII male connector – <strong>for</strong> 16 pin (OBDII) DLC of <strong>Vito</strong> model5 – not using with this software3www.<strong>noimmo</strong>.lt
If you order this cables set you get it together with software CR1-CR2 READER:Update your MB Keyprog-2 device from program window:Press Update-Load (then provide a path to update file “upd8_cr1_cr2_mb_keyprog2.bin”) then pressagain Update-Write and wait till it will be finished.Connect your MB Keyprog-2 device (using OBDII + according cable from this set) to the car DiagnosticLink Connector (DLC). Turn ignition ON.Press READ button.At the bottom of the window you will see CONNECT TO CR1 message and progress bar goes on. Firstof all device trying to connect with CR1 ECU (EEPROM 24С04), then if it couldn’t find it – with CR2ECU (EEPROM 95Р08).4www.<strong>noimmo</strong>.lt
On this sample we found and connected with CR1 ECU – see message at the bottom of window:After reading will be finished you see EEPROM data in the program window:You can save these data to file - press SAVE button <strong>for</strong> it. We recommend to save it every time.Program allows you to modify ECU EEPROM and save/write new dump via DLC.Press ADD EMULATOR button. All necessary modifications will be done and new changed EEPROMwill be written to the ECU automatically. After that you can remove original <strong>WSP</strong> immobilizer box fromthe car and connect <strong>WSP</strong> <strong>Emulator</strong> instead it. LED on emulator should ON if all power lines in immoconnector are OK.5www.<strong>noimmo</strong>.lt
The job process with CR2 ECU is the same like with CR1.If you see the following messageIt means ECU power supply is too low, diagnostic line damaged or some other electrical problem there isin the car.You can change ECU EEPROM data also manually with removing of ECU and with soldering job.6www.<strong>noimmo</strong>.lt