Using the paste machine CB 67 F as a table model - tapo-fix
Using the paste machine CB 67 F as a table model - tapo-fix
Using the paste machine CB 67 F as a table model - tapo-fix

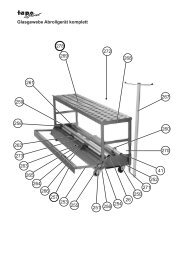
Create successful ePaper yourself
Turn your PDF publications into a flip-book with our unique Google optimized e-Paper software.
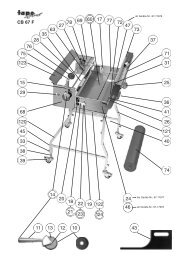
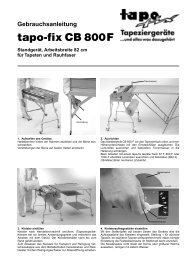
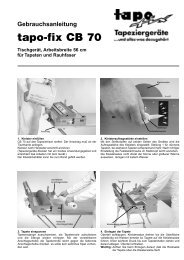
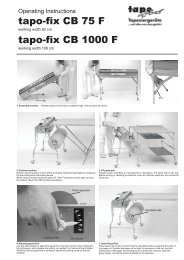
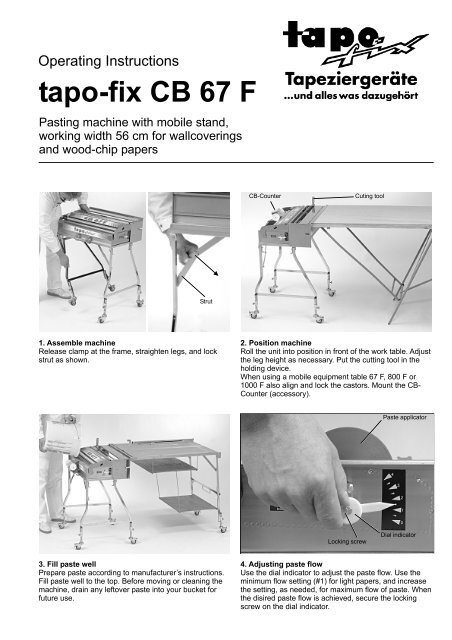
Operating Instructions<br />
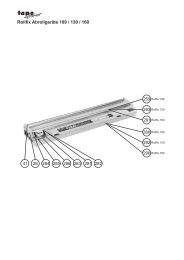
<strong>tapo</strong>-<strong>fix</strong> <strong>CB</strong> <strong>67</strong> F<br />
P<strong>as</strong>ting <strong>machine</strong> with mobile stand,<br />
working width 56 cm for wallcoverings<br />
and wood-chip papers<br />
Strut<br />
1. Assemble <strong>machine</strong><br />
Rele<strong>as</strong>e clamp at <strong>the</strong> frame, straighten legs, and lock<br />
strut <strong>as</strong> shown.<br />
3. Fill <strong>p<strong>as</strong>te</strong> well<br />
Prepare <strong>p<strong>as</strong>te</strong> according to manufacturer’s instructions.<br />
Fill <strong>p<strong>as</strong>te</strong> well to <strong>the</strong> top. Before moving or cleaning <strong>the</strong><br />
<strong>machine</strong>, drain any leftover <strong>p<strong>as</strong>te</strong> into your bucket for<br />
future use.<br />
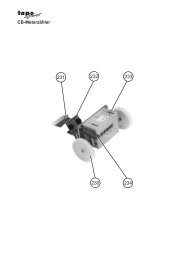
<strong>CB</strong>-Counter<br />
2. Position <strong>machine</strong><br />
Roll <strong>the</strong> unit into position in front of <strong>the</strong> work <strong>table</strong>. Adjust<br />
<strong>the</strong> leg height <strong>as</strong> necessary. Put <strong>the</strong> cutting tool in <strong>the</strong><br />
holding device.<br />
When using a mobile equipment <strong>table</strong> <strong>67</strong> F, 800 F or<br />
1000 F also align and lock <strong>the</strong> c<strong>as</strong>tors. Mount <strong>the</strong> <strong>CB</strong>-<br />
Counter (accessory).<br />
Locking screw<br />
Cuting tool<br />
P<strong>as</strong>te applicator<br />
Dial indicator<br />
4. Adjusting <strong>p<strong>as</strong>te</strong> flow<br />
Use <strong>the</strong> dial indicator to adjust <strong>the</strong> <strong>p<strong>as</strong>te</strong> flow. Use <strong>the</strong><br />
minimum flow setting (#1) for light papers, and incre<strong>as</strong>e<br />
<strong>the</strong> setting, <strong>as</strong> needed, for maximum flow of <strong>p<strong>as</strong>te</strong>. When<br />
<strong>the</strong> disired <strong>p<strong>as</strong>te</strong> flow is achieved, secure <strong>the</strong> locking<br />
screw on <strong>the</strong> dial indicator.
5. Install Paper Roll<br />
Swivel <strong>the</strong> paper holder rod out, thread paper roll on<br />
paper holder rod, <strong>fix</strong> paper roll with <strong>the</strong> adjus<strong>table</strong> disk so<br />
<strong>the</strong>re is light pressure between disk and paper roll.<br />
<strong>CB</strong>-Counter<br />
Cutting groove<br />
Adjus<strong>table</strong> disk<br />
7. Me<strong>as</strong>uring wallpaper<br />
When using a <strong>CB</strong>-Counter ( accessory), pull <strong>the</strong> paper to<br />
<strong>the</strong> cutting groove and reset counter to zero, and <strong>the</strong>n pull<br />
paper to required length.<br />
O<strong>the</strong>rwise mark length of wallpaper required on <strong>the</strong><br />
p<strong>as</strong>ting <strong>table</strong> with m<strong>as</strong>king tape (me<strong>as</strong>ure from <strong>the</strong> cutting<br />
groove). Pull paper through <strong>the</strong> <strong>machine</strong> to mark. If <strong>the</strong><br />
paper is longer than <strong>the</strong> <strong>table</strong>, me<strong>as</strong>ure back from <strong>the</strong> end<br />
of <strong>the</strong> <strong>table</strong> and mark, folding paper over to obtain length.<br />
Note: Fold corners of paper <strong>as</strong> shown above before<br />
pulling paper through <strong>machine</strong>.<br />
Support rod<br />
6. Prepare <strong>machine</strong> for use<br />
Open <strong>the</strong> lid of <strong>the</strong> p<strong>as</strong>ting <strong>machine</strong>. Place paper face up<br />
on <strong>the</strong> <strong>p<strong>as</strong>te</strong> applicator and press it lightly against <strong>the</strong><br />
<strong>p<strong>as</strong>te</strong> applicator. Lay <strong>the</strong> paper on <strong>the</strong> support rod, and<br />
close <strong>the</strong> lid of <strong>the</strong> <strong>machine</strong>.<br />
Note: Always put back of paper on <strong>p<strong>as</strong>te</strong> applicator.<br />
Cutting groove<br />
Turn <strong>p<strong>as</strong>te</strong> applicator<br />
Cutting tool<br />
8. Cutting <strong>the</strong> paper<br />
Apply light pressure to cutting tool when pulling it along<br />
<strong>the</strong> cutting groove. Paper may folded or handled <strong>as</strong><br />
usual.<br />
9. Cleaning <strong>the</strong> <strong>machine</strong><br />
Cleaning is required only after heavy use or when <strong>the</strong><br />
<strong>machine</strong> will not be used for some time. To clean, drain<br />
remaining <strong>p<strong>as</strong>te</strong>. Set <strong>the</strong> dial indicator at <strong>the</strong> highest<br />
setting (largest opening), and remove <strong>the</strong> <strong>p<strong>as</strong>te</strong><br />
applicator by inserting your hand between <strong>the</strong> <strong>p<strong>as</strong>te</strong><br />
applicator and bottom of <strong>the</strong> p<strong>as</strong>t well, pressing roll up<br />
and out of bearings.<br />
Note: Before removing <strong>p<strong>as</strong>te</strong> applicator dial indicator<br />
adjustment should be in <strong>the</strong> full, open position. Before<br />
storing for long periods <strong>machine</strong> should be cleaned,<br />
especially underside of wiper to remove accumulated<br />
residue.
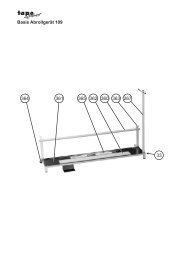
Knurled nut<br />
11. Fill <strong>the</strong> <strong>p<strong>as</strong>te</strong> well.<br />
Prepare <strong>p<strong>as</strong>te</strong> according to manufacturer’s instructions.<br />
Fill <strong>p<strong>as</strong>te</strong> well to <strong>the</strong> top. Before moving or cleaning <strong>the</strong><br />
<strong>machine</strong>, drain any leftover <strong>p<strong>as</strong>te</strong> into your bucket for<br />
future use.<br />
Adjus<strong>table</strong> disk<br />
Paper holder rod<br />
Paper holder rod<br />
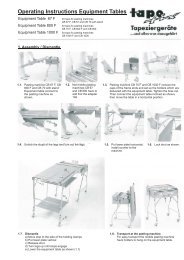
10. <strong>Using</strong> <strong>as</strong> <strong>table</strong> <strong>model</strong><br />
After unlocking <strong>the</strong> knurled nut, <strong>the</strong> unit may be removed<br />
from <strong>the</strong> mobile stand.<br />
Important: Swivel <strong>the</strong> paper holder rod out before put in<br />
<strong>the</strong> unit into <strong>the</strong> mobile stand. Correct rest of <strong>the</strong> p<strong>as</strong>ting<br />
unit on <strong>the</strong> frame must be checked before locking <strong>the</strong><br />
knurled nut.<br />
The p<strong>as</strong>ting <strong>machine</strong> <strong>CB</strong> <strong>67</strong> F can be used <strong>as</strong> a freestanding<br />
<strong>machine</strong> and also <strong>as</strong> a <strong>table</strong> <strong>model</strong>.<br />
<strong>Using</strong> <strong>the</strong> <strong>p<strong>as</strong>te</strong> <strong>machine</strong> <strong>CB</strong> <strong>67</strong> F <strong>as</strong> a <strong>table</strong> <strong>model</strong><br />
Adjus<strong>table</strong> disk<br />
13. Install Paper Roll<br />
Swivel <strong>the</strong> paper holder rod out, thread paper roll<br />
on paper holder rod, <strong>fix</strong> paper roll with <strong>the</strong><br />
adjus<strong>table</strong> disk so that <strong>the</strong>re is light pressure<br />
between disk and paper roll.<br />
Support rod<br />
Locking screw<br />
P<strong>as</strong>te applicator<br />
Dial indicator<br />
12. Adjusting <strong>p<strong>as</strong>te</strong> flow<br />
Use <strong>the</strong> dial indicator to adjust <strong>the</strong> <strong>p<strong>as</strong>te</strong> flow. Use <strong>the</strong><br />
minimum flow setting (#1) for light papers, and incre<strong>as</strong>e<br />
<strong>the</strong> setting, <strong>as</strong> needed, for maximum flow of <strong>p<strong>as</strong>te</strong>. When<br />
<strong>the</strong> disired <strong>p<strong>as</strong>te</strong> flow is achieved, secure <strong>the</strong> locking<br />
screw on <strong>the</strong> dial indicator.<br />
Support rod<br />
Turn <strong>p<strong>as</strong>te</strong> applicator<br />
14. Prepare <strong>machine</strong> for use<br />
Open <strong>the</strong> lid of <strong>the</strong> p<strong>as</strong>ting <strong>machine</strong>. Place paper face up<br />
on <strong>the</strong> <strong>p<strong>as</strong>te</strong> applicator and press it lightly against <strong>the</strong><br />
<strong>p<strong>as</strong>te</strong> applicator. Lay <strong>the</strong> paper on <strong>the</strong> support rod and<br />
close <strong>the</strong> lid of <strong>the</strong> <strong>machine</strong>.<br />
Note: Always put back side of paper on <strong>p<strong>as</strong>te</strong> applicator.
<strong>Using</strong> <strong>the</strong> <strong>p<strong>as</strong>te</strong> <strong>machine</strong> <strong>CB</strong> <strong>67</strong> F <strong>as</strong> a <strong>table</strong> <strong>model</strong><br />
<strong>CB</strong>-Counter<br />
Cutting groove<br />
15. Me<strong>as</strong>uring wallpaper<br />
When using a <strong>CB</strong>-Counter ( accessory ) , pull <strong>the</strong> paper to<br />
<strong>the</strong> cutting groove and reset counter to zero, and <strong>the</strong>n<br />
pull paper to required length.<br />
O<strong>the</strong>rwise mark length of wallpaper required on <strong>the</strong><br />
p<strong>as</strong>ting <strong>table</strong> with m<strong>as</strong>king tape (me<strong>as</strong>ure from <strong>the</strong><br />
cutting groove). Pull paper through <strong>the</strong> <strong>machine</strong> to mark.<br />
If <strong>the</strong> paper is longer than <strong>the</strong> <strong>table</strong>, me<strong>as</strong>ure back from<br />
<strong>the</strong> end of <strong>the</strong> <strong>table</strong> and mark, folding paper over to<br />
obtain length.<br />
Note: Fold corners of paper <strong>as</strong> shown above before<br />
pulling paper through <strong>machine</strong>.<br />
Drain plug<br />
Cleaning tool<br />
17. Drain <strong>p<strong>as</strong>te</strong><br />
Move <strong>the</strong> <strong>machine</strong> off to one side of <strong>the</strong> <strong>table</strong>; remove <strong>the</strong><br />
drain plug and drain <strong>the</strong> <strong>p<strong>as</strong>te</strong>. Use <strong>the</strong> cleaning tool for<br />
quick and e<strong>as</strong>y cleaning of <strong>the</strong> <strong>p<strong>as</strong>te</strong> well.<br />
Note: Remove support rod before draining <strong>p<strong>as</strong>te</strong>.<br />
Cutting groove<br />
Cutting tool<br />
16. Cutting <strong>the</strong> paper<br />
Apply light pressure to cutting tool when pulling it along<br />
<strong>the</strong> cutting groove. Paper may folded or handled <strong>as</strong><br />
usual.<br />
18. Cleaning <strong>the</strong> <strong>machine</strong><br />
Cleaning is required only after heavy use or when <strong>the</strong><br />
<strong>machine</strong> will not be used for some time. To clean, remove<br />
<strong>the</strong> drain plug, and drain remaining <strong>p<strong>as</strong>te</strong>.Set dial<br />
indicator to <strong>the</strong> highest setting (largest opening), and<br />
remove <strong>p<strong>as</strong>te</strong> applicator by inserting your hand between<br />
<strong>the</strong> <strong>p<strong>as</strong>te</strong> applicator and bottom of <strong>the</strong> p<strong>as</strong>t well, pressing<br />
roll up and out of bearings.<br />
Note: Before removing <strong>p<strong>as</strong>te</strong> applicator dial indicator<br />
adjustment should be in full, open position. Before storing<br />
for long periods <strong>machine</strong> should be cleaned, especially<br />
underside of wiper to remove accumulated residue.<br />
<strong>tapo</strong>-<strong>fix</strong> GmbH & Co. KG<br />
Meinstraße 114 • D-38448 Wolfsburg • Telefon +49 5363 9771-0 • Telefax +49 5363 9771-50<br />
e-mail: info@<strong>tapo</strong><strong>fix</strong>.de Internet: www.<strong>tapo</strong><strong>fix</strong>.de<br />
Printed in Germany 01/04