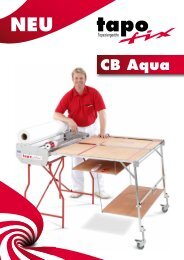
Operating Instructions Equipment Tables - tapo-fix
Operating Instructions Equipment Tables - tapo-fix
Operating Instructions Equipment Tables - tapo-fix

You also want an ePaper? Increase the reach of your titles
YUMPU automatically turns print PDFs into web optimized ePapers that Google loves.
<strong>Operating</strong> <strong>Instructions</strong> <strong>Equipment</strong> <strong>Tables</strong><br />
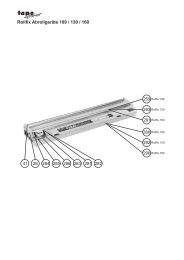
<strong>Equipment</strong> Table 67 F<br />
<strong>Equipment</strong> Table 800 F<br />
<strong>Equipment</strong> Table 1000 F<br />
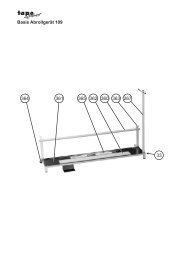
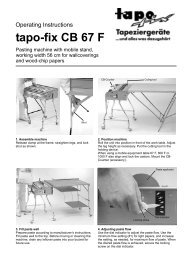
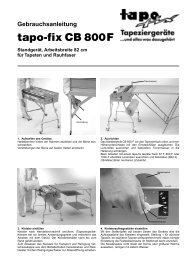
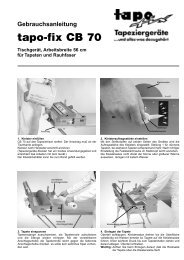
1. Assembly / Dismantle<br />
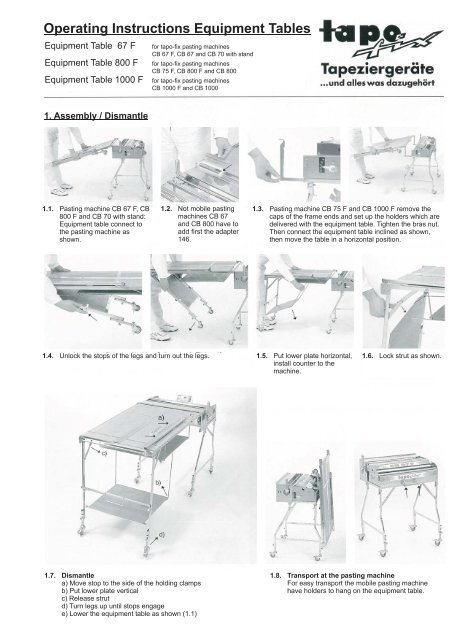
1.1. Pasting machine CB 67 F, CB<br />
800 F and CB 70 with stand:<br />
<strong>Equipment</strong> table connect to<br />
the pasting machine as<br />
shown.<br />
for <strong>tapo</strong>-<strong>fix</strong> pasting machines<br />
CB 67 F, CB 67 and CB 70 with stand<br />
for <strong>tapo</strong>-<strong>fix</strong> pasting machines<br />
CB 75 F, CB 800 F and CB 800<br />
for <strong>tapo</strong>-<strong>fix</strong> pasting machines<br />
CB 1000 F and CB 1000<br />
1.2. Not mobile pasting<br />
machines CB 67<br />
and CB 800 have to<br />
add first the adapter<br />
146.<br />
1.7. Dismantle<br />
a) Move stop to the side of the holding clamps<br />
b) Put lower plate vertical<br />
c) Release strut<br />
d) Turn legs up until stops engage<br />
e) Lower the equipment table as shown (1.1)<br />
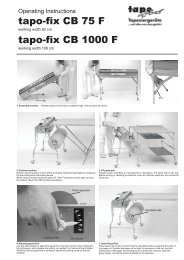
1.3. Pasting machine CB 75 F and CB 1000 F remove the<br />
caps of the frame ends and set up the holders which are<br />
delivered with the equipment table. Tighten the bras nut.<br />
Then connect the equipment table inclined as shown,<br />
then move the table in a horizontal position.<br />
1.4. Unlock the stops of the legs and turn out the legs. 1.5. Put lower plate horizontal,<br />
install counter to the<br />
machine.<br />
1.6. Lock strut as shown.<br />
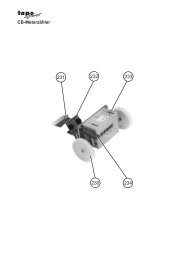
1.8. Transport at the pasting machine<br />
For easy transport the mobile pasting machine<br />
have holders to hang on the equipment table.
2. Work with the equipment table<br />
2.1. Install paper roll and pull paper to the cutting grove. Put on<br />
the counter to the paper and reset counter to zero.<br />
2.3. Part wallpapers up to 3 meter length, for example 2,6 meters<br />
a) First pull 1 meter less than the wanted<br />
paper length for example 1,6 meters<br />
and book up to the red label on the lid<br />
of the machine.<br />
b) Fold this pasted and booked paper<br />
two times.<br />
2.4 Paste wallpapers of more than 3 meter length<br />
a) First pull up to the end of the equipment table and book to the<br />
red label at the lid of the machine (like 2.3 a)<br />
2.2. Measuring length<br />
Attention: Beginning and end of the measurement is at<br />
the cutting grove, because that is the position to cut.<br />
Parallel stripes on the equipment table make it easier to<br />
cut the paper right-angled.<br />
c) Second pull up to the required length<br />
for example 2,6 meter, cut paper with<br />
cutting tool<br />
Attention: Reset counter on zero.<br />
b) Take the booked paper, pull again to the end of the<br />
equipment table and than book again.<br />
Repeat this building loops up to the required length, cat<br />
paper with cutting tool.<br />
Attention: Reset counter on zero.
2.5. Pasting wallpapers with design on the <strong>tapo</strong>-<strong>fix</strong> equipment table<br />
Inside the lid of the <strong>tapo</strong>-<strong>fix</strong> CB pasting machine you find a label with the <strong>tapo</strong>-<strong>fix</strong> table for wallpapers with design.<br />
This is a part of the <strong>tapo</strong>-<strong>fix</strong> table for wallpapers with design. Please try to practice this table.<br />
Example for using the <strong>tapo</strong>-<strong>fix</strong> table for wallpapers with design<br />
1. Parallel design<br />
Length of the design 32 cm<br />
High of the wall 2,48 m:<br />
Length of the wallpaper = 2,56 m<br />
Read the length of the wallpaper in the column "Musterlänge 32 cm".<br />
Each roll has to begin at the same point of the design.<br />
2. Alternating or shifting design<br />
Length of the design 32 cm<br />
High of the wall = 2,56 meter + ½ length of the design 0,16 meter =<br />
2,72 meters.<br />
Begin each roll at the correct point of design<br />
for example point 1 for pieces with odd numbers (1-3-5-7…)<br />
for example point 2 for pieces with even numbers (2-4-6-8…)<br />
3. Small design<br />
Design under 20 cm length = high of the wall + 1 length of the design<br />
Decide the beginning of design<br />
On each new roll is the decided beginning of the<br />
design to define.<br />
Make a little cut at this point of the design (arrow).<br />
Install the wallpaper roll and cut at this little cut. Now it<br />
is the correct beginning of the design for this new roll.<br />
Reset counter on zero and work like before
2.6. Cut of paper in full length<br />
a) Set stop at the required width and place the booked<br />
wallpaper against the stop.<br />
Attention: Adjust edge of the paper exactly<br />
c) Cut in "saw cut" ������<br />
for example wood chip and thin wallpapers.<br />
b) Than lift the stop, bring it to the cutting grove and lay down at<br />
the paper without disarrange the paper.<br />
Cut with a cutting knife with a sharp blade in the cutting grove<br />
while <strong>fix</strong>ing the stop.<br />
d) Cut in "pull cut" for example PVC wall papers.