here - Works Shocks
here - Works Shocks
here - Works Shocks

You also want an ePaper? Increase the reach of your titles
YUMPU automatically turns print PDFs into web optimized ePapers that Google loves.
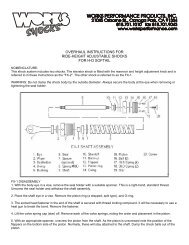
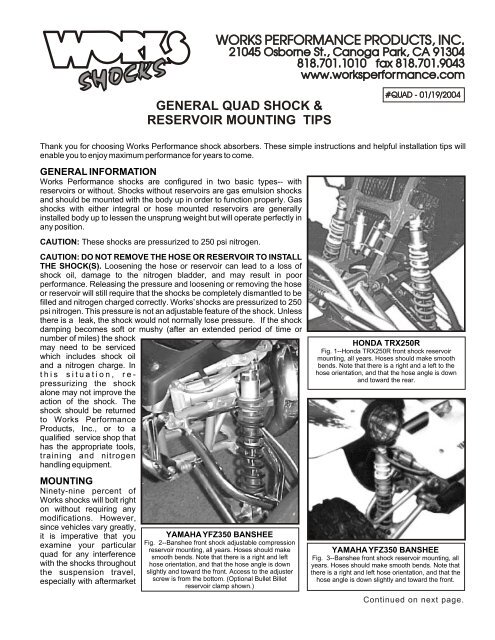
SHOCKSWORKS PERFORMANCE PRODUCTS, INC.21045 Osborne St., Canoga Park, CA 91304818.701.1010 fax 818.701.9043www.worksperformance.comGENERAL QUAD SHOCK &RESERVOIR MOUNTING TIPS#QUAD - 01/19/2004Thank you for choosing <strong>Works</strong> Performance shock absorbers. These simple instructions and helpful installation tips willenable you to enjoy maximum performance for years to come.GENERAL INFORMATION<strong>Works</strong> Performance shocks are configured in two basic types-- withreservoirs or without. <strong>Shocks</strong> without reservoirs are gas emulsion shocksand should be mounted with the body up in order to function properly. Gasshocks with either integral or hose mounted reservoirs are generallyinstalled body up to lessen the unsprung weight but will operate perfectly inany position.CAUTION: These shocks are pressurized to 250 psi nitrogen.CAUTION: DO NOT REMOVE THE HOSE OR RESERVOIR TO INSTALLTHE SHOCK(S). Loosening the hose or reservoir can lead to a loss ofshock oil, damage to the nitrogen bladder, and may result in poorperformance. Releasing the pressure and loosening or removing the hoseor reservoir will still require that the shocks be completely dismantled to befilled and nitrogen charged correctly. <strong>Works</strong>’ shocks are pressurized to 250psi nitrogen. This pressure is not an adjustable feature of the shock. Unlesst<strong>here</strong> is a leak, the shock would not normally lose pressure. If the shockdamping becomes soft or mushy (after an extended period of time ornumber of miles) the shockmay need to be servicedwhich includes shock oiland a nitrogen charge. Inthis situation, repressurizingthe shockalone may not improve theaction of the shock. Theshock should be returnedto <strong>Works</strong> PerformanceProducts, Inc., or to aqualified service shop thathas the appropriate tools,training and nitrogenhandling equipment.MOUNTINGNinety-nine percent of<strong>Works</strong> shocks will bolt righton without requiring anymodifications. However,since vehicles vary greatly,it is imperative that youexamine your particularquad for any interferencewith the shocks throughoutthe suspension travel,especially with aftermarketYAMAHA YFZ350 BANSHEEFig. 2--Banshee front shock adjustable compressionreservoir mounting, all years. Hoses should makesmooth bends. Note that t<strong>here</strong> is a right and lefthose orientation, and that the hose angle is downslightly and toward the front. Access to the adjusterscrew is from the bottom. (Optional Bullet Billetreservoir clamp shown.)HONDA TRX250RFig. 1--Honda TRX250R front shock reservoirmounting, all years. Hoses should make smoothbends. Note that t<strong>here</strong> is a right and a left to thehose orientation, and that the hose angle is downand toward the rear.YAMAHA YFZ350 BANSHEEFig. 3--Banshee front shock reservoir mounting, allyears. Hoses should make smooth bends. Note thatt<strong>here</strong> is a right and left hose orientation, and that thehose angle is down slightly and toward the front.Continued on next page.
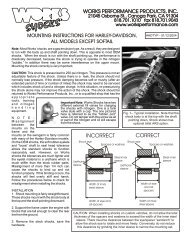
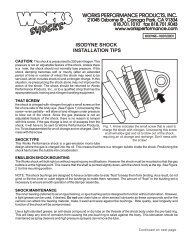
Quad Instructions, ContinuedPage 2swing arms or A-arms. Nothing on the A-arms, swing arm or frame should touch any part of the shock except the pointw<strong>here</strong> the mount touches the shock eye bushing. If the spring, retainer, outside diameter of the shock eye or clevis touchesthe frame or swing arm, then the shock will become damaged with use. If you have to partially compress the shocks toinstall them, then t<strong>here</strong> is a clearance problem around the eyes or spring retainer that is interfering with the fit. The point ofinterference should be dealt with. Make sure that the arm installation iscorrect, as sometimes the arms can be installed backwards or upsidedown. If the clearance cannot be obtained by grinding or filing at theinterference point, then the shocks should be returned to <strong>Works</strong>Performance for modification.Some shocks use flanged mounting bushings to keep them from sliding offthe mounting studs. In other cases, a washer may be provided to fitopposite the flange to positively locate the shocks in both directions. In anycase, you should never be able to see the urethane bushing over an outsideretaining washer. Should your shocks be equipped with spherical (”Heim”)bearings, it is unnecessary to tighten the bolts any more than 15 footpounds of torque. Use Loctite or other thread locking compounds and/orself locking nuts.NOTE: The two piece Igus-style shock bushings are designed to have acertain side-to-side “float” to keep them from binding. As a result, do notgrind or file the inner or outer edges of the bushings to make them narrower.The amount of "float" in the bushing set is necessary to ensure smoothoperation of the damper assembly. If the shock eyes are tightened metal-tometal(the outer faces of the eyes to the flanges or washers), this will lead toa harsh, stiff or choppy ride and premature seal leakage.Once you are satisfied with the alignment and fit for clearance, sparinglyapply a thread locking compound to the threads on the shock mountingfasteners and tighten them to the appropriate torque. Over-tightening thefasteners can damage the bushings and cause the shock to bind. Thisresults in harsh, choppy performance and premature seal failure.YAMAHA YFZ350 BANSHEEFig. 4--Banshee rear shock reservoir mounting, allyears. Hoses should make smooth bends. The hoseexits from the rear and loops over the top of thebrake master cylinder reservoir. The reservoir ismounted on the inside of the frame tube behind thestock plastic fenders/side cover. On adjustablecompression reservoirs the adjuster points towardsthe axle.GENERAL INSTALLATIONWhen installing remote reservoirs, use rubber blocks between the frameand the reservoirs. Position the reservoirs in such a way as to allow a bendin the hoses so that they are never pulled taut as the suspension movesthrough its travel. If your vehicle is not shown in these illustrations, followthese simple tips for mounting your reservoirs.HONDA TRX400EXFig. 5-- TRX400EX rear shock reservoir mounting, all years. Hoses should makesmooth bends. Finned and smooth reservoir mounting is identical. On adjustablereservoir models, the hose comes across the top of the reservoir so that theknob/screw points down and clears the tool box and electrical components.HONDA TRX400EXFig. 6--TRX400EX front shock reservoir mounting,all years. Hoses should make smooth bends. Notethat t<strong>here</strong> is a right and left hose orientation, andthat the hose angle is down and toward the rearand around the shock on the inside. Adjustablecompression reservoir screws point forward and up.Continued on next page.
Quad Instructions, ContinuedSHOCK POSITION IN RELATION TO RESERVOIR POSITIONIn most cases the <strong>Works</strong> shocks are mounted with the shock body and hoseat the top, with the shaft pointing down. Many of the common mountings aredepicted <strong>here</strong>. If you have a custom application or you have mademodifications to the swingarm or frame that will make mounting difficult,keep this following tip in mind. The reservoir should always be attachedto the same area that the shock end with the hose is attached.EXAMPLES— Right Way: Reservoir mounts to frame, so shock end withhose mounts to frame.Wrong way: Shock end with hose mounted to frame, reservoir mounted toA-Arm or swingarm.Wrong way: Shock end with hose mounted to A-Arm or swingarm withreservoir mounted to frame.HOSE ROUTINGThe reservoir hose should have smooth bends, so that t<strong>here</strong> will be notension on the hose or the fittings. If you have to stretch the hose against thefittings, it may cause the fittings to crack later during use. Keep the hoseaway from brake brackets, frame gussets or anything else that is sharpenough to cause damage to the stainless steel braid. This braidedcovering provides the strength of the hose. If the braid is broken or frayed,the inner liner will burst, causing oil leakage. Slit some fuel line (3/8-inchautomotive) and wrap it around the hose for protection at any problem area.Whenever possible, route the hose away from any part of the frame that cancome into contact with part of the suspension (tie rods, drag links, etc.)Route the hose so that rocks or other foreign objects can have the leastpossibility of hitting and damaging the braided fabric. On the rear shocks,keep the hose well away from the drive chain. It is always a good idea tomount it on the opposite side of the vehicle from the drive chain. Try to keepthe reservoir and hose as far from mufflers and exhaust pipes as ispossible. If the hose comes in contact with the hot exhaust system, it cancause the inner lining to fail and cause the hose to leak shock oil.RESERVOIR MOUNTINGMost <strong>Works</strong> Performance remote reservoir shocks are fitted with apolyurethane bladder inside the reservoir, as opposed to a floating piston.The advantages of a bladder style reservoir are numerous: smoothoperation; excellent nitrogen/oil separation; and no friction. It also meansthat the reservoirs can be clamped in virtually any position and at any placeon the reservoir.Page 3BOMBARDIER DS650Fig. 7--Front shock reservoir mounting, all years.Hoses should make smooth bends. Adjustablecompression reservoir shown, however, finned andsmooth reservoir mounting is identical. Make surethat left front hose does not touch the line to the oiltank. Rotate the reservoir around the frame tube asnecessary for clearanceBOMBARDIER DS650Fig. 8--Rear shock reservoir mounting, all years.Hoses should make smooth bends. Adjustablecompression reservoir shown, however, finned andsmooth reservoir mounting is identical.Normally, the hose clamps should be placed about one-half inch (1/2-inch)from either end of the reservoir. Because the reservoir expands when itgets hot (under hard use) two guidelines should be followed. One is that thestand-off blocks provided should be used. This will keep the hose clampsfrom breaking when the reservoir expands. You can also use pieces ofautomotive radiator or heater hoses to provide a cushion. The secondguideline to follow is to not over-tighten the hose clamps, for the samereasons. The use of zip ties to mount the reservoir is not encouragedbecause they may not be able to expand enough and may break when t<strong>here</strong>servoir expands (or when the outside temperature drops). Also, zip tiestend to become brittle after prolonged exposure to weather and sun, andcan break as a result.CHECKING RIDE HEIGHT (SAG)Setting the correct ride height, or sag as it is often referred to, is critical tobest performance. Not enough sag in the front suspension can cause topouttoo often and can reduce the tracking and cornering ability of the frontsuspension. Not enough sag in the rear suspension will also causeexcessive topping and can reduce the ability of the tires to “hook up” or getgood traction under acceleration. Too much sag will cause both front andPOLARIS, ALL THRU 99Fig. 9--Rear shock reservoir mounting, all yearsthrough 99. Hoses should make smooth bends.Smooth reservoir shown, however, finned andadjustable compression reservoir mounting isidentical. (Adjustment access is from under fender)Front hose clamp is between tool box bracket andframe.Continued on next page.
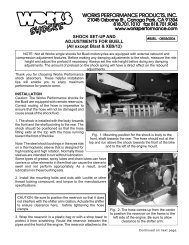
Quad Instructions, Continuedrear suspensions to bottom too hard and too often.Page 4SUSPENSION MEASUREMENTSNOTE: Measurements for determining ride height should always be takenfrom the upper surface of the suspension (or tire) to a point above it. Havean assistant take the measurements, if you are the rider. Attempting to siton the vehicle and take measurements is not at all accurate, because theweight distribution is off. See the illustrations on these pages for the correctsuspension measuring pointsNOTE: Never take measurements from the front “push bar” orbumper or from the rear bumper or lifting handle to the ground. Asyou move further away from the axle center line, those measurementsbecome multiplied. In addition, a measurement to the ground doesnot take into consideration how much tire deflection t<strong>here</strong> is loadedand unloaded because it includes the “flat” side of the tire. Thesemeasurements can vary based on temperature, barometric pressure,and tire pressure and construction. For these reasons, anymeasurements taken to the ground are bogus, and will not help youset up your quad correctly.MEASUREMENT “ A”Two measurements are made at each end of the vehicle. The first is takenwith the quad completely unloaded— meaning that the wheels are off theground. In front, take this measurement from the top of the tire to the edgeof the fender just above it. If you have longer than stock A-arms orshortened fenders, you can take the measurement from the top of theRear Ride HeightFig. 10-- Measurements for sag at the rearare taken from the top of the tire or axle toa point straight above it, in this case thefender. Rear measurements are taken inthe same manner as the front (see Fig.11)ABFront Ride Height MeasurementsFig. 11-- Ride height (sag) measurement is taken from the top of the tire or ball joint to a point just above it on theframe or fender. On the left, measurement ”A” is taken with the suspension fully extended--wheels off the ground(note the jack under the front of the vehicle). On the right, measurement ”B” is taken between the same twopoints but with the rider on the seat. Subtract measurement “B” (9-inches) from measurement “A” (11 inches) andthat is the ride sag (2 inches) in the suspension. The ride sag is a percentage of the total suspension travel andshould be somew<strong>here</strong> between ¼ and 1/3 of the wheel travel. Example: The Banshee above has 8.0-inches ofwheel travel, and the ride sag is 2 inches, which is ¼ of the wheel travel. The ride sag should be from 2 inches to2-5/8 inches. On a vehicle with 4 inches of wheel travel, the ride sag would be from 1 inch to 1-3/8 inches.Continued on next page.
Quad Instructions, ContinuedPage 5upper a-arm ball joint to the fender, butuse whichever is the most verticalmeasurement. If the fenders areremoved, lay a yardstick or welding rodacross the frame to give you an uppermeasurement point. Record thismeasurement. At the rear, take ameasurement from the top of the tire ortop of the axle to a point directly above it,usually the fender or frame. Record thismeasurement.MEASUREMENT “B”Next, put the quad back on the ground.Have the rider stand on the pegs andbounce the suspension. Once thesuspension settles, roll the quad backand forth to allow the front suspension toovercome the side loading on the fronttires caused when the tires moveout as the A-arms move up anddown. Usually the front will comeup a little when the side loading isnullified. Now, with the rider stillon the pegs, take measurementsfrom the same two points at eachend of the vehicle and recordthem.KAWASAKI KXF250 TECATE 4Fig. 12--Kawasaki KXF250 Tecate 4reservoir mounting, all years. Hoses shouldmake smooth bends. It may be necessaryto trim the lower edges of the radiatorshrouds.SUZUKI LT250R ‘85-’90Fig. 13-- Suzuki LT250R ‘85-’90 rear shockreservoir mounting. Note that the shockshaft points up, with the hose fitting at thebottom exiting to the rear. The reservoir isattached to the right side of the strut.MEASUREMENT “A”MINUS MEASUREMENT“B” EQUALS RIDE SAG.The difference between the firstmeasurement “A” and themeasurement “B”is the amount ofsag in the suspension. Forinstance, if measurement “A” is16 inches and “B” is 13 inches,the ride sag is 3 inches. On mostHONDA TRX250EX - ‘01Fig. 15-- Honda TRX250EX front shock reservoirmounting. Hoses should have a smooth bend. Notethat the hose exit is opposite on each shock, sot<strong>here</strong> is a specific left and right shock.quads, the sag should be between 25 and 33 percent of the total wheel travel. Fora quad with 10 inches of travel, the ride sag would be from 2-1/2 to 3-3/8 inches.W<strong>here</strong> you set the ride sag depends on personal preference and the effort to getgood balance in the suspension. For instance, if the rear ride is too soft or has toomuch ride sag, then the front will seem stiffer and not sag appropriately, becausemore of the vehicle weight transfers to the rear. Conversely, if the rear is too stiff orthe ride height is too tall (not enough sag), it will make the front seem too soft andthrow off the ride sag measurement at that end.SUZUKI LT250R ‘85-’86Fig. 14-- Suzuki LT250R 85-86 front shockreservoir mounting. Hoses should makesmooth bends. Note that the hose exit isthe same on both shocks, but the hosesshould bend around towards the rear.IF THE RIDE HEIGHT IS TOO LOW.....To raise the vehicle and reduce the amount of ride sag, screw the adjuster nuttowards the spring to increase the pre-load. This makes the installed length of thespring shorter. If this is for competition, record this installed length so that you canset the bike up the same after having the shock disassembled for service.IF THE RIDE HEIGHT IS TOO HIGH.....To lower the vehicle and increase the amount of ride sag, screw the adjuster nutaway from the spring to decrease the pre-load. This makes the installed length ofthe spring longer. For a competition vehicle, record this installed length.HONDA TRX250EX - ‘01Fig. 16-- TRX250EX rear shock reservoirmounting. The hose should have a slightbend, so position the reservoir so the hosewon’t be straight.Continued on next page.
Quad Instructions, ContinuedPage 6Reservoir Mounting IllustrationsYAMAHA YFM660R RAPTORFig. 17--Raptor front shock smoothreservoir mounting, all years. (Left sideshown.) Hoses should make smoothbends. Note that t<strong>here</strong> is a right and lefthose orientation, and that the hose angleis down and toward the front.YAMAHA YFM660R RAPTORFig. 18--Raptor front shock adjustable compressionreservoir mounting, all years. Hoses should makesmooth bends. Note that t<strong>here</strong> is a right and left hoseorientation, and that the hose angle is down slightlyand toward the rear. Access to the adjuster screw isfrom the side.YAMAHA 2002 YFM660RRAPTOR REARFig. 19--2002 Raptor rear shockadjustable compression reservoirmounting. Hoses should make smoothbends. Keep reservoir up high formaximum clearance to chain roller.Smooth reservoir is similar with fill valve atthe bottom. Previous Raptor models usethe stock reservoir mounting bracket.SUZ LTZ400 & KAWKFX400 REARFig. 20--Rear shock reservoirmounting. Adjustablecompression reservoir shown.Smooth and finned reservoirmountings are similar.EARLY SUZ LTZ400 & KAW KFX400(SHOCKS MADE BEFORE 01/01/03)Fig. 21--Front shock reservoir mounting used up until01/01/03. Hose fittings are at different angles and crossover. This hose length and fittings on shocks made afterthis date were changed to the configuration at the right.LATE SUZ LTZ400 & KAW KFX400(SHOCKS MADE AFTER 01/01/03)Fig. 22--Front shock reservoir mounting usedon shocks made after 01/01/03. Hosesshould make smooth bends. Adjustablecompression reservoirs are similar.POLARIS PREDATOR 500Fig. 23--(At Left) Front shock reservoirmounting. Leave some slack to avoidpulling hoses too tight. Smoothreservoir shown. Adjustablecompression and finned reservoirmountings are similar.POLARIS PREDATOR 500Fig. 24--(At Right) Rear shock reservoirmounting. Hose and reservoir loop overthe top of the boot to protect the hosefrom the chain. Adjustable compressionreservoir shown. Smooth and finnedreservoir mountings are similar.Continued on next page.
Quad Instructions, ContinuedYFZ450 RESERVOIR MOUNTINGSUPPLEMENTRear ShockThe <strong>Works</strong> rear shock for the Yamaha YFZ450 modelsfeatures a hose mounted remote reservoir. Because of thetight confines around the shock, a bracket has beenincluded to facilitate the reservoir mounting. Care should betaken when installing the shock so that the fittings are nothit. If the hose fittings on the shock or reservoir are cracked,oil will leak out of the system.Page 7Please refer to the Quad Shock mounting instructions forother tips on setting up your <strong>Works</strong> Performance shocks.Fig. 26– The reservoir fits on the supplied bracket which isattached to the upper shock mount bolt with the suppliedrubber standoffs. Note the hose routing along side theshock toward the front of the machine.Fig. 25– Front reservoir mounts to down tube to t<strong>here</strong>ar of the shocks.. This is the view of the right sideshock. The left is opposite. The hoses should makesmooth bends.Fig. 27– Slotted screw for compression is positionedto allow easy access for adjustment from the rightside of the machine.Fig. 28– Another view from the rear of the machine of thehose routing and bracket installation.Continued on next page.
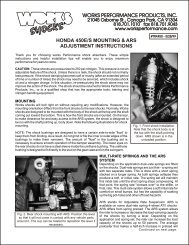
Quad Instructions, ContinuedPage 8With the threaded preload option, it is possible toadjust the crossover without removing the springs.(1) Measure the length of the spring stack from oneend to the other (all springs).(2) Back the pre load nut off far enough to repositionthe clip up on the body, the crossover distance isincreased (so the springs will stay on the softer ratelonger). By moving the clip down on the body, thesprings will transition sooner to the stiffer rate.Crossover ring“Go-between”(springClip grooves(steel body only)This distance is the crossoverspace that is left after installedpreload on the spring set.By decreasing this distance,the spring set will get stiffersooner in the suspensiontravel.Threaded Spring Preload andCrossover DiagramBy increasing this distance, thespring set will stay softerlonger in the suspensiontravel.