PDF file - David Thomas Contact Lenses
PDF file - David Thomas Contact Lenses
PDF file - David Thomas Contact Lenses
- No tags were found...

Create successful ePaper yourself
Turn your PDF publications into a flip-book with our unique Google optimized e-Paper software.
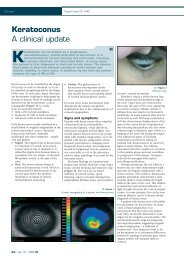
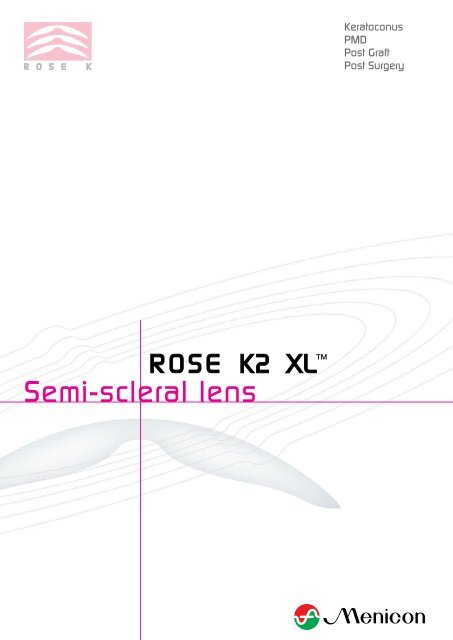
KeratoconusPMDPost GraftPost SurgeryROSESemi-scleral lensK2 XLTM
ROSE K2 XL semi-scleral lensApplicationsDesign Primary indications: Keratoconus, Pellucid Marginal Degeneration (PMD), Post Graft, CornealRings, Post-LASIK ectasia, advanced dry eye and any irregular corneal condition that cannotbe successfully fitted within the limbus. Secondary indications: Polluted work conditions, stability for sport or working environment.Corneal GP intolerance, Piggyback. Daily wear. Aspheric Back Optic Zone which decreases as BC steepens. Front surface aberration control. Precise Edge Lift control.Parameter range BC range: 5.80 to 8.40 mm. Diameter range: 13.60 to 15.60 mm*Standard diameter 14.60 mm. Power: +30.00 to -30.00 D. Edge Lifts: 9 options5 standard Lifts will optimally fit 90% of cases.Other options are available on request. Material: Menicon Z, Lagado Tyro 97, Boston XO.Fitting set 16 lenses. BC: from 6.00 to 8.00 mm. Standard diameter: 14.60 mm. Edge Lift: Standard Lift (0).*Note: in some very steep BC’s maximumdiameter is restricted (ie 6.1 mm and steeper).2.0 Double Flat Lift1.0 Standard Flat Lift0 Standard Lift-1.0 Standard Steep Lift-2.0 Double Steep LiftDoubleDecreased Lift2.0-2.0- 1.50StandardDecreased Lift1.0-1.0- 0.50StandardIncreased Lift1.0+ 1.50+ 0.5001.0 2.0Standard Lift0.0DoubleIncreased Lift2.0Very excessive EL Excessive EL Correct EL Tight EL Very tight ELLFluorescein pictures with standard Lift (0) trial lens:arrows with the pictures indicate the required Lift value to give the correct Edge Lift pattern.
ROSE K2 XL HandlingLens insertion• With the lens concave side up, fill the lens with saline solution andadd a small amount of fluorescein.• Have the patient tilt their head down, so it is parallel with the floor,and centrally apply the lens to the eye so that the solution remains inthe lens.• Patients can handle the lens with either a suction holder or by balancingthe lens in a tripod between the thumb, index and middle finger.Small insertion bubbles are of no consequence, but larger bubbles willdisrupt both vision and comfort and must be avoided.If bubbles are obvious under the central part of the lens after insertion,the lens must be removed and the insertion process repeated.Handling TipsIf there is difficulty at the initial fitting eliminating large bubbles underthe lens, substitute saline solution with MeniCare Plus solution.Lens removal• Place the wetted suction holder on the outside temporal edge of the lens.• Peel the lens off by pulling outwards and across in an arc towardsthe nose.• The lens may also be removed by using the lower lid to lift thecontact lens edge up and outwards.Patients should not have lenses dispensed until they have showncompetence in being able to remove the lens.Warning : do not attempt to remove the lens with the suction holder placed centrally.Lens care instructions1 Gently rub the lens between thumb and forefinger with a few dropsof MeniCare Plus solution.2 Rinse the lens with MeniCare Plus solution.3 Store the lens in appropriate lens case (flat lens case or large sizecontainer) filled with MeniCare Plus solution.Handling Tips1. Do not rub the lens inthe palm of the hand;this may cause lensbreakage.3
ROSE K2 XL Fitting procedureStep 1: Base curve evaluationIf topography is unavailable to accurately identify the condition you arefitting, choose your first trial lens 0.2 mm steeper than the average K’s.Guide to first trial lens by condition:• Keratoconus: 0.2 flatter than mean K’s• PMD: 0.6 steeper than mean K’s• Post Graft: 0.7 steeper than mean K’s• Post LASIK: 0.7 steeper than mean K’s• Corneal Rings: 0.1 steeper than mean K’s.NB : the above is only an approximate guide.- Instill saline with fluorescein into the concave side of lens.- Judge the central fit immediately after insertion.- Select progressively flatter or steeper BC’s until a light feather touchis achieved at the highest point on the cornea.- Allow the lens to settle for a further 20 minutes and re-evaluate the fit.- If further fluorescein is required, place on the sclera at 12 o’clock justabove the lens. Ask the patient to blink several times.- If fluorescein does not circulate behind the lens, manipulate the lowerand or upper edge to encourage fluorescein to flush under the lens.Central fit - IdealFitting Tips1. Judge initial central fitimmediately after insertionand again after 20minutes.2. Any staining at thehighest point on the corneaindicates the need fora steeper BC.Step 2: Edge Lift- Once the correct central fit has been achieved, observe the fluoresceinpattern at the outer 1 mm of the lens at all positions around the clock.- A peripheral band about 0.8 to 1 mm wide is ideal.- Reinsert fluorescein onto the sclera if several minutes elapse.- Fluorescein should circulate under the edge of the lens.- If the band is too wide, it may show lift off and bubbling at the edgeof the lens with associated discomfort: decrease the lift.- If the band is too narrow: increase the lift.- Fluorescein band may be irregular if peripheral astigmatism is present.- A tight Edge Lift may cause binding of the lens, which can causeblanching of the conjunctival vessels from the limbus to the edge of thelens, and/or hyperemia to conjunctival vessels just outside the lens.Ideal peripheral fitFitting Tips1. 50% of patients can be optimally fitted with the standard edge lift.2. 90 % of patients can be optimally fitted using the normal 5 Edge Lifts.3. Judge Edge Lift immediately after insertion and again after 20 minutes.4. Lens discomfort is most commonly associated with an excessive Edge Lift.5. Discomfort experienced on lens removal often indicates a tight edge : increase the Edge Lift.6. With the correct edge lift, with slight upward pressure on the edge of the lens at 6 o’clockvia the lid, fluorescein should be seen to enter under the edge of the lens. Having to useexcessive force indicates a tight edge.7. Judging the correct choice of edge lift is a combination of interpretation of the fluoresceinpattern, the movement of the lens, and how easily fluorescein enters the lens at 6 o’clockwith upward pressure.8. Excessive force should not be required to remove the lens with a suction holder.4Excessive loose fitTight peripheral fit
ROSE K2 XL HandlingStep 3: Diameter- Recommended standard diameter: 14.60 mm (60% of fits)- On the average sized cornea of 11.8 mm, the lens should extend 1.3 to 1.5 mm outside the limbus.- For large corneas: increase the diameter.- For small corneas: decrease the diameter.1.3-1.5 mm• With the lens concave side up, fill the lens with saline solution andadd a small amount of fluorescein.Fitting Tips• 1. Have Decreasing the the patient diameter tilt may their also head assist down, with insertion so it and is removal. parallel with the floor,2. Making the lens larger will often make the lens more stable.3. and 0.3 mm centrally change in apply diameter the can lens be significant. to the eye so that the solution remains in4. the The lens. BC does not require any adjustment if you change the diameter.Lens insertion• Patients can handle the lens with either a suction holder or by balancingthe lens in a tripod between the thumb, index and middle finger.Step 4: LocationSmall insertion bubbles are of no consequence, but larger bubbles willdisrupt both vision and comfort and must be avoided.-IfThebubbleslens shouldare obvioussit evenlyunderaroundthe centralthe limbus.part of the lens after insertion,-theA decenteredlens must beapex,removedmay causeand thetheinsertionlens to locateprocessinferiorly.repeated.- To improve centration: increase the diameter and/or steepen the BC.- Slight decentration may not cause any major issues but may be slightly lesscomfortable. Handling TipsIf there is difficulty at the initial fitting eliminating large bubbles underthe lens, substitute saline solution with MeniCare Plus solution.Step 5: Movement- On first insertion, the lens should move slightly on blinking.- Judge movement at 6 o’clock, by having the patient look up and blink.- After lens settles: very little movement should be obvious (maximum of 0.5 mm).-• Excessive Place the wetted movement suction makes holder the on lens the outside less comfortable. temporal edge of the lens.- To decrease the movement: - Decrease the Edge Lift.• Peel the lens off by pulling outwards and across in an arc towards- Steepen the BC.the nose.- Increase the diameter or a combination of these.• The lens may also be removed by using the lower lid to lift the- To contact increase lens the edge movement: up and outwards. - Increase the Edge Lift.- Flatten the BC.Patients should not have lenses - dispensed Decrease the until diameter they have or shown a combination of these.competence in being able to remove the lens.Lens removalWarning : do not attempt to remove the lens with the suction holder placed centrally.Fitting TipsJudge the movement both on initial insertion and after the lens has settled for 20 minutes.Lens care instructionsStep 6: Vision1 Gently rub the lens between thumb and forefinger with a few dropsof MeniCare Plus solution.An 2 Rinse accurate the over lens with refraction MeniCare should Plus be solution. performed once the lens hassettled after 20 minutes.3 Store the lens in appropriate lens case (flat lens case or large sizecontainer) filled with MeniCare Plus solution.Fitting Tips1. BCVA at the fitting is an accurate indication of the best BCVA that will be achieved.2. For follow up visits, vision should always be checked first before any fluorescein is appliedto the eye.3. Going too steep centrally can reduce best vision. If the visual acuity is poor, try a flatter BC.Handling Tips1. Do not rub the lens inthe palm of the hand;this may cause lensbreakage.35
Suggested wearing schedule• Day 1: 3 hours maximum.• Day 2: increase wearing time by 2 hours per day to amaximum of 8 hours per day.• First follow up visit: 2 weeks after dispensing lenses. If thereare no problems at this visit, wearing time can be increasedprogressively 2 hours per day to a maximum of 12 hours.• Second follow up visit: 1 month after dispensing lenses.• Third follow up visit: 3 months after dispensing lenses.• Ongoing follow up visits: every 6 months thereafter.Fitting Tips1. Ease of removal of the lens off the eye with a suction holderis a good indication of whether the Edge Lift is sufficient.With the method described here the lens should lift out easilyfrom the eye.2. Manipulating the lens over the cornea by using pressure onthe lower lid and lifting the upper lid, will give a good indicationof whether the lens overall is too tight. The lens shouldmove relatively easily. This is best observed with the patientlooking straight ahead.3. It is not uncommon to get slight fluorescein uptake on thecornea after a few hours of wear. This is generally a verysuperficial staining and may not cause any long-term issues.4. Because of the decreased tear exchange over the cornea,some patients may report some discomfort or a dry feelingafter 3 to 4 hours of wear. Removal of the lens, refilling withsaline and reinsertion will often alleviate this and give a further3 to 4 hours comfortable wear. This should be performedroutinely for new wearers for the first month of wear.5. A tight edge on initial insertion gives much better comfortthan a loose edge but may cause issues in the long term.Slight discomfort on first insertion, even with the correctEdge Lift is not uncommon, and often settles after a fewminutes. Initial comfort is not necessarily an indication of agood fitting lens. Because ROSE K2 XL lens has a high EdgeLift, it may be slightly less comfortable on first insertion.“Lens awareness” is not uncommon for the first 2-3 daysbefore settling.6. Conjunctival indentation seen on lens removal may be eliminatedby increasing the diameter and/or increasing the Edge Lift.7. Because of the comfort and reduced tear exchange, semisclerallenses can cause corneal issues earlier than corneallenses and often with less symptoms. Wearing time shouldbe conservative until the first follow up at 2 weeks. Usually ifthere are going to be any issues they will show up within thefirst month of wear. The patient should be advised to removethe lens and consult you IMMEDIATELY should they experiencediscomfort/pain, injection/hyperemia, photophobia,“cloudy/misty” vision or any other issue they are concernedabout.0120 - Manufactured by <strong>David</strong> <strong>Thomas</strong> CL Ltd, NN3 8RJ, UKwww.menicon.comBubbling causes1. Lens flat centrally. There is too much touch on the highestpoint on the cornea that causes the lens to rock causing liftoff at the edge that introduces bubbles at this point. It isvery important to note the touch on the highest point. Forexample with corneal inserts, the highest point may bedirectly over the rings.2. The Edge Lift is excessive and needs to be reduced.3. The diameter is too small so the lens does not fit adequatelyonto the sclera.4. The sclera is toric.NB: toric or asymmetric options should be available soon.Bubbling due to small diameterBubbles trappedon insertionBubbling due to excessiveEdge Lift at 6 o’clockME104/1 2012-07- www.quelquechoseenplus.fr Photos : all rights reserved - Printed in France by Menicon Europe - RCS Nanterre B 722 038 668