Create successful ePaper yourself
Turn your PDF publications into a flip-book with our unique Google optimized e-Paper software.
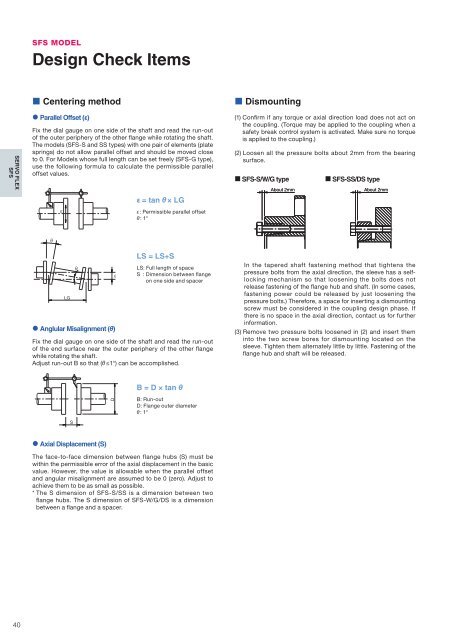
SFS MODELDesign Check Items¢ Centering method¢ DismountingSERVO FLEXSFSò Parallel Offset (ε)Fix the dial gauge on one side of the shaft and read the run-outof the outer periphery of the other flange while rotating the shaft.The models (SFS-S and SS types) with one pair of elements (platesprings) do not allow parallel offset and should be moved closeto 0. For Models whose full length can be set freely (SFS-G type),use the following formula to calculate the permissible paralleloffset values.ε = tan θ × LG(1) Confirm if any torque or axial direction load does not act onthe coupling. (Torque may be applied to the coupling when asafety break control system is activated. Make sure no torqueis applied to the coupling.)(2) Loosen all the pressure bolts about 2mm from the bearingsurface.¢ SFS-S/W/G type ¢ SFS-SS/DS typeAbout 2mmAbout 2mmε : Permissible parallel offsetθ : 1°LGò Anglular Misalignment (θ)LS = LS+SLS: Full length of spaceS : Dimension between flangeon one side and spacerFix the dial gauge on one side of the shaft and read the run-outof the end surface near the outer periphery of the other flangewhile rotating the shaft.Adjust run-out B so that (θ ≤1°) can be ac<strong>com</strong>plished.In the tapered shaft fastening method that tightens thepressure bolts from the axial direction, the sleeve has a selflockingmechanism so that loosening the bolts does notrelease fastening of the flange hub and shaft. (In some cases,fastening power could be released by just loosening thepressure bolts.) Therefore, a space for inserting a dismountingscrew must be considered in the coupling design phase. Ifthere is no space in the axial direction, contact us for furtherinformation.(3) Remove two pressure bolts loosened in (2) and insert theminto the two screw bores for dismounting located on thesleeve. Tighten them alternately little by little. Fastening of theflange hub and shaft will be released.B = D × tan θDB: Run-outD: Flange outer diameterθ : 1°Sò Axial Displacement (S)The face-to-face dimension between flange hubs (S) must bewithin the permissible error of the axial displacement in the basicvalue. However, the value is allowable when the parallel offsetand angular misalignment are assumed to be 0 (zero). Adjust toachieve them to be as small as possible.* The S dimension of SFS-S/SS is a dimension between twoflange hubs. The S dimension of SFS-W/G/DS is a dimensionbetween a flange and a spacer.40


