Compound Parabolic Solar Cooker - nocookie.net
Compound Parabolic Solar Cooker - nocookie.net
Compound Parabolic Solar Cooker - nocookie.net

Create successful ePaper yourself
Turn your PDF publications into a flip-book with our unique Google optimized e-Paper software.
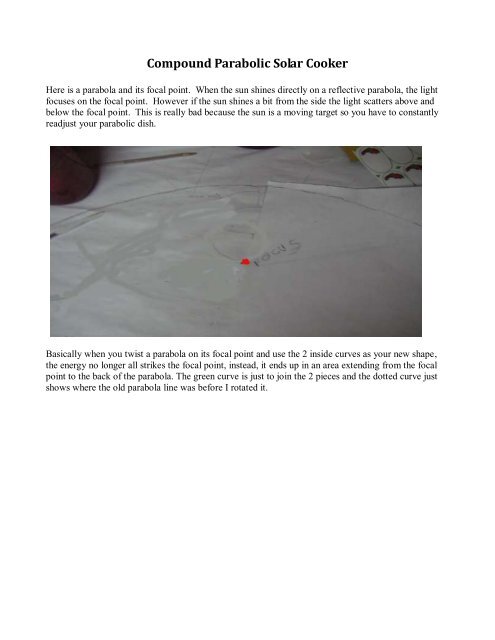
<strong>Compound</strong> <strong>Parabolic</strong> <strong>Solar</strong> <strong>Cooker</strong>Here is a parabola and its focal point. When the sun shines directly on a reflective parabola, the lightfocuses on the focal point. However if the sun shines a bit from the side the light scatters above andbelow the focal point. This is really bad because the sun is a moving target so you have to constantlyreadjust your parabolic dish.Basically when you twist a parabola on its focal point and use the 2 inside curves as your new shape,the energy no longer all strikes the focal point, instead, it ends up in an area extending from the focalpoint to the back of the parabola. The green curve is just to join the 2 pieces and the dotted curve justshows where the old parabola line was before I rotated it.
http://www.youtube.com/user/gaiatechnician has a lot more detail in recent videos.Here we show a cooking pot in blue that is in that sweet spot. As long as the sunlight falling on thedish is within the acceptance angle, the light shines on the cooking pot.
I think a lot of people will redirect their efforts when they understand the difference between anordinary parabolic dish and a compound parabolic dish.I decided on a size close to 1 m 2 for my reflector because it makes the math easier.I chose a 3 hour acceptance angle because this allows me to cook unattended for quite a long time.It also fitted in nicely with the pot size that I intended to use. I chose a pot that was 9.5 inches (24 cm)wide and 8.5 inches (21.5 cm) high. This fits very well in the turkey roasting bags available here.I did drawings of the compound parabola and then put a drawing of my pot behind the focal area.From that I could calculate the right size for my dish. Here is a template that you can use to make o<strong>net</strong>oo.
Then you can use the template to cut 12 segments from your bendable sheet material. Then you cantape them together to make an umbrella shape and then you stick mylar or kitchen foil on the inside ofthe umbrella shape.Please note that I did it on a dome that I made from cob but the method is essentially the same withsegments
Here is apple stewingPotatoes are baked in the top of the pot! I used a wire fruit holder supported by a glass canning jar tokeep them up high.
Temp CProof that they cooked!This was the 29 th of september (not a good day and they only got to 85 degrees C but as you can seethey baked!Here is my first test heating 7 liters of water in a 1.25 kg aluminium pot. It was hung at and behind thefocal point to try to catch all the sunlight100Time versus temperature7 l water in a pot908070605040302010Column A00 100 200 300 400 500 600 700Time minutesAnd here is a test I ran on 13 th september with the same parameters.I let it cool down in the evening after the sun no longer shone on it just to see the cooling curve.This allows an estimate of heat losses through the turkey bag if you wish.
Temperature120time versus temperatureheating and cooling1008060402000 100 200 300 400 500 600 700Time minutesI also did a test with 1 liter of water in the 7 liter potAnd I also heated soil to sterilize it. You should be aware that heat moves through soil slowly so I putthe thermometer in the middle at the top. Heat approaches the thermometer slowly! So the curve is notthe same as when you heat water!On a good day the soil can go to 100°C.I have been very pleased with this solar cooker, after the design process, it proved easy to make, it hasknown parameters of operation and I shall use it and test it out until the cloudy winter comes in here.Brian White (gaiatechnician@yahoo.com)