tank tread kit - VEX Robotics
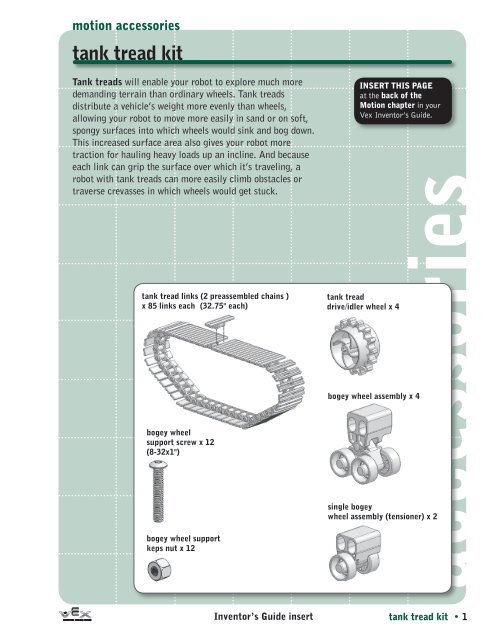
tank tread kit - VEX Robotics
tank tread kit - VEX Robotics

You also want an ePaper? Increase the reach of your titles
YUMPU automatically turns print PDFs into web optimized ePapers that Google loves.
motion accessories<strong>tank</strong> <strong>tread</strong> <strong>kit</strong>, continuedAs you learned in the Vex Inventor’s Guide, arobot’s structure and motion subsystems areusually interdependent and often have to be builttogether. In this case, you’ll need to have somepre-existing structure to which you can connectthe <strong>tank</strong> track components. In particular, you’llneed a chassis rail or other structural component,two axles for the <strong>tank</strong> tracks’ drive wheels, and amotor to power one of those axles. Remember tomount the motor securely using two 6-32 screws,or you’ll have problems down to the road!Note: for more information on motors and motionsystems, see the Motion chapter in your VexInventor’s Guide.Assembly Instructions1 Build Your Support StructureStart by assembling the chassis of your robot and the supportstructure on which you intend to mount the <strong>tank</strong> <strong>tread</strong>. (Note: thestructure shown in these instructions is only for reference.) Themounting structure should include two axles spaced out such thatthere are 11 open holes in between them. One of these axles will beconnected to a motor, which will drive the whole assembly.11 holesaccessoriesNOTE: The followingassembly instructions showhow to build <strong>tank</strong> tracks forone side of your robot. Thesame directions should alsobe followed to build theother side.<strong>tank</strong> <strong>tread</strong> <strong>kit</strong> • 2Inventor’s Guide insert
motion accessories<strong>tank</strong> <strong>tread</strong> <strong>kit</strong>, continued2 Add bogey wheel assembliesAdd two bogey wheel assemblies to the support structure as shown.Note that, for both bogey wheel assemblies, there should be twospaces separating the bogey wheel assembly and the axle. Securethe bogey wheel assemblies to the support structure using two8-32x1" screws and two keps nuts per bogey wheel assembly. Theoblong holes in the bogey wheel assemblies will allow you to adjustthe tension of the tracks once you’ve finished assembling the system.Your assembly should now look like this:Parts needed in this step:bogey wheelassembly8-32 x 1"screwaccessorieskeps nutx 2 x 4 x 4Inventor’s Guide insert<strong>tank</strong> <strong>tread</strong> <strong>kit</strong> • 3
motion accessories<strong>tank</strong> <strong>tread</strong> <strong>kit</strong>, continued5 Verify position of components.At this point, make sure that your assembly looks like this. It’s veryimportant to have all the components in the right position with respect toone another, or the preassembled <strong>tread</strong> links might not fit.6 Adjust chain of <strong>tread</strong> links.The <strong>tread</strong> links come preassembled in two long chains of85 links apiece. For this design, you’ll need a section ofchain with 47 links in it. The link material is slightlyflexible, which makes it easy to separate links from therest of the chain. Just bend the arms out – GENTLY! – justenough to disengage the hole from the posts on the nextlink. Reverse the process to reassemble the links.accessories<strong>tank</strong> <strong>tread</strong> <strong>kit</strong> • 6Inventor’s Guide insert
motion accessories<strong>tank</strong> <strong>tread</strong> <strong>kit</strong>, continued7 Add <strong>tread</strong> links.Wrap the chain of 47 preassembled <strong>tread</strong> links around the drivewheels, tensioner, and bogey wheel assemblies, making sure that theteeth of the drive wheels mesh with the rollers of the links.Note how the teeth on the drive wheel fitbetween the rollers on the <strong>tread</strong> links.accessoriesParts needed in this step:<strong>tank</strong> <strong>tread</strong>linksx 1 chainInventor’s Guide insert<strong>tank</strong> <strong>tread</strong> <strong>kit</strong> • 7
motion accessories<strong>tank</strong> <strong>tread</strong> <strong>kit</strong>, continuedOnce the chain of <strong>tread</strong> links is securely in place, connect the firstand last link to make a continuous loop.You can now slightly loosen the screws holding the bogey wheelassemblies and tensioner in place. Slide the tensioner and thebogey wheel assemblies to tighten the chain of <strong>tread</strong> links. If the<strong>tread</strong> links are loose, they’ll come off once the robot is in motion.Limited 90-day WarrantyThis product is warranted by Innovation One against manufacturing defects in material and workmanship undernormal use for ninety (90) days from the date of purchase from authorized Innovation One dealers. For completewarranty details and exclusions, check with your dealer.Innovation One, Inc.350 North Henderson StreetFort Worth, TX 7610208/05Printed in China0405accessories<strong>tank</strong> <strong>tread</strong> <strong>kit</strong> • 8Inventor’s Guide insert