Wood Hinged Patio Door - Weather Shield
Wood Hinged Patio Door - Weather Shield
Wood Hinged Patio Door - Weather Shield
- No tags were found...

Create successful ePaper yourself
Turn your PDF publications into a flip-book with our unique Google optimized e-Paper software.
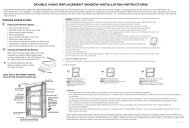
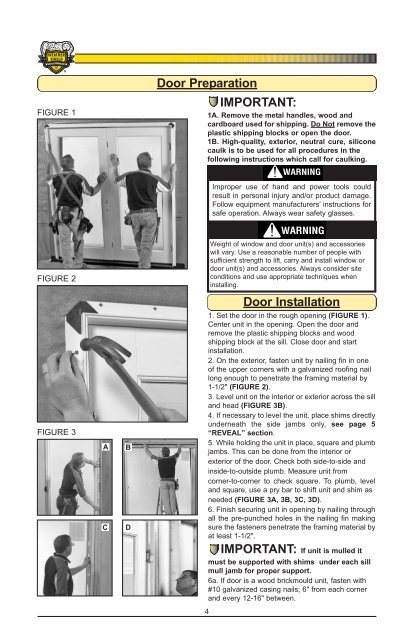
FIGURE 1<strong>Door</strong> PreparationIMPORTANT:1A. Remove the metal handles, wood andcardboard used for shipping. Do Not remove theplastic shipping blocks or open the door.1B. High-quality, exterior, neutral cure, siliconecaulk is to be used for all procedures in thefollowing instructions which call for caulking.Improper use of hand and power tools couldresult in personal injury and/or product damage.Follow equipment manufacturers’ instructions forsafe operation. Always wear safety glasses.FIGURE 2Weight of window and door unit(s) and accessorieswill vary. Use a reasonable number of people withsufficient strength to lift, carry and install window ordoor unit(s) and accessories. Always consider siteconditions and use appropriate techniques wheninstalling.<strong>Door</strong> InstallationFIGURE 3ACBD1. Set the door in the rough opening (FIGURE 1).Center unit in the opening. Open the door andremove the plastic shipping blocks and woodshipping block at the sill. Close door and startinstallation.2. On the exterior, fasten unit by nailing fin in oneof the upper corners with a galvanized roofing naillong enough to penetrate the framing material by1-1/2" (FIGURE 2).3. Level unit on the interior or exterior across the silland head (FIGURE 3B).4. If necessary to level the unit, place shims directlyunderneath the side jambs only, see page 5“REVEAL” section.5. While holding the unit in place, square and plumbjambs. This can be done from the interior orexterior of the door. Check both side-to-side andinside-to-outside plumb. Measure unit fromcorner-to-corner to check square. To plumb, leveland square, use a pry bar to shift unit and shim asneeded (FIGURE 3A, 3B, 3C, 3D).6. Finish securing unit in opening by nailing throughall the pre-punched holes in the nailing fin makingsure the fasteners penetrate the framing material byat least 1-1/2".IMPORTANT: If unit is mulled itmust be supported with shims under each sillmull jamb for proper support.6a. If door is a wood brickmould unit, fasten with#10 galvanized casing nails; 6" from each cornerand every 12-16" between.4