Strike & Latch Plate Template - Lee Valley Tools
Strike & Latch Plate Template - Lee Valley Tools
Strike & Latch Plate Template - Lee Valley Tools

You also want an ePaper? Increase the reach of your titles
YUMPU automatically turns print PDFs into web optimized ePapers that Google loves.
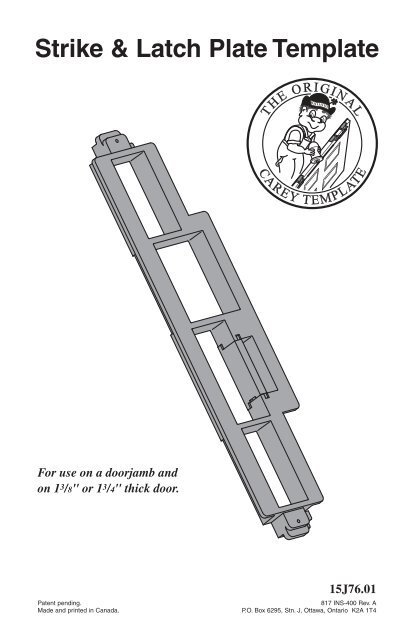
<strong>Strike</strong> & <strong>Latch</strong> <strong>Plate</strong> <strong>Template</strong>THE ORIGINALCAREY TEMPLATEFor use on a doorjamb andon 1 3 /8" or 1 3 /4" thick door.Patent pending.Made and printed in Canada.15J76.01817 INS-400 Rev. AP.O. Box 6295, Stn. J, Ottawa, Ontario K2A 1T4
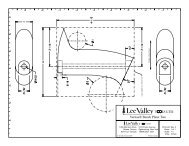
This glass-filled polycarbonate template makes it easy to rout mortisesfor the strike and latch plate on a doorjamb and on a door that is 1 3 /8" or1 3 /4" thick.It includes four windows, as shown in Figure 1:• One for 1 1 /8" × 2 1 /4" latch bolt or dead bolt plate,• One for 2 1 /4" strike plate,• One for 1 1 /8" × 2 3 /4" dead bolt or 2 3 /4" strike plate, and• One for 1" × 2 1 /4" latch bolt or dead bolt plate for the strike plate.The template is designed with a built-in 1 /16" offset so it can be used with a1/2" dia. straight double-flute router bit and a 5 /8" O.D. template guide (or a1/2" dia. hinge mortising bit and a 5 /8" bearing.)<strong>Template</strong> window for 1 1 /8" × 2 1 /4" latch bolt or dead bolt plate.<strong>Template</strong> window for 2 1 /4" strike plate.Flange for removingtemplate from dooror jamb.Snap-In Gate<strong>Template</strong> window for 1" × 2 1 /4"latch bolt or dead bolt platefor the strike plate.<strong>Template</strong> windowfor 1 1 /8" × 2 3 /4" dead bolt (with gate in place)or for 2 3 /4" strike plate (without gate).Nail Hole<strong>Template</strong>Figure 1: <strong>Template</strong> window identification.Caution: Be sure to follow the safety instructions that came withyour router. Make sure the workpiece is free from nails or otherforeign objects, and always maintain proper footing and balance.2
Note: For best results, rout in the clockwise direction. Proceed withcaution when using the mortising bit and bearing for shallow cuts, asonly a portion of the bearing will be in contact with the template.5. Pry under the flange behind the nail holder to remove the templatefrom the door.6. Install the latch bolt on the door. Close the door against the doorjamb,then transfer the location of the top and bottom of the bolt onto thedoorjamb.<strong>Strike</strong> <strong>Plate</strong>1. Select the appropriate opening, and align it vertically with the transfermarks on the doorjamb, as shown in Figure 4. (For a 2 3 /4" strike plate,remove the gate.)Gauge notch alignedto edge of doorjamb.Transfer MarksDoorjambFigure 4: <strong>Template</strong> set-up for use on doorjamb.5
2. Align the appropriate notch (for 1 3 /8" or 1 3 /4" thick door) against theedge of the doorjamb, as shown in Figure 4.3. Nail the top and bottom of the template to the doorjamb.4. Rout the mortise into the doorjamb.5. Pry under the flange behind the nail holder to remove the templatefrom the doorjamb.6. Install the strike plate on the doorjamb....Tip: Use a corner chisel to quickly square the corners of arouted mortise.6
THE ORIGINALCAREY TEMPLATEAccessories15J75.01 Hinge Mortising <strong>Template</strong>