Infrared Shutter Remote Controller - HiModel
Infrared Shutter Remote Controller - HiModel
Infrared Shutter Remote Controller - HiModel

Create successful ePaper yourself
Turn your PDF publications into a flip-book with our unique Google optimized e-Paper software.
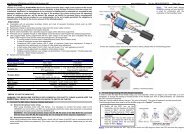
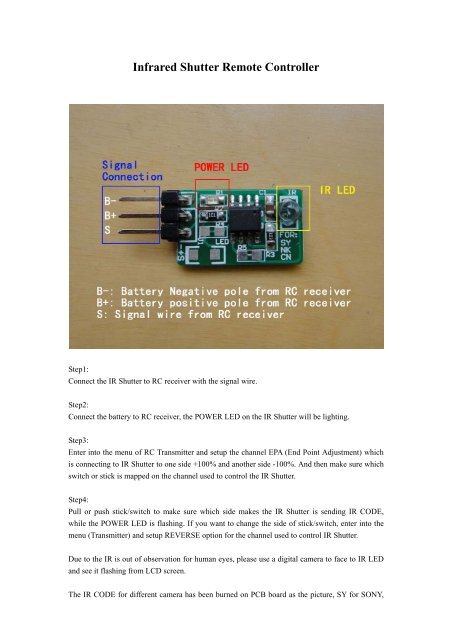
<strong>Infrared</strong> <strong>Shutter</strong> <strong>Remote</strong> <strong>Controller</strong>Step1:Connect the IR <strong>Shutter</strong> to RC receiver with the signal wire.Step2:Connect the battery to RC receiver, the POWER LED on the IR <strong>Shutter</strong> will be lighting.Step3:Enter into the menu of RC Transmitter and setup the channel EPA (End Point Adjustment) whichis connecting to IR <strong>Shutter</strong> to one side +100% and another side -100%. And then make sure whichswitch or stick is mapped on the channel used to control the IR <strong>Shutter</strong>.Step4:Pull or push stick/switch to make sure which side makes the IR <strong>Shutter</strong> is sending IR CODE,while the POWER LED is flashing. If you want to change the side of stick/switch, enter into themenu (Transmitter) and setup REVERSE option for the channel used to control IR <strong>Shutter</strong>.Due to the IR is out of observation for human eyes, please use a digital camera to face to IR LEDand see it flashing from LCD screen.The IR CODE for different camera has been burned on PCB board as the picture, SY for SONY,
NK for NIKON and CN for CANON. Since different CODE (SONY, NIKON, CANON) withdifferent pattern of flashing (POWER LED), it is easy to distinguish.