Manual for HiModel FLY Series Car ESCs (50A and 100A)
Manual for HiModel FLY Series Car ESCs (50A and 100A)
Manual for HiModel FLY Series Car ESCs (50A and 100A)
- No tags were found...

You also want an ePaper? Increase the reach of your titles
YUMPU automatically turns print PDFs into web optimized ePapers that Google loves.
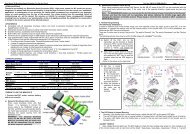
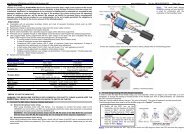
<strong>Manual</strong> <strong>for</strong> <strong>HiModel</strong> <strong>FLY</strong> <strong>Series</strong> <strong>Car</strong> <strong>ESCs</strong> (<strong>50A</strong> <strong>and</strong> <strong>100A</strong>)the motor starts up.Note: All the above modes in red are Factory Default Setting.Plug the JR connector into the throttle control channel of receiver.• Swith “on” the transmitter <strong>and</strong> move the stick of throttle to the middle position (in the Forward/Reverse mode). Onlyin Forward mode, the throttle can be put in the lowest position.• Connect the main power pack to ESC (pay attention to the polarity).• The motor transmits a single or double beeps to confirm the correct connection. The ESC is ready to be operated <strong>and</strong>the motor can be switched on(ESC <strong>for</strong> <strong>Car</strong>s both in Forward/Reverse mode or Forward mode have Brake).• A single beep announces the Forward mode, the double beep says that the brake is in the Forward/Reverse mode.• If you didn’t hear the above “beep”, please disconnect the ESC to battery pack <strong>and</strong> check whether the JR connector isconnected correctly to the throttle control channel of receiver, <strong>and</strong> whether the throttle stick is at the lowestposition.• The rotating direction of motor can be achieved by exchanging any two of three connecting wires between ESC <strong>and</strong>motor.• Option parameter assistant by transmitter• The transmitter can only set one parameter of ESC at a time. If you want to set several parameters, please repeat thefollowing procedures:• Plug the JR connector into the throttle control channel of receiver.• Swith “on” the transmitter <strong>and</strong> move the stick of throttle to the highest position.• Connect the main power pack to ESC (pay attention to the polarity).• Wait <strong>for</strong> 5 seconds, you will hear 4 beeps, that means it entered the programming mode.• And then you will hear 5 groups “♪ (a short beep)”, then 5 groups “♪♪”, then 5 groups “♪♪♪” <strong>and</strong> then 5 groups“♪♪♪♪” ; <strong>and</strong> 5 groups “♪”,5 groups “♪-(a long beep)♪”,5 groups “♪♪”. And these sounds of groups will circulatecontinuously.• Each group of 5 sounds st<strong>and</strong>s <strong>for</strong> a different parameter of ESC respectively.• You can put the throttle stick to the middle position during one group of 5 sounds, then the corresponding mode issaved.• Hear 1 “♪”(Forward mode) or "♪♪" (Forward/Reverse mode) , then you can exit the setting mode after saving themode.• When the mode is saved, you can disconnect the ESC to the battery pack.• Forward mode <strong>and</strong> Forward/Reverse mode: Hear the first “♪♪♪♪”,put the throttle stick to the middle position, themode is changed from Forward mode into Forward/Reverse mode. If you want to change back, please repeat the aboveprocedures, <strong>and</strong> vice versa.• Setting of timing: Hear 5 groups “♪” or “♪♪” or “♪♪♪” or “♪♪♪♪” in the above circulation, put the throttle stick to themiddle position.Timing mode 1: 5 groups “♪”----2°(recommended <strong>for</strong> 2 poles <strong>and</strong> common motors)Timing mode 2: 5 groups “♪♪”----8°(recommended <strong>for</strong> 4 poles motors)Timing mode 3: 5 gropus “♪♪♪”----15°(recommended <strong>for</strong> 8 poles motors)Timing mode 4: 5 groups “♪♪♪♪”----30°(recommended <strong>for</strong> more than 10 poles motors <strong>and</strong> outrunner motors)• Setting of Frequency: Hear 5 groups “♪-” or 5 “♪-♪” or 5 “ ♪♪” in the above circulation, put the throttle stick to themiddle position.Frequency 1: 5 groups “♪-”-----8kHz (For common setting, the lowest efficiency losse)Frequency 2: 5 groups “♪-♪”----16kHz (recommended <strong>for</strong> the low “impedence” of motor)Frequency 3: 5 groups “♪♪”----32kHz (recommended <strong>for</strong> the low electrical inductance of motor)Note: when the timing of motor is saved, please adjust it on the ground be<strong>for</strong>e the flight.【Digram <strong>for</strong> Option parameter assistant by transmitter】2
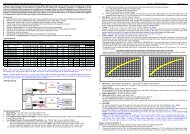
<strong>Manual</strong> <strong>for</strong> <strong>HiModel</strong> <strong>FLY</strong> <strong>Series</strong> <strong>Car</strong> <strong>ESCs</strong> (<strong>50A</strong> <strong>and</strong> <strong>100A</strong>)• Option parameter assistant by Prog-Box-Connect ESC to motor.-For the OPTO ESC, connect the Prog-Box to power pack of 4.8V-6V.- Plug JR connector in a appropriate side to the matching position.-Connect to the power pack to ESC what you have chosen.-Choose the options you need according to the button of up/down/left/right in the LCD panel.-You can hear one “beep” when each option is saved.-Cut off the power pack when all the setting is saved, <strong>and</strong> the ESC can keep your setting.3