2005 - Z1 FR 3
2005 - Z1 FR 3
2005 - Z1 FR 3
- No tags were found...

You also want an ePaper? Increase the reach of your titles
YUMPU automatically turns print PDFs into web optimized ePapers that Google loves.
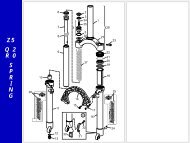
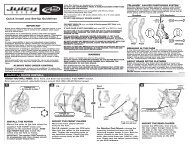
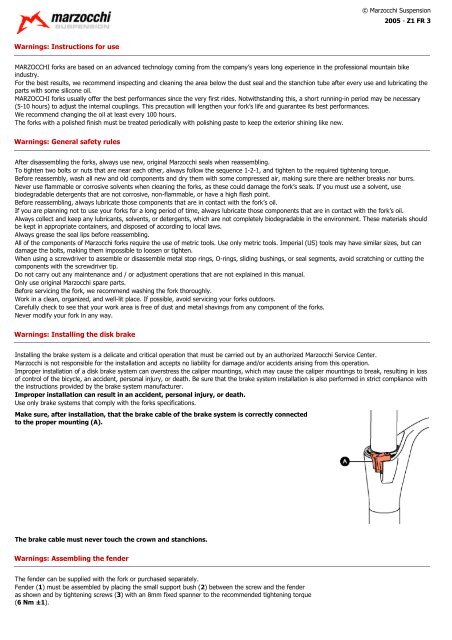
© Marzocchi Suspension<strong>2005</strong> - <strong>Z1</strong> <strong>FR</strong> 3Warnings: Instructions for useMARZOCCHI forks are based on an advanced technology coming from the company’s years long experience in the professional mountain bikeindustry.For the best results, we recommend inspecting and cleaning the area below the dust seal and the stanchion tube after every use and lubricating theparts with some silicone oil.MARZOCCHI forks usually offer the best performances since the very first rides. Notwithstanding this, a short running-in period may be necessary(5-10 hours) to adjust the internal couplings. This precaution will lengthen your fork’s life and guarantee its best performances.We recommend changing the oil at least every 100 hours.The forks with a polished finish must be treated periodically with polishing paste to keep the exterior shining like new.Warnings: General safety rulesAfter disassembling the forks, always use new, original Marzocchi seals when reassembling.To tighten two bolts or nuts that are near each other, always follow the sequence 1-2-1, and tighten to the required tightening torque.Before reassembly, wash all new and old components and dry them with some compressed air, making sure there are neither breaks nor burrs.Never use flammable or corrosive solvents when cleaning the forks, as these could damage the fork’s seals. If you must use a solvent, usebiodegradable detergents that are not corrosive, non-flammable, or have a high flash point.Before reassembling, always lubricate those components that are in contact with the fork’s oil.If you are planning not to use your forks for a long period of time, always lubricate those components that are in contact with the fork’s oil.Always collect and keep any lubricants, solvents, or detergents, which are not completely biodegradable in the environment. These materials shouldbe kept in appropriate containers, and disposed of according to local laws.Always grease the seal lips before reassembling.All of the components of Marzocchi forks require the use of metric tools. Use only metric tools. Imperial (US) tools may have similar sizes, but candamage the bolts, making them impossible to loosen or tighten.When using a screwdriver to assemble or disassemble metal stop rings, O-rings, sliding bushings, or seal segments, avoid scratching or cutting thecomponents with the screwdriver tip.Do not carry out any maintenance and / or adjustment operations that are not explained in this manual.Only use original Marzocchi spare parts.Before servicing the fork, we recommend washing the fork thoroughly.Work in a clean, organized, and well-lit place. If possible, avoid servicing your forks outdoors.Carefully check to see that your work area is free of dust and metal shavings from any component of the forks.Never modify your fork in any way.Warnings: Installing the disk brakeInstalling the brake system is a delicate and critical operation that must be carried out by an authorized Marzocchi Service Center.Marzocchi is not responsible for the installation and accepts no liability for damage and/or accidents arising from this operation.Improper installation of a disk brake system can overstress the caliper mountings, which may cause the caliper mountings to break, resulting in lossof control of the bicycle, an accident, personal injury, or death. Be sure that the brake system installation is also performed in strict compliance withthe instructions provided by the brake system manufacturer.Improper installation can result in an accident, personal injury, or death.Use only brake systems that comply with the forks specifications.Make sure, after installation, that the brake cable of the brake system is correctly connectedto the proper mounting (A).The brake cable must never touch the crown and stanchions.Warnings: Assembling the fenderThe fender can be supplied with the fork or purchased separately.Fender (1) must be assembled by placing the small support bush (2) between the screw and the fenderas shown and by tightening screws (3) with an 8mm fixed spanner to the recommended tightening torque(6 Nm ±1).