2006 - MZ III
2006 - MZ III
2006 - MZ III
- No tags were found...

Create successful ePaper yourself
Turn your PDF publications into a flip-book with our unique Google optimized e-Paper software.
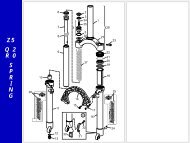
© Marzocchi Suspension<strong>2006</strong> - <strong>MZ</strong> <strong>III</strong>Spare part list - <strong>MZ</strong> <strong>III</strong> - 100Rif. Code DescriptionQ.ty in themodel
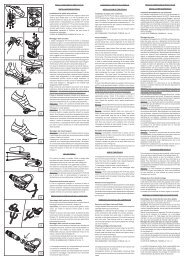
© Marzocchi Suspension<strong>2006</strong> - <strong>MZ</strong> <strong>III</strong>Warnings: Assembling the wheel on forks with ø20mm through-axleFor a correct operation of the fork, install the wheel as explained below:Align the center of the wheel with each wheel axle clamp.Insert the wheel axle (1) through the right dropout, the wheel and the left dropout.With the 6mm Allen wrench act on cap (2) and tighten the wheel axle to the recommended tighteningtorque (15 Nm ± 1).Check for the proper fork-wheel alignment. To do this, begin by fully compressing the fork a few times.The wheel should not make contact with, or come close to any portion of the fork.Then lift the front of the bicycle and spin the wheel a few times to verify the correct alignment with thedisk brake. The wheel should not wobble from side to side or up and down. Check the owner’s manual ofthe brake system for the proper specifications.With a 4mm Allen wrench, tighten the screws (3) on both dropouts to the recommended tighteningtorque (6 Nm ± 1).
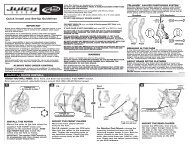
© Marzocchi Suspension<strong>2006</strong> - <strong>MZ</strong> <strong>III</strong>Dismantling: Removing the top capsPut the fork in the vice in vertical position, fixing it by the dropouts.Fully unscrew lock cap (2) with the special spanner.Remove lock cap (2).Dismantling: Dismantling spring and elastomerRemove the top spring cup (1), elastomer (2), spring (3) and the bottom spring cup (4) from both legs.Dismantling: Breaking down the steering crown unit / arch-slider assemblyUse the special spanner to remove the bottom nuts. Do not use other tools.Turn the arch-slider assembly upside down.With the 5mm Allen wrench, loosen the bottom screw (5) of both legs.Drive out the bottom screw (5) and washer (6) complete with O-ring (7).Pull the crown-stanchion unit (3) off the arch-slider assembly (4).
© Marzocchi Suspension<strong>2006</strong> - <strong>MZ</strong> <strong>III</strong>Dismantling: Breaking down the pumping elementRemove the bottom pad (1) from the pumping element rod.Pull the pumping element (3), spacer (7) (only for models with 100mm travel), the rebound spring (4),bush (5) and the bottom washer (13) off the top of the fork.Dismantling: Removing the sealsPrize the dust seal (1) off its seat with a small flat-tip screwdriver.Take great care not to damage the internal surfaces of the one-piece assembly whileremoving the dust seal.With the same screwdriver, prize off the metal stop ring (2).Take great care not to damage the internal surfaces of the one-piece assembly whileremoving the stop ring.
© Marzocchi Suspension<strong>2006</strong> - <strong>MZ</strong> <strong>III</strong>Pull the extractor rod so that the upper face of the washer stops against the lower face of the guide bush.Insert the aluminium bush (A) in the seat of the sealing ring.While holding the main rod in position, the aluminium bush will drive the guide bushes during extraction.Using striker (D) knock out and extract the guide bush (1).Remove the guide bush (1) from the extractor.Repeat the steps above to remove the bottom guide bush.
© Marzocchi Suspension<strong>2006</strong> - <strong>MZ</strong> <strong>III</strong>Assembling: Assembling the guide bushesInsert the guide bushes using the special introducers (short type for the top bush and long type for the bottom bush, both with awhite finish). Do not use other tools.Fit first the bottom bushes, then the top bushes.Using the long introducer (A) fit the bottom bush (1).Using a hammer knock the introducer (A) into the arch-slider assembly.Using the short introducer (B) fit the top bush (2).Using a hammer knock the introducer (B) into the arch-slider assembly.Smear the guide bushes with the recommended grease.Assembling: Assembling the sealsInsert the spring cup (4) in its seat.
© Marzocchi Suspension<strong>2006</strong> - <strong>MZ</strong> <strong>III</strong>Smear the dust seal and the sealing ring with some grease.Insert the sealing ring (3) in its seat with the special introducer (A).Using a hammer, knock in introducer (A) and drive the sealing ring home into the arch-slider assembly.Using a small flat-tip screwdriver, fit the stop ring (2) and check that it fits perfectly into its groove.Take great care not to damage the internal surfaces of the one-piece assembly when fittingthe stop ring.The dust seals shall be refitted when reassembling the crown-stanchion unit / arch-slider assembly.Assembling:During the assembly of the pumping unit, strictly obey the instructions below.Do not, at any times, reverse the position of the pumping elements in the fork legs (if you are unsure about anything, please referto the relevant exploded view).Assembling: Assembling the pumping elementInsert spacer (7), the rebound spring (4), bush (5) and the bottom washer (6) in the piston rod (3).Insert the pumping element into the stanchion.
© Marzocchi Suspension<strong>2006</strong> - <strong>MZ</strong> <strong>III</strong>Fit the bottom pad (1) to the end of the pumping element rod.Assembling: Reassembling the steering crown unit / arch-slider assemblyA special spanner shall be used to assemble the bottom nuts. Do not, at any times, use othertools.Fit both dust seals (11) to the stanchions.Insert the crown-stanchion unit (3) in the arch-slider assembly (4).Fit washer (6) and O-ring (7) on the bottom screw (5) of both legs, then tighten to the recommendedtightening torque (10 Nm ± 1) with the 5mm Allen wrench.Using introducer (A) insert the dust seals (11) in their seats.
© Marzocchi Suspension<strong>2006</strong> - <strong>MZ</strong> <strong>III</strong>Assembling: Assembling spring and elastomerBlock the fork in the vice, in perfectly vertical position.Smear both springs with the recommended grease.Lift the crown-stanchion unit on the arch-slider assembly.Insert the bottom spring cup (4), spring (3),elastomer (2) and the top spring cup (1) in both legs.Assembling: Mounting the top capsPut the fork in the vice in vertical position, fixing it by the dropouts.Using the special spanner, tighten the lock cap (2) to the recommended tightening torque (10 Nm ± 1).Restore the correct preload value, if necessary (see settings).
© Marzocchi Suspension<strong>2006</strong> - <strong>MZ</strong> <strong>III</strong>Setting: General rules for calibrationBy carefully calibrating the damping system you can get the maximum performance out of the same.This paragraph indicates the sequence of operations to perform to set up the Marzocchi forks correctly.In order to find the best settings for you, you will need to try several times to understand where and how to make adjustments. When doing so,please ride in an open area, free from traffic, obstacles and other hazards.The optimal setting is influenced by the geometry of the frame of the mountain bike, the weight of the cyclist, the type of terrain the bike will beused on and the type of obstacles you have to deal with, but also by subjective factors associated with your riding style; therefore it is impossible toprovide objective data on the desired settings.Nevertheless by carefully following the instructions below you will soon be able to find the optimal setting for you.The shock absorber must be calibrated simply by using one adjuster at a time, following the order explained, noting the operations and any resultstep-by-step.During setting don't force the adjusters beyond their limit of travel and don't exceed the max recommended air pressure.To keep the pressure inside the fork’s legs, only use the special MARZOCCHI pump with pressure gauge.The use of any other pump can compromise the inflating operation and cause malfunction or damage to the fork, resulting in anaccident, personal injury or death.Once the correct setting has been found, we recommend noting the number of clicks or turns of the adjuster with respect to the "fully closed"position (adjuster fully clockwise) for a faster re-setting of your fork in case of need.Setting: SAGSAG means the fork bottoming under the biker's weight.How to measure the SAG:Follow these simple steps to measure the SAG.On the leg portion of the fork, measure the distance between the lower crown and the dust seal (seePicture A). Note this value as “H1”.While sitting on the bike, repeat the measurement (see picture B). Note this value as “H2".SAG = H1 - H2How to find the best percent SAG:The best percent SAG is 15-20% for Cross-country and All Mountain forks and 25-30% for Freeride andDownhill forks.In order to calculate the best SAG for your own fork, you will need to make the following calculation:SAG = T x S (T = total travel; S = suggested sinking percentage).Setting: Spring preloadFor both fork legs:The optimal spring preloading is the one that lets you obtain the desired SAG under the biker's weight.The forks are factory-set to the minimum preload, say with the adjuster fully turned counter-clockwise.In this configuration, the spring is slightly preloaded to counteract static loads.Turning adjuster (A) clockwise increases the spring preload.Turning adjuster (A) counter-clockwise decreases the spring preload.
© Marzocchi Suspension<strong>2006</strong> - <strong>MZ</strong> <strong>III</strong>Do not force the adjuster beyond its limit of travel.
© Marzocchi Suspension<strong>2006</strong> - <strong>MZ</strong> <strong>III</strong>Tightening torquesComponents Tightening torque (Nm)<strong>MZ</strong> <strong>III</strong> - 100 -
© Marzocchi Suspension<strong>2006</strong> - <strong>MZ</strong> <strong>III</strong>DiagnosticsFinding the problem Finding the possible cause Possible solutions proposedFork doesn't get full travel Oil level too high Check oil levelsFork doesn't get full travel Spring rate too stiff Change to softer spring rateFork extends too quickly; harsh top-out afterimpactsRebound damping is not enoughFork has too much sag Oil is too fluid Check oil levelsReplace the oil (SAE 7.5) with one of higherviscosity indexFork has too much sag Spring rate too soft Change to stiffer spring rateFork has too much sag Spring rate too soft Increase spring preloadFork has too much sagFork is “sticky”; fork does not perform as newFork is too soft, but the sag is the onerecommendedFork is too soft, needs more than the maximumpreloadFork is too soft, needs more than the maximumpreloadFront wheel tends to tuck under while turning leftor rightHeavy amount of oil on stanchions; oil drippingdown legsHeavy amount of oil on stanchions; oil drippingdown legsSpring rate too softDirty sealing rings; fork needs to beservicedCompression damping is not enoughOil is too fluidSpring rate too softSpring rate too softSealing rings damagedThe stanchion tubes could be damagedIncrease spring preload by replacing the preloadtubeRenew all sealsIncrease compression damping by changing oilvolumesCheck oil levelsChange to stiffer spring rateChange to stiffer spring rateRenew all sealsLoss of sensitivity Old oil Change the oilHave the stanchions be checkedLoss of sensitivity Sliding bushes worn Renew the sliding bushesOil leaking from the bottom of the fork leg Bottom nut/screw loose Tighten the nut or screwOil ring on stanchions Sealing rings dirty Renew all seals