Installation and mounting manual for EK-FC Titan SE ... - EKWB
Installation and mounting manual for EK-FC Titan SE ... - EKWB
Installation and mounting manual for EK-FC Titan SE ... - EKWB

You also want an ePaper? Increase the reach of your titles
YUMPU automatically turns print PDFs into web optimized ePapers that Google loves.
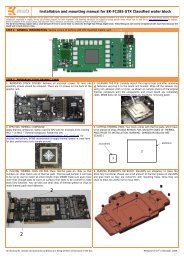
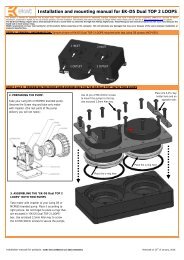
STEP 3: ATTACHING <strong>EK</strong>-<strong>FC</strong>780 GTX Ti BACKPLATE TO THE GRAPHICS CARDTake enclosed <strong>mounting</strong> screws <strong>and</strong> install them as shown on picture below. <strong>EK</strong>WB recommends users to start with four (6) M3x8 DIN7991 screws(HINT: do not tighten screws until they are all positioned in their <strong>mounting</strong> holes) in the middle of the card <strong>and</strong> then continue with screwing in ofthe remaining M3x4 DIN7985 screw using Philips head screwdriver. Backplate has milled in st<strong>and</strong>offs, so there is no fear of over tightening of thescrews. Nevertheless do not exaggerate with screwing <strong>for</strong>ce as there is no need <strong>for</strong> it.(By all means users must also consider that this product is intended to be used only with <strong>EK</strong>-<strong>FC</strong>780 GTX Ti, <strong>EK</strong>-<strong>FC</strong> <strong>Titan</strong> <strong>SE</strong> or <strong>EK</strong>-<strong>FC</strong>770 GTX serieswater blocks. No other water block or 3 rd party heat sinks or coolers are supported!)Use enclosed Allen key 2mm onDIN7991 screws to attach backplate.M3x8 DIN7991 screwM3x4 DIN7984 screwThis applies only <strong>for</strong> Acetal<strong>and</strong>Original CSQ top version,which cover the entire lenghtof the PCB!SHORT PLEXI TOP VERSION: Use 2 (two) M3x10 DIN7991 screws, M3nuts <strong>and</strong> washers to secure the backplate. If the screws are not enclosedwith the backplate (your product is <strong>EK</strong>-<strong>FC</strong> <strong>Titan</strong> <strong>SE</strong> Backplate) please checkthe content of the <strong>EK</strong>-<strong>FC</strong>780 GTX Ti water block.M3 nutPVC washerM3x10 DIN7991 screwSTEP 4: CHECKING FOR CONTACTSIf necessary temporarily remove the backplate to check <strong>for</strong> uni<strong>for</strong>m surface contact between the backplate <strong>and</strong> the components. Check whetherthe backplate makes contact with the intended integrated cirucit. Then repeat sub-steps in previous section to re-attach the backplate. In case youfail to obtain good contact, please check again your thermal pad thickness or contact our support service athttp://www.ekwb.com/support.IMPORTANT DISCLOSURESVERY IMPORTANT NOTICE: Once the installation is completed, it is a recommended practice to test the cooling circuit <strong>for</strong> leaks prior to powering up thecomputer. We recommend a 24 hour leak test prior to powering up the computer. Do not test the water block using city water pressure. This will rupture the topof the housing <strong>and</strong> render the block unusable (<strong>and</strong> will void your warranty).While all ef<strong>for</strong>ts have been made to provide the most comprehensive tutorial possible,<strong>EK</strong> Water Blocks assumes no liability expressed or implied <strong>for</strong> any consequential damage(s) occurring to your equipment as a result of using <strong>EK</strong> Water Blockscooling products, either due to errors or omissions on our part in the above instructions, or due to failure or defect in the <strong>EK</strong> Water Blocks cooling products.WARRANTY:Our products are warranted against defects in materials or workmanship <strong>for</strong> a period of 24 months beginning from the date of delivery to the final user. Duringthis period, products will be repaired or have parts replaced at our discretion provided that: (I) the product is returned to the agent from whom it waspurchased; (II) the product has been purchased by an end user <strong>and</strong> has not used <strong>for</strong> commercial purposes; (III) the product has not been misused, h<strong>and</strong>ledcarelessly, or used in a manner other than in accordance with the instructions provided describing its installation <strong>and</strong> proper use. This warranty does not conferrights other than those expressly set out above <strong>and</strong> does not cover any claims <strong>for</strong> consequential loss or damage. This warranty is offered as an extra benefit <strong>and</strong>does not affect your statutory rights as a consumer. This warranty is voided if the product comes in contact with aggressive UV additives or other improperliquids.<strong>EK</strong> blocks are sealed with warranty void circular label, which proves that the block has withstood a pressure leak test. Removing it will void leak-free guarantee<strong>and</strong> not the guarantee on the product itself. Any other RMA issues can be reported to <strong>EK</strong> Support at http://www.ekwb.com/support <strong>for</strong> further analysis.REQUIRED TOOLS AND MOUNTING SCREWS:scissorsPhilips head screwdriverAll disclosures, notices <strong>and</strong> warranty conditions are being written on <strong>EK</strong>WB website. Revision 1.0. Released on 13 th of November 2013.