

Port forward QSD Series DVR (6204-6209) - Q-See
Port forward QSD Series DVR (6204-6209) - Q-See
Port forward QSD Series DVR (6204-6209) - Q-See

Create successful ePaper yourself
Turn your PDF publications into a flip-book with our unique Google optimized e-Paper software.
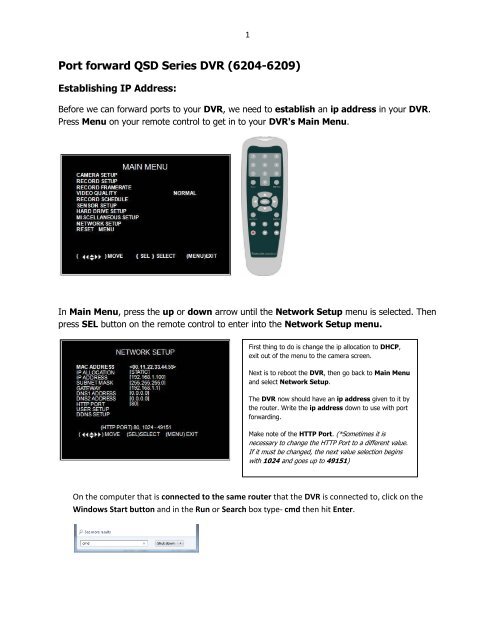
1<strong>Port</strong> <strong>forward</strong> <strong>QSD</strong> <strong>Series</strong> <strong>DVR</strong> (<strong>6204</strong>-<strong>6209</strong>)Establishing IP Address:Before we can <strong>forward</strong> ports to your <strong>DVR</strong>, we need to establish an ip address in your <strong>DVR</strong>.Press Menu on your remote control to get in to your <strong>DVR</strong>'s Main Menu.In Main Menu, press the up or down arrow until the Network Setup menu is selected. Thenpress SEL button on the remote control to enter into the Network Setup menu.First thing to do is change the ip allocation to DHCP,exit out of the menu to the camera screen.Next is to reboot the <strong>DVR</strong>, then go back to Main Menuand select Network Setup.The <strong>DVR</strong> now should have an ip address given to it bythe router. Write the ip address down to use with port<strong>forward</strong>ing.Make note of the HTTP <strong>Port</strong>. (*Sometimes it isnecessary to change the HTTP <strong>Port</strong> to a different value.If it must be changed, the next value selection beginswith 1024 and goes up to 49151)On the computer that is connected to the same router that the <strong>DVR</strong> is connected to, click on theWindows Start button and in the Run or Search box type- cmd then hit Enter.
2You will now get a command prompt where you will type- ipconfig and hit Enter.You will now see the network settings of the network that you are connected to:Write down theDefault GatewayEnter the gateway into your browser address box and hit Enter:You will now get the Login Screen for your Router:At this point you will follow the <strong>Port</strong> Forwarding instructions for your model of Router and the <strong>DVR</strong>that you are setting up: http://port<strong>forward</strong>.com/cports.htmWhen finished you can check to see if ports are open at: http://canyouseeme.org/
3If all ports show open… the last step is to allow active x controls to run in the IE Browser: Active XSetupFollow the instructions for allowing Active X in the IE Browser, then just enter the address of the<strong>DVR</strong> into the IE browser address box. Example Below ( *Adjust for any network differences )That’s it! You should now be at the <strong>DVR</strong> login screen.


