Dive Rite Transpac Manual - Simply Scuba
Dive Rite Transpac Manual - Simply Scuba
Dive Rite Transpac Manual - Simply Scuba
- No tags were found...

Create successful ePaper yourself
Turn your PDF publications into a flip-book with our unique Google optimized e-Paper software.
117 West Washington Street • Lake City, FL 32055 • USAPhone (386) 752-1087 • Fax (386) 755-0613www.diverite.com
<strong>Transpac</strong> II Owner’s <strong>Manual</strong> Page 2<strong>Dive</strong> <strong>Rite</strong> <strong>Transpac</strong> II Limited Warranty <strong>Dive</strong> <strong>Rite</strong> will—at its sole discretion—repair or replace <strong>Transpac</strong> II system componentsproved to be damaged by faulty manufacture or material, at no cost, for aperiod of up to one year (365 days) from the date of purchase. This warranty applies only to the original retail purchaser. It does not covercommercial or rental use, nor does it extend to units purchased from other thanan authorized <strong>Dive</strong> <strong>Rite</strong> dealer. This warranty specifically excludes color changes, light fastness, or fading. <strong>Dive</strong><strong>Rite</strong> does not accept responsibility for stains or transference or bleeding of colorto other items. All air cell bladders have a limited lifetime warranty against RF welded seamseparation. No warranty exists for bladder punctures. If we deem a <strong>Transpac</strong> II component to be beyond repair— through no fault of theuser — then, and only then, will we replace the affected component(s). To make a claim under this warranty, the owner must have either completed andreturned the Warranty Registration card at the time of purchase, or registeredhis/her warranty using <strong>Dive</strong> <strong>Rite</strong>’s website (www.diverite.com). He or she mustthen return the damaged items to <strong>Dive</strong> <strong>Rite</strong>, along with a copy of the originalpurchase invoice or receipt. No warranty service will be performed for other thanregistered owners. This warranty becomes void if the <strong>Transpac</strong> system components are damaged byanything other than normal diving use, of if they have been serviced or repaired byother than authorized <strong>Dive</strong> <strong>Rite</strong> dealers. Repairs made under this warranty will not extend the warranty period. All further claims, especially for damage after diving accidents, are excluded fromcoverage under this warranty. <strong>Dive</strong> <strong>Rite</strong> has no obligation to honor any extension of this warranty.© 1997-2002, Lamartek, Inc., dba <strong>Dive</strong> <strong>Rite</strong> • All Rights Reserved Version Date: 02.01.09
<strong>Transpac</strong> II Owner’s <strong>Manual</strong> Page 3Table of ContentsIntroduction.................................................................................4Additional Warnings ................................................................................................5What Your <strong>Transpac</strong> II Will and Will Not Do..........................................................7<strong>Transpac</strong> II System Features......................................................................................8<strong>Transpac</strong> II Components........................................................................................10Assembling Your <strong>Transpac</strong> System.........................................21Attaching Your <strong>Transpac</strong> II Harness to Single Cylinders .........................................21Attaching Your <strong>Transpac</strong> II Harness to Double Cylinders.......................................25Installing the Optional Integrated Weight System ..................................................29Adding/Removing Shoulder D-Rings.....................................................................30Using Your <strong>Transpac</strong>.................................................................31Donning and Adjusting Your <strong>Transpac</strong>...................................................................31Inflation and Deflation Procedures.........................................................................32Post-<strong>Dive</strong> Maintenance and Care ...........................................................................33The PPE (Personal Protection Equipment) mentioned in this manual was testedand certified according to 89/686/EEC Directive, for a maximum depth of 50meters (150 feet), by ITALCERT, Viale Sarca 336, 20126 Milano-Italy, NotifiedBody N o 0426 • The device is in compliance with the EN 250 (PPE of categoryIII in accordance with 89/686/EEC Directive) and EN 1809 (PPE of category IIin accordance with 89/686/EEC Directive) and it is not a lifejacket; it does notguarantee a head-up position of the wearer at the surface.CE 0426 is the conformity marking according to 89/686/CDD Directive. The number 0426identifies the Notified Body ITALCERT for the controls on the product according to Article11A of the 89/686/CDD Directive (only for PPEs of III category).
<strong>Transpac</strong> II Owner’s <strong>Manual</strong> Page 4IntroductionTraditionally, owner’s manuals begin with statements such as, “Congratulations onyour purchase of our nifty new whiz-bang product…” Such statements are, of course,entirely self-serving on the part of the manufacturer.Nevertheless, the fact remains you’ve got one helluva BC on your hands. If youfollow the instructions in this manual, and give the product the care it deserves, itshould provide you with years of enjoyable service.Before using your <strong>Transpac</strong> II, there are several things you must do.These include: Obtain a minimum of entry-level open-water scuba diver trainingand certification from a recognized diver-training organization,such as ACUC, BSAC, CMAS, GUE, IANTD, IDEA, NASDS,NAUI, PADI, SSI or YMCA. As part of this training, you must master all basic skills of buoyancycontrol, including: proper weighting; ascents; descents; surfaceswimming and resting; and establishing neutral buoyancyunder water. This training must also cover (both at the surfaceand under water): the use of buoyancy-control devices (BCs); oralinflation of BCs; low-pressure inflation of BCs; and deflation ofBCs using a variety of methods. You must read and understand this manual and all other warningsthat accompany the product. If you do not understand some partof this manual, contact <strong>Dive</strong> <strong>Rite</strong> using the information appearingon the cover.Misuse of the <strong>Transpac</strong> II can result in uncontrolled ascents,descents or loss of buoyancy control. This, in turn, can cause seriouspersonal injury or death.Before using your <strong>Transpac</strong> II in open water, wrecks, caves or under ice, there aretwo things you must do. They are: Read and understand this manual in its entirety. There is very little, if any, informationhere that does not pertain to you. Don’t risk missing vital information by
<strong>Transpac</strong> II Owner’s <strong>Manual</strong> Page 5picking and choosing the data you think applies to you. Why take chances? Readit all. Practice using your <strong>Transpac</strong> II in confined water before using it in more challengingconditions. This advice really applies to any major piece of diving equipment. Withbuoyancy-control equipment, it is especially important to practice adding andventing air in a variety of positions. To omit this practice is to risk dangerous,uncontrolled ascents.Additional WarningsThe <strong>Transpac</strong> II is not a Personal Flotation DeviceThe <strong>Transpac</strong> II is not a United States Coast Guard-approved Personal FlotationDevice (PFD). It will not provide face-up flotation for all users and conditions.Do Not Modify Your <strong>Transpac</strong> IIChanges to the <strong>Transpac</strong> II or use of after-market accessories can prevent its properfunction or result in damage to the <strong>Transpac</strong> II.Proper Assembly and Adjustment Required Do not use either the Classic Wings or Super Wings with single cylinders. Whenusing Rec Wings with single cylinders, always tighten the gusset control cord andelastic strap to help prevent the air cell from wrapping itself around the sides ofthe cylinder, trapping air. Failure to follow these instructions can prevent you fromventing air from your BC and may lead to uncontrolled ascents. This can furtherresult in serious personal injury or death. Before each use, soak the <strong>Transpac</strong> II’s tank bands in water and allow them tostretch. Be certain that the end of each tank band faces inward and rests directlyagainst the tank(s). Each tank band must pass through the tip of its cam strapbuckle, and mate with the material on the outside of the strap. Failure to do socan result in the bands loosening or coming undone during use, resulting in thepossible shifting or loss of scuba cylinders in or out of the water. Once you have attached your <strong>Transpac</strong> II to a single scuba cylinder, you shouldpick the unit up by the BC and shake it up and down a few times. This will helpmake sure that the tank is fastened in securely, and that the bands are tight enoughto help prevent them from coming undone accidentally, later on. Adjust the waist, shoulder and chest straps for a comfortable fit. Properly fitted,the <strong>Transpac</strong> II should not restrict your breathing when any of its air cells arefully inflated.
<strong>Transpac</strong> II Owner’s <strong>Manual</strong> Page 6Use Weight System Properly Gravity alone may not be sufficient to pull weights completely clear of the weightpocket, other equipment or your body, thus enabling them to be jettisoned safely.When jettisoning weights, always check to make sure the weight pockets arecompletely empty, and that no weights are caught on, or entangled in, otherequipment. Whenever possible, hold any weight you are jettisoning away fromthe body before dropping it. Failure to follow these instructions may result inunsuccessful attempts at jettisoning weight which, in turn, can lead to the inabilityto ascend to or remain at the surface. If you do install other pockets in addition to those of the weight system, makecertain these other pockets do not interfere with easy and rapid removal of weightin an emergency. Failure to do so may result in unsuccessful attempts at jettisoningweight which, in turn, can lead to the inability to ascend to or remain at thesurface. If you need a weight belt, remember to fasten the <strong>Transpac</strong> II’s optional crotchstrap first, then put the weight belt on over it. Failure to do so will hinder yourability to release your weight belt in an emergency.Pre-<strong>Dive</strong> Inspection RequiredThe examinations described in this manual will help you identify equipment problemsbefore unsafe conditions exist. Nearly all equipment-related diving accidentsare preventable by: Following the recommendations outlined in this manual. Having equipment regularly inspected and serviced by trained technicians atfactory-authorized repair facilities. Before each use, check all of your <strong>Transpac</strong> II’s tank bands and buckles, straps,quick-disconnect clips and the cummerbund/waist strap for wear. Have an authorizedrepair facility replace worn or damaged items before you use your <strong>Transpac</strong>II. If your <strong>Transpac</strong> II fails to pass any of the tests outlined in this manual, or if youhave any doubt as to the safe and proper function of any of its components, donot use it. Instead, have your <strong>Transpac</strong> II inspected and, if necessary, serviced by anauthorized repair facility before taking it in the water again.Careful Inflation/Deflation Required Do not attach your <strong>Transpac</strong> II’s low-pressure inflator hose to a high-pressure airsource, such as the HP (high pressure) port of a regulator. The <strong>Transpac</strong> II’s low-
<strong>Transpac</strong> II Owner’s <strong>Manual</strong> Page 7pressure inflator and its supply hose can only handle pressures of approximately150 pounds per square inch/10 bar over ambient pressure.Read your regulator manufacturer’s instructions concerning the proper connectionof low- and high-pressure hoses. Installation or changing of such hosesshould only be done by trained technicians working for factory-authorized divecenters. Product damage can result from improper hose connection. Always inflate <strong>Transpac</strong> II air cells slowly, both at the surface and under water.Rapid inflation under water can result in uncontrolled ascents. Uncontrolledascents can cause serious lung overpressure injuries, such as Arterial Gas Embolism(AGE). Such serious overpressure injuries can result in death. Maintaining safe rates of ascent requires training and practice. The <strong>Transpac</strong> II aircells’ overpressure relief valve does not control or prevent uncontrolled ascents. These instructions do not necessarily incorporate all the steps required, under allconditions, to orally inflate the <strong>Transpac</strong> II above or below the water. Oral inflationof BCs under water requires special training and practice. This should first beattempted under controlled conditions and the supervision of a certified instructor. Never breath from your <strong>Transpac</strong> II’s oral inflator/manual deflator mouthpiece.Your <strong>Transpac</strong> II’s air cell may contain contamination or gas residue that may behazardous if inhaled. Use of the <strong>Transpac</strong> II’s oral inflator/manual deflator or overpressure relief valve fordeflation may allow water to enter your <strong>Transpac</strong> II’s air cell. Repeated deflationof the <strong>Transpac</strong> II under water may allow enough water to enter the air cell tosubstantially reduce the <strong>Transpac</strong> II’s lift capacity (buoyancy) or interfere with itsability to allow the user to control buoyancy.If you have questions regarding any of the information you find in this manualor—equally important—questions pertaining to information about the <strong>Transpac</strong> IIyou cannot find in this manual, contact your local authorized <strong>Dive</strong> <strong>Rite</strong> dealer. Ifthere is no authorized <strong>Dive</strong> <strong>Rite</strong> dealer in your area, contact <strong>Dive</strong> <strong>Rite</strong> directly, usingthe contact information appearing on the front of this manual.What Your <strong>Transpac</strong> II SystemWill and Will Not DoBefore using your <strong>Transpac</strong> II, it is important you have a realistic perspective of whatit will and will not do.What Your <strong>Transpac</strong> II Will DoYour <strong>Transpac</strong> II is designed to do only the following:
<strong>Transpac</strong> II Owner’s <strong>Manual</strong> Page 8 Provide divers with additional buoyancy while surface swimming and resting. Offset loss of buoyancy caused by exposure suit compression under water. Provide a means of mounting single and double scuba cylinders and commonaccessories to the diver.What Your <strong>Transpac</strong> II Will Not DoYour <strong>Transpac</strong> II is not designed to do any of the following: The <strong>Transpac</strong> II is not to be used as a diver’s sole form of flotation; divers shouldhave additional forms of flotation, such as a neoprene foam wet or dry suits, toprovide buoyancy in case they need to abandon the <strong>Transpac</strong> II, or it malfunctions.The <strong>Transpac</strong> II is not a United States Coast Guard-approved personalflotation device (PFD). It will not float an unconscious person ina face-up position in all situations or under all conditions. The <strong>Transpac</strong> II is not a substitute for adequate swimming and scuba diving skills.(Trusting your life to any single piece of equipment is just plain stupid.) It is not an emergency air supply. Do not attempt to breathe from the air cellmouthpiece. The bladder may contain gasses or residues that are hazardous tobreathe. The <strong>Transpac</strong> II is not a lift bag. Attempting to use it as such places a diver atextreme risk of finding him or herself in a dangerous, uncontrolled ascent.If you have questions regarding the <strong>Transpac</strong> II’s suitability for a particular purpose,contact <strong>Dive</strong> <strong>Rite</strong> at the phone numbers appearing on the front of this manual.<strong>Transpac</strong> II FeaturesHere is an overview of some of the many features and benefits your <strong>Transpac</strong> IIsystem offers you. (The numbers refer to the illustration on the next page.) You willfind more specific information on these features throughout this manual.1. Tank adjustment strap helps you mount the <strong>Transpac</strong> II harness on singlecylinders at the same height each time (works with Travel, Trek and Rec Wings).2. Padded shoulder straps—available in five different lengths—provide comfortablefit.
<strong>Transpac</strong> II Owner’s <strong>Manual</strong> Page 9Figure 1: Key <strong>Transpac</strong> II features.3. Shoulder strap attachment point enables you to add or remove D-rings fromshoulder strap.4. Three one-inch/25mm D-rings along each side of harness provide attachmentpoints for light canisters, pony bottles and other equipment.5. Self-closing “epaulet” on the left-hand shoulder strap helps you keep inflationhoses under control.6. Grommetted mounting holes for doubles enable positioning of cylinders atdifferent heights.
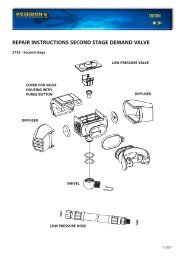
<strong>Transpac</strong> II Owner’s <strong>Manual</strong> Page 107. Shoulder strap quick releases feature unique, “fail-safe” design.8. Two-inch/50 mm D-rings on each shoulder are adjustable for height and bent ata slight angle for better access. You may also add or remove D-rings from theshoulder-strap webbing.9. Shoulder straps are easily adjustable for length and fit.10. Mounting slots for two-inch/50 mm cam straps (included with harness) enableuse with single cylinders.11. Two-inch/50 mm D-rings on each side of waist strap are adjustable. Waist strapdesign enables easy mounting of pockets and other accessories. <strong>Transpac</strong>s alsocome with a stainless-steel, quick-release buckle.12. Padded cummerbund helps transfer cylinder weight to hips for better fit andcomfort.13. Shoulder strap base plates, made from stainless steel, allow users to move baseof shoulder strap back and forth for best fit and performance. These plates arepre-drilled to accept installation of special “Tek” D-rings for use with sidemountor stage bottles.14. Heavily padded lumbar support and padded waist band transfer weight to hips.15. Attachment point for optional 1056D crotch strap.<strong>Transpac</strong> II ComponentsYour <strong>Transpac</strong> II is not merely a BC, but rather a system of components that enableyou to customize your <strong>Transpac</strong> II for a variety of applications. In its most compactform, you might use just the <strong>Transpac</strong> II harness and Travel Wings, for traveling toa warm-water dive destination. At the other extreme, you might use the <strong>Transpac</strong> IIharness in combination with Super Wings, the optional crotch strap and stabilizingplates, and a variety of pockets, for the most demanding technical diving.This section will help you identify the components you presently own, andthose you may wish to add to your <strong>Transpac</strong> II at a later date.<strong>Transpac</strong> II HarnessThe <strong>Transpac</strong> II harness is the heart of the system. All other <strong>Transpac</strong> II componentsattach to it. <strong>Transpac</strong> II Sizes The harness is available in five sizes, ranging fromXS (Extra Small) to XXL (Extra, Extra Large). Size denotes shoulder strap length.To ensure proper shoulder strap length, measure from at point at the top of theshoulder to a point at the waist immediately below it, as shown in the accompanyingillustration. Be sure to allow for exposure suit thickness.
<strong>Transpac</strong> II Owner’s <strong>Manual</strong> Page 11SizeXSSMM/LXLRange13.0 in/33 cm to 16.0 in/41 cm14.0 in/36 cm to 17.5 in/44 cm17.0 in/43 cm to 22.0 in/55 cm18.5 in/47 cm to 23.5 in/60 cmXXL For divers >75 in/190 cm; 250 lbs/110 kgFigure 2: How to measure for shoulder strap length.Small (S) and Extra Small (XS) <strong>Transpac</strong> harnesses come with back sections andlumbar supports that are approximately 2.0 inches/5.0 cm shorter than those oflarger <strong>Transpac</strong> harnesses. This is the preferred size for any diver whose back-of-neckto waist measurement is 17.0 inches/43 cm or less (a range that includes nearly allwomen). Any combination of <strong>Transpac</strong> shoulder harness and standard or short backsection/lumbar support are available on special order.<strong>Transpac</strong> II harnesses come with a padded “Tek” cummerbund that is inproportion to the length of the shoulder strap. It is possible, however, to order your<strong>Transpac</strong> II harness with a different size “Tek” cummerbund, or with the optional,full-length “Sport” cummerbund described on page 19. These are also available asafter-market replacement items.Tek cummerbund size ranges are:SizeXSSM/LXLXXLRange24 in/60 cm to 28 in/70 cm28 in/70 cm to 34 in/85 cm32 in/80 cm to 40 in/100 cm38 in/95 cm and upFor divers over 75 in/190 cm; 250 lbs/110 kgThe <strong>Transpac</strong> II harness comes with a “Sport” back pad/lumbar support, as shown inFigure 3 (next page). An optional “Tek” back pad/lumbar support is also available;see pages 19-20.
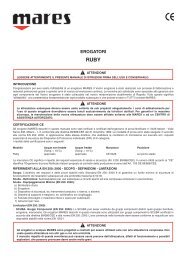
<strong>Transpac</strong> II Owner’s <strong>Manual</strong> Page 12Figure 3: Back pad and lumbar support.<strong>Transpac</strong> II Air CellsInterchangeable air cells for the <strong>Transpac</strong> II are available in five styles. Each <strong>Dive</strong><strong>Rite</strong> air cell incorporates an air-tight inner bladder, surrounded by a heavy-dutyouter shell. Here are descriptions of the different air cells, and the roles each isdesigned to fulfill.Figure 4: Travel Wings. Travel Wings (2071) Travel Wings are the most compact <strong>Transpac</strong> II air cell.They can provide up to 30 pounds/14 kg of buoyancy and can accommodateback-mounted single cylinders of up to 95 cubic feet/15 litres. An elastic outershell helps them maintain a streamlined shape. A 27-inch/69 cm low-pressureinflator hose is standard. Travel Wings are an ideal choice for divers who dive singlecylinders—or who want an additional, compact <strong>Transpac</strong> air cell for use solely withsingles (such as when travelling to a tropical resort destination).
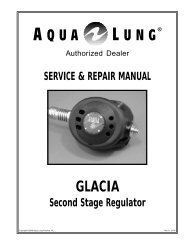
<strong>Transpac</strong> II Owner’s <strong>Manual</strong> Page 13Figure 5: Trek Wings. Trek Wings (2060) Trek Wings provide up to 40 pounds/18 kg of buoyancy. Theyare best suited for use with single cylinders of any size, and with lightweight tomedium-weight double cylinders (“a shorter air cell for shorter cylinders”). TrekWings can accommodate up to two 83-cubic-foot/13 litre back-mounted cylinders.Trek wings also incorporate a built-in gusset-control cord to help divers manage theshape and lift capacity of the air cell (see page 15 for additional information on thisfeature). A 27-inch/69 cm low-pressure inflator hose is standard.Trek Wings are a good choice for divers whose time under water is dividedbetween diving singles and lightweight doubles. They have also proven popular inareas such as Mexico’s Yucatan Peninsula, where local cave divers want an air cellthat is well-matched in size to the double aluminum 80s which are popular inthis region, and which does not allow large pockets of air to slosh from side toside, the way larger air cells tend to do. Further, Trek Wings are clearly “the” aircell for side mounting.Figure 6: Rec/Dual Rec Wings.
<strong>Transpac</strong> II Owner’s <strong>Manual</strong> Page 14 Rec Wings (2074)/Dual Rec Wings (2075) Rec Wings provide up to 51pounds/23 kg of buoyancy. They can be used with both single and doublecylinders. Rec Wings can accommodate up to two 104-cubic-foot/16 litre backmountedcylinders. Like Trek and Super Wings, Rec Wings also incorporate abuilt-in gusset-control cord. A 27-inch/69cm low-pressure inflator hose is standard.Standard Rec Wings have a single internal bladder and inflation hose. DualRec Wings have a redundant bladder and inflation hose. Rec Wings are a goodchoice for divers who, while they may primarily use doubles, want to be able toconfigure their air cell for use with single cylinders as well.Figure 7: Classic Wings. Classic Wings (2030) Diving’s first air cell designed specifically for doublecylinders, Classic Wings provide up to 59 pounds/27+ kg of buoyancy. They aredesigned for use with medium- to heavyweight doubles (Classic Wings should notbe used with single cylinders). These wings can accommodate up to two 104-cubicfoot/16litre back-mounted cylinders, and one 80-cubic-foot/11 litre stage bottle.A 22-inch/56cm low-pressure inflator hose is standard. Classic Wings are popularamong hard-core cave divers, who appreciate their simple, streamlined, “no frills”design.
<strong>Transpac</strong> II Owner’s <strong>Manual</strong> Page 15Figure 8: Super/SuperOne Wings. SuperOne Wings (2076)/Super Wings (2073) SuperOne Wings and standardSuper Wings provide from up to 84 pounds/38 kg of buoyancy, depending ongusset-control cord tension. They can accommodate up to two 120-cubic-foot/19litre back-mounted cylinders, and two 80-cubic-foot/11 litre stage bottles. (SuperWings should not be used with single cylinders.) The wings incorporate a heavydutyouter bag and, in the case of the standard Super Wings, redundant innerbladders with separate inflators (SuperOne Wings have a single internal bladder).One or two 22-inch/56cm low-pressure inflator hoses are standard. Super Wingsare designed for technical divers who need or desire both exceptional buoyancyand built-in redundancy.More About Gusset-Control Cords The gusset-control cord found on Rec andSuper Wings fulfills a variety of functions. Among them: When not inflated, the cord helps compress the air cell to as small a profile aspossible. This reduces drag and helps protect air cells from damage. By tightening the cord, users can limit lift capacity to only that needed for aparticular application (example: diving single cylinders generally requires far lessbuoyancy that doubles do). The benefit is that reduced lift capacity also helpsreduce the likelihood of uncontrolled ascents. Tightening the Trek or Rec Wings’ gusset-control cord to its maximum limit helpsprevent the air cell from wrapping around the sides of single cylinders.You can tighten or loosen the gusset control cord by adjusting the clips at each side ofthe base of the air cell. When doing so, adjust both cords evenly.
<strong>Transpac</strong> II Owner’s <strong>Manual</strong> Page 16Figure 9: The gusset-control cord found on Rec and Super Wings enables users to controlthe overall shape and profile of these air cells.Before diving with either Trek, Rec or Super Wings, you should spend time ina controlled environment, such as a pool, experimenting with gusset control cordsettings. This will help you find the setting that best fits your diving needs and youroverall equipment configuration.Before using your Trek, Rec or Super Wings in open water or other,more challenging environments, spend time in a controlled environment,such as a pool, practicing venting your wings in a variety ofpositions. The inability to vent such a high-capacity air cell quicklyand efficiently can lead to dangerous, uncontrolled ascents. Suchascents can result in serious personal injury or death.
<strong>Transpac</strong> II Owner’s <strong>Manual</strong> Page 17Air Cell Summary Here are some of the key features found on each <strong>Dive</strong> <strong>Rite</strong>air cell.Maximum Redundant Single Double InflatorAir Cell Buoyancy Air Cell Cylinders Cylinders Hose LengthTravel Wings 135 N/14 kg/30 lbs 27 in/69cmTrek Wings 175 N/18 kg/40 lbs 27 in/69cmRec Wings 225 N/23 kg/51 lbs 27 in/69cmDual Rec Wings 225 N/23 kg/51 lbs 27 in/69cmClassic Wings 265 N/27 kg/59 lbs 22 in/56cmSuper One Wings 370 N/38 kg/84 lbs 22 in/56cmSuper Wings 340 N/35 kg/77 lbs 22 in/56cm<strong>Transpac</strong> II AccessoriesWeight Systems An integrated weight system is available for the <strong>Transpac</strong> II; <strong>Dive</strong><strong>Rite</strong> trim weights work with a wide variety of BCs and harnesses.Figure 10: The <strong>Transpac</strong> II’s optional, integrated weight system, weight pocket insertsand seven- and four-pound trim weights. Weight Pockets (2109) The <strong>Transpac</strong> II’s optional integrated weight system holdsup to 32 pound/15kg (actual capacity may vary, depending on the size and shapeof the weights used). Weight system components install easily on the <strong>Transpac</strong> II’s2.0-inch/50mm waist strap.The weight system’s pockets have a zipper on the top that divers can use toadd or remove weight in non-emergency situations. A flap at the bottom of thepocket is held securely in place with a large Velcro ® flap. In an emergency, pullingon the flap’s large, color-coded tab opens the pocket. Weight Pouches (2110/2111) Two different types of weight pouches are availablefor the <strong>Transpac</strong> II’s optional, integrated weight system. The model 2110 pouchis designed for loose shot weight; model 2111 is designed for either normal block
<strong>Transpac</strong> II Owner’s <strong>Manual</strong> Page 18weights or shot weight (model 2110 has a smaller zipper on top). Both come witha convenient carrying handle. 4- and 7-Pound Trim Weights (2150-4 and 2150-7) These can provide additional,non removable ballast, as needed. <strong>Dive</strong>rs can use stainless quick links to mounttrim weights between the D-rings found along the side of the <strong>Transpac</strong>’s back piece.Additionally, the seven-pound weights will fit between the bolts of double cylindersand the four-pound weights come with slots for 2.0-inch/50 mm webbing.Pockets These attach to the <strong>Transpac</strong> II waist band or any other harness waist bandthat uses 2.0-inch/50 mm webbing.Figure 11: (Top Row) Mask Pocket, Thigh Pocket; (Bottom Row) Slate Pocket, Two-Zipper Pocket Thigh Pocket If you need the type of pocket normally installed on a wetsuit ordrysuit thigh (but don’t have one), this makes a handy alternative. It also enablesyou to keep the same items with you when you change suits. Includes internal keyring. Item number 2761. Two-Zipper Pockets The two-zipper <strong>Dive</strong>r’s Pocket (2014) is large enough to holdslates, tables and similar-size items. Available in Black, Blue, Red. Mask/Utility Pocket The standard Mask/Utility pocket (2065) holds back-up mask,jon lines and similar size items. Available in Black, Blue, Red. Slate Pocket The Slate pocket (2016) is just the right size to hold a set of 2058Executive Slate, plus has a built-in ring for keys. Available in Black.Harness Accessories These accessories are designed to help you improve thecomfort and/or fit of your BC harness, or to facilitate its use with a variety ofcylinders.
<strong>Transpac</strong> II Owner’s <strong>Manual</strong> Page 19Figure 12: Stabilizing Plates. Stabilizing Plates (2084) Stabilizing plates allow the <strong>Transpac</strong> II harness and aircells to be firmly secured to nearly any set of doubles that uses industry-standardbands and bolts. They make attaching doubles quick and easy.Figure 13: Sport Cummerbund. Sport Cummerbund (2104) Some divers prefer a cummerbund that completelyencircles the waist. For these divers, <strong>Dive</strong> <strong>Rite</strong> offers the “Sport” cummerbund.The Sport Cummerbund is available as an after-market accessory, or may be specialordered with the <strong>Transpac</strong> II.SizeXSSM/LXLRange24 in/60 cm to 28 in/70 cm28 in/70 cm to 34 in/85 cm32 in/80 cm to 40 in/100 cm38 in/95 cm and upWhen measuring for cummerbunds, remember to allow for exposure suit thicknessand circumference.Figure 14: “Tek” back pad/lumbar support.
<strong>Transpac</strong> II Owner’s <strong>Manual</strong> Page 20 “Tek” Back Pad (2102S) and Lumbar Support (2102L) Some <strong>Transpac</strong> users preferusing a separate back pad and lumbar support. As with the Sport Cummerbund,the “Tek” back pad and lumbar support are available as after-market accessories, ormay be special ordered with the <strong>Transpac</strong> II.Figure 15: Crotch straps. Crotch Straps <strong>Dive</strong> <strong>Rite</strong>’s two most-popular crotch straps for the <strong>Transpac</strong> II arethe 1.0-inch/25 mm 1056 and 1056D. Both crotch straps are equipped with slidereleasebuckles; the 1056D also includes a 2.0-inch/50 mm circular ring for usewith diver propulsion vehicles (DPVs).TRANSPAC SHOULDERSTRAP BASE PLATEWITH “TEK” D-RINGFigure 16: “Tek” D-ring. “Tek” D-Rings (2769) These special D-rings can be installed on <strong>Transpac</strong> II shoulderstrap base plates. They make excellent attachment points for stage bottles.Changes to the <strong>Transpac</strong> II or use of after-market accessories canprevent its proper function or result in damage to the <strong>Transpac</strong> II.This can cause serious personal injury or death.
<strong>Transpac</strong> II Owner’s <strong>Manual</strong> Page 21Assembling Your<strong>Transpac</strong> II SystemBefore you can use your <strong>Transpac</strong> II, you must first assemble its components into aconfiguration that best fits your needs. This section devotes itself to that assemblyprocess. It covers: Attaching Your <strong>Transpac</strong> II System to Single Cylinders Step-by-step procedures forusing the <strong>Transpac</strong> II with single cylinders. Attaching Your <strong>Transpac</strong> II System to Double Cylinders The special techniques youmust follow when using the <strong>Transpac</strong> II with double cylinders. Weight System How to install and use the <strong>Transpac</strong> II’s optional integrated weightsystem. Adding/Removing Shoulder D-rings You can not only change position of the <strong>Transpac</strong>II’s shoulder-strap D-rings, you can add more or remove them, if you sochoose.If you have questions regarding any of the information you find in this manualor—equally important—questions pertaining to information about the <strong>Transpac</strong> IIyou cannot find in this manual, contact your local authorized <strong>Dive</strong> <strong>Rite</strong> dealer. Ifthere is no authorized <strong>Dive</strong> <strong>Rite</strong> dealer in your area, contact <strong>Dive</strong> <strong>Rite</strong> directly, usingthe contact information appearing on the front of this manual.Attaching Your <strong>Transpac</strong> IIHarness to Single CylindersAttaching your assembled <strong>Transpac</strong> II system to a variety of single cylinders is afairly straightforward procedure. It is largely the same as you learned in your firstscuba course, and have probably been doing with other BCDs and tank harnessesfrom day one.As shown in Figure 17 (next page), you will find two slots for attachingstandard, single-tank cam bands on the back side of your <strong>Transpac</strong> II harness. (Twosuch cam bands come standard with each <strong>Transpac</strong> II harness.) <strong>Transpac</strong> II harnessesmade prior to 2002 have cam bands made using industry-standard nylon cam bandbuckles; those made from early 2002 onward use special stainless cam band buckles(see Figure 17, next page).
<strong>Transpac</strong> II Owner’s <strong>Manual</strong> Page 22Figure 17: Slots for attaching single-tank cam bands; stainless cam band buckle.Figure 18 shows how the harness, Travel or Rec Wings air cell, cam straps and singlecylinder should look when fully assembled. Notice that the air cell is sandwichedbetween the tank and harness.Figure 18: Positioning of cam straps and air cell with single cylinders.
<strong>Transpac</strong> II Owner’s <strong>Manual</strong> Page 23Before each use, soak the <strong>Transpac</strong> II’s tank bands in water andallow them to stretch. Failure to do so may allow these bands toloosen during use, resulting in the possible shifting or loss of scubacylinders in or out of the water. This, in turn, can cause seriouspersonal injury or death.Once you have attached it to a single scuba cylinder, you shouldpick the unit up by the BC and shake it up and down a fewtimes. This will help make sure that the tank is fastened in securely,and that the bands are tight enough to help prevent them fromcoming undone accidentally, later on. Remember, accidental loss ofair supply can cause serious personal injury or death.If your “shake test” reveals that the straps are not tight enough, unfasten them andsee if you can make them tighter. If you have difficulty with this, it is probablybecause you either did not soak the straps first in water, or did not thread themas shown in Figure 18.One final note: You will most likely find your <strong>Transpac</strong> II works best withsingle cylinders if you remove the back (spine) pad.Before each use, check all scuba tank buckles and bands for wear.Have an authorized repair facility replace worn or damaged itemsbefore use. Failure to replace worn or damaged scuba tank bucklesand bands could lead to loss of scuba cylinders or of the <strong>Transpac</strong> IIassembly itself. This could lead to serious personal injury or death.Tank Height Adjustment StrapWhen attaching your <strong>Transpac</strong> II to single cylinders, you will probably want to takeadvantage of the tank-height adjustment strap, shown back in Figure 18. This strapis designed to hook over the cylinder valve and help you achieve a consistent heightsetting each time you put your <strong>Transpac</strong> II on a tank. You can also use this strap as acarrying handle when your <strong>Transpac</strong> II is not attached to a scuba cylinder.The tank-height adjustment strap fastens and adjusts with a belt slide. Youwill need to experiment with it to find the adjustment height that is right for you.Many divers have a fear of hitting themselves in the back of the head with a tank
<strong>Transpac</strong> II Owner’s <strong>Manual</strong> Page 24that sits too high in its harness. In reality, most recreational dives wear their tanksfar too low.There is a simple test to ensure that your tank is sitting high enough in itsharness. That test is: Can you reach back and easily turn your tank’s on/off valve(s)? Ifyou can, great! If not, your tank should probably be higher.Sooner or later, nearly all of us manage to jump in the water with ourair turned off. If we can reach the tank valve to turn it on, this is merely aninconvenience. If we cannot reach our tank valve, what would otherwise be merelyan embarrassment can turn into a life-threatening situation.Eliminating Tank Wrap-UpBefore using any other back-inflation style air cell with single cylinders, there aresome things you should be aware of. Figure 19 shows the tendency back-inflationstyleBCs have when used in conjunction with single cylinders. Air inside the cellcauses it to wrap around the tank. This traps air above the level of the BC hose elbowwhen the diver is in a normal swimming position. Thus, when the diver attempts tovent air from the BC, he or she may not be able to do so.Figure 19: Tank wrap-up causes trapped air, making it difficult to vent the air cell whilein a normal swimming position.Figure 20 shows the benefit of eliminating tank wrap-up. The entire air cell is nowbelow the level of the BC hose elbow. Thus, when the diver attempts to vent air,either by using the remote exhaust valve in the hose elbow or by holding the end ofthe hose up and depressing the oral inflation/manual deflation button, he or she willbe able to vent air more easily. Travel Wings, Trek Wings and Rec Wings each employa method of helping divers avoid single-tank wrap-up.
<strong>Transpac</strong> II Owner’s <strong>Manual</strong> Page 25Figure 20: Eliminating tank wrap-up makes it much easier to vent the air cell whilein a normal swimming position.In the case of Travel Wings, the elastic outer bag helps the BC maintain the moststreamlined shape possible, regardless of whether it contains air or not. This designgreatly minimizes any tendency toward tank wrap-up. On Trek and Rec Wingskeeping the gusset control cord as snug as possible will help keep single tank wrap-upto a minimum.Do not use either the Classic Wings or Super Wings with singlecylinders. When using Trek or Rec with single cylinders, alwayskeep the elastic strap and gusset control cords as snug as possible.Failure to do so can prevent you from venting air from your BC andmay lead to uncontrolled ascents. This can further result in seriouspersonal injury or death.Attaching Your <strong>Transpac</strong> IISystem to Double CylindersThe method you will use to attach your <strong>Transpac</strong> II to double cylinders will dependon the size and configuration of those cylinders. In Europe and elsewhere, a commonconfiguration for compact double cylinders is that shown in Figure 21.
<strong>Transpac</strong> II Owner’s <strong>Manual</strong> Page 26Figure 21: Compact double cylinders.Here the manifold and tank boot hold the cylinders together as a single unit. Youcan treat such cylinders as though they were a large single tank, and attach themto your <strong>Transpac</strong> II with cam straps. If the standard <strong>Transpac</strong> II cam straps are notlong enough, you can replace them with Model 2032D straps, which accommodatea wide variety of double cylinders.To attach higher capacity double cylinders to your <strong>Transpac</strong> II, the doublesmust be bolted together with <strong>Dive</strong> <strong>Rite</strong> 1033 or 1033W tank bands, or theirequivalent. The bands should be spaced so that the bolt centers are exactly 11.0inches/28cm apart. Doubles used with <strong>Dive</strong> <strong>Rite</strong> “Wings” BCDs and traditionalback plates are already set up this way.Figure 22: Bolt clearance.As shown in Figure 22, the bolts should protrude quite a distance from the center ofthe bands—but not so far, however, that they will gouge the wearer in the back.Figure 23 shows how to attach double cylinders, air cells and harnesses to oneanother using 2084 stabilizing plates. (To access the harness bolt holes, you willneed to temporarily pull the back pad/lumbar support away from the inside of theharness.) As with single cylinders, the air cell is sandwiched between the cylindersand harness.
<strong>Transpac</strong> II Owner’s <strong>Manual</strong> Page 27Figure 23: Proper positioning of doubles, air cell, harness and stabilizing plates.Tighten the 2084 stabilizing plates in place using the wing nuts that come with thetank-band bolt kit, as shown in Figure 23. Turn the wing nuts until they are astight as you can get them.Figure 24: This is what happens when you tighten the wing nuts.Attaching/Using Optional Crotch StrapThe nature of the human body is such that, while it is easy to design a harnesscapable of holding considerable weight when a person is in a vertical or horizontalposition, it is not as easy to support that weight when the person goes into aninverted (head-down) position. This is why users of doubles and other heavyweightcylinders often choose to add crotch straps to their systems. When in an invertedposition, the crotch strap helps keep the cylinders from sliding down and whackingthe diver in the head.
<strong>Transpac</strong> II Owner’s <strong>Manual</strong> Page 28Figure 25: Crotch strap installation.As Figure 25 shows, crotch straps thread into the 1.0-inch/25mm D-ring at the baseof the harness. The belt slide supplied with the crotch straps allows users to makemajor adjustments; minor adjustments can be made at the compression-release fittingat the front of the crotch strap.If you need an auxiliary weight belt, remember to fasten the crotchstrap first, then put the weight belt on over it. Failure to do so willhinder your ability to release your weight belt in an emergency. Thiscould lead to serious personal injury or death.
<strong>Transpac</strong> II Owner’s <strong>Manual</strong> Page 29Installing the OptionalIntegrated Weight SystemTo install <strong>Transpac</strong> II weight pockets, all users must do is thread that portion of thewaist band which passes through the shoulder strap base plate so that it captures therear-most of the pocket’s two vertical webbing slots. The shoulder strap itself goesthrough the upper, horizontal webbing slot. Once installed, the back of the pocketsshould look exactly like what is shown in Figure 26.Figure 26: Weight pocket installation.Additional ConsiderationsThe design of the <strong>Transpac</strong> II’s 2.0-inch/50mm waist strap allows the flexibility toinstall pockets in a wide variety of ways. Depending on what pockets you choose andthe length of the waist strap you have to work with, there may be some limitationson how or where you can install pockets.If you do install other pockets in addition to those of the weightsystem, make certain these other pockets do not interfere with easyand rapid removal of weight in an emergency. Failure to do so mayresult in unsuccessful attempts at jettisoning weight which, in turn,can lead to the inability to ascend to or remain at the surface. Thiscan cause serious personal injury or death by drowning or other causes.
<strong>Transpac</strong> II Owner’s <strong>Manual</strong> Page 30Adding/Removing Shoulder Strap D-RingsTo add or remove D-rings from <strong>Transpac</strong> II shoulder straps, or to replace shoulderstraps with those of a different size, you will need to know how to thread andunthread the 2.0-inch/50mm webbing found at the top of each strap. Figure 27shows how. Among the things you will need to bear in mind: If you are replacing shoulder straps, you will first need to insert the Velcro®-tippedtab at the top of each new strap into the corresponding slot on the <strong>Transpac</strong> IIbackpiece. Make certain each tab goes in as far as possible. An effective way todo this is to first place the tab inside a small plastic bag, before inserting it inthe slot. After the tab is in place, pull the bag out the top of the slot. Doing sowill help ensure that both sides of the Velcro ® do not make contact until the tabis completely in place. As the Figure 27 shows, the shoulder strap webbing is designed to pass throughtwo stainless belt slides (weight retainers). The top slide is permanently sewed tothe <strong>Transpac</strong> II backpiece. The lower slide goes on the shoulder strap webbing.Note that the webbing passes through this lower slide twice, to help ensure thestrongest possible hold.Figure 27: Rethreading shoulder strap webbing.Remember that, due to the curvature of the shoulder strap, the webbing needs to beslightly longer than the strap beneath it.
<strong>Transpac</strong> II Owner’s <strong>Manual</strong> Page 31Using Your <strong>Transpac</strong> IIHaving correctly assembled your <strong>Transpac</strong> II system, you are ready to use it. Thissection covers some important things you need to know, and some important stepsyou need to follow, when doing so. It is not intended as a replacement for certified,professional instruction in scuba diving and buoyancy control. Among the thingsthis section covers: Donning and Adjusting Your <strong>Transpac</strong> A guide to achieving the best possible fitand performance. Post-<strong>Dive</strong> Maintenance and Care The steps you must follow, after every use, toprotect your <strong>Transpac</strong> II from harm.As before, if you have questions regarding any of the information you find inthis manual or—equally important—questions pertaining to information about the<strong>Transpac</strong> II you cannot find in this manual, contact your local authorized <strong>Dive</strong> <strong>Rite</strong>dealer. If there is no authorized <strong>Dive</strong> <strong>Rite</strong> dealer in your area, contact <strong>Dive</strong> <strong>Rite</strong>directly, using the information appearing on the front of this manual.Donning and Adjusting Your <strong>Transpac</strong> IIA snug, secure fit is among the chief benefits of the <strong>Transpac</strong> II system. To helpensure a snug, yet comfortable fit, follow these steps:1. Before donning your <strong>Transpac</strong> II, loosen the shoulder and cross-chest straps.2. Don the <strong>Transpac</strong> II and fasten the waist strap so that it is comfortable.3. Fasten the cross-chest strap but do not tighten it.4. Partially tighten the shoulder straps.5. Partially tighten the cross-chest strap.6. Repeat steps 4 and 5 until you achieve the most comfortable fit.7. If installed, fasten the optional crotch strap. (Remember not to don your weightbelt until after the crotch strap is fastened.) If the crotch strap does not fitsecurely, tighten it by pulling down on the free end of the strap.9. Rock gently from side to side to make sure the harness is tight and secure.10. Fully inflate the BC to ensure it will not restrict your breathing or movement.
<strong>Transpac</strong> II Owner’s <strong>Manual</strong> Page 32Adjust the waist, shoulder and chest straps for a comfortable fit.Properly fitted, the <strong>Transpac</strong> II should not restrict your breathingwhen its air cell is fully inflated.Before each use, check your <strong>Transpac</strong> II’s bands, straps, quickdisconnectclips and the cummerbund/ waist strap for wear. Havean authorized repair facility replace worn or damaged items beforeyou use your <strong>Transpac</strong> II.Inflation and Deflation ProceduresAn Important Note Regarding Redundant Bladders Both the Dual Rec Wingsand Super Wings contain a primary bladder which you inflate and deflate throughthe large-diameter inflation/deflation hose located on the left side of the air cell. Inthe event of bladder or air-hose failure, these air cells also contain a back-up bladder.You inflate and deflate the back-up bladder with the inflation/deflation hose locatedon the right side of the air cell.Figure 28: Location of primary and back-up inflation hoses.Keep the large-diameter inflation/deflation hose for the back-up bladder readilyavailable. On the Super Wings, you will find a retaining strap for the back-up bladderhose on the right side of the air cell. We recommend that you keep a low-pressureinflator hose attached to this large-diameter hose during each dive.
<strong>Transpac</strong> II Owner’s <strong>Manual</strong> Page 33Post-<strong>Dive</strong> Maintenance and CareWith proper care and service, your <strong>Transpac</strong> II can provide you years of safe,enjoyable use. Without this care, your BC can become damaged and be eitherunserviceable or dangerous to use.General Maintenance Procedures The sun’s ultraviolet rays can fade and damage your BC, shortening its life. Storeyour <strong>Transpac</strong> II away from sunlight and excessive heat. Keep sharp objects from coming in contact with your <strong>Transpac</strong> II. Take care when handling your <strong>Transpac</strong> II. Do not rest heavy objects on it or dragit over rough surfaces. Periodically lubricate the low-pressure inflator hose coupling and quick-disconnectplug with silicone lubricant.Do not disconnect the large-diameter inflation hose elbow/remoteexhaust from the air cell body. Detachment and re-attchment ofthis component requires use of a special tool, and should only beattempted by a qualified technician working under the supervisionof an authorized <strong>Dive</strong> <strong>Rite</strong> dealer or distributor. Attempts to removeand/or replace this component without the necessary training andtools may result in permanent damage to the inflation hose assemplyor air cell. Due to the type of material used in the construction of your <strong>Transpac</strong> II, youshould clean it only with fresh water and mild detergent. Chemicals, strong detergentsand cleaning solutions can damage your <strong>Transpac</strong> II and shorten its life. Have your <strong>Transpac</strong> II inspected yearly by your local, authorized <strong>Dive</strong> <strong>Rite</strong> dealer.Steps to Follow After Every <strong>Dive</strong>Perhaps the greatest threat to your <strong>Transpac</strong> II’s long life is the presence of contaminantsin its air cells. Salt water, in particular, poses a very serious threat. Whenit evaporates, salt water leaves behind razor-sharp crystals that can easily punctureair cell fabric. Other substances can cause the inside surfaces of your air cell topermanently stick to one another. To help prevent this from happening, follow thesesteps:
<strong>Transpac</strong> II Owner’s <strong>Manual</strong> Page 341. Begin by draining any water that may have collected in your BC during the dive.To do so, at least partially inflate the BC, then turn it over so that the hoseelbow is at the lowest point. Depress the oral inflator/manual deflator button whilesqueezing gently on the air cell. Continue to do so until all the water is out.2. Refill the BC with fresh water, until it is approximately one-quarter full. Inflate theBC the rest of the way with air.3. Turn the BC over and over, so that the fresh water has the opportunity to rinseall of the BC’s interior surfaces.4. Repeat step 1 to drain the fresh water from the BC.5. Repeat steps 2, 3 and 4 one or two more times.6. Rinse the exterior of the BC by immersing it in a tub or fresh water, or sprayingit gently with a hose.7. Inflate the BC until it is nearly full, and let it stand for 30 minutes. After 30minutes, check for loss of air.8. Lay the <strong>Transpac</strong> II out flat or—better still—hang it upside down for several hours,to allow it to dry thoroughly.9. Store the <strong>Transpac</strong> II partially inflated, in a dry, dark place.
<strong>Transpac</strong> II Owner’s <strong>Manual</strong> Page 35Seriel Number______________________________________________Notes:________________________________________________________________________________________________________________________________________________________________________________________________________________________________________________________________________________________________________________________________________________________________________________________________________________________________________________________________________________________________________________________________________________________________________________________________________________________________________________________________________________________________________________________________________________________________________________________________________________________________________________________________________________________________________________________________________________________________________________________________________________________________________________________________________________________________________________________________________________________________________________________________________________________________________________________________________________________________________________________________________________________________________________________________________________________________________________________________________________________________________________________________________________________________________________________________________________________________________________________________________________________________________________________________________________________________________________________________________________________________________________________________________________________________________________________________________________________________________________________________________________________________________________________________________________________________________________________________________________________________________________________________________________________________________________________________________________________________________________________________________________