Refurbishing a Clansman Battery - VMARSmanuals
Refurbishing a Clansman Battery - VMARSmanuals
Refurbishing a Clansman Battery - VMARSmanuals
- No tags were found...

You also want an ePaper? Increase the reach of your titles
YUMPU automatically turns print PDFs into web optimized ePapers that Google loves.
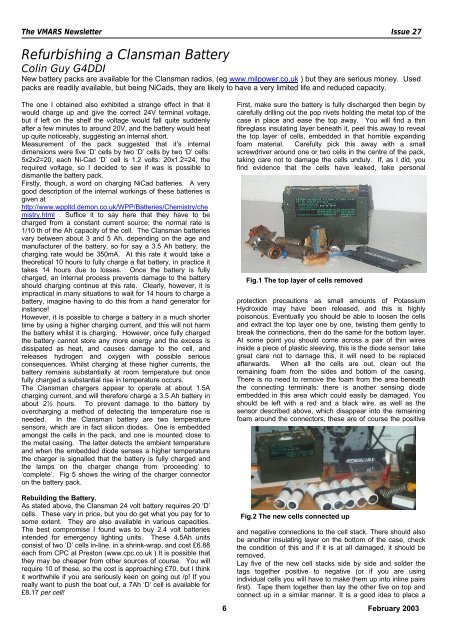
The VMARS Newsletter Issue 27<strong>Refurbishing</strong> a <strong>Clansman</strong> <strong>Battery</strong>Colin Guy G4DDINew battery packs are available for the <strong>Clansman</strong> radios, (eg www.milpower.co.uk ) but they are serious money. Usedpacks are readily available, but being NiCads, they are likely to have a very limited life and reduced capacity.The one I obtained also exhibited a strange effect in that itwould charge up and give the correct 24V terminal voltage,but if left on the shelf the voltage would fall quite suddenlyafter a few minutes to around 20V, and the battery would heatup quite noticeably, suggesting an internal short.Measurement of the pack suggested that it’s internaldimensions were five ‘D’ cells by two ‘D’ cells by two ‘D’ cells:5x2x2=20, each Ni-Cad ‘D’ cell is 1.2 volts: 20x1.2=24, therequired voltage, so I decided to see if was is possible todismantle the battery pack.Firstly, though, a word on charging NiCad batteries. A verygood description of the internal workings of these batteries isgiven athttp://www.wppltd.demon.co.uk/WPP/Batteries/Chemistry/chemistry.html . Suffice it to say here that they have to becharged from a constant current source; the normal rate is1/10 th of the Ah capacity of the cell. The <strong>Clansman</strong> batteriesvary between about 3 and 5 Ah, depending on the age andmanufacturer of the battery, so for say a 3.5 Ah battery, thecharging rate would be 350mA. At this rate it would take atheoretical 10 hours to fully charge a flat battery, in practice ittakes 14 hours due to losses. Once the battery is fullycharged, an internal process prevents damage to the batteryshould charging continue at this rate. Clearly, however, it isimpractical in many situations to wait for 14 hours to charge abattery, imagine having to do this from a hand generator forinstance!However, it is possible to charge a battery in a much shortertime by using a higher charging current, and this will not harmthe battery whilst it is charging. However, once fully chargedthe battery cannot store any more energy and the excess isdissipated as heat, and causes damage to the cell, andreleases hydrogen and oxygen with possible seriousconsequences. Whilst charging at these higher currents, thebattery remains substantially at room temperature but oncefully charged a substantial rise in temperature occurs.The <strong>Clansman</strong> chargers appear to operate at about 1.5Acharging current, and will therefore charge a 3.5 Ah battery inabout 2½ hours. To prevent damage to the battery byovercharging a method of detecting the temperature rise isneeded. In the <strong>Clansman</strong> battery are two temperaturesensors, which are in fact silicon diodes. One is embeddedamongst the cells in the pack, and one is mounted close tothe metal casing. The latter detects the ambient temperatureand when the embedded diode senses a higher temperaturethe charger is signalled that the battery is fully charged andthe lamps on the charger change from ‘proceeding’ to‘complete’. Fig 5 shows the wiring of the charger connectoron the battery pack.Rebuilding the <strong>Battery</strong>.As stated above, the <strong>Clansman</strong> 24 volt battery requires 20 ‘D’cells. These vary in price, but you do get what you pay for tosome extent. They are also available in various capacities.The best compromise I found was to buy 2.4 volt batteriesintended for emergency lighting units. These 4.5Ah unitsconsist of two ‘D’ cells in-line, in a shrink-wrap, and cost £6.88each from CPC at Preston (www.cpc.co.uk ) It is possible thatthey may be cheaper from other sources of course. You willrequire 10 of these, so the cost is approaching £70, but I thinkit worthwhile if you are seriously keen on going out /p! If youreally want to push the boat out, a 7Ah ‘D’ cell is available for£8.17 per cell!First, make sure the battery is fully discharged then begin bycarefully drilling out the pop rivets holding the metal top of thecase in place and ease the top away. You will find a thinfibreglass insulating layer beneath it, peel this away to revealthe top layer of cells, embedded in that horrible expandingfoam material. Carefully pick this away with a smallscrewdriver around one or two cells in the centre of the pack,taking care not to damage the cells unduly. If, as I did, youfind evidence that the cells have leaked, take personalFig.1 The top layer of cells removedprotection precautions as small amounts of PotassiumHydroxide may have been released, and this is highlypoisonous. Eventually you should be able to loosen the cellsand extract the top layer one by one, twisting them gently tobreak the connections, then do the same for the bottom layer.At some point you should come across a pair of thin wiresinside a piece of plastic sleeving, this is the diode sensor: takegreat care not to damage this, it will need to be replacedafterwards. When all the cells are out, clean out theremaining foam from the sides and bottom of the casing.There is no need to remove the foam from the area beneaththe connecting terminals: there is another sensing diodeembedded in this area which could easily be damaged. Youshould be left with a red and a black wire, as well as thesensor described above, which disappear into the remainingfoam around the connectors, these are of course the positiveFig.2 The new cells connected upand negative connections to the cell stack. There should alsobe another insulating layer on the bottom of the case, checkthe condition of this and if it is at all damaged, it should beremoved.Lay five of the new cell stacks side by side and solder thetags together positive to negative (or if you are usingindividual cells you will have to make them up into inline pairsfirst). Tape them together then lay the other five on top andconnect up in a similar manner. It is a good idea to place a6 February 2003
The VMARS Newsletter Issue 27Fig 3. Test chargingpiece of thin insulating material between the two layers, I usethe clear plastic sheeting in which many things are packagedthese days, but probably better would be thin fibreglass sheetFig.4 Final testing before the lid goes back on!as in the original battery if you can get it (it is more heatresistant). The original battery relied only on the ‘heatshrink’wrap of the cells for inter-cell insulation, as you can see infig.1 this has not fared too well!When the cells are all connected up it is a good idea tomeasure the terminal voltage – it should be very close to 24volts unless the cells are totally flat. If it is any less,check for reversed cells, it is easy to do if you are notcareful. When you are satisfied that the wiring of thecells is correct, place a piece of insulating material inthe bottom of the battery case and ease the new cellpack into the case. Then slide a suitably sized pieceof insulating material between the cells and the caseon each side and on top. Relocate the sensor diodein the centre of the cell pack, and connect the redand black wires to the appropriate terminals of thecells. Refit the top metal cover but do not re-rivet it atthis stage, a couple of self - tapping screws willlocate it if it is loose.Now is the time to charge the battery: give it a couple ofhours, if the indicator lamp on the charger doesn’t changeover see if the cells are any more than just warm, if not givethem a little longer, if they are quite hot you may havedamaged one of the diodes; they can be checked forcontinuity with a multimeter, (see fig 5). If all is well clip thepack to your radio and see how long it works for! It may benecessary to charge and discharge new cells a few timesbefore full capacity is achieved.When you are quitesure the battery isworking properly,remove the cover andadd some moreinsulation asnecessary to makesure the cells aren’tloose. You can buysmall cans ofFig.5 Charging socket connectionsexpanding foam from diy stores and builders merchants, but Iwould suggest not using this material unless you really wantto make the pack ‘squaddieproof’, as sooner or later the cellswill fail again!! Also, the foam is expensive and once a can isstarted, it ‘goes off’ very quickly and so is wasted, it’s only aneconomical proposition if you are doing several batteriestogether. Either way, replace the cover, ‘pop’ in some newrivets and no-one will know its been apart.7 February 2003