conditions of use for a rim brake pads - tech-mavic
conditions of use for a rim brake pads - tech-mavic
conditions of use for a rim brake pads - tech-mavic
- No tags were found...

You also want an ePaper? Increase the reach of your titles
YUMPU automatically turns print PDFs into web optimized ePapers that Google loves.
CONDITIONS OF USE FOR A RIMCONDITIONS OF USE TO BE GIVEN TO YOUR CUSTOMERS :Recommendations <strong>for</strong> <strong>use</strong> <strong>of</strong> each <strong>rim</strong> are defined in 2000 Mavic’s catalog.Any other <strong>use</strong> is not recommended and is the sole responsibility <strong>of</strong> the <strong>use</strong>r.Please advise customers <strong>of</strong> the following :• Choose a suitable <strong>rim</strong> designed <strong>for</strong> the type <strong>of</strong> riding you wish to do.• Respect the instructions <strong>for</strong> tire pressure and dimension mentioned in the Technical Manual (see following diagrams).• Respect appropriate tension <strong>of</strong> spokes. Mavic recommends tension <strong>of</strong> spokes between 70 - 90 kg (<strong>for</strong> a front or rear wheel on the free wheel sidewith 3 cross pattern).• Do not build a radial wheel with a sleeve or pin jointed <strong>rim</strong> (MA3, CXP11, CXP21, X221, X223 Disc, T221 and T223).• Inappropriate tension <strong>of</strong> spokes can generate too much stress.• Rims must be cleaned on a regular basis with Mavic abrasive eraser (M40410).• Remove gravel or metal particles in the <strong>brake</strong> <strong>pads</strong>.• Replace <strong>brake</strong> <strong>pads</strong> when they worn.• Discontinue <strong>use</strong> <strong>of</strong> <strong>rim</strong> if the braking surfaces are worn, if eyelets are missing, or in any other case where safety might be compromised.• Check, or have your <strong>rim</strong>s checked, on a regular basis. If this not possible check them at least in the beginning <strong>of</strong> each season and after intensive<strong>use</strong>. When checking, look inside (especially under the <strong>rim</strong> tape) and outside the <strong>rim</strong>. Look <strong>for</strong> signs <strong>of</strong> fatigue, wear, damage to the braking surfaces,or cracks in the walls around the eyelets.Following these recommendations will guarantee longer product life <strong>for</strong> the <strong>rim</strong>s, maximum per<strong>for</strong>mance and riding enjoyment.
DURABILITY :A <strong>rim</strong> has two main functions :• to support the tire.• to serve as a <strong>brake</strong> disk.In the framework <strong>of</strong> this second function as a braking surface, <strong>rim</strong>s may be subject to wear, especially from intensive or prolonged <strong>use</strong>. Rims mayexperience wear <strong>for</strong> reasons as diverse as the encrustation <strong>of</strong> gravel or mud in the <strong>brake</strong> <strong>pads</strong> or the <strong>use</strong> <strong>of</strong> worn or poorly adjusted <strong>brake</strong> <strong>pads</strong>.These can wear down or damage the <strong>rim</strong> sidewalls, and may not be noticed by the <strong>use</strong>r.It is common <strong>for</strong> the <strong>use</strong>r to have the <strong>rim</strong>s replaced as he would the <strong>brake</strong> <strong>pads</strong>.You must make your customers aware <strong>of</strong> this.To reduce wear and tear, we have developed the CERAMIC coating on our top-<strong>of</strong>-the-line <strong>rim</strong>s.If, following a violent shock the <strong>rim</strong> is heavily out <strong>of</strong> true, the <strong>rim</strong> should be replaced as soon as possible, in order to avoid overloading or even rupture.MAINTENANCE :Rims and <strong>brake</strong> <strong>pads</strong> must be cleaned with soap and water on a regular basis. Abrasive substances (sand...) may have been deposited during <strong>use</strong>and could scratch or significantly damage the sidewalls <strong>of</strong> <strong>rim</strong>s.If the cleaning is not sufficient, <strong>use</strong> a Mavic abrasive eraser M40410 (except on the <strong>rim</strong> <strong>of</strong> the Crosslink ® Disc and Deemax ® wheels).If grease exists on a <strong>rim</strong>, it may be removed with any type <strong>of</strong> solvent without risking damage to the <strong>rim</strong> (except on the <strong>rim</strong> <strong>of</strong> the Crosslink ® Disc andDeemax ® wheels).Do not <strong>use</strong> any solvents in the area <strong>of</strong> the sticker, as there is a risk <strong>of</strong> damage to the sticker. Use only the Mavic abrasive eraser M40410(except on the <strong>rim</strong> <strong>of</strong> the Crosslink ® Disc and Deemax ® wheels), a sponge or cloth.
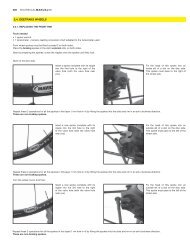
CONDITIONS OF USE FOR A RIM (CONTINUATION)BRAKE PADSADJUSTING THE BRAKE PADS :The <strong>brake</strong> <strong>pads</strong> should be positioned on the braking surface <strong>of</strong> the <strong>rim</strong>.ROAD RIM : MOUNTAIN BIKE RIM :OKNO1 mmminimumNOOKRECOMMENDATIONS FOR USE AND TYPE OF BRAKE PADFor proper braking :- Clean the <strong>brake</strong> <strong>pads</strong> with Mavic abrasive eraser M40410.- Avoid all types <strong>of</strong> greasy substances on the braking surface.- Use <strong>brake</strong> <strong>pads</strong> that are adapted to the specific <strong>rim</strong> coating.Certain <strong>brake</strong> manufacturers <strong>of</strong>fer specific Ceramic <strong>pads</strong>.- Check the degree <strong>of</strong> wear and tear and the smoothness <strong>of</strong> the <strong>brake</strong> <strong>pads</strong>. Replace them on a regular basis.To avoid braking noise, optimize the adjustment <strong>of</strong> the braking system :- Clean the <strong>brake</strong> <strong>pads</strong> with the Mavic abrasive eraser M40410.- Use the correct <strong>brake</strong> <strong>pads</strong>.- Change the tightness <strong>of</strong> the adjustment.- If necessary, mount a stiffener.CHARACTERISTICS OF THE CERAMIC COATINGThe main advantage <strong>of</strong> this coating is that it reduces the braking distance in wet <strong>conditions</strong> and increases the durability <strong>of</strong> the <strong>rim</strong>.Initially, the wear and tear <strong>of</strong> the <strong>brake</strong> <strong>pads</strong> will be greater with this type <strong>of</strong> coating than with a conventional treatment.Consequently, <strong>use</strong> <strong>brake</strong> <strong>pads</strong> specifically manufactured <strong>for</strong> <strong>rim</strong>s with Ceramic coating.Also, since this Ceramic coating is very hard, it is also sensitive to impacts.A hard impact could ca<strong>use</strong> cracks in the Ceramic coating, which would have no effect on the efficiency <strong>of</strong> the braking.TUBULAR TIRE MOUNTINGMaterials :• solvent• compressed air• high grade tubular tire glue• small paint brush• steel wool.Process :Any previously <strong>use</strong>d <strong>rim</strong> and/or tire must be thoroughly cleaned and free <strong>of</strong> old glue be<strong>for</strong>e mounting.The <strong>rim</strong> should be cleaned with acetone or a similar product be<strong>for</strong>e application <strong>of</strong> glue.1 Prepare the clean tire mounting surface <strong>of</strong> the <strong>rim</strong> by rubbing it with steel wool.2 Thoroughly coat the prepared mounting surface with glue, using a small paintbrush.3 After the glue has dried, repeat process twice and allow the final coat <strong>of</strong> glue to dry(the <strong>rim</strong> should have at least three dry coats <strong>of</strong> glue).4 Inflate the tire and coat the tire base tape (inside diameter <strong>of</strong> tire) with glue.5 Deflate (not completely) the tire while the glue is still wet and insert the valve stem through the valve stem hole <strong>of</strong> the <strong>rim</strong>. Carefully stretchthe tire onto the <strong>rim</strong>, working evenly from both sides <strong>of</strong> the valve stem, to the point opposite the valve stem.6 Adjust the position <strong>of</strong> the tire until it is centered on the <strong>rim</strong>.7 Inflate the tire to 45-60 PSI (3-4 bars). Allow the glue to dry <strong>for</strong> 12 hours be<strong>for</strong>e riding on the tire.