
You also want an ePaper? Increase the reach of your titles
YUMPU automatically turns print PDFs into web optimized ePapers that Google loves.
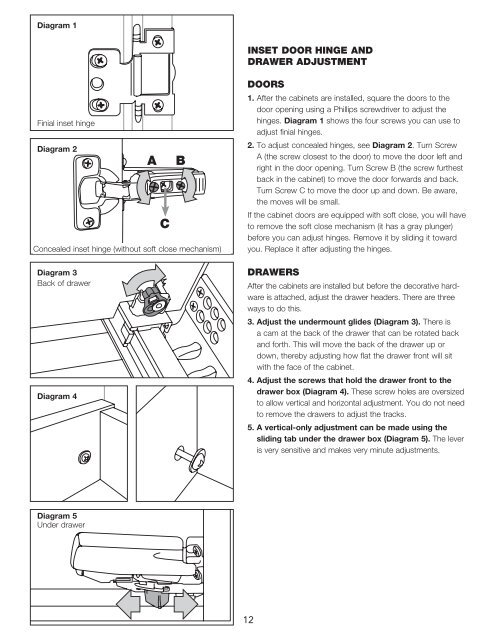
Diagram 1<br />
Finial inset hinge<br />
Diagram 2<br />
A B<br />
C<br />
Concealed inset hinge (without soft close mechanism)<br />
Diagram 3<br />
Back of drawer<br />
Diagram 4<br />
Diagram 5<br />
Under drawer<br />
INSET DOOR HINGE AND<br />
DRAWER ADJUSTMENT<br />
DOORS<br />
1. After the cabinets are installed, square the doors to the<br />
door opening using a Phillips screwdriver to adjust the<br />
hinges. Diagram 1 shows the four screws you can use to<br />
adjust finial hinges.<br />
2. To adjust concealed hinges, see Diagram 2. Turn Screw<br />
A (the screw closest to the door) to move the door left and<br />
right in the door opening. Turn Screw B (the screw furthest<br />
back in the cabinet) to move the door forwards and back.<br />
Turn Screw C to move the door up and down. Be aware,<br />
the moves will be small.<br />
If the cabinet doors are equipped with soft close, you will have<br />
to remove the soft close mechanism (it has a gray plunger)<br />
before you can adjust hinges. Remove it by sliding it toward<br />
you. Replace it after adjusting the hinges.<br />
DRAWERS<br />
After the cabinets are installed but before the decorative hardware<br />
is attached, adjust the drawer headers. There are three<br />
ways to do this.<br />
3. Adjust the undermount glides (Diagram 3). There is<br />
a cam at the back of the drawer that can be rotated back<br />
and forth. This will move the back of the drawer up or<br />
down, thereby adjusting how flat the drawer front will sit<br />
with the face of the cabinet.<br />
4. Adjust the screws that hold the drawer front to the<br />
drawer box (Diagram 4). These screw holes are oversized<br />
to allow vertical and horizontal adjustment. You do not need<br />
to remove the drawers to adjust the tracks.<br />
5. A vertical-only adjustment can be made using the<br />
sliding tab under the drawer box (Diagram 5). The lever<br />
is very sensitive and makes very minute adjustments.<br />
12