P ower RI PX ScreenPrint
P ower RI PX ScreenPrint
P ower RI PX ScreenPrint
- No tags were found...

Create successful ePaper yourself
Turn your PDF publications into a flip-book with our unique Google optimized e-Paper software.
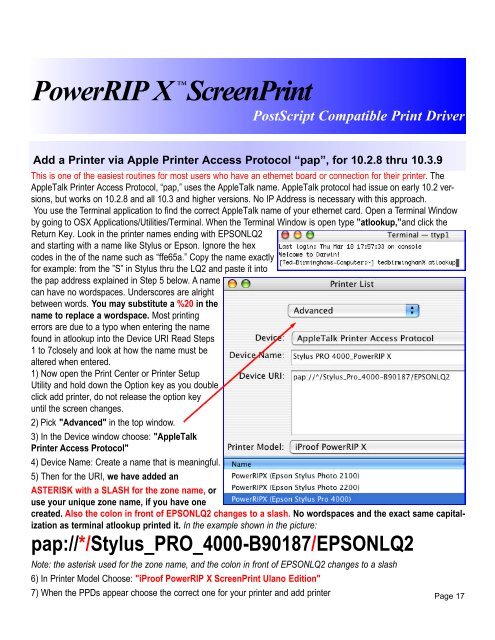
P o w e r R I <strong>PX</strong> <strong>ScreenPrint</strong>PostScript Compatible Print DriverAdd a Printer via Apple Printer Access Protocol “pap”, for 10.2.8 thru 10.3.9This is one of the easiest routines for most users who have an ethernet board or connection for their printer. TheAppleTalk Printer Access Protocol, “pap,” uses the AppleTalk name. AppleTalk protocol had issue on early 10.2 versions,but works on 10.2.8 and all 10.3 and higher versions. No IP Address is necessary with this approach.You use the Terminal application to find the correct AppleTalk name of your ethernet card. Open a Terminal Windowby going to OSX Applications/Utilities/Terminal. When the Terminal Window is open type ”atlookup,”and click theReturn Key. Look in the printer names ending with EPSONLQ2and starting with a name like Stylus or Epson. Ignore the hexcodes in the of the name such as “ffe65a.” Copy the name exactlyfor example: from the ”S” in Stylus thru the LQ2 and paste it intothe pap address explained in Step 5 below. A namecan have no wordspaces. Underscores are alrightbetween words. You may substitute a %20 in thename to replace a wordspace. Most printingerrors are due to a typo when entering the namefound in atlookup into the Device U<strong>RI</strong> Read Steps1 to 7closely and look at how the name must bealtered when entered.1) Now open the Print Center or Printer SetupUtility and hold down the Option key as you doubleclick add printer, do not release the option keyuntil the screen changes.2) Pick "Advanced" in the top window.3) In the Device window choose: "AppleTalkPrinter Access Protocol"4) Device Name: Create a name that is meaningful.5) Then for the U<strong>RI</strong>, we have added anASTE<strong>RI</strong>SK with a SLASH for the zone name, oruse your unique zone name, if you have onecreated. Also the colon in front of EPSONLQ2 changes to a slash. No wordspaces and the exact same capitalizationas terminal atlookup printed it. In the example shown in the picture:pap://*/Stylus_PRO_4000-B90187/EPSONLQ2Note: the asterisk used for the zone name, and the colon in front of EPSONLQ2 changes to a slash6) In Printer Model Choose: "iProof P<strong>ower</strong><strong>RI</strong>P X <strong>ScreenPrint</strong> Ulano Edition"7) When the PPDs appear choose the correct one for your printer and add printer Page 17