The Bicortical Implant for immediate insertion after ... - Implant Direct
The Bicortical Implant for immediate insertion after ... - Implant Direct
The Bicortical Implant for immediate insertion after ... - Implant Direct

Create successful ePaper yourself
Turn your PDF publications into a flip-book with our unique Google optimized e-Paper software.
ONE-PHASE<br />
SUCCESS<br />
THE ORIGINAL<br />
PURE TITANIUM<br />
SELF-CUTTING BICORTICAL<br />
BICORTICAL SUPPORT PERFECT<br />
®<br />
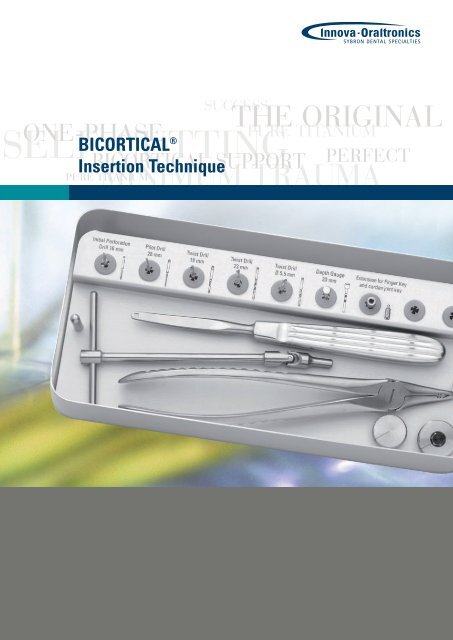
Insertion Technique<br />
MINIMUM TRAUMA<br />
PURE TITANIUM
BICORTICAL ®<br />
Concept<br />
<strong>The</strong> self-cutting titanium implant<br />
with bicortical support<br />
Concept<br />
<strong>The</strong> <strong>Bicortical</strong> <strong>Implant</strong> is a<br />
unique one-phase implant<br />
which was developed in design<br />
and function <strong>for</strong> a maximum<br />
of primary stability and a<br />
minimum of surgical trauma.<br />
For the implant <strong>insertion</strong> only<br />
the shaft diameter of mm<br />
has to be prepared in bone.<br />
<strong>The</strong> deep anchorage of the<br />
self-cutting threads ensure an<br />
excellent primary stability of<br />
the implant. Since the occlusal<br />
<strong>for</strong>ces are transferred through<br />
the threads into the bone,<br />
the shaft of the implant rests<br />
passively within the crestal<br />
bone. <strong>The</strong>re is no resorption<br />
(as documented in long-term<br />
studies over 0 years). <strong>The</strong><br />
self-cutting <strong>Bicortical</strong> <strong>Implant</strong><br />
was originally developed <strong>for</strong><br />
single tooth replacement.<br />
<strong>The</strong> implant also serves as<br />
bridge or bar abutment in<br />
the edentulous region of the<br />
maxilla and mandible. <strong>The</strong> implant<br />
is not only used <strong>for</strong> later<br />
Fig.1<br />
<strong>The</strong> pilot drill and the twist drill prepare<br />
the volume of the implant shaft only. <strong>The</strong><br />
threads with helix segments cut their<br />
own way in the bone.<br />
<strong>insertion</strong>, but in many cases<br />
can be inserted <strong>immediate</strong>ly<br />
post-extraction.<br />
When inserted in fresh extraction<br />
sockets or neighboring<br />
infection-free defects, we<br />
recommend to augment the<br />
site. If the bone preparation<br />
is not completely filled by the<br />
implant shaft <strong>after</strong> <strong>insertion</strong>,<br />
healing will be accelerated<br />
if the site is augmented with<br />
synthetic material (such as<br />
Bioresorb), and larger defects<br />
should be covered by a membrane<br />
(Cytoplast) to keep the<br />
alveolar crest level.<br />
<strong>The</strong> <strong>Bicortical</strong> <strong>Implant</strong> finds<br />
an <strong>immediate</strong> and permanent<br />
stable support in healthy bone.<br />
<strong>The</strong> deep thread anchorage<br />
and bicortical support<br />
provides <strong>immediate</strong> stability<br />
of the implant and ensures<br />
healing without complications<br />
with direct bone-to-implant<br />
contact.<br />
Fig. 2<br />
<strong>The</strong> helix cutting segments allow a lowtrauma<br />
procedure without compression of<br />
the surrounding bone.<br />
<strong>Implant</strong> Selection<br />
Precondition <strong>for</strong> any implant<br />
surgery is the clinical<br />
examination of the patient<br />
including ascertaining the<br />
true width of the alveolar<br />
crest, i.e. diagnosis regarding<br />
quantity and quality. <strong>The</strong> crest<br />
width can be determined<br />
easily with the Osteometer<br />
instrument, using surface<br />
or infiltration anesthesia.<br />
Furthermore, a periapical<br />
or panoramic radiograph<br />
should be taken. <strong>The</strong> X-ray<br />
indicator corresponding with<br />
the magnification factor of<br />
the X-ray unit is placed on<br />
the radiograph to preselect<br />
the optimal lengths and<br />
diameters of the implants <strong>for</strong><br />
the corresponding jaw region<br />
prior to surgery.<br />
Fig. 3<br />
Note the mini-traumatic cervical implant<br />
entrance (left to right: round post, square<br />
post, ball post)
Easy, simple <strong>insertion</strong><br />
technique<br />
Preparation <strong>for</strong> <strong>insertion</strong><br />
in porous cancellous bone<br />
(anterior to sinus and mental<br />
<strong>for</strong>amen)<br />
Basic principle: <strong>The</strong> more<br />
porous the bone is, the larger<br />
should be the implant diameter.<br />
Start with incision and<br />
thorough reflection of the<br />
gingiva periosteum flaps and<br />
exposure of the bone site.<br />
Enter the external compact<br />
bone with the Initial Per<strong>for</strong>ation<br />
(IP) Drill (800 – 1, 00<br />
rpm) just slightly to per<strong>for</strong>ate<br />
the cortical bone. Continue<br />
with the Pilot Drill, penetrate<br />
the spongiosa/cancellous<br />
bone under slow parallel<br />
rotation (800 – 1, 00 rpm) and<br />
up and down movements<br />
with sufficient cooling. <strong>The</strong><br />
proper depth is reached<br />
when the opposite cortical<br />
plate is felt. At this point the<br />
drill procedure should be<br />
terminated <strong>immediate</strong>ly.<br />
Only with the careful parallel<br />
rotating and up and down<br />
movements of the drill on<br />
slow setting, a free-moving<br />
and precise touching of the<br />
opposite cortical bone is<br />
possible.<br />
Preparation <strong>for</strong> <strong>insertion</strong> in<br />
dense cancellous bone and<br />
compact cortical regions,<br />
especially in the mandibular<br />
inter<strong>for</strong>aminal region<br />
In addition to the above-mentioned<br />
procedure, a slight<br />
preparation (1,800– ,400 rpm)<br />
with the laser-graduated Twist<br />
Drill of Ø .0 mm may be<br />
necessary, according to the<br />
bone density. Do not rotate<br />
now, but per<strong>for</strong>m only a few<br />
up and down movements,<br />
also <strong>for</strong> cleaning the drill.<br />
This <strong>insertion</strong> procedure<br />
should be used especially<br />
with the large implant<br />
diameters of .5 mm and<br />
4.5 mm. For the 5.5 mm Ø,<br />
use the .5 mm Ø Twist Drill.<br />
<strong>The</strong> Twist Drill should only<br />
prepare the cortical region<br />
max. to the complete length<br />
of the threads. For <strong>insertion</strong><br />
of the .5 mm diameter<br />
<strong>Bicortical</strong> <strong>Implant</strong>, use the<br />
Pilot Drill only.<br />
Checking the prepared<br />
channel<br />
<strong>The</strong> laser-graduated depth<br />
gauge checks the depth and<br />
shape of the bur channel.<br />
<strong>The</strong> final selection of the<br />
implant length is determined<br />
by the depth gauge, taking<br />
the gingiva height into<br />
consideration. For the .5 mm<br />
Ø, the length is determined by<br />
the Pilot Drill only.<br />
<strong>Implant</strong> Insertion<br />
Retrieve the implant from the<br />
sterile package and insert<br />
directly into the prepared site<br />
by holding the sterile vial cap,<br />
screwing it in until a stability<br />
has been reached. Remove<br />
the cap from the implant by<br />
pulling off and replace by the<br />
finger key. Apply slight apical<br />
pressure and slow back<br />
and <strong>for</strong>th rotations of the<br />
finger key. After two <strong>for</strong>ward<br />
rotations apply one back<br />
rotation in order to make<br />
optimal use of the cutting<br />
property. <strong>The</strong> conical shape<br />
of the special threads and<br />
cutting segments on the helix<br />
enable the <strong>Bicortical</strong> <strong>Implant</strong><br />
to cut its own way into the<br />
bone. This way, the use of<br />
a precutting instrument is<br />
avoided.<br />
For transapical <strong>insertion</strong><br />
Insertion<br />
into a fresh extraction<br />
socket, prepare the site<br />
with thorough curettage and<br />
proceed as a<strong>for</strong>ementioned.<br />
Be<strong>for</strong>e the implant is<br />
screwed in completely to its<br />
final position, the site can be<br />
augmented. <strong>The</strong> anatomical<br />
limits should be carefully<br />
considered <strong>for</strong> the <strong>insertion</strong><br />
direction.<br />
For the final position of the<br />
implant post level, the gingiva<br />
healing up to the post base<br />
should be considered, to<br />
keep the post completely free<br />
<strong>for</strong> the cementation.<br />
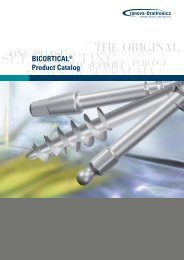
BICORTICAL ®<br />
Survey of the sequence of drills and<br />
instruments to be used<br />
Thread diameter Drills/instruments<br />
ø .5 mm 1. IP Drill<br />
. Pilot Drill<br />
. Depth Gauge<br />
4. Insertion of the implant<br />
ø .5 mm 1. IP Drill<br />
ø 4.5 mm . Pilot Drill<br />
. Twist Drill ø ,0 mm<br />
4. Depth Gauge<br />
5. Insertion of the implant<br />
ø 5.5 mm 1. IP Drill<br />
. Pilot Drill<br />
. Twist Drill ø .0 mm<br />
4. Twist Drill ø .5 mm<br />
5. Depth Gauge<br />
6. Insertion of the implant
4<br />
Fig. 1<br />
BICORTICAL ®<br />
Insertion<br />
<strong>The</strong> <strong>insertion</strong> step by step<br />
Initial per<strong>for</strong>ation of the cortical bone and<br />
distance distribution with the IP drill and<br />
finding the optimal direction <strong>for</strong> <strong>insertion</strong>.<br />
Fig. 2<br />
Continuation of the depth <strong>insertion</strong> and<br />
marking the opposite cortical bone with<br />
the pilot drill which is rotating also<br />
slightly horizontal.<br />
Fig. 3<br />
Enlarging the diameter with the laser-gra-<br />
duated twist drill to 2.0 mm Ø.<br />
Fig. 4<br />
Laser-graduated depth gauge inserted.<br />
mm<br />
1 mm<br />
19 mm<br />
16 mm<br />
1 mm
Fig. 5<br />
By slow rotation (2 x <strong>for</strong>ward, 1 x back)<br />
and slight pressure towards apical a<br />
low-trauma <strong>insertion</strong> is achieved, using<br />
the one-piece finger key (<strong>for</strong> square and<br />
round post) or the finger key on octagon<br />
key (<strong>for</strong> ball post).<br />
Fig. 6<br />
By use of the finger key, the implant is in<br />
stable optimal position, having bicortical<br />
support at cervical and apical site. Traces<br />
of threads will heal spontaneously.<br />
Use of the Cardan Joint Key<br />
Insertion BICORTICAL ®<br />
After initial <strong>insertion</strong> of the implant with the<br />
finger key, the cardan joint key can be used<br />
<strong>for</strong> final positioning. Continue carefully by<br />
slow <strong>for</strong>ward and backward rotations. Stop<br />
<strong>immediate</strong>ly when feeling resistance – strong<br />
<strong>for</strong>ce transmission!<br />
I Note<br />
<strong>The</strong> maximum angulation of the<br />
cardan joint key should not exceed<br />
20°, to avoid overloading of the bone<br />
and de<strong>for</strong>mation of the implant.<br />
5
6<br />
BICORTICAL ®<br />
Indikation<br />
<strong>The</strong> <strong>Bicortical</strong> <strong>Implant</strong><br />
<strong>for</strong> <strong>immediate</strong> <strong>insertion</strong> <strong>after</strong> extraction<br />
Indication variety with safe functional quality<br />
<strong>The</strong> .5 mm Ø implant can be<br />
used as an additional implant<br />
to relieve the primary implants<br />
from loading during the<br />
healing phase. <strong>The</strong> <strong>Bicortical</strong><br />
<strong>Implant</strong> is indicated especially<br />
in the inter<strong>for</strong>aminal region.<br />
Distal of the mental <strong>for</strong>amen<br />
the uncomplicated <strong>insertion</strong><br />
is limited by the mandibular<br />
canal. Experienced implantologists<br />
will succeed to insert<br />
<strong>Bicortical</strong> <strong>Implant</strong>s of 1<br />
mm <strong>insertion</strong> depth into sites<br />
of premolars or first molars<br />
above the mandibular nerve<br />
<strong>immediate</strong>ly or <strong>after</strong> healing.<br />
Indication in the distal maxil-<br />
Square Post<br />
<strong>The</strong> square post can be<br />
inserted in small approximal<br />
spaces (lower incisors,<br />
upper lateral incisors). In<br />
addition, the square post is<br />
indicated in cases of severe<br />
divergencies of the implant<br />
axis to the crown axis. <strong>The</strong><br />
square post can be adjusted<br />
in the mouth by bending the<br />
neck below the square, using<br />
the holding instrument and<br />
bending pliers.<br />
lary area is limited by the<br />
sinus extension. An additional<br />
indication is in the tuber area<br />
<strong>for</strong> short <strong>Bicortical</strong> <strong>Implant</strong>s<br />
of 4.5 and 5.5 mm diameter<br />
<strong>for</strong> distal support which is essential<br />
<strong>for</strong> connection of the<br />
prosthetic construction and<br />
relief of the anterior abutments.<br />
<strong>The</strong> <strong>Bicortical</strong> <strong>Implant</strong><br />
is suitable <strong>for</strong> a variety of anatomical<br />
indications by four<br />
different diameters<br />
( .5/ .5/4.5/5.5 mm) and the<br />
shorter <strong>insertion</strong> depths. Also<br />
in cases of an accident or<br />
missing lateral incisors or in<br />
cases of extremely atrophied<br />
Choice of 3 posts<br />
In order to increase the indication range, the <strong>Bicortical</strong> <strong>Implant</strong><br />
is now available in different post designs to meet the<br />
additional indications. According to each situation of available<br />
space, esthetic requirements or just <strong>for</strong> economical reasons,<br />
please choose among three modalities.<br />
Round Post<br />
For normal available interdental<br />
spaces, <strong>for</strong> single tooth<br />
replacement or as bridge<br />
abutment. <strong>The</strong> round post can<br />
be trimmed in the laboratory,<br />
and the conical shape favors<br />
parallelism <strong>for</strong> a bridge.<br />
For square and round posts<br />
the same instrumentarium<br />
can be used.<br />
Please note: the round post<br />
and the ball post are not<br />
adjustable.<br />
alveolar crests of the mandible<br />
or maxilla, the <strong>Bicortical</strong><br />
<strong>Implant</strong> finds a unique indication.<br />
<strong>The</strong> <strong>Bicortical</strong> <strong>Implant</strong>,<br />
anchored transapically, can<br />
find bicortical support and<br />
optimal primary stability<br />
<strong>immediate</strong>ly <strong>after</strong> <strong>insertion</strong>.<br />
<strong>The</strong> implant can be provided<br />
with a temporary crown<br />
keeping it free from occlusion<br />
contact.<br />
Ball Post<br />
This <strong>Bicortical</strong> <strong>Implant</strong><br />
variation can be used <strong>for</strong> the<br />
support and improvement<br />
of economical prosthetic<br />
constructions, preferably<br />
in the inter<strong>for</strong>aminal region<br />
with primary stability on<br />
four implants. <strong>The</strong> ball post<br />
<strong>Bicortical</strong> <strong>Implant</strong> is available<br />
in Ø .5 and 4.5 mm, nonadjustable.<br />
For <strong>insertion</strong> of<br />
the ball post implant, use the<br />
octagon key with the finger<br />
key.
Legal notice<br />
<strong>The</strong> implant must be used only by<br />
doctors who are suitably familiar with<br />
the system. <strong>The</strong> instructions (in this<br />
brochure and in the instructions <strong>for</strong><br />
use) must be strictly complied with.<br />
Continuing training in this implant<br />
system is absolutely essential. We<br />
reserve the right to modify or improve<br />
the products in line with technical<br />
progress.<br />
Indication<br />
Ø 2.5 mm<br />
BICORTICAL ®<br />
Basic use as temporary implant, to support and protect the<br />
primary implants during the healing phase. Do not use <strong>for</strong><br />
<strong>immediate</strong> post extraction. A .5 mm diameter of mm<br />
<strong>insertion</strong> depth can remain as final implant if well integrated<br />
in a small interdental space in cortical bone (D1/D ) with<br />
bicortical support. Splinting with other implants or natural<br />
teeth is imperative.<br />
Ø 3.5 mm<br />
For the lateral incisor region in the maxilla, or the central and<br />
lateral incisor in the mandible, also <strong>immediate</strong> post-extraction<br />
with transapical anchorage or bicortical support.<br />
Ø 4.5 mm<br />
For single tooth replacement or bridge abutments in the maxilla<br />
and mandible anterior, canine or presinus regions. Especially<br />
<strong>for</strong> <strong>immediate</strong> post-extraction in these regions in both jaws,<br />
also in connection with other implants or natural teeth.<br />
Ø 5.5 mm<br />
Immediate post-extraction or <strong>after</strong> healing of sockets in mandibular<br />
or maxillary bicuspid region. Special indication of 1 mm<br />
<strong>insertion</strong> depth <strong>for</strong> distal support in the maxillary tuber region,<br />
and funnel-shaped periodontal defects. Can be applied in rich<br />
marrow spongeous bone. Not suitable <strong>for</strong> cortical bone regions.<br />
Histology: Sarnachiaro, Bonal et al., Primates Research Institute,<br />
University of Buenos Aires, “Oral <strong>Implant</strong>ology” 1 /1986.<br />
<strong>The</strong> <strong>Bicortical</strong> <strong>Implant</strong> achieves optimal<br />
bone-implant contact: Osseointegration.<br />
1. implant body<br />
2. original bone, cancellous<br />
3. fatty bone marrow,<br />
not near the implant<br />
4. new bone <strong>for</strong>mation in<br />
direct contact to implant<br />
5. direct bone contact to helix,<br />
no fibrous tissue layer<br />
6. direct bone contact<br />
to implant shaft
BICORTICAL ® -<strong>Implant</strong><br />
Square Post Round Post Ball Post<br />
ONE-PHASE<br />
SUCCESS<br />
THE ORIGINAL<br />
PURE TITANIUM<br />
SELF-CUTTING PERFECT<br />
Innovative products<br />
BICORTICAL SUPPORT<br />
MINIMUM TRAUMA<br />
PURE TITANIUM<br />
PITT-EASY ®<br />
ENDOPORE ®<br />
BICORTICAL ®<br />
BIORESORB ®<br />
CYTOPLAST ®<br />
INNOVA – ORALTRONICS – ATTACHMENTS<br />
A World of <strong>Implant</strong> Solutions<br />
<strong>The</strong> dental implant plat<strong>for</strong>m of Sybron Dental Specialties (SDS)<br />
brings over 85 years of combined experience in design and<br />
manufacturing of proprietary implant systems to the dental<br />
implant market.<br />
Delivering two of the most respected, leading-edge dental<br />
implants on the market – ENDOPORE ® and PITT-EASY ® – we<br />
are giving you access to a world of implant solutions.<br />
ORALTRONICS ® Dental <strong>Implant</strong> Technology GmbH<br />
HDS ·<br />
Herrlichkeit 4 · 8199 Bremen · Germany<br />
Phone +49 4 1 4 9 9-0 · Fax +49 4 1 44 9 6<br />
www.oraltronics.com · info@oraltronics.com 06-0174:11/06 -01-GB