GPS™ Brochure - Implant Direct
GPS™ Brochure - Implant Direct
GPS™ Brochure - Implant Direct

You also want an ePaper? Increase the reach of your titles
YUMPU automatically turns print PDFs into web optimized ePapers that Google loves.
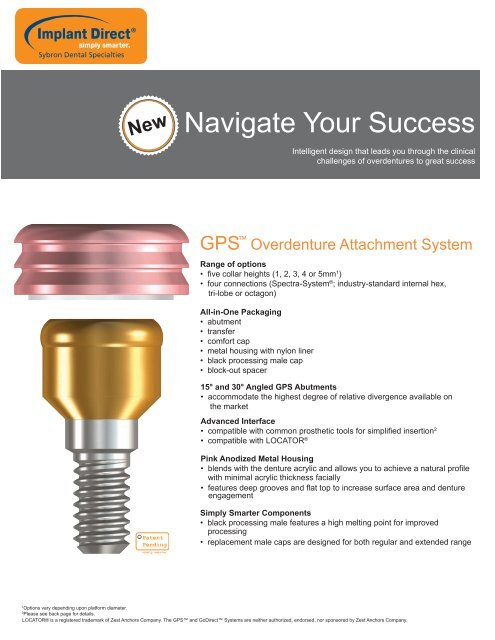
NewNavigate Your SuccessIntelligent design that leads you through the clinicalchallenges of overdentures to great successGPS Overdenture Attachment SystemRange of options• five collar heights (1, 2, 3, 4 or 5mm 1 )• four connections (Spectra-System ® ; industry-standard internal hex,tri-lobe or octagon)All-in-One Packaging• abutment• transfer• comfort cap• metal housing with nylon liner• black processing male cap• block-out spacer15° and 30° Angled GPS Abutments• accommodate the highest degree of relative divergence available onthe marketAdvanced Interface• compatible with common prosthetic tools for simplified insertion 2• compatible with LOCATOR ®Pink Anodized Metal Housing• blends with the denture acrylic and allows you to achieve a natural profilewith minimal acrylic thickness facially• features deep grooves and flat top to increase surface area and dentureengagementSimply Smarter Components• black processing male features a high melting point for improvedprocessing• replacement male caps are designed for both regular and extended range1Options vary depending upon platform diameter.2Please see back page for details.LOCATOR® is a registered trademark of Zest Anchors Company. The GPS and Go<strong>Direct</strong> Systems are neither authorized, endorsed, nor sponsored by Zest Anchors Company.
ProtocolAttach the GPS abutment withappropriate insertion tool.Tighten to 30Ncm.Place comfort caps and thensuture tissue.Place parallel posts onto the topof the abutments.Then use an Angle MeasurementGuide to determine the relativedivergence of the implants.Place the Block-Out Spacer over thehead of the implant. Attach the metalcap with Black Processing Male.Locate the areas of the denturerelative to the housings andrelieve those areas.Steps forLaboratory-ProcessedProsthesisAttach the gray transfers for animpression. They can be trimmedif more clearance is needed.After placing the transfers, coverwith impression material.Fill tray with impression materialand press firmly. Allow to set.Insert the Abutment Analogs intothe Impression Copings.Pour die stone and allow toharden.Place the White Block-Out Spacerover the analogs and attach theCap with Black Processing Male.Process denture. Pull on black capat an angle to remove it. If needed,wedge a tool against the bottom.Use the Male Seating Tool to pushthe Replacement Male of choiceinto the metal cap.Insert the finished prosthesis.Instruct your patient on standardcleaning instructions.
Restorative OptionsThe GPS overdenture attachment system includes a full-range of componentsincluding male nylon liners with various retention levels and a convenientAbutment Housing Kit for denture processing. The system also features aunique Core Tool for easy liner replacement.Regardless of the abutment-implant connection you choose, all GPSabutments feature a profile that is compatible with LOCATOR ® components.Treatment PlanningAngled GPS abutments solve complex casesAccommodating up to 90° relative divergence, GPS allowsyou to place multiple inclined implants. This is especiallyuseful in the maxilla to avoid the sinus.Paralleling PinsSold separately[1000-97]Angle MeasurementGuideSold separately[1000-99]Additional Component OptionsNecessary ToolProsthesis Processing & PlacementReplacement MaleRed (1.0lb)Sold separately[1000-92R]Replacement MaleOrange (2.0lbs)TransferComfort CapSold separately[1000-92E]AbutmentProcessingCap/Male KitSold separately[1000-98S]Replacement MaleGreen (3.0lbs)Sold separately[1000-92G]Core ToolSold separately[1000-96]Replacement MaleClear (4.5lbs)Black Processing MaleSilicon spacerMetal HousingAll-in-One PackagingIncludes items for chairside processingLOCATOR® is a registered trademark of Zest Anchors Company. The GPS and Go<strong>Direct</strong> Systems are neither authorized, endorsed, nor sponsored by Zest Anchors Company.
Rationale<strong>Implant</strong>-Retained Overdenture vs. Complete DenturePreservation of residual alveolar ridge 1,2Increased comfort and chewing efficiency 3Greater patient satisfaction 4Less invasive and expensiveResilient Attachment UseStability without overloadResilient attachments transfer more occlusal force to the soft tissue thus lowering the stress placed on the bonesurrounding implants than rigid attachments 5<strong>Implant</strong> overload is the main cause of bone resorption 5ConsiderationsPatient acceptanceAt a typical fee of $3,500, an overdenture supported by two implants is the least expensive alternative for anedentulous patient 6All-in-One Packaging saves up to 46% over competitors which you can pass onto your patients if you choose 7Surgical BenefitsAccommodates highest degree of relative divergence<strong>Implant</strong> angulation may be chosen based upon clinical needs without prosthetic limitationProsthetic BenefitsEnhanced estheticsPink anodized metal housing blends with denture acrylicThis allows you to achieve a natural profile with minimal acrylic faciallyImproved processingMetal housing design increases surface area and denture engagementBlack processing male cap features a high melting pointSimplified insertionCompatible with standard 1.25mmD (.050in) hex toolRePlant ® abutments feature the patented Dual-Grip interface that enables use of Nobel Biocare’s Uni-Grip DriverSwish abutments feature the patented Duo-Grip interface that enables use of Straumann’s SCS Screwdriver1Atwood DA, Coy WA. Clinical, cephalometric, and densiometric study of reduction of residual ridges. J Prosthet Dent. 1971;26:280–295.2Tallgren A. The continuing reduction of the residual alveolar ridges in complete denture wearers: a mixed-longitudinal study covering 25 years. J Prosthet Dent. 1972;27:120–132.3Stellingsma K, Slagter AP, Stegenga B, Raghoebar GM. Masticatory function in patients with an extremely resorbed mandible restored with mandibular implant-retained overdentures:comparison of three types of treatment protocols. J Oral Rehabil. 2005;32:403–410.4Kenney R, Richards MW. Photoelastic stress patterns produced by implant-retained overdentures. J Prosthet Dent. 1998;80:559–564.5Daas M, Dubois G, Bonnet AS, Lipinski P, Rigon-Bret C. A complete finite element model of a mandibular overdenture with two implants: Comparison between rigid and resilientattachment configurations. Medical Engineering & Physics 2008; 30(2): 218-225.6Christensen, GJ. Treatment of the edentulous mandible. JADA 2001; 132: 231-233.7Price comparison based upon US list prices as of April 2010.www.implantdirect.com | 1-888-NIZ-NICK