IMSolo-IV Forensic LinkMASSter-NET Quick Start Guide - ICS-IQ.com
IMSolo-IV Forensic LinkMASSter-NET Quick Start Guide - ICS-IQ.com
IMSolo-IV Forensic LinkMASSter-NET Quick Start Guide - ICS-IQ.com
- No tags were found...

You also want an ePaper? Increase the reach of your titles
YUMPU automatically turns print PDFs into web optimized ePapers that Google loves.
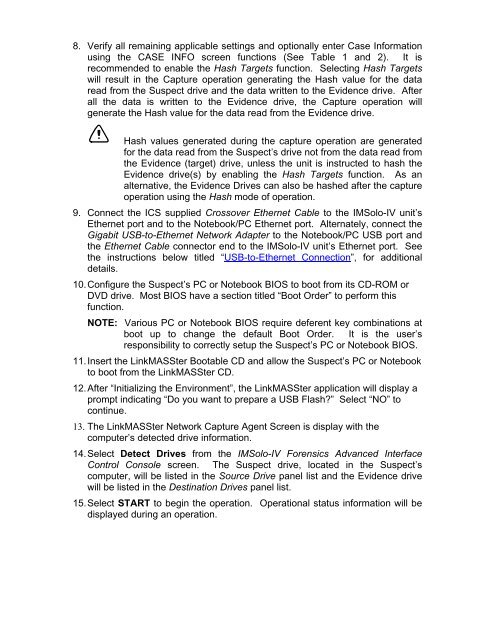
8.Verify all remaining applicable settings and optionally enter Case Informationusing the CASE INFO screen functions (See Table 1 and 2). It isre<strong>com</strong>mended to enable the Hash Targets function. Selecting Hash Targetswill result in the Capture operation generating the Hash value for the dataread from the Suspect drive and the data written to the Evidence drive. Afterall the data is written to the Evidence drive, the Capture operation willgenerate the Hash value for the data read from the Evidence drive.9.Hash values generated during the capture operation are generatedfor the data read from the Suspect’s drive not from the data read fromthe Evidence (target) drive, unless the unit is instructed to hash theEvidence drive(s) by enabling the Hash Targets function. As analternative, the Evidence Drives can also be hashed after the captureoperation using the Hash mode of operation.Connect the <strong>ICS</strong> supplied Crossover Ethernet Cable to the <strong>IMSolo</strong>-<strong>IV</strong> unit’sEthernet port and to the Notebook/PC Ethernet port. Alternately, connect theGigabit USB-to-Ethernet Network Adapter to the Notebook/PC USB port andthe Ethernet Cable connector end to the <strong>IMSolo</strong>-<strong>IV</strong> unit’s Ethernet port. Seethe inst ructions below titled “USB-to-Ethernet Connection”, for additionaldetails.10. Configure the Suspect’s PC or Notebook BIOS to boot from its CD-ROM orDVD drive. Most BIOS have a section titled “Boot Order” to perform thisfunction.NOTE:Various PC or Notebook BIOS require deferent key <strong>com</strong>binations atboot up to change the default Boot Order. It is the user’sresponsibility to correctly setup the Suspect’s PC or Notebook BIOS.11. Insert the <strong>LinkMASSter</strong> Bootable CD and allow the Suspect’s PC or Notebookto boot from the <strong>LinkMASSter</strong> CD.12. After “Initializing the Environment”, the <strong>LinkMASSter</strong> application will display aprompt indicating “Do you want to prepare a USB Flash?” Select “NO” tocontinue.13. The <strong>LinkMASSter</strong> Network Capture Agent Screen is display with the<strong>com</strong>puter’s detected drive information.14. Select Detect Drives from the <strong>IMSolo</strong>-<strong>IV</strong> <strong>Forensic</strong>s Advanced InterfaceControl Console screen. The Suspect drive, located in the Suspect’s<strong>com</strong>puter, will be listed in the Source Drive panel list and the Evidence drivewill be listed in the Destination Drives panel list.15. Select START to begin the operation.Operational status information will bedisplayed during an operation.