command link multifunction meter (square) - Yamaha Outboards
command link multifunction meter (square) - Yamaha Outboards
command link multifunction meter (square) - Yamaha Outboards

Create successful ePaper yourself
Turn your PDF publications into a flip-book with our unique Google optimized e-Paper software.
COMMAND LINK<br />
MULTIFUNCTION METER<br />
(SQUARE)<br />
OPERATION MANUAL<br />
6Y8-2819U-00
To the owner<br />
Thank you for choosing the <strong>Yamaha</strong> Command<br />
Link Multifunction Meter.<br />
This Operation Manual contains information<br />
you will need for proper operation.<br />
A thorough understanding of these simple<br />
instructions and of those in the Owner’s<br />
Manual of the outboard motor will help you<br />
obtain maximum enjoyment of your new<br />
<strong>Yamaha</strong>. This manual should be considered<br />
a permanent part of this <strong>meter</strong> and should<br />
remain with it even if the <strong>meter</strong> is subsequently<br />
sold.<br />
In this Operation Manual particularly important<br />
information is distinguished in the following<br />
ways.<br />
The Safety Alert Symbol means<br />
ATTENTION! BECOME ALERT! YOUR<br />
SAFETY IS INVOLVED!<br />
WARNING<br />
Failure to follow WARNING instructions<br />
could result in severe injury or death to<br />
the machine operator, a bystander, or a<br />
person inspecting or repairing the outboard<br />
motor.<br />
CAUTION:<br />
A CAUTION indicates special precautions<br />
that must be taken to avoid damage<br />
to the outboard motor.<br />
NOTE:<br />
A NOTE provides key information to make<br />
procedures easier or clearer.<br />
COMMAND LINK<br />
MULTIFUNCTION METER<br />
(SQUARE)<br />
OPERATION MANUAL<br />
©2005 by <strong>Yamaha</strong> Motor Co., Ltd.<br />
1st Edition, March 2005<br />
All rights reserved.<br />
Any reprinting or unauthorized use<br />
without the written permission of<br />
<strong>Yamaha</strong> Motor Co., Ltd.<br />
is expressly prohibited.<br />
Printed in Japan
The Command Link Multifunction Meter<br />
enables the display of information through<br />
digital communication with the engine.<br />
Optional parts such as the speed sensor,<br />
cooling water pressure sensor, Triducer-<br />
Multi sensor, and GPS are described in this<br />
manual by assuming that the parts are<br />
installed and set up on the outboard motor.<br />
The Command Link Multifunction Meter<br />
described in this manual consists of the following.<br />
Tacho<strong>meter</strong> unit<br />
(Part No.: 6Y8-8350T-0*)<br />
Speedo<strong>meter</strong> unit<br />
(Part No.: 6Y8-8350S-0*)<br />
Fuel management <strong>meter</strong> unit<br />
(Part No.: 6Y8-8350F-0*)<br />
Speed & Fuel <strong>meter</strong> unit<br />
(Part No.: 6Y8-83500-0*)<br />
The Command Link Multifunction Meter is<br />
compatible with the following outboard<br />
motors.<br />
4-stroke models:<br />
Fuel injection models only<br />
2-stroke models:<br />
HPDI models only<br />
The operations of the SET button and the<br />
MODE button are described in this manual<br />
as follows.<br />
Button operations:<br />
Press the SET button one time.<br />
Press the MODE button one time.<br />
or<br />
Press the SET button or the MODE button<br />
one time.<br />
(1 second)<br />
Press the SET button for 1 second.<br />
(4 seconds)<br />
Press the MODE button for 4 seconds.<br />
(10 seconds)<br />
Press the MODE button for 10 seconds.<br />
(2 times)<br />
Press the MODE button two times.<br />
+<br />
Press the SET button and the MODE button<br />
simultaneously.<br />
+ (10 seconds)<br />
Press the SET button and the MODE button<br />
simultaneously for 10 seconds.
Table of contents<br />
1. Tacho<strong>meter</strong> unit ....................... 1<br />
Description .................................. 2<br />
Activating the <strong>meter</strong> .................... 2<br />
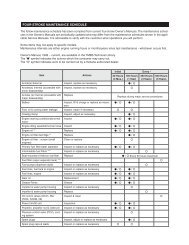
Periodic maintenance<br />
notification............................. 3<br />
Tacho<strong>meter</strong> ................................. 3<br />
Trim <strong>meter</strong>................................... 3<br />
Multifunction display.................... 4<br />
Oil pressure display<br />
(4-stroke models) .................. 5<br />
Oil level display<br />
(2-stroke models) .................. 6<br />
Total hour, Trip hour display .... 6<br />
Cooling water/engine<br />
temperature display............... 7<br />
Battery voltage display ............. 8<br />
Cooling water pressure display<br />
(optional: cooling water<br />
pressure sensor has been<br />
installed)................................ 9<br />
Water detection warning .......... 9<br />
Changing backlight settings ...... 10<br />
Adjusting trolling speed ............. 10<br />
Changing settings<br />
(custom mode) ....................... 11<br />
Switching to custom mode ..... 11<br />
Resetting custom mode ......... 12<br />
MAINTENANCE<br />
(resetting maintenance<br />
intervals).............................. 12<br />
TRIM SET (setting trim<br />
angle) .................................. 13<br />
DISPLAY (setting displays) .... 13<br />
FORM (setting display<br />
format)................................. 15<br />
ENGINE NUMBER<br />
(setting corresponding<br />
engine) ................................ 19<br />
Service functions....................... 20<br />
Diagnosis ............................... 20<br />
Resetting engine number ....... 21<br />
2. Speedo<strong>meter</strong> unit................... 22<br />
Description................................ 23<br />
Activating the <strong>meter</strong> .................. 23<br />
Speedo<strong>meter</strong> ............................ 24<br />
Fuel <strong>meter</strong>................................. 25<br />
Multifunction display.................. 25<br />
Trip display (optional: speed<br />
sensor has been<br />
installed) ............................. 26<br />
Ambient water temperature<br />
display (optional:<br />
Triducer-multi sensor has<br />
been installed) .................... 27<br />
Depth display (optional:<br />
Triducer-multi sensor has<br />
been installed) .................... 27<br />
System voltage display .......... 28<br />
Clock (optional: GPS has<br />
been installed) .................... 28<br />
Changing backlight settings...... 29<br />
Changing settings<br />
(custom mode)....................... 29<br />
Switching to custom mode..... 29<br />
Resetting custom mode ......... 30<br />
DISPLAY (setting displays).... 30<br />
UNIT (setting displayed<br />
units) ................................... 32<br />
FUEL SENSOR<br />
(setting fuel sensor) ............ 33<br />
3. Fuel management <strong>meter</strong><br />
unit ........................................... 34<br />
Description................................ 35<br />
Activating the <strong>meter</strong> .................. 35<br />
Fuel flow <strong>meter</strong> ......................... 36<br />
Multifunction display.................. 37<br />
Total fuel consumption<br />
display................................. 38<br />
Fuel economy display ............ 39<br />
Remaining fuel display........... 40<br />
Changing backlight settings...... 40
Changing settings<br />
(custom mode) ....................... 41<br />
Switching to custom mode ..... 41<br />
Resetting custom mode ......... 41<br />
DISPLAY (setting displays) .... 42<br />
UNIT (setting displayed<br />
units) ................................... 43<br />
TANK CAPACITY<br />
(setting fuel tank capacity) .. 44<br />
CALIBRATION<br />
(setting correction value)..... 45<br />
4. Speed & Fuel <strong>meter</strong> unit ........ 47<br />
Description ................................ 48<br />
Activating the <strong>meter</strong> .................. 48<br />
Speedo<strong>meter</strong>............................. 49<br />
Fuel <strong>meter</strong> ................................. 50<br />
Multifunction display.................. 50<br />
Trip display (optional: speed<br />
sensor has been<br />
installed).............................. 51<br />
Fuel economy display ............ 52<br />
Fuel flow display..................... 52<br />
Total fuel consumption<br />
display................................. 53<br />
Ambient water temperature<br />
display (optional:<br />
Triducer-multi sensor has<br />
been installed)..................... 53<br />
Depth display (optional:<br />
Triducer-multi sensor has<br />
been installed)..................... 54<br />
System voltage display .......... 54<br />
Clock (optional: GPS has<br />
been installed)..................... 55<br />
Changing backlight settings ...... 55<br />
Changing settings<br />
(custom mode) ....................... 56<br />
Switching to custom mode ..... 56<br />
Resetting custom mode ......... 56<br />
DISPLAY (setting displays) .... 57<br />
Table of contents<br />
UNIT (setting displayed<br />
units) ................................... 59<br />
FUEL SENSOR<br />
(setting fuel sensor) ............ 61<br />
CALIBRATION<br />
(setting correction value) .... 61<br />
5. Setting up the <strong>meter</strong>s ............ 63<br />
Activating for the first time......... 63<br />
Setting the initial settings .......... 64<br />
Tacho<strong>meter</strong> unit..................... 64<br />
Speedo<strong>meter</strong> unit .................. 64<br />
Fuel management <strong>meter</strong><br />
unit ...................................... 64<br />
Speed & Fuel <strong>meter</strong> unit ........ 64<br />
Tacho<strong>meter</strong> unit<br />
Speedo<strong>meter</strong> unit<br />
Fuel management<br />
<strong>meter</strong> unit<br />
Speed & Fuel <strong>meter</strong><br />
unit<br />
Setting up the<br />
<strong>meter</strong>s
1. Tacho<strong>meter</strong> unit<br />
NOTE:<br />
Depending on the model of the outboard motor, some functions may not be compatible. For<br />
information on models which contain the compatible functions, consult a <strong>Yamaha</strong> dealer.<br />
Tacho<strong>meter</strong><br />
The tacho<strong>meter</strong><br />
shows the engine<br />
revolutions per<br />
minute. (Page 3)<br />
Adjusting trolling speed<br />
or : To adjust the trolling speed<br />
randomly. (Page 10)<br />
1<br />
Trim <strong>meter</strong><br />
The trim <strong>meter</strong> shows<br />
the trim angle of the<br />
outboard motor in 10<br />
levels. (Page 3)<br />
Multifunction display (Page 4)<br />
· Up to four displays can be switched to show the information.<br />
· Shows up to three types of information combined in one display. In addition,<br />
when an engine malfunction occurs, each indicator b<strong>link</strong>s to warn of the<br />
malfunction.<br />
Oil pressure display (4-stroke models) (Page 5)<br />
Oil level display (2-stroke models) (Page 6)<br />
Total hour, Trip hour display (Page 6)<br />
Cooling water/engine temperature display (Page 7)<br />
Battery voltage display (Page 8)<br />
Cooling water pressure display (optional) (Page 9)<br />
Water detection warning (Page 9)<br />
· The information shown on each display and the display format combination<br />
can be changed (custom mode).<br />
DISPLAY (setting displays) (Page 13)<br />
FORM (setting display format) (Page 15)<br />
· Periodic maintenance intervals are notified.<br />
Periodic maintenance notification (Page 3)
Description<br />
1 SET button<br />
2 MODE button<br />
4<br />
7<br />
5<br />
1<br />
6<br />
8<br />
9<br />
1<br />
1 Tacho<strong>meter</strong><br />
2 Trim <strong>meter</strong><br />
3 Multifunction display<br />
4 Cooling water pressure<br />
5 Cooling water/engine temperature<br />
6 Water detection warning indicator<br />
7 Battery voltage<br />
8 Oil level (2-stroke models)<br />
9 Oil pressure (4-stroke models)<br />
Description/Activating the <strong>meter</strong><br />
2<br />
2<br />
3<br />
2<br />
Activating the <strong>meter</strong><br />
When the engine start switch is turned to<br />
ON, the <strong>meter</strong> is activated and “Welcome”<br />
appears on the <strong>multifunction</strong> <strong>meter</strong>. Then,<br />
all the displays come on and the display<br />
switches to the normal display after the total<br />
hour display comes on.<br />
Tacho<strong>meter</strong> unit
Tacho<strong>meter</strong>/Trim <strong>meter</strong><br />
Periodic maintenance notification<br />
When the hours of engine operation exceed<br />
100 hours, “MAINTENANCE” is scrolled on<br />
the display and the elapsed time from the<br />
previous maintenance period (when the<br />
<strong>meter</strong> was reset) b<strong>link</strong>s.<br />
play.<br />
or : To return to the normal dis-<br />
B<strong>link</strong>s<br />
NOTE:<br />
The elapsed time b<strong>link</strong>s every time the<br />
engine is started until it is reset.<br />
When the hours of engine operation<br />
exceed 100 hours and the periodic maintenance<br />
notification is activated, consult<br />
an authorized <strong>Yamaha</strong> dealer for periodical<br />
maintenance.<br />
To reset the maintenance period, see<br />
“MAINTENANCE (resetting maintenance<br />
intervals)” in “Changing settings (custom<br />
mode).”<br />
3<br />
Tacho<strong>meter</strong><br />
The tacho<strong>meter</strong> shows the engine revolutions<br />
per minute.<br />
Trim <strong>meter</strong><br />
The trim <strong>meter</strong> shows the trim angle of the<br />
outboard motor in 10 levels.<br />
When the angle of the outboard motor<br />
exceeds the trim range, the top segment<br />
b<strong>link</strong>s.<br />
B<strong>link</strong>s
Multifunction display<br />
The <strong>multifunction</strong> display shows up to three<br />
types of information simultaneously using<br />
numeric values or graphics. In addition, up<br />
to four displays can be set up for the display<br />
configuration with a combination of information.<br />
The configuration of the default displays<br />
is described below.<br />
: Press to switch between the displays.<br />
Display 1<br />
(4-stroke)<br />
Oil pressure +<br />
Total hour<br />
Display 2<br />
Display 3<br />
Display 4<br />
Display 1<br />
(2-stroke)<br />
Oil level +<br />
Total hour<br />
Total hour, Trip hour<br />
Cooling water/ Cooling water/<br />
engine temperature + engine temperature +<br />
Battery voltage level + Battery voltage level +<br />
Oil pressure Oil level<br />
Battery voltage value,<br />
Battery voltage level<br />
4<br />
Multifunction display<br />
When the engine start switch is turned to<br />
OFF, the last display shown is shown first<br />
when the engine start switch is turned to ON<br />
again.<br />
NOTE:<br />
To change the display configuration, see<br />
“DISPLAY (setting displays)” in “Changing<br />
settings (custom mode).”<br />
Tacho<strong>meter</strong> unit
Oil pressure display (4-stroke models)<br />
Oil pressure display (4-stroke models)<br />
The oil pressure indicator ( ) comes on<br />
and the engine oil pressure is shown in 5<br />
levels.<br />
When the engine oil pressure drops too low,<br />
the oil pressure indicator ( ) b<strong>link</strong>s and<br />
the “LOW OIL PRESSURE” warning comes<br />
on.<br />
B<strong>link</strong>s<br />
CAUTION:<br />
• Do not operate the engine without<br />
engine oil. Severe engine damage can<br />
result.<br />
Check the oil level by following the<br />
procedure described in the engine<br />
Owner’s Manual.<br />
If you cannot locate and correct the<br />
cause, consult a <strong>Yamaha</strong> dealer.<br />
5<br />
NOTE:<br />
The oil pressure display shows “L” for low<br />
and “H” for high.<br />
The low oil pressure warning does not display<br />
the oil level.<br />
Depending on the model of the outboard<br />
motor, the oil pressure display may not be<br />
available. If not available, select another<br />
display other than the oil pressure display.<br />
Depending on the operating conditions<br />
such as when the engine is operated at<br />
extremely low speeds, the oil pressure<br />
may be shown as low even when the<br />
engine is operating properly.
Oil level display (2-stroke models)/Total hour, Trip hour display<br />
Oil level display (2-stroke models)<br />
The oil level indicator ( ) comes on and<br />
the engine oil level is shown in 3 levels.<br />
When the engine oil level is low, the oil level<br />
indicator ( ) b<strong>link</strong> and the “EMPTY OIL”<br />
warning comes on.<br />
B<strong>link</strong><br />
CAUTION:<br />
Do not operate the engine without engine<br />
oil. Severe engine damage can result.<br />
6<br />
Total hour, Trip hour display<br />
The total hour display shows the total hours<br />
of engine operation and the trip hour display<br />
shows the trip hours (Tr).<br />
B<strong>link</strong><br />
+ (1 second): To reset the trip<br />
hours (Tr).<br />
NOTE:<br />
The total hours of engine operation cannot<br />
be reset.<br />
Tacho<strong>meter</strong> unit
Cooling water/engine temperature display<br />
Cooling water/engine temperature<br />
display<br />
The cooling water/engine temperature indi-<br />
cator ( ) comes on and the engine cooling<br />
water temperature or the engine<br />
temperature is shown in 5 levels.<br />
When the engine overheats, the cooling<br />
water/engine temperature indicator ( )<br />
and the “OVERHEAT” warning b<strong>link</strong>.<br />
B<strong>link</strong><br />
CAUTION:<br />
When the overheat warning comes on,<br />
turn the engine off and check the cooling<br />
water inlet for clogs.<br />
If you cannot locate and correct the<br />
cause, consult a <strong>Yamaha</strong> dealer.<br />
7<br />
NOTE:<br />
When one or two displays are shown, the<br />
cooling water/engine temperature display<br />
shows “C” for cool and “H” for hot.
Battery voltage display<br />
The battery voltage indicator ( ) comes<br />
on and the battery voltage of the engine is<br />
shown in 5 levels or the voltage value is<br />
shown.<br />
When the battery voltage decreases to 12<br />
volts or less or increases to 16 volts or more<br />
the battery voltage indicator ( ) and the<br />
voltage value b<strong>link</strong>.<br />
B<strong>link</strong><br />
8<br />
Battery voltage display<br />
When the battery voltage decreases below<br />
the voltage that is required by the engine,<br />
the “LOW VOLTAGE” warning comes on.<br />
B<strong>link</strong><br />
CAUTION:<br />
When the low battery voltage warning<br />
comes on, check the battery and the<br />
wiring.<br />
If you cannot locate and correct the<br />
cause, consult a <strong>Yamaha</strong> dealer.<br />
NOTE:<br />
The voltage level display shows “L” for low<br />
and “H” for high.<br />
Tacho<strong>meter</strong> unit
Cooling water pressure display/Water detection warning<br />
Cooling water pressure display<br />
(optional: cooling water pressure sensor<br />
has been installed)<br />
The cooling water pressure indicator ( )<br />
comes on and the cooling water pressure is<br />
shown in 5 levels. You can select whether to<br />
display the scale.<br />
10 PSi<br />
CAUTION:<br />
• When the cooling water pressure<br />
decreases to 10 psi or less, turn the<br />
engine off and check the cooling water<br />
inlet for clogs.<br />
If you cannot locate and correct the<br />
cause, consult a <strong>Yamaha</strong> dealer.<br />
NOTE:<br />
The cooling water pressure level display<br />
shows “L” for low and “H” for high.<br />
9<br />
Water detection warning<br />
When water has accumulated in the water<br />
separator (fuel filter), the water detection<br />
warning indicator ( ) and the “WATER IN<br />
FUEL” warning b<strong>link</strong>. This function is not<br />
available for outboard motors that are not<br />
equipped with the water detection warning<br />
function.<br />
CAUTION:<br />
When the water detection warning comes<br />
on, turn the engine off and remove the<br />
water from the water separator (fuel filter)<br />
by following the procedure described<br />
in the Owner’s Manual of the outboard<br />
motor. A malfunction can result if fuel<br />
mixed with water is sent to the engine.<br />
NOTE:<br />
B<strong>link</strong><br />
or : To deactivate the buzzer<br />
and return to the display before the warning<br />
was activated.
Changing backlight settings/Adjusting trolling speed<br />
Changing backlight settings<br />
You can turn the backlight on or off, or<br />
change the brightness level of the backlight<br />
for all <strong>meter</strong>s synchronized. You can also<br />
change the settings for each <strong>meter</strong> individually.<br />
1. + : To activate the backlight<br />
mode.<br />
2. : Press to switch between the five<br />
brightness levels (1–5).<br />
: To switch between “LIGHT ON”<br />
and “LIGHT OFF.”<br />
3. + : To return to the normal<br />
display.<br />
NOTE:<br />
The backlight default settings are “LIGHT<br />
OFF,” brightness level 1, and “SYNC.”<br />
If no operations are carried out for 5 seconds<br />
or more, the display returns to the<br />
normal display.<br />
The backlight settings can be changed<br />
from all <strong>meter</strong>s and all displays.<br />
When “SYNC” is displayed, all <strong>meter</strong>s<br />
operate simultaneously and can be<br />
changed synchronized. Press the<br />
button for 1 second to set “SYNC”<br />
so that it is not displayed and to change<br />
the <strong>meter</strong>s individually.<br />
10<br />
Adjusting trolling speed<br />
You can adjust the trolling speed randomly<br />
by increasing or decreasing it approximately<br />
50 r/min.<br />
When in the trolling speed setting mode, the<br />
display switches to the normal display when<br />
the engine speed is increased (within 3,000<br />
r/min) using the throttle. When the throttle is<br />
closed, the display returns to the trolling<br />
speed setting mode.<br />
This function is not available for outboard<br />
motors that are not equipped with the trolling<br />
speed adjustment function.<br />
1. (1 second): To activate the trolling<br />
speed setting mode.<br />
2. : To decrease the engine speed.<br />
3. : To increase the engine speed.<br />
4. (1 second): To return to the normal<br />
display and to the default engine<br />
idle speed.<br />
Tacho<strong>meter</strong> unit
Changing settings (custom mode)<br />
NOTE:<br />
Trolling is affected by currents and other<br />
operating conditions and may differ from<br />
the actual engine speed.<br />
The default engine idle speed is reset<br />
automatically when the display is switched<br />
to the normal display. The default engine<br />
idle speed is also reset automatically<br />
when the engine is turned off or when the<br />
engine speed exceeds 3,000 r/min.<br />
When warming up a cold engine, the trolling<br />
speed cannot be decreased below the<br />
specified engine idle speed.<br />
Depending on the model of the outboard<br />
motor, some functions may not be compatible.<br />
For information on models which<br />
contain the compatible functions, consult<br />
a <strong>Yamaha</strong> dealer.<br />
11<br />
Changing settings (custom mode)<br />
Switching to custom mode<br />
In the custom mode, you can change the<br />
<strong>meter</strong> function settings. “CUSTOM” and<br />
each setting function name are scrolled on<br />
the <strong>meter</strong>.<br />
1. Turn the engine off and the engine start<br />
switch to ON.<br />
2. (4 seconds): To activate the custom<br />
mode.<br />
3. : Press to switch between the setting<br />
function names (custom mode<br />
selection display).<br />
MAINTENANCE<br />
(resetting maintenance intervals)<br />
TRIM 0SET (setting trim angle)<br />
DISPLAY (setting displays)<br />
FORM (setting display format)<br />
ENGINE NUMBER<br />
(setting corresponding engine)<br />
4. : To switch to the change settings<br />
display.
MAINTENANCE (resetting maintenance intervals)<br />
5. Change the various settings and return<br />
to the custom mode selection display.<br />
To change the settings, see the corresponding<br />
sections for each setting function.<br />
6. (1 second): To return to the normal<br />
display.<br />
NOTE:<br />
If no operations are carried out for 30 seconds<br />
or more or if the engine is started,<br />
the settings will not be applied and the<br />
display returns to the normal display.<br />
Press the button for 2 seconds from<br />
step 5 to change the settings and return to<br />
the normal display.<br />
Resetting custom mode<br />
In the custom mode, you can reset the<br />
default settings collectively for all settings<br />
that have been changed.<br />
1. Turn the engine off and the engine start<br />
switch to ON.<br />
2. (4 seconds): To activate the custom<br />
mode.<br />
3. + (10 seconds): To reset all<br />
settings to the default settings.<br />
12<br />
MAINTENANCE (resetting maintenance<br />
intervals)<br />
You can reset the elapsed time from the<br />
previous maintenance interval (when the<br />
<strong>meter</strong> was reset).<br />
1. Turn the engine off and the engine start<br />
switch to ON.<br />
2. (4 seconds): To activate the custom<br />
mode.<br />
3. : To switch to the resetting display.<br />
B<strong>link</strong>s<br />
4. + (1 second): To reset the<br />
elapsed time to “0h.”<br />
5. (1 second): To return to the normal<br />
display.<br />
NOTE:<br />
Press the button for 1 second from<br />
step 3 to cancel the resetting of the elapsed<br />
time and return to the custom mode selection<br />
display.<br />
Tacho<strong>meter</strong> unit
TRIM 0SET (setting trim angle)/DISPLAY (setting displays)<br />
TRIM 0SET (setting trim angle)<br />
You can set the trim angle to zero. Fully trim<br />
the outboard motor down.<br />
1. Turn the engine off and the engine start<br />
switch to ON.<br />
2. (4 seconds): To activate the custom<br />
mode.<br />
3. : To switch between the setting<br />
function names.<br />
4. : To switch to the zero adjustment<br />
display.<br />
5. + (1 second): To adjust the<br />
trim angle to zero using the current trim<br />
position as the standard value.<br />
6. (1 second): To return to the normal<br />
display.<br />
NOTE:<br />
Press the button for 1 second from<br />
step 4 to cancel the adjustment of the trim<br />
angle to zero and return to the custom mode<br />
selection display.<br />
13<br />
DISPLAY (setting displays)<br />
You can change the display configuration of<br />
the normal display. There are a total of 16<br />
combinations of which up to four displays<br />
can be set up.<br />
The display configuration numbers that have<br />
been selected as the default display configuration<br />
are indicated by the shaded areas<br />
in the table below.<br />
Display<br />
configuration No.<br />
Cooling water/<br />
engine temperature<br />
Cooling water<br />
pressure<br />
Battery voltage<br />
Oil pressure/<br />
Oil level<br />
Total hour,<br />
Trip hour<br />
00 — — — — —<br />
01 — —<br />
02 — —<br />
03 — — —<br />
04 — — —<br />
05 — — —<br />
06 — — —<br />
07 — — —<br />
08 — — —<br />
09 — — —<br />
10 — — —<br />
11 — — —<br />
12 — — — —<br />
13 — — — —<br />
14 — — — —<br />
15 — — — —<br />
16 — — — —<br />
:Displayed<br />
Changing the display configurations:<br />
1. Turn the engine off and the engine start<br />
switch to ON.
2. (4 seconds): To activate the custom<br />
mode.<br />
3. (2 times): Press to switch<br />
between the setting function names.<br />
4. : To switch to the change settings<br />
display.<br />
5. : Press to switch between the display<br />
numbers. Select the display number<br />
(01–04) you want to change. The<br />
first two digits in the tacho<strong>meter</strong> display<br />
show the display numbers.<br />
6. : To select the display configuration<br />
numbers (00–16) you want to<br />
change. The last two digits in the<br />
tacho<strong>meter</strong> display show the display<br />
configuration numbers. Press to switch<br />
between the display configuration numbers.<br />
DISPLAY (setting displays)<br />
14<br />
* In the display example, display number 01<br />
and display configuration number 13 are<br />
shown.<br />
* When the display configuration number<br />
“00” is selected, “HIDDEN” is shown and<br />
the display is not shown.<br />
7. (1 second): To change the display<br />
configuration and return to the custom<br />
mode selection display.<br />
8. (1 second): To return to the normal<br />
display.<br />
NOTE:<br />
When changing two or more display configurations<br />
of the <strong>multifunction</strong> display, repeat<br />
steps 5 and 6.<br />
Resetting the display configuration default<br />
settings:<br />
1. Turn the engine off and the engine start<br />
switch to ON.<br />
2. (4 seconds): To activate the custom<br />
mode.<br />
3. (2 times): Press to switch<br />
between the setting function names.<br />
4. : To switch to the change settings<br />
display.<br />
Tacho<strong>meter</strong> unit
FORM (setting display format)<br />
5. + (1 second): To reset the<br />
display configuration default settings<br />
and return to the custom mode selection<br />
display.<br />
6. (1 second): To return to the normal<br />
display.<br />
15<br />
FORM (setting display format)<br />
You can change the display formats of the<br />
total hour and trip hour (Tr) display, the battery<br />
voltage display and the cooling water<br />
pressure display. (The displays can be<br />
changed when there are displays that correspond<br />
respectively to displays 1–4.)<br />
Total hour, Trip hour (Tr):<br />
1. Turn the engine off and the engine start<br />
switch to ON.<br />
2. (4 seconds): To activate the custom<br />
mode.<br />
3. (3 times): Press to switch<br />
between the setting function names.<br />
4. : To switch to the change settings<br />
display.<br />
5. : To select the display number.<br />
The first two digits in the tacho<strong>meter</strong><br />
display show the display numbers and<br />
the last two digits show the configuration<br />
numbers.<br />
6. : To select the display format.<br />
Press to switch between each display<br />
format.
One display: Display configuration number<br />
(16)<br />
Total hour + Trip hour (Tr)<br />
Total hour<br />
Trip hour (Tr)<br />
B<strong>link</strong><br />
* In the display example, the total operation<br />
hours and trip hours (Tr) are shown.<br />
Two displays: Display configuration numbers<br />
(05, 10, 11)<br />
Total hour<br />
Trip hour (Tr)<br />
B<strong>link</strong>s<br />
* In the display example, the trip hours (Tr)<br />
and the cooling water/engine temperature<br />
are shown.<br />
FORM (setting display format)<br />
7. (1 second): To change the display<br />
format and return to the custom mode<br />
selection display.<br />
Battery voltage value<br />
16<br />
8. (1 second): To return to the normal<br />
display.<br />
Battery voltage:<br />
1. Turn the engine off and the engine start<br />
switch to ON.<br />
2. (4 seconds): To activate the custom<br />
mode.<br />
3. (3 times): Press to switch<br />
between the setting function names.<br />
4. : To switch to the change settings<br />
display.<br />
5. : To select the display number.<br />
The first two digits in the tacho<strong>meter</strong><br />
display show the display numbers and<br />
the last two digits show the display configuration<br />
numbers.<br />
6. : To select the display format.<br />
Press to switch between each display<br />
format.<br />
One display: Display configuration number<br />
(14)<br />
Battery voltage value + Battery voltage level<br />
Battery voltage level<br />
Tacho<strong>meter</strong> unit
FORM (setting display format)<br />
B<strong>link</strong><br />
* In the display example, the battery voltage<br />
value and battery voltage level are shown.<br />
Two displays: Display configuration numbers<br />
(03, 09, 10)<br />
Battery voltage value<br />
Battery voltage level<br />
B<strong>link</strong><br />
* In the display example, the battery voltage<br />
level and the cooling water/engine temperature<br />
are shown.<br />
7. (1 second): To change the display<br />
format and return to the custom mode<br />
selection display.<br />
8. (1 second): To return to the normal<br />
display.<br />
17<br />
Cooling water pressure:<br />
1. Turn the engine off and the engine start<br />
switch to ON.<br />
2. (4 seconds): To activate the custom<br />
mode.<br />
3. (3 times): Press to switch<br />
between the setting function names.<br />
4. : To switch to the change settings<br />
display.<br />
5. : To select the display numbers.<br />
The first two digits in the tacho<strong>meter</strong><br />
display show the display numbers and<br />
the last two digits show the display configuration<br />
numbers.<br />
6. : To select the display format.<br />
Press to switch between each display<br />
format.<br />
One display: Display configuration number<br />
(13)<br />
Cooling water pressure level<br />
without scale<br />
Cooling water pressure level<br />
with scale
B<strong>link</strong><br />
* In the display example, the cooling water<br />
pressure level (with scale) is shown.<br />
Two displays: Display configuration number<br />
(06)<br />
Cooling water pressure level<br />
without scale<br />
+ Battery voltage level<br />
Cooling water pressure level<br />
without scale<br />
+ Battery voltage value<br />
Cooling water pressure level<br />
with scale<br />
+ Battery voltage level<br />
Two displays: Display configuration number<br />
(07)<br />
Cooling water pressure level<br />
without scale<br />
+ Oil pressure/Oil level<br />
Cooling water pressure level<br />
with scale<br />
+ Oil pressure/Oil level<br />
FORM (setting display format)<br />
18<br />
B<strong>link</strong><br />
* In the display example, the cooling water<br />
pressure level (with scale) and the oil level<br />
display are shown.<br />
Two displays: Display configuration number<br />
(08)<br />
Cooling water pressure level<br />
without scale + Total hour<br />
Cooling water pressure level<br />
without scale + Trip hour (Tr)<br />
7. (1 second): To change the display<br />
format and return to the custom mode<br />
selection display.<br />
8. (1 second): To return to the normal<br />
display.<br />
NOTE:<br />
When the corresponding displays are not<br />
available for displays 1–4, FORM is not displayed<br />
in the custom mode selection display.<br />
Tacho<strong>meter</strong> unit
ENGINE NUMBER (setting corresponding engine)<br />
ENGINE NUMBER (setting<br />
corresponding engine)<br />
You can select the engines that are compatible<br />
to this <strong>meter</strong>. The port outboard motor is<br />
set to “No.1 (engine number 1)” and the<br />
starboard outboard motor is set to “No.2<br />
(engine number 2).”<br />
1. Turn the engine off and the engine start<br />
switch to ON.<br />
2. (4 seconds): To activate the custom<br />
mode.<br />
3. (4 times): Press to switch<br />
between the setting function names.<br />
4. : To switch to the change settings<br />
display.<br />
5. : To switch between the displayed<br />
engine numbers.<br />
No.1 (engine number 1)<br />
No.2 (engine number 2)<br />
No.3 (engine number 3)<br />
No.4 (engine number 4)<br />
6. (1 second): To change the corresponding<br />
engine and return to the custom<br />
mode selection display.<br />
19<br />
7. (1 second): To return to the normal<br />
display.<br />
NOTE:<br />
The <strong>meter</strong>s are set at the factory to “No.1<br />
(engine number 1).”<br />
To engine number, see “Resetting engine<br />
number” in “Service functions.”
Service functions<br />
Diagnosis<br />
You can display the self-diagnosis results of<br />
the engine.<br />
(10 seconds): To scroll “DIAGNOSIS”<br />
and to display the diagnosis codes.<br />
When there are no malfunctions, the “01”<br />
diagnosis code is displayed for 3 seconds<br />
and the display returns to the normal display.<br />
When a malfunction occurs, the corresponding<br />
diagnosis codes, except “01,” are displayed.<br />
When there are multiple diagnosis<br />
codes, “ ” is displayed next to the code<br />
number.<br />
: To display the next code number.<br />
: To return to the normal display.<br />
20<br />
CAUTION:<br />
Service functions<br />
When a diagnosis code other than “01”<br />
is displayed, the engine cannot be operated<br />
normally. Consult a <strong>Yamaha</strong> dealer.<br />
NOTE:<br />
Although the custom mode is activated after<br />
a few seconds while the button is<br />
being pressed, continue to press the button<br />
for 10 consecutive seconds to activate the<br />
diagnosis mode.<br />
Tacho<strong>meter</strong> unit
Service functions<br />
Resetting engine number<br />
When replacing the engines of multiple outboard<br />
motors or resetting the setting order,<br />
reset all engine numbers to “No. 1 (engine<br />
number 1).”<br />
1. Turn the engine off and the engine start<br />
switch to ON.<br />
2. (10 seconds): “ENGINE No.<br />
RESET” will be displayed for 1 second.<br />
3. Turn the engine start switch to OFF.<br />
The engine number is reset after<br />
approximately 10 seconds.<br />
4. Turn the engine start switches to ON in<br />
order from port to starboard.<br />
NOTE:<br />
The engine numbers are stored in the<br />
ECM (Engine Control Module) of each<br />
engine for engine identification.<br />
The engine numbers are stored in the<br />
ECM (Engine Control Module) when, the<br />
engine start switch is first turned to ON<br />
after being connected. The numbers are<br />
stored in the order from number one to<br />
number four starting from the port outboard<br />
motor. When multiple outboard<br />
motors are installed, be sure to wait at<br />
least 2 seconds before turning each<br />
engine start switch to ON.<br />
21
2. Speedo<strong>meter</strong> unit<br />
NOTE:<br />
Depending on the model of the outboard motor, some functions may not be compatible. For<br />
information on models which contain the compatible functions, consult a <strong>Yamaha</strong> dealer.<br />
Speedo<strong>meter</strong><br />
Shows the speed of<br />
the boat. You can<br />
switch the displayed<br />
unit to miles per hour<br />
(mph), knots, or<br />
kilo<strong>meter</strong>s per hour<br />
(km/h). (Page 24)<br />
22<br />
Fuel <strong>meter</strong><br />
The fuel <strong>meter</strong> shows<br />
the remaining fuel<br />
level in 10 levels.<br />
(Page 25)<br />
Multifunction display (Page 25)<br />
· Up to four displays can be switched to show the information.<br />
· Shows up to two types of information combined on one display.<br />
Trip display (optional) (Page 26)<br />
Ambient water temperature display (optional) (Page 27)<br />
Depth display (optional) (Page 27)<br />
System voltage display (Page 28)<br />
Clock (optional) (Page 28)<br />
· The information shown on each display and the display format combination<br />
can be changed (custom mode).<br />
DISPLAY (setting displays) (Page 30)<br />
Speedo<strong>meter</strong> unit
Description/Activating the <strong>meter</strong><br />
Description<br />
1 SET button<br />
2 MODE button<br />
1<br />
3<br />
1<br />
1 Speedo<strong>meter</strong><br />
2 Fuel <strong>meter</strong><br />
3 Multifunction display<br />
2<br />
2<br />
23<br />
Activating the <strong>meter</strong><br />
When the engine start switch is turned to<br />
ON, the <strong>meter</strong> is activated and “Welcome”<br />
appears on the <strong>multifunction</strong> <strong>meter</strong>. Then,<br />
all the displays come on and the display<br />
switches to the normal display after a few<br />
seconds.
Speedo<strong>meter</strong><br />
The speedo<strong>meter</strong> shows the ground speed<br />
or the water speed of the boat. To display<br />
the ground speed, the GPS must be connected<br />
to the <strong>meter</strong>. To display the water<br />
speed, an optional sensor (speed sensor or<br />
Triducer-Multi sensor) must be connected to<br />
the <strong>meter</strong>.<br />
Switching the speed sensors:<br />
1. (4 seconds): To activate the<br />
speed sensor setting mode.<br />
2. : Press to switch between the<br />
speed sensor types.<br />
“GPS ON” (ground speed)<br />
“GPS OFF” (water speed)<br />
3. (1 second): To set the speed sensor<br />
and return to the normal display.<br />
24<br />
Speedo<strong>meter</strong><br />
NOTE:<br />
If no operations are carried out for 30 seconds<br />
or more, the speed sensor is set and<br />
the display returns to the normal display.<br />
When signals from the GPS cannot be<br />
received even when the GPS function is<br />
on, the GPS display goes off and the<br />
water speed is displayed.<br />
You can select to show miles per hour<br />
(mph), kilo<strong>meter</strong>s per hour (km/h), or<br />
knots on the speedo<strong>meter</strong> display. To<br />
change the displayed unit, see “UNIT (setting<br />
displayed units)” in “Changing settings<br />
(custom mode).”<br />
Speedo<strong>meter</strong> unit
Fuel <strong>meter</strong>/Multifunction display<br />
Fuel <strong>meter</strong><br />
The fuel <strong>meter</strong> shows the remaining fuel<br />
level in 10 levels and all the segments are<br />
displayed when the fuel tank is full. When<br />
the fuel level is low, the last segment b<strong>link</strong>s.<br />
When two fuel tanks are connected, the<br />
segments are divided into a left and right<br />
column to show the fuel levels individually.<br />
When only one tank is connected, all segments<br />
are displayed to show the fuel level.<br />
NOTE:<br />
The fuel sensor setting can be changed<br />
according to the fuel sensor type. To change<br />
the fuel sensor setting, see “FUEL SENSOR<br />
(setting the fuel sensor)” in “Changing settings<br />
(custom mode).”<br />
25<br />
Multifunction display<br />
The <strong>multifunction</strong> display shows up to two<br />
types of information simultaneously using<br />
numeric values. In addition, up to four displays<br />
can be set up for the display configuration<br />
with a combination of information. The<br />
configuration of the default displays is<br />
described below.<br />
: Press to switch between the displays.<br />
Display 1<br />
Trip<br />
Display 2<br />
(not displayed)<br />
Display 3<br />
(not displayed)<br />
Display 4<br />
(not displayed)<br />
When the engine start switch is turned to<br />
OFF, the last display shown is shown first<br />
when the engine start switch is turned to ON<br />
again.
NOTE:<br />
Since “Display 1” is the only default display,<br />
no displays can be switched.<br />
To change the display configuration, see<br />
“DISPLAY (setting displays)” in “Changing<br />
settings (custom mode).”<br />
26<br />
Trip display<br />
Trip display (optional: speed sensor has<br />
been installed)<br />
TRIP shows the information from the speed<br />
sensor converted to the distance traveled.<br />
+ (1 second): To reset the distance<br />
traveled.<br />
NOTE:<br />
The distance traveled is affected by currents<br />
and other operating conditions and<br />
may differ from the actual distance traveled.<br />
You can select to show miles (M), nautical<br />
miles (NM), or kilo<strong>meter</strong>s (km) on the<br />
TRIP display. To change the displayed<br />
unit, see “UNIT (setting displayed units)”<br />
in “Changing settings (custom mode).”<br />
Speedo<strong>meter</strong> unit
Ambient water temperature display/Depth display<br />
Ambient water temperature display<br />
(optional: Triducer-multi sensor has<br />
been installed)<br />
TEMP shows the ambient water temperature.<br />
NOTE:<br />
You can select to show Fahrenheit (°F) or<br />
Celsius (°C) on the TEMP display. To<br />
change the displayed unit, see “UNIT (setting<br />
displayed units)” in “Changing settings<br />
(custom mode).”<br />
27<br />
Depth display (optional: Triducer-multi<br />
sensor has been installed)<br />
DEPTH or DPTH shows the water depth.<br />
NOTE:<br />
You can select to show feet (F) or <strong>meter</strong>s<br />
(m) on the DEPTH or DPTH display. To<br />
change the displayed unit, see “UNIT (setting<br />
displayed units)” in “Changing settings<br />
(custom mode).”
System voltage display<br />
BATTERY or BAT shows the supplied voltage<br />
to the <strong>meter</strong> circuit. The system voltage<br />
display differs from the tacho<strong>meter</strong> unit voltage<br />
display (battery voltage). In addition, the<br />
voltage value may be changed according to<br />
the <strong>meter</strong> connection specifications.<br />
When the battery voltage decreases to 12<br />
volts or less or increases to 16 volts or more<br />
the voltage value b<strong>link</strong>s.<br />
B<strong>link</strong>s<br />
CAUTION:<br />
When the low battery voltage warning<br />
comes on, check the battery and the<br />
wiring.<br />
If you cannot locate and correct the<br />
cause, consult a <strong>Yamaha</strong> dealer.<br />
System voltage display/Clock<br />
28<br />
Clock (optional: GPS has been installed)<br />
The clock shows the time in 12 hours. The<br />
local time is easily displayed by calculating<br />
the longitude information received from the<br />
GPS communication data. Set the time as<br />
necessary.<br />
Setting the time:<br />
1. : To activate the time setting mode<br />
and switch to the time setting display.<br />
B<strong>link</strong>s<br />
2. : To change the minutes. Press<br />
and hold to advance quickly.<br />
3. : To set the hours.<br />
4. : To change the hours. Press and<br />
hold to advance quickly.<br />
5. : To set the time and return to the<br />
normal display.<br />
Resetting the time:<br />
1. : To activate the time setting mode<br />
and to switch to the time setting display.<br />
2. + (1 second): To reset the<br />
time to “0:00” and return to the normal<br />
display.<br />
Speedo<strong>meter</strong> unit
Changing backlight settings/Changing settings (custom mode)<br />
Changing backlight settings<br />
You can turn the backlight on or off, or<br />
change the brightness level of the backlight<br />
for all <strong>meter</strong>s collectively. You can also<br />
change the settings for each <strong>meter</strong> individually.<br />
NOTE:<br />
The backlight setting procedure is the same<br />
as that of the tacho<strong>meter</strong> unit. To change<br />
the backlight settings, see “Changing backlight<br />
settings” in “1. Tacho<strong>meter</strong> unit.”<br />
29<br />
Changing settings (custom mode)<br />
Switching to custom mode<br />
In the custom mode, you can change the<br />
<strong>meter</strong> function settings. “CUSTOM” and<br />
each setting function name are scrolled on<br />
the <strong>meter</strong>.<br />
1. Turn the engine off and the engine start<br />
switch to ON.<br />
2. (4 seconds): To activate the custom<br />
mode.<br />
3. : Press to switch between the setting<br />
function names (custom mode<br />
selection display).<br />
DISPLAY (setting displays)<br />
UNIT (setting displayed units)<br />
FUEL SENSOR<br />
(setting fuel sensor)<br />
4. : To switch to the change settings<br />
display.<br />
5. Change the various settings and return<br />
to the custom mode selection display.<br />
To change the settings, see the corresponding<br />
sections for each setting function.<br />
6. (1 second): To return to the normal<br />
display.
NOTE:<br />
If no operations are carried out for 30 seconds<br />
or more or if the engine is started,<br />
the settings will not be applied and the<br />
display returns to the normal display.<br />
Press the button for 2 seconds from<br />
step 5 to change the settings and return to<br />
the normal display.<br />
Resetting custom mode<br />
In the custom mode, you can reset the<br />
default settings collectively for all settings<br />
that have been changed.<br />
1. Turn the engine off and the engine start<br />
switch to ON.<br />
2. (4 seconds): To activate the custom<br />
mode.<br />
3. + (10 seconds): To reset all<br />
settings to the default settings.<br />
DISPLAY (setting displays)<br />
30<br />
DISPLAY (setting displays)<br />
You can change the display configuration of<br />
the normal display. There are a total of 15<br />
combinations of which up to four displays<br />
can be set up.<br />
The display configuration number that has<br />
been selected as the default display configuration<br />
is indicated by the shaded<br />
area in the table below.<br />
Display<br />
configuration No.<br />
Ambient water<br />
temperature<br />
Depth<br />
Trip<br />
System voltage<br />
Clock<br />
0 — — — — —<br />
1 — — —<br />
2 — — —<br />
3 — — —<br />
4 — — —<br />
5 — — —<br />
6 — — —<br />
7 — — —<br />
8 — — —<br />
9 — — —<br />
10 — — —<br />
11 — — — —<br />
12 — — — —<br />
13 — — — —<br />
14 — — — —<br />
15 — — — —<br />
:Displayed<br />
Changing the display configurations:<br />
1. Turn the engine off and the engine start<br />
switch to ON.<br />
2. (4 seconds): To activate the custom<br />
mode.<br />
Speedo<strong>meter</strong> unit
DISPLAY (setting displays)<br />
3. : To switch to the change settings<br />
display.<br />
4. : Press to switch between the display<br />
numbers. Select the display number<br />
(1–4) you want to change. The first<br />
two digits in the speedo<strong>meter</strong> display<br />
show the display numbers.<br />
5. : To select the display configuration<br />
number (0–15) you want to change.<br />
The fuel level segments show the display<br />
configuration numbers. Press to<br />
switch between the display configuration<br />
numbers.<br />
* In the display example, display number 2<br />
and display configuration number 12 are<br />
shown.<br />
31<br />
* When the display configuration number 0<br />
is selected, “HIDDEN” is shown and the<br />
display is not shown.<br />
6. (1 second): To change the display<br />
configuration and return to the custom<br />
mode selection display.<br />
7. (1 second): To return to the normal<br />
display.<br />
NOTE:<br />
When changing two or more display configurations<br />
of the <strong>multifunction</strong> display, repeat<br />
steps 4 and 5.<br />
Resetting the display configuration default<br />
settings:<br />
1. Turn the engine off and the engine start<br />
switch to ON.<br />
2. (4 seconds): To activate the custom<br />
mode.<br />
3. : To switch to the change settings<br />
display.<br />
4. + (1 second): To reset the<br />
display configuration default settings<br />
and return to the custom mode selection<br />
display.<br />
5. (1 second): To return to the normal<br />
display.
UNIT (setting displayed units)<br />
You can change the units that are shown in<br />
each display.<br />
1. Turn the engine off and the engine start<br />
switch to ON.<br />
2. (4 seconds): To activate the custom<br />
mode.<br />
3. : To switch between the setting<br />
function names.<br />
4. : To switch to the change settings<br />
display.<br />
5. : Press to switch between the displays.<br />
Speedo<strong>meter</strong> ( )<br />
TEMP (ambient water temperature)<br />
DPTH (depth)<br />
TRIP (trip)<br />
B<strong>link</strong><br />
* In the display example, the speedo<strong>meter</strong><br />
is shown.<br />
6. : Press to switch between the displayed<br />
units.<br />
Speedo<strong>meter</strong><br />
You can select to show miles per hour<br />
(mph), kilo<strong>meter</strong>s per hour (km/h), or knots.<br />
The default setting is miles per hour (mph).<br />
UNIT (setting displayed units)<br />
32<br />
TEMP<br />
You can select to show Fahrenheit (°F) or<br />
Celsius (°C).<br />
The default setting is Fahrenheit (°F).<br />
DPTH<br />
You can select to show feet (F) or <strong>meter</strong>s<br />
(m).<br />
The default setting is feet (F).<br />
TRIP<br />
You can select to show miles (M), nautical<br />
miles (NM), or kilo<strong>meter</strong>s (km).<br />
The default setting is miles (M).<br />
7. (1 second): To change the displayed<br />
unit and return to the custom<br />
mode selection display.<br />
8. (1 second): To return to the normal<br />
display.<br />
NOTE:<br />
When the speedo<strong>meter</strong> unit settings are<br />
changed, the TEMP, DPTH, and the TRIP<br />
unit settings are collectively changed automatically.<br />
To change the settings for each<br />
displayed unit individually, repeat steps 5<br />
and 6.<br />
Speedo<strong>meter</strong> unit
FUEL SENSOR (setting fuel sensor)<br />
FUEL SENSOR (setting fuel sensor)<br />
You can set the fuel sensor type that is connected<br />
to this <strong>meter</strong>.<br />
1. Turn the engine off and the engine start<br />
switch to ON.<br />
2. (4 seconds): To activate the custom<br />
mode.<br />
3. (2 times): Press to switch<br />
between the setting function names.<br />
4. : To switch to the change settings<br />
display.<br />
5. : Press to switch between the fuel<br />
sensor types.<br />
ABYC (US)<br />
EUROPE<br />
YAMAHA<br />
B<strong>link</strong>s<br />
6. (1 second): To change the fuel<br />
sensor type and return to the custom<br />
mode selection display.<br />
7. (1 second): To return to the normal<br />
display.<br />
33
3. Fuel management <strong>meter</strong> unit<br />
NOTE:<br />
Depending on the model of the outboard motor, some functions may not be compatible. For<br />
information on models which contain the compatible functions, consult a <strong>Yamaha</strong> dealer.<br />
Fuel flow <strong>meter</strong><br />
The fuel flow <strong>meter</strong><br />
shows the fuel<br />
consumption of each<br />
engine per hour or<br />
the total fuel<br />
consumption of all<br />
engines. (Page 36)<br />
Multifunction display (Page 37)<br />
· Up to three displays can be switched to show the information.<br />
· Shows up to two types of information combined on one display.<br />
Total fuel consumption display (Page 38)<br />
Fuel economy display (Page 39)<br />
Remaining fuel display (Page 40)<br />
· The information shown on each display and the display format combination<br />
can be changed (custom mode).<br />
DISPLAY (setting displays) (Page 42)<br />
34<br />
Fuel management<br />
<strong>meter</strong> unit
Description/Activating the <strong>meter</strong><br />
Description<br />
1<br />
1 SET button<br />
2 MODE button<br />
1 Fuel flow <strong>meter</strong><br />
2 Multifunction display<br />
1<br />
2<br />
2<br />
35<br />
Activating the <strong>meter</strong><br />
When the engine start switch is turned to<br />
ON, the <strong>meter</strong> is activated and “Welcome”<br />
appears on the <strong>multifunction</strong> <strong>meter</strong>. Then,<br />
all the displays come on and the display<br />
switches to the normal display after a few<br />
seconds.
Fuel flow <strong>meter</strong><br />
The fuel flow <strong>meter</strong> shows the fuel economy<br />
of each engine or the total fuel consumption<br />
per hour of all engines.<br />
When multiple outboard motors are<br />
installed, press the button to switch<br />
between the engines you want to display or<br />
between the total fuel consumption of all<br />
engines.<br />
* In the display example, the total fuel consumption<br />
of two outboard motors is<br />
shown.<br />
* In the display example, the total fuel consumption<br />
of three outboard motors is<br />
shown.<br />
36<br />
When two outboard motors are installed:<br />
PS (port & starboard)<br />
P (port)<br />
S (starboard)<br />
P<br />
PS<br />
When three outboard motors are installed:<br />
PCS (port & center &<br />
starboard)<br />
P (port)<br />
C (center)<br />
S (starboard)<br />
Fuel flow <strong>meter</strong><br />
S<br />
Fuel management<br />
<strong>meter</strong> unit
Multifunction display<br />
P<br />
C S<br />
PCS<br />
NOTE:<br />
You can select to show gallons per hour<br />
(gph) or liters per hour (l/h) on the fuel flow<br />
display. To change the displayed unit, see<br />
“UNIT (setting displayed units)” in “Changing<br />
the settings (custom mode).”<br />
37<br />
Multifunction display<br />
The <strong>multifunction</strong> display shows up to two<br />
types of information simultaneously using<br />
numeric values. In addition, up to three displays<br />
can be set up for the display configuration<br />
with a combination of information. The<br />
configuration of the default displays is<br />
described below.<br />
: Press to switch between the displays.<br />
Display 1<br />
Total fuel consumption +<br />
Fuel economy<br />
Display 2<br />
(not displayed)<br />
Display 3<br />
(not displayed)<br />
When the engine start switch is turned to<br />
OFF, the last display shown is shown first<br />
when the engine start switch is turned to ON<br />
again.
NOTE:<br />
Since “Display 1” is the only default display,<br />
no displays can be switched.<br />
To change the display configuration, see<br />
“DISPLAY (setting displays)” in “Changing<br />
settings (custom mode).”<br />
Total fuel consumption display<br />
38<br />
Total fuel consumption display<br />
TTL shows the total fuel consumption of all<br />
engines.<br />
The TTL display cannot measure over 1,999<br />
gallons or 1,999 liters. When exceeding<br />
1,999 gallons or 1,999 liters of fuel, “ ”<br />
b<strong>link</strong>s in front of the numeric value to indicate<br />
an overflow.<br />
B<strong>link</strong>s<br />
+ (1 second): To reset the TTL<br />
display.<br />
When the display configuration number is<br />
changed so that the AVAL (available:<br />
remaining fuel) is displayed (see page 40) in<br />
“Changing settings (custom mode),” the TTL<br />
display resetting method is changed.<br />
Fuel management<br />
<strong>meter</strong> unit
Fuel economy display<br />
Resetting the TTL (total fuel consumption)<br />
and AVAL (available: remaining fuel) displays:<br />
Be sure to reset the TTL display on a full<br />
tank of fuel. If the TTL display is reset when<br />
the fuel tank is not full or if not reset and the<br />
fuel tank is filled with fuel, the AVAL display<br />
will not be displayed accurately. When the<br />
TTL display is reset, the AVAL display is<br />
reset simultaneously.<br />
1. + (1 second): To display the<br />
“TTL AVAL RESET?” confirmation display<br />
in the <strong>multifunction</strong> <strong>meter</strong> display.<br />
2. (1 second) or +<br />
(1 second): To simultaneously reset the<br />
TTL and AVAL and return to the normal<br />
display.<br />
NOTE:<br />
Press the button for 1 second from<br />
step 1 to cancel resetting the TTL display<br />
and return to the normal display.<br />
You can select to show gallons (G) or<br />
liters (L) on the TTL display. To change<br />
the displayed unit, see “UNIT (setting displayed<br />
units)” in “Changing settings (custom<br />
mode).”<br />
39<br />
Fuel economy display<br />
ECON shows the distance traveled per unit<br />
of fuel.<br />
NOTE:<br />
Fuel economy is affected by the type of<br />
boat being operated and the operating<br />
conditions, and it is constantly changing.<br />
You can select to show miles per gallon<br />
(MPG), nautical miles per liter (NM/l), or<br />
kilo<strong>meter</strong>s per liter (km/l) on the ECON<br />
display. To change the displayed unit, see<br />
“UNIT (setting displayed units)” in “Changing<br />
settings (custom mode).”
Remaining fuel display/Changing backlight settings<br />
Remaining fuel display<br />
AVAL shows the numeric value of the consumed<br />
fuel that is deducted from 90 percent<br />
of the specified fuel tank capacity.<br />
The default setting of the fuel tank capacity<br />
is 50 G (190 L). Change as necessary.<br />
Resetting the AVAL (available: remaining<br />
fuel) and TTL (total fuel consumption) displays:<br />
Be sure to reset the AVAL display on a full<br />
tank of fuel. If the AVAL display is reset<br />
when the fuel tank is not full or if not reset<br />
and the fuel tank is filled with fuel, the display<br />
will not be displayed accurately.<br />
1. + (1 second): To display the<br />
“TTL AVAL RESET?” confirmation display<br />
in the <strong>multifunction</strong> <strong>meter</strong> display.<br />
40<br />
2. (1 second) or +<br />
(1 second): To simultaneously reset the<br />
AVAL and TTL displays and return to<br />
the normal display.<br />
NOTE:<br />
When the AVAL display is reset, the TTL<br />
display is reset simultaneously.<br />
Press the button for 1 second from<br />
step 1 to cancel resetting the AVAL display<br />
and return to the normal display.<br />
The displayed units are gallons (G) or<br />
liters (L).<br />
Changing backlight settings<br />
You can turn the backlight on or off, or<br />
change the brightness level of the backlight<br />
for all <strong>meter</strong>s collectively. You can also<br />
change the settings for each <strong>meter</strong> individually.<br />
NOTE:<br />
The backlight setting procedure is the same<br />
as that of the tacho<strong>meter</strong> unit. To change<br />
the backlight settings, see “Changing backlight<br />
settings” in “1. Tacho<strong>meter</strong> unit.”<br />
Fuel management<br />
<strong>meter</strong> unit
Changing settings (custom mode)<br />
Changing settings (custom mode)<br />
Switching to custom mode<br />
In the custom mode, you can change the<br />
<strong>meter</strong> function settings. “CUSTOM” and<br />
each setting function name are scrolled on<br />
the <strong>meter</strong>.<br />
1. Turn the engine off and the engine start<br />
switch to ON.<br />
2. (4 seconds): To activate the custom<br />
mode.<br />
3. : Press to switch between the setting<br />
function names (custom mode<br />
selection display).<br />
DISPLAY (setting display)<br />
UNIT (setting displayed units)<br />
TANK CAPA.<br />
(setting fuel tank capacity)<br />
CALIBRATION<br />
(setting correction value)<br />
4. : To switch to the change settings<br />
display.<br />
5. Change the various settings and return<br />
to the custom mode selection display.<br />
To change the settings, see the corresponding<br />
sections for each setting function.<br />
41<br />
6. (1 second): To return to the normal<br />
displays.<br />
NOTE:<br />
If no operations are carried out for 30 seconds<br />
or more or if the engine is started,<br />
the settings will not be applied and the<br />
display returns to the normal display.<br />
Press the button for 2 seconds from<br />
step 5 to change the settings and return to<br />
the normal display.<br />
Resetting custom mode<br />
In the custom mode, you can reset the<br />
default settings collectively for all settings<br />
that have been changed.<br />
1. Turn the engine off and the engine start<br />
switch to ON.<br />
2. (4 seconds): To activate the custom<br />
mode.<br />
3. + (10 seconds): To reset all<br />
settings to the default settings.
DISPLAY (setting displays)<br />
You can change the display configuration of<br />
the normal display. There are a total of 6<br />
combinations of which up to three displays<br />
can be set up.<br />
The display configuration number that has<br />
been selected as the default display configuration<br />
is indicated by the shaded<br />
area in the table below.<br />
Display<br />
configuration No.<br />
Total fuel<br />
consumption<br />
Fuel economy<br />
Remaining fuel<br />
0 — — —<br />
1 —<br />
2 —<br />
3 —<br />
4 — —<br />
5 — —<br />
6 — —<br />
:Displayed<br />
Changing the display configurations:<br />
1. Turn the engine off and the engine start<br />
switch to ON.<br />
2. (4 seconds): To activate the custom<br />
mode.<br />
3. : To switch to the change settings<br />
display.<br />
4. : Press to switch between the display<br />
numbers. Select the display number<br />
(01–03) you want to change. The<br />
first two digits in the fuel flow display<br />
show the display numbers.<br />
DISPLAY (setting displays)<br />
42<br />
5. : To select the display configuration<br />
number (0–6). The last two digits in<br />
the fuel flow display show the display<br />
configuration numbers. Press to switch<br />
between the display configuration numbers.<br />
* In the display example, the display number<br />
02 and the display configuration number<br />
6 are shown.<br />
Fuel management<br />
<strong>meter</strong> unit
UNIT (setting displayed units)<br />
* When the display configuration number<br />
“0” is selected, “HIDDEN” is shown and<br />
the display is not shown.<br />
6. (1 second): To change the display<br />
configuration and return to the custom<br />
mode selection display.<br />
7. (1 second): To return to the normal<br />
display.<br />
NOTE:<br />
When changing two or more display configurations<br />
of the <strong>multifunction</strong> display, repeat<br />
steps 4 and 5.<br />
Resetting the display configuration default<br />
settings:<br />
1. Turn the engine off and the engine start<br />
switch to ON.<br />
2. (4 seconds): To activate the custom<br />
mode.<br />
3. : To switch to the change settings<br />
display.<br />
4. + (1 second): To reset the<br />
display configurations to the default settings<br />
and return to the custom mode<br />
selection display.<br />
5. (1 second): To return to the normal<br />
display.<br />
43<br />
UNIT (setting displayed units)<br />
You can change the units that are shown in<br />
each display.<br />
1. Turn the engine off and the engine start<br />
switch to ON.<br />
2. (4 seconds): To activate the custom<br />
mode.<br />
3. : To switch between the setting<br />
function names.<br />
4. : To switch to the change settings<br />
display.<br />
5. : Press to switch between the displays.<br />
Fuel flow<br />
TTL (total fuel consumption)<br />
ECON (fuel economy)<br />
B<strong>link</strong><br />
* In the display example, the fuel flow is<br />
shown.<br />
6. : Press to switch between the displayed<br />
units.<br />
Fuel flow<br />
You can select to show gallons per hour<br />
(gph) or liters per hour (l/h).<br />
The default setting is gallons per hour (gph).
TTL<br />
You can select to show gallons (G) or liters<br />
(L).<br />
The default setting is gallons (G).<br />
ECON<br />
You can select to show miles per gallon<br />
(MPG), nautical miles per liter (NM/l), or kilo<strong>meter</strong>s<br />
per liter (km/l).<br />
The default setting is miles per gallon<br />
(MPG).<br />
7. (1 second): To change the displayed<br />
units and return to the custom<br />
mode selection display.<br />
8. (1 second): To return to the normal<br />
display.<br />
NOTE:<br />
When the fuel flow unit settings are<br />
changed, the TTL, ECON, and AVAL unit<br />
settings are collectively changed automatically.<br />
To change the settings for each displayed<br />
unit individually, repeat steps 5 and<br />
6.<br />
TANK CAPA. (setting fuel tank capacity)<br />
44<br />
TANK CAPA. (setting fuel tank capacity)<br />
You can set the capacity of the fuel tank that<br />
is connected to this <strong>meter</strong>.<br />
1. Turn the engine off and the engine start<br />
switch to ON.<br />
2. (4 seconds): To activate the custom<br />
mode.<br />
3. (2 times): Press to switch<br />
between the setting function names.<br />
4. : To switch to the change settings<br />
display.<br />
B<strong>link</strong>s<br />
5. : Press to switch between the<br />
selected digits.<br />
: Press to switch between the<br />
selected digit numeric values.<br />
6. (1 second): To change the capacity<br />
of the fuel tank and return to the custom<br />
mode selection display.<br />
7. (1 second): To return to the normal<br />
display.<br />
Fuel management<br />
<strong>meter</strong> unit
CALIBRATION (setting correction value)<br />
NOTE:<br />
The default setting of the fuel tank capacity<br />
is 50 G (190 L). The maximum fuel tank<br />
capacity can be set to 1,999 gallons or<br />
1,999 liters.<br />
Depending on the position of the fuel outlet<br />
and the position of the boat while cruising,<br />
the usable fuel may decrease. Be<br />
sure to check the available fuel capacity<br />
before setting the default setting.<br />
To change the displayed unit, see “UNIT<br />
(setting displayed units)” in “Changing settings<br />
(custom mode).”<br />
Press the and buttons for 1<br />
second from step 4 to change the default<br />
setting to “0.”<br />
AVAL shows 90 percent of the specified<br />
fuel tank capacity.<br />
45<br />
CALIBRATION (setting correction value)<br />
You can calibrate the displayed fuel flow<br />
value within –7 to +7 percent. The difference<br />
in the fuel consumption display and the<br />
actual fuel consumption is calibrated.<br />
Checking the calibration value:<br />
1. Operate the outboard motor on a full<br />
tank of fuel.<br />
2. After operating the outboard motor, fill<br />
the fuel tank. Compare the amount of<br />
fuel filled into the fuel tank with the fuel<br />
consumed shown on the fuel consumption<br />
display and set the calibration value<br />
to the difference if necessary.<br />
Changing the calibration value:<br />
1. Turn the engine off and the engine start<br />
switch to ON.<br />
2. (4 seconds): To activate the custom<br />
mode.<br />
3. (3 times): Press to switch<br />
between the setting function names.<br />
4. : To switch to the change settings<br />
display.<br />
5. : Press to switch between the calibration<br />
values.<br />
B<strong>link</strong>s<br />
6. (1 second): To change the calibration<br />
value and return to the custom<br />
mode selection display.
7. (1 second): To return to the normal<br />
display.<br />
NOTE:<br />
The fuel flow display may differ depending<br />
on the operating conditions.<br />
When the fuel flow calibration value is<br />
changed, the fuel flow <strong>meter</strong>, TTL, ECON,<br />
and AVAL displays are shown calibrated.<br />
CALIBRATION (setting correction value)<br />
46<br />
Fuel management<br />
<strong>meter</strong> unit
4. Speed & Fuel <strong>meter</strong> unit<br />
NOTE:<br />
Depending on the model of the outboard motor, some functions may not be compatible. For<br />
information on models which contain the compatible functions, consult a <strong>Yamaha</strong> dealer.<br />
Speedo<strong>meter</strong><br />
Shows the speed of<br />
the boat. You can<br />
switch the displayed<br />
unit to miles per hour<br />
(mph), knots, or<br />
kilo<strong>meter</strong>s per hour<br />
(km/h). (Page 49)<br />
47<br />
Fuel <strong>meter</strong><br />
The fuel <strong>meter</strong> shows<br />
the remaining fuel in<br />
10 levels. (Page 50)<br />
Multifunction display (Page 50)<br />
· Up to five displays can be switched to show the information.<br />
· Shows up to two types of information combined on one display.<br />
Trip display (optional) (Page 51)<br />
Fuel economy display (Page 52)<br />
Fuel flow display (Page 52)<br />
Total fuel consumption display (Page 53)<br />
Ambient water temperature display (optional) (Page 53)<br />
Depth display (optional) (Page 54)<br />
Clock (optional) (Page 55)<br />
· The information shown on each display and the display format combination<br />
can be changed (custom mode).<br />
DISPLAY (setting displays) (Page 57)
Description<br />
1 SET button<br />
2 MODE button<br />
1<br />
3<br />
1<br />
1 Speedo<strong>meter</strong><br />
2 Fuel <strong>meter</strong><br />
3 Multifunction display<br />
Description/Activating the <strong>meter</strong><br />
2<br />
2<br />
48<br />
Activating the <strong>meter</strong><br />
When the engine start switch is turned to<br />
ON, the <strong>meter</strong> is activated and “Welcome”<br />
appears on the <strong>multifunction</strong> <strong>meter</strong>. Then,<br />
all the displays come on and the display<br />
switches to the normal display after a few<br />
seconds.<br />
Speed & Fuel <strong>meter</strong><br />
unit
Speedo<strong>meter</strong><br />
Speedo<strong>meter</strong><br />
The speedo<strong>meter</strong> shows the ground speed<br />
or the water speed of the boat. To display<br />
the ground speed, the GPS must be connected<br />
to the <strong>meter</strong>. To display the water<br />
speed, an optional sensor (speed sensor or<br />
Triducer-Multi sensor) must be connected to<br />
the <strong>meter</strong>.<br />
Switching the speed sensors:<br />
1. (4 seconds): To activate the<br />
speed sensor setting mode.<br />
2. : Press to switch between the fuel<br />
sensor types.<br />
“GPS ON” (ground speed)<br />
“GPS OFF” (water speed)<br />
3. (1 second): To set the speed sensor<br />
and return to the normal display.<br />
49<br />
NOTE:<br />
If no operations are carried out for 30 seconds<br />
or more, the speed sensor is set and<br />
the display returns to the normal display.<br />
When signals from the GPS cannot be<br />
received even when the GPS function is<br />
on, the GPS display goes off and the<br />
water speed is displayed.<br />
You can select to show miles per hour<br />
(mph), kilo<strong>meter</strong>s per hour (km/h), or<br />
knots on the speedo<strong>meter</strong> display. To<br />
change the displayed unit, see “UNIT (setting<br />
displayed units)” in “Changing settings<br />
(custom mode).”
Fuel <strong>meter</strong><br />
The fuel <strong>meter</strong> shows the remaining fuel<br />
level in 10 levels and all segments are displayed<br />
when the fuel tank is full. When the<br />
fuel level is low, the last segment b<strong>link</strong>s.<br />
When two fuel tanks are connected, the<br />
segments are divided into a left and a right<br />
column to show the fuel levels individually.<br />
When only one tank is connected, all segments<br />
are displayed to show the fuel level.<br />
NOTE:<br />
The fuel sensor setting can be changed<br />
according to the fuel sensor type. To change<br />
the fuel sensor setting, see “FUEL SENSOR<br />
(setting the fuel sensor)” in “Changing settings<br />
(custom mode).”<br />
Fuel <strong>meter</strong>/Multifunction display<br />
50<br />
Multifunction display<br />
The <strong>multifunction</strong> display shows up to two<br />
types of information simultaneously using<br />
numeric values. In addition, up to five displays<br />
can be set up for the display configuration<br />
with a combination of information. The<br />
configuration of the default displays is<br />
described below.<br />
: Press to switch between the displays.<br />
Display 1<br />
Display 2<br />
Display 3<br />
(not displayed)<br />
Display 4<br />
(not displayed)<br />
Display 5<br />
(not displayed)<br />
Trip<br />
+ Fuel economy<br />
Fuel flow<br />
+ Total fuel<br />
consumption<br />
Speed & Fuel <strong>meter</strong><br />
unit
Trip display<br />
When the engine start switch is turned to<br />
OFF, the last display shown is shown first<br />
when the engine start switch is turned to ON<br />
again.<br />
NOTE:<br />
Since “Display 1” and “Display 2” are the<br />
only default displays, other displays cannot<br />
be switched.<br />
To change the display configuration, see<br />
“Display (setting displays)” in “Changing<br />
settings (custom mode).”<br />
51<br />
Trip display (optional: speed sensor has<br />
been installed)<br />
TRIP shows the information from the speed<br />
sensor converted to the distance traveled.<br />
+ (1 second): To reset the distance<br />
traveled.<br />
NOTE:<br />
The distance traveled is affected by currents<br />
and other operating conditions and<br />
may differ from the actual distance traveled.<br />
You can select to show miles (M), nautical<br />
miles (NM), or kilo<strong>meter</strong>s (km) on the<br />
TRIP display. To change the displayed<br />
unit, see “UNIT (setting displayed units)”<br />
in “Changing settings (custom mode).”
Fuel economy display<br />
ECON shows the distance traveled per unit<br />
of fuel.<br />
NOTE:<br />
Fuel economy is affected by the type of<br />
boat being operated and the operating<br />
conditions, and it is constantly changing.<br />
You can select to show miles per gallon<br />
(MPG), nautical miles per liter (NM/l), or<br />
kilo<strong>meter</strong>s per liter (km/l) on the ECON<br />
display. To change the displayed unit, see<br />
“UNIT (setting displayed units)” in “Changing<br />
settings (custom mode).”<br />
Fuel economy display/Fuel flow display<br />
52<br />
Fuel flow display<br />
FLOW shows the total fuel consumption per<br />
hour of all engines.<br />
NOTE:<br />
You can select to show gallons per hour<br />
(GPH) or liters per hour (l/h) on the FLOW<br />
display. To change the displayed unit, see<br />
“UNIT (setting displayed units)” in “Changing<br />
settings (custom mode).”<br />
Speed & Fuel <strong>meter</strong><br />
unit
Total fuel consumption display/Ambient water temperature display<br />
Total fuel consumption display<br />
TTL shows the total fuel consumption of all<br />
engines.<br />
The TTL display cannot measure over 1,999<br />
gallons or 1,999 liters. When exceeding<br />
1,999 gallons or 1,999 liters of fuel, “ ”<br />
b<strong>link</strong>s in front of the numeric value to indicate<br />
an overflow.<br />
B<strong>link</strong>s<br />
+ (1 second): To reset the TTL<br />
display.<br />
NOTE:<br />
You can select to show gallons (G) or liters<br />
(L) on the TTL display. To change the displayed<br />
unit, see “UNIT (setting displayed<br />
units)” in “Changing settings (custom<br />
mode).”<br />
53<br />
Ambient water temperature display<br />
(optional: Triducer-multi sensor has<br />
been installed)<br />
TEMP shows the ambient water temperature.<br />
NOTE:<br />
You can select to show Fahrenheit (°F) or<br />
Celsius (°C) on the TEMP display. To<br />
change the displayed unit, see “UNIT (setting<br />
displayed units)” in “Changing settings<br />
(custom mode).”
Depth display (optional: Triducer-multi<br />
sensor has been installed)<br />
DEPTH or DPTH displays the water depth.<br />
NOTE:<br />
You can select to show feet (F) or <strong>meter</strong>s<br />
(m) on the DEPTH or DPTH display. To<br />
change the displayed unit, see “UNIT (setting<br />
displayed units)” in “Changing settings<br />
(custom mode).”<br />
Depth display/System voltage display<br />
54<br />
System voltage display<br />
BATTERY or BAT shows the supplied voltage<br />
to the <strong>meter</strong> circuit. The system voltage<br />
display differs from the tacho<strong>meter</strong> unit voltage<br />
display (battery voltage). In addition, the<br />
voltage value may be changed according to<br />
the <strong>meter</strong> connection specifications.<br />
When the battery voltage decreases to 12<br />
volts or less or increases to 16 volts or more<br />
the voltage value b<strong>link</strong>s.<br />
B<strong>link</strong>s<br />
CAUTION:<br />
When the low battery voltage warning<br />
comes on, check the battery and the<br />
wiring.<br />
If you cannot locate and correct the<br />
cause, consult a <strong>Yamaha</strong> dealer.<br />
Speed & Fuel <strong>meter</strong><br />
unit
Clock/Changing backlight settings<br />
Clock (optional: GPS has been installed)<br />
The clock shows the time in 12 hours. The<br />
local time is easily displayed by calculating<br />
the longitude information received from the<br />
GPS communication data. Set the time as<br />
necessary.<br />
Setting the time:<br />
1. : To activate the time setting mode<br />
and switch to the time setting display.<br />
B<strong>link</strong>s<br />
2. : To change the minutes. Press<br />
and hold to advance quickly.<br />
3. : To set the hours.<br />
4. : To change the hours. Press and<br />
hold to advance quickly.<br />
5. : To set the time and return to the<br />
normal display.<br />
Resetting the time:<br />
1. : To activate the time setting mode<br />
and switch to the time setting display.<br />
2. + (1 second): To reset the<br />
time to “0:00” and return to the normal<br />
display.<br />
55<br />
Changing backlight settings<br />
You can turn the backlight on or off, or<br />
change the brightness level of the backlight<br />
for all <strong>meter</strong>s collectively. You can also<br />
change the settings for each <strong>meter</strong> individually.<br />
NOTE:<br />
The backlight setting procedure is the same<br />
as that of the tacho<strong>meter</strong> unit. To change<br />
the backlight settings, see “Changing backlight<br />
settings” in “1. Tacho<strong>meter</strong> unit.”
Changing settings (custom mode)<br />
Switching to custom mode<br />
In the custom mode, you can change the<br />
<strong>meter</strong> function settings. “CUSTOM” and<br />
each setting function name are scrolled on<br />
the <strong>meter</strong>.<br />
1. Turn the engine off and the engine start<br />
switch to ON.<br />
2. (4 seconds): To activate the custom<br />
mode.<br />
3. : Press to switch between the setting<br />
function names (custom mode<br />
selection display).<br />
DISPLAY (setting displays)<br />
UNIT (setting displayed units)<br />
FUEL SENSOR<br />
(setting fuel sensor)<br />
CALIBRATION<br />
(setting correction value)<br />
4. : To switch to the change settings<br />
display.<br />
5. Change the various settings and return<br />
to the custom mode selection display.<br />
To change the settings, see the corresponding<br />
sections for each setting function.<br />
Changing settings (custom mode)<br />
56<br />
6. (1 second): To return to the normal<br />
display.<br />
NOTE:<br />
If no operations are carried out for 30 seconds<br />
or more or if the engine is started,<br />
the settings will not be applied and the<br />
display returns to the normal display.<br />
Press the button for 2 seconds from<br />
step 5 to change the settings and return to<br />
the normal display.<br />
Resetting custom mode<br />
In the custom mode, you can reset the<br />
default settings collectively for all settings<br />
that have been changed.<br />
1. Turn the engine off and the engine start<br />
switch to ON.<br />
2. (4 seconds): To activate the custom<br />
mode.<br />
3. + (10 seconds): To reset all<br />
settings to the default settings.<br />
Speed & Fuel <strong>meter</strong><br />
unit
DISPLAY (setting displays)<br />
DISPLAY (setting displays)<br />
You can change the display configuration of<br />
the normal display. There are a total of 36<br />
combinations of which up to five displays<br />
can be set up.<br />
The display configuration numbers that have<br />
been selected as the default display configuration<br />
are indicated by the shaded areas<br />
in the table below.<br />
57<br />
Display<br />
configuration No.<br />
Trip<br />
Fuel flow<br />
Fuel economy<br />
Total fuel<br />
consumption<br />
Ambient water<br />
temperature<br />
Depth<br />
System voltage<br />
Clock<br />
0 — — — — — — — —<br />
1 — — — — — —<br />
2 — — — — — —<br />
3 — — — — — —<br />
4 — — — — — —<br />
5 — — — — — —<br />
6 — — — — — —<br />
7 — — — — — —<br />
8 — — — — — —<br />
9 — — — — — —<br />
10 — — — — — —<br />
11 — — — — — —<br />
12 — — — — — —<br />
13 — — — — — —<br />
14 — — — — — —<br />
15 — — — — — —<br />
16 — — — — — —<br />
17 — — — — — —<br />
18 — — — — — —<br />
19 — — — — — —<br />
20 — — — — — —<br />
21 — — — — — —<br />
22 — — — — — —<br />
23 — — — — — —<br />
24 — — — — — —<br />
25 — — — — — —<br />
26 — — — — — —<br />
27 — — — — — —<br />
28 — — — — — —<br />
29 — — — — — — —<br />
30 — — — — — — —<br />
31 — — — — — — —<br />
32 — — — — — — —<br />
33 — — — — — — —<br />
34 — — — — — — —<br />
35 — — — — — — —<br />
36 — — — — — — —<br />
:Displayed
Changing the display configurations:<br />
1. Turn the engine off and the engine start<br />
switch to ON.<br />
2. (4 seconds): To activate the custom<br />
mode.<br />
3. : To switch to the change settings<br />
display.<br />
4. : Press to switch between the display<br />
numbers. Select the display numbers<br />
(1–5) you want to change. The first<br />
two digits in the speedo<strong>meter</strong> display<br />
show the display numbers.<br />
5. : To select the display configuration<br />
numbers (0–36) you want to<br />
change. The fuel level display segments<br />
(the left column represents the tens digit<br />
and the right column represents the<br />
ones digit) show the display configuration<br />
numbers. Press to switch between<br />
the display configuration numbers.<br />
36<br />
DISPLAY (setting displays)<br />
58<br />
* In the display example, the display number<br />
3 and the display configuration number<br />
36 are shown.<br />
* When the display configuration number 0<br />
is selected, “HIDDEN” is shown and the<br />
display is not shown.<br />
6. (1 second): To change the display<br />
configuration and return to the custom<br />
mode selection display.<br />
7. (1 second): To return to the normal<br />
mode.<br />
NOTE:<br />
When changing two or more display configurations<br />
of the <strong>multifunction</strong> display, repeat<br />
steps 4 and 5.<br />
Resetting the display configuration default<br />
settings:<br />
1. Turn the engine off and the engine start<br />
switch to ON.<br />
2. (4 seconds): To activate the custom<br />
mode.<br />
3. : To switch to the change settings<br />
display.<br />
4. + (1 second): To reset the<br />
display configurations to the default settings<br />
and return to the custom mode<br />
selection display.<br />
Speed & Fuel <strong>meter</strong><br />
unit
UNIT (setting displayed units)<br />
5. (1 second): To return to the normal<br />
display.<br />
59<br />
UNIT (setting displayed units)<br />
You can change the units that are shown in<br />
each display.<br />
1. Turn the engine off and the engine start<br />
switch to ON.<br />
2. (4 seconds): To activate the custom<br />
mode.<br />
3. : To switch between the setting<br />
function names.<br />
4. : To switch to the change settings<br />
display.<br />
5. : Press to switch between the displays.<br />
Speedo<strong>meter</strong> ( )<br />
TRIP (trip)<br />
FLOW (fuel flow)<br />
ECON (fuel economy)<br />
TTL (total fuel consumption)<br />
TEMP (ambient water temperature)<br />
DPTH (depth)<br />
B<strong>link</strong><br />
* In the display example, the speedo<strong>meter</strong><br />
is shown.
6. : Press to switch between the displayed<br />
units.<br />
Speedo<strong>meter</strong><br />
You can select to show miles per hour<br />
(mph), kilo<strong>meter</strong>s per hour (km/h), or knots.<br />
The default setting is miles per hour (mph).<br />
TRIP<br />
You can select to show miles (M), nautical<br />
miles (NM), or kilo<strong>meter</strong>s (km).<br />
The default setting is miles (M).<br />
FLOW<br />
You can select to show gallons per hour<br />
(GPH) or liters per hour (l/h).<br />
The default setting is gallons per hour<br />
(GPH).<br />
ECON<br />
You can select to show miles per gallon<br />
(MPG), nautical miles per liter (NM/l), or kilo<strong>meter</strong>s<br />
per liter (km/l).<br />
The default setting is miles per gallon<br />
(MPG).<br />
TTL<br />
You can select to show gallons (G) or liters<br />
(L).<br />
The default setting is gallons (G).<br />
TEMP<br />
You can select to show Fahrenheit (°F) or<br />
Celsius (°C).<br />
The default setting is Fahrenheit (°F).<br />
DPTH<br />
You can select to show feet (F) or <strong>meter</strong>s<br />
(m).<br />
The default setting is feet (F).<br />
7. (1 second): To change the displayed<br />
units and return to the custom<br />
mode.<br />
8. (1 second): To return to the normal<br />
display.<br />
UNIT (setting displayed units)<br />
60<br />
NOTE:<br />
When the speedo<strong>meter</strong> unit settings are<br />
changed, the TRIP, FLOW, ECON, TTL,<br />
TEMP, and DPTH settings can be collectively<br />
changed automatically. To change the<br />
settings for each displayed unit individually,<br />
repeat steps 5 and 6.<br />
Speed & Fuel <strong>meter</strong><br />
unit
FUEL SENSOR (setting fuel sensor)/CALIBRATION (setting correction value)<br />
FUEL SENSOR (setting fuel sensor)<br />
You can set the fuel sensor type that is connected<br />
to this <strong>meter</strong>.<br />
1. Turn the engine off and the engine start<br />
switch to ON.<br />
2. (4 seconds): To activate the custom<br />
mode.<br />
3. (2 times): Press to switch<br />
between the setting function names.<br />
4. : To switch to the change settings<br />
display.<br />
5. : Press to switch between the fuel<br />
sensor types.<br />
ABYC (US)<br />
EUROPE<br />
YAMAHA<br />
B<strong>link</strong>s<br />
6. (1 second): To change the fuel<br />
sensor type and return to the custom<br />
mode selection display.<br />
7. (1 second): To return to the normal<br />
display.<br />
61<br />
CALIBRATION (setting correction value)<br />
You can calibrate the displayed fuel flow<br />
value within –7 to +7 percent. The difference<br />
in the fuel consumption display and the<br />
actual fuel consumption is calibrated.<br />
Checking the calibration value:<br />
1. Operate the outboard motor on a full<br />
tank of fuel.<br />
2. After operating the outboard motor, fill<br />
the fuel tank. Compare the amount of<br />
fuel filled into the fuel tank with the fuel<br />
consumed shown on the fuel consumption<br />
display and set the calibration value<br />
to the difference if necessary.<br />
Changing the calibration value:<br />
1. Turn the engine off and the engine<br />
switch to ON.<br />
2. (4 seconds): To activate the custom<br />
mode.<br />
3. (3 times): Press to switch<br />
between the setting function names.<br />
4. : To switch to the change settings<br />
display.<br />
5. : Press to switch between the calibration<br />
values.<br />
B<strong>link</strong>s<br />
6. (1 second): To change the calibration<br />
value and return to the custom<br />
mode selection display.
7. (1 second): To return to the normal<br />
display.<br />
NOTE:<br />
The fuel flow display may differ depending<br />
on the operating conditions.<br />
When the fuel flow calibration value is<br />
changed, the FLOW, TTL, and ECON displays<br />
are shown calibrated.<br />
CALIBRATION (setting correction value)<br />
62<br />
Speed & Fuel <strong>meter</strong><br />
unit
Activating for the first time<br />
5. Setting up the <strong>meter</strong>s<br />
To install the <strong>meter</strong>s and the optional sensors<br />
and to connect the <strong>meter</strong>s to the<br />
engine, see the “Command Link Multifunction<br />
Meter Installation Manual.”<br />
Be sure to follow the procedures in “Activating<br />
for the first time” and “Setting the initial<br />
settings.” If the procedures are performed<br />
incorrectly, the engine number will change,<br />
resulting in improper operation.<br />
1. Installing the <strong>meter</strong>s<br />
2. Connecting the <strong>meter</strong>s to the engine<br />
3. Installing an optional sensor<br />
4. Activating for the first time<br />
5. Setting the initial settings<br />
If the procedures are performed incorrectly,<br />
see “Service functions” in “1. Tacho<strong>meter</strong><br />
unit” to reset all of the engine numbers.<br />
Check the connections, and follow the setup<br />
procedures again to set up the <strong>meter</strong>s.<br />
63<br />
Activating for the first time<br />
After installing the <strong>meter</strong>s, be sure to turn<br />
the engine start switch to ON when the<br />
power is supplied for the first time. When<br />
multiple outboard motors are installed, be<br />
sure to turn the engine start switch to ON<br />
from the port outboard motor and to wait at<br />
least 2 seconds before turning each engine<br />
start switch to ON.<br />
NOTE:<br />
The engine number of the engine whose<br />
engine start switch was first turned to ON<br />
is stored in the ECM (Engine Control Module)<br />
of the engine as the port engine<br />
(engine number 1).<br />
To reset an engine number, see “Resetting<br />
engine number” under “Service functions”<br />
in “1. Tacho<strong>meter</strong> unit.”
Setting the initial settings<br />
Before operating the <strong>meter</strong>, be sure to<br />
change the default settings as described<br />
below. For the setting procedures, see the<br />
corresponding setting procedure for each<br />
<strong>meter</strong>.<br />
Tacho<strong>meter</strong> unit<br />
ENGINE NUMBER (setting corresponding<br />
engine)<br />
Select the engine compatible to this <strong>meter</strong>.<br />
(See page 19.)<br />
TRIM 0SET (setting trim angle)<br />
Adjust the trim angle to zero. (See page 13.)<br />
DISPLAY (setting displays)<br />
When the optional cooling water pressure<br />
sensor is connected, change the display<br />
configuration number so that it can be displayed<br />
in the cooling water pressure display.<br />
When the oil pressure display function is not<br />
available on your model, change the display<br />
configuration number so that the oil pressure<br />
display is not included. (See page 13.)<br />
Speedo<strong>meter</strong> unit<br />
FUEL SENSOR (setting fuel sensor)<br />
Set the fuel sensor according to the fuel<br />
tank type. (See page 33.)<br />
DISPLAY (setting displays)<br />
When the optional Triducer-Multi sensor and<br />
GPS are connected, change the display<br />
configuration number to display the ambient<br />
water temperature, depth, and clock displays.<br />
(See page 30.)<br />
Fuel management <strong>meter</strong> unit<br />
TANK CAPA. (setting fuel tank capacity)<br />
Set the capacity of the connected fuel tank.<br />
(See page 44.)<br />
64<br />
Setting the initial settings<br />
DISPLAY (setting displays)<br />
Change the display configuration number as<br />
necessary so that the AVAL display can be<br />
displayed. (See page 42.)<br />
Speed & Fuel <strong>meter</strong> unit<br />
FUEL SENSOR (setting fuel sensor)<br />
Set the fuel sensor according to the fuel<br />
tank type. (See page 61.)<br />
DISPLAY (setting displays)<br />
When the optional Triducer-Multi sensor and<br />
GPS are connected, change the display<br />
configuration number to display the ambient<br />
water temperature, depth, and clock displays.<br />
(See page 57.)<br />
Setting up the<br />
<strong>meter</strong>s
YAMAHA MOTOR CO., LTD.<br />
Printed in Japan<br />
March 2005 – 1.5 × 1 CR Printed on recycled paper<br />
(E)