Making your first black and white print - the ILFORD PHOTO Website
Making your first black and white print - the ILFORD PHOTO Website
Making your first black and white print - the ILFORD PHOTO Website
- No tags were found...

You also want an ePaper? Increase the reach of your titles
YUMPU automatically turns print PDFs into web optimized ePapers that Google loves.
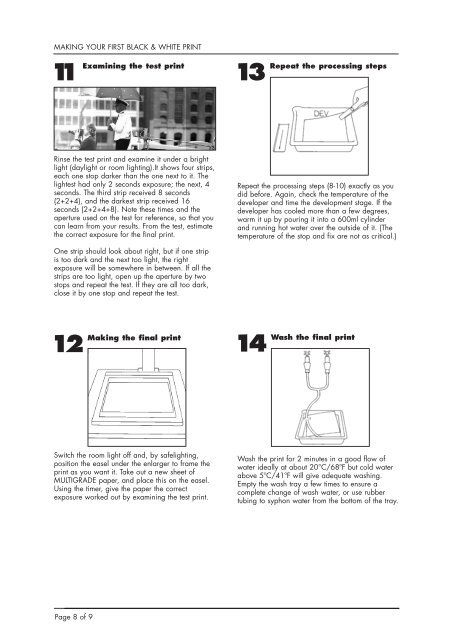
MAKING YOUR FIRST BLACK & WHITE PRINT11Examining <strong>the</strong> test <strong>print</strong>13Repeat <strong>the</strong> processing stepsRinse <strong>the</strong> test <strong>print</strong> <strong>and</strong> examine it under a brightlight (daylight or room lighting).It shows four strips,each one stop darker than <strong>the</strong> one next to it. Thelightest had only 2 seconds exposure; <strong>the</strong> next, 4seconds. The third strip received 8 seconds(2+2+4), <strong>and</strong> <strong>the</strong> darkest strip received 16seconds (2+2+4+8). Note <strong>the</strong>se times <strong>and</strong> <strong>the</strong>aperture used on <strong>the</strong> test for reference, so that youcan learn from <strong>your</strong> results. From <strong>the</strong> test, estimate<strong>the</strong> correct exposure for <strong>the</strong> final <strong>print</strong>.Repeat <strong>the</strong> processing steps (8-10) exactly as youdid before. Again, check <strong>the</strong> temperature of <strong>the</strong>developer <strong>and</strong> time <strong>the</strong> development stage. If <strong>the</strong>developer has cooled more than a few degrees,warm it up by pouring it into a 600ml cylinder<strong>and</strong> running hot water over <strong>the</strong> outside of it. (Thetemperature of <strong>the</strong> stop <strong>and</strong> fix are not as critical.)One strip should look about right, but if one stripis too dark <strong>and</strong> <strong>the</strong> next too light, <strong>the</strong> rightexposure will be somewhere in between. If all <strong>the</strong>strips are too light, open up <strong>the</strong> aperture by twostops <strong>and</strong> repeat <strong>the</strong> test. If <strong>the</strong>y are all too dark,close it by one stop <strong>and</strong> repeat <strong>the</strong> test.12<strong>Making</strong> <strong>the</strong> final <strong>print</strong>14Wash <strong>the</strong> final <strong>print</strong>Switch <strong>the</strong> room light off <strong>and</strong>, by safelighting,position <strong>the</strong> easel under <strong>the</strong> enlarger to frame <strong>the</strong><strong>print</strong> as you want it. Take out a new sheet ofMULTIGRADE paper, <strong>and</strong> place this on <strong>the</strong> easel.Using <strong>the</strong> timer, give <strong>the</strong> paper <strong>the</strong> correctexposure worked out by examining <strong>the</strong> test <strong>print</strong>.Wash <strong>the</strong> <strong>print</strong> for 2 minutes in a good flow ofwater ideally at about 20°C/68ºF but cold waterabove 5ºC/41ºF will give adequate washing.Empty <strong>the</strong> wash tray a few times to ensure acomplete change of wash water, or use rubbertubing to syphon water from <strong>the</strong> bottom of <strong>the</strong> tray.Page 8 of 9