Making your first black and white print - the ILFORD PHOTO Website
Making your first black and white print - the ILFORD PHOTO Website
Making your first black and white print - the ILFORD PHOTO Website
- No tags were found...

You also want an ePaper? Increase the reach of your titles
YUMPU automatically turns print PDFs into web optimized ePapers that Google loves.
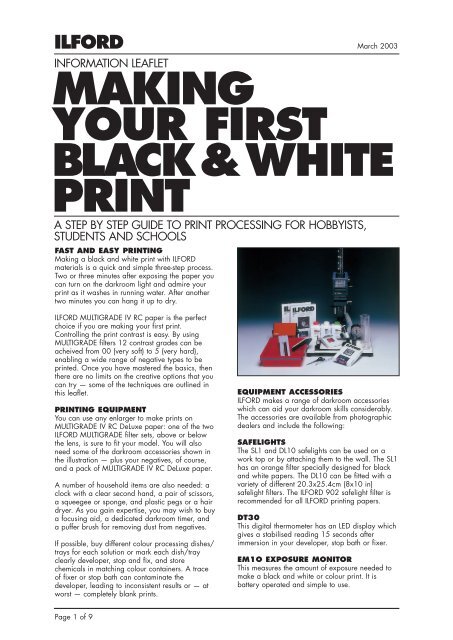
<strong>ILFORD</strong>INFORMATION LEAFLETMAKINGYOUR FIRSTBLACK&WHITEPRINTA STEP BY STEP GUIDE TO PRINT PROCESSING FOR HOBBYISTS,STUDENTS AND SCHOOLSFAST AND EASY PRINTING<strong>Making</strong> a <strong>black</strong> <strong>and</strong> <strong>white</strong> <strong>print</strong> with <strong>ILFORD</strong>materials is a quick <strong>and</strong> simple three-step process.Two or three minutes after exposing <strong>the</strong> paper youcan turn on <strong>the</strong> darkroom light <strong>and</strong> admire <strong>your</strong><strong>print</strong> as it washes in running water. After ano<strong>the</strong>rtwo minutes you can hang it up to dry.March 2003<strong>ILFORD</strong> MULTIGRADE IV RC paper is <strong>the</strong> perfectchoice if you are making <strong>your</strong> <strong>first</strong> <strong>print</strong>.Controlling <strong>the</strong> <strong>print</strong> contrast is easy. By usingMULTIGRADE filters 12 contrast grades can beacheived from 00 (very soft) to 5 (very hard),enabling a wide range of negative types to be<strong>print</strong>ed. Once you have mastered <strong>the</strong> basics, <strong>the</strong>n<strong>the</strong>re are no limits on <strong>the</strong> creative options that youcan try — some of <strong>the</strong> techniques are outlined inthis leaflet.PRINTING EQUIPMENTYou can use any enlarger to make <strong>print</strong>s onMULTIGRADE IV RC DeLuxe paper: one of <strong>the</strong> two<strong>ILFORD</strong> MULTIGRADE filter sets, above or below<strong>the</strong> lens, is sure to fit <strong>your</strong> model. You will alsoneed some of <strong>the</strong> darkroom accessories shown in<strong>the</strong> illustration — plus <strong>your</strong> negatives, of course,<strong>and</strong> a pack of MULTIGRADE IV RC DeLuxe paper.A number of household items are also needed: aclock with a clear second h<strong>and</strong>, a pair of scissors,a squeegee or sponge, <strong>and</strong> plastic pegs or a hairdryer. As you gain expertise, you may wish to buya focusing aid, a dedicated darkroom timer, <strong>and</strong>a puffer brush for removing dust from negatives.If possible, buy different colour processing dishes/trays for each solution or mark each dish/trayclearly developer, stop <strong>and</strong> fix, <strong>and</strong> storechemicals in matching colour containers. A traceof fixer or stop bath can contaminate <strong>the</strong>developer, leading to inconsistent results or — atworst — completely blank <strong>print</strong>s.EQUIPMENT ACCESSORIES<strong>ILFORD</strong> makes a range of darkroom accessorieswhich can aid <strong>your</strong> darkroom skills considerably.The accessories are available from photographicdealers <strong>and</strong> include <strong>the</strong> following:SAFELIGHTSThe SL1 <strong>and</strong> DL10 safelights can be used on awork top or by attaching <strong>the</strong>m to <strong>the</strong> wall. The SL1has an orange filter specially designed for <strong>black</strong><strong>and</strong> <strong>white</strong> papers. The DL10 can be fitted with avariety of different 20.3x25.4cm (8x10 in)safelight filters. The <strong>ILFORD</strong> 902 safelight filter isrecommended for all <strong>ILFORD</strong> <strong>print</strong>ing papers.DT30This digital <strong>the</strong>rmometer has an LED display whichgives a stabilised reading 15 seconds afterimmersion in <strong>your</strong> developer, stop bath or fixer.EM1O EXPOSURE MONITORThis measures <strong>the</strong> amount of exposure needed tomake a <strong>black</strong> <strong>and</strong> <strong>white</strong> or colour <strong>print</strong>. It isbattery operated <strong>and</strong> simple to use.Page 1 of 9
MAKING YOUR FIRST BLACK & WHITE PRINTUSING CHEMICALSNote Photographic chemicals are not hazardouswhen used correctly. It is recommended thatgloves, eye protection <strong>and</strong> an apron or overall areworn when h<strong>and</strong>ling <strong>and</strong> mixing all chemicals.Always follow <strong>the</strong> specific health <strong>and</strong> safetyrecommendations on <strong>the</strong> chemical packaging.Photochemical material safety data sheetscontaining full details for <strong>the</strong> safe h<strong>and</strong>ling,disposal <strong>and</strong> transportation of <strong>ILFORD</strong> chemicalsare available from <strong>ILFORD</strong> agents or directly from<strong>the</strong> <strong>ILFORD</strong> web site at www.ilford.com.Do not use utensils for food preparation to makeup <strong>and</strong> store photochemicals. Keep all foodstuffsaway from areas where photographic chemicalsare being prepared <strong>and</strong> used.Do not use soft drink bottles to store chemicals.Always label containers clearly, <strong>and</strong> store <strong>the</strong>msafely, out of reach of children.Do not allow children to use photochemicalsunsupervised.THE CHEMICALS YOU NEEDFor <strong>your</strong> <strong>first</strong> <strong>print</strong>, use <strong>the</strong> <strong>ILFORD</strong> chemicalsmentioned below. They are easy to mix <strong>and</strong> use,because <strong>the</strong>y are supplied in liquid form. All areavailable in small bottles, so <strong>the</strong>y are economicalif you make <strong>print</strong>s only occasionally.<strong>ILFORD</strong> MULTIGRADE developer makes <strong>the</strong> imageappear on <strong>the</strong> paper. You should mix up only asmuch developer as you need to fill <strong>the</strong> developingdish/tray about half full: pour <strong>the</strong> used solutiondown <strong>the</strong> drain after finishing <strong>your</strong> processingsession.<strong>ILFORD</strong> ILFOSTOP stop bath brings development toan end, <strong>and</strong> prolongs <strong>the</strong> life of <strong>the</strong> fixer.<strong>ILFORD</strong> RAPID FIXER makes <strong>the</strong> developed imagepermanent. <strong>ILFORD</strong> RAPID FIXER works quickly.You can make up <strong>and</strong> use ILFOSTOP <strong>and</strong><strong>ILFORD</strong> RAPID FIXER for more than one <strong>print</strong>ing<strong>and</strong> processing session.PROCESS SUMMARYFor MULTIGRADE IV RC DeLuxe paperStep Time TemperatureDevelopment<strong>ILFORD</strong> MULTIGRADE 1 minute 20°C/68ºFdeveloper diluted 1+9or<strong>ILFORD</strong>PQ UNIVERSAL 2 minutes 20°C/68ºFdeveloper diluted 1+9Stop bath<strong>ILFORD</strong> ILFOSTOP 10 seconds About 20°C/68ºFdiluted 1+19— preferably nowarmer than24°C/75ºF <strong>and</strong>no cooler than18°C/64ºFFix<strong>ILFORD</strong> RAPID FIXER 30 seconds as abovediluted 1+4Wash In running No coolerwater for than 5°C/41ºF2 minutesDry Variable Room temperatureor with a coolhair dryerCONTROLLING PRINT CONTRASTMultigrade filter setsTo work with <strong>ILFORD</strong> MULTIGRADE materials, youneed to be able to control <strong>the</strong> colour of <strong>the</strong> lightfrom <strong>the</strong> enlarger — usually by putting filters into<strong>the</strong> light path. White light produces a <strong>print</strong> ofnormal contrast, about grade 2; yellow (green)light reduces contrast, <strong>and</strong> magenta (blue) lightincreases it.MULTIGRADE filters are available in kits of 12filters, covering in half grades <strong>the</strong> equivalent ofpaper grades 00 to 5. If <strong>your</strong> enlarger has a filterdrawer, choose a set of unmounted square filters.There is also a below-<strong>the</strong>-lens kit of mounted filtersfor enlargers that do not have a filter drawer.We strongly recommend that you useMULTIGRADE filters to control <strong>the</strong> colour of <strong>the</strong>light — even if <strong>your</strong> enlarger is equipped with acolour head. MULTIGRADE filters are densitybalancedso that exposure times remain constantat contrast levels lower than grade 4. If you switchto filter 4 or a higher contrast filter, you need onlydouble <strong>the</strong> exposure. If you never<strong>the</strong>less wish touse a colour head, you will find filtrationrecommendations below.Page 2 of 9
MAKING YOUR FIRST BLACK & WHITE PRINTColour enlargersRefer to <strong>the</strong> chart below to set filtration if you use<strong>the</strong> colour head of <strong>your</strong> enlarger instead ofindividual MULTIGRADE filters. With a colour headyou will need to make a fresh exposure test eachtime you change contrast — or determineexposure compensation values by experiment.Most colour head enlargers will be provided witha chart with compensation values to indicate whatincrease in exposure time can be anticipatedwhen <strong>the</strong> contrast is changed.Durst Kodak MeoptaDunco Advena MeoptaDurstBeselerKaiserChromegaKienzleDe VereLeitzFujimotoLupoIFFJoboLPLOmegaPatersonSimmardVivitarMULTIGRADE Durst Durst Kodak Meoptafilter (max (max170M) 130M)00 150Y 120Y 199Y 150Y0 90Y 70Y 90Y 90Y1/ 2 70Y 50Y 70Y 70Y1 55Y 40Y 50Y 55Y1 1/ 2 30Y 25Y 30Y 30Y2 0 0 0 02 1/ 2 20M 10M 5M 20M3 45M 30M 25M 40M3 1/ 2 65M 50M 50M 65M4 100M 75M 80M 85M4 1/ 2 140M 120M 140M 200M5 170M* 130M 199M –*Some enlargers in this group have a maximum magentasetting higher or lower than 170M. For <strong>the</strong>se enlargers, set<strong>the</strong> highest possible magenta value as an approximateequivalent to filter 5.Divided filtrationWith a single sheet of MULTIGRADE paper youcan make a <strong>print</strong> of any contrast — but why stopat one contrast level? Some negatives have highcontrast overall, <strong>and</strong> low contrast in a small area.You can deal with this problem by making twoexposures using <strong>the</strong> same negative <strong>and</strong> paper; setdifferent levels of contrast for each exposure, <strong>and</strong>use <strong>your</strong> h<strong>and</strong> or a piece of card to shade <strong>first</strong>one part of <strong>the</strong> <strong>print</strong>, <strong>the</strong>n <strong>the</strong> o<strong>the</strong>r.Printing from colour negativesMULTIGRADE paper produces reasonable <strong>black</strong><strong>and</strong> <strong>white</strong> <strong>print</strong>s from colour negatives. Use aMULTIGRADE filter 3 or 4 to set an initial contrastlevel.Paper negativesUse a sheet of glass to press a washed <strong>and</strong> dried<strong>print</strong> face-to-face with a fresh sheet ofMULTIGRADE paper, <strong>the</strong>n expose <strong>the</strong> ’s<strong>and</strong>wich’to <strong>the</strong> light of <strong>the</strong> enlarger, using a MULTIGRADEfilter 5. This produces a paper negative which youcan again contact <strong>print</strong> in <strong>the</strong> same way toeliminate grey tones, making <strong>the</strong> <strong>print</strong> entirely<strong>black</strong> <strong>and</strong> <strong>white</strong>.ToningAll MULTIGRADE papers respond well to toning.This traditional process turns <strong>the</strong> <strong>black</strong>s of <strong>the</strong> <strong>print</strong>to a warm brown or some o<strong>the</strong>r colour.Particularlyrecommended are MG WARMTONE FB <strong>and</strong> MGWARMTONE RC Ask <strong>your</strong> local photo dealerabout toning kits.Going fur<strong>the</strong>r<strong>ILFORD</strong> MULTIGRADE IV RC DeLuxe paper is auniquely versatile material. Using <strong>the</strong> techniquessuggested below, you can exploit <strong>the</strong> paper‘squalities to <strong>print</strong> from difficult negatives, createnostalgic sepia <strong>print</strong>s when combined with toning,or eliminate grey tones for striking images. Thereis only room to outline <strong>the</strong>se creative techniqueshere.Page 3 of 9
MAKING YOUR FIRST BLACK & WHITE PRINT<strong>ILFORD</strong> PAPERS<strong>ILFORD</strong> manufactures a range of papers to suit<strong>your</strong> individual <strong>print</strong>ing needs. The processingprocedure outlined in this information sheet makesreference to <strong>ILFORD</strong> MULTIGRADE RC DeLuxe butthis is just one of eight <strong>black</strong> <strong>and</strong> <strong>white</strong> papersthat <strong>ILFORD</strong> produces for general photographicuse. More information about all <strong>ILFORD</strong> productsis available from our website atwww.ilford.com.MULTIGRADE PAPERS<strong>ILFORD</strong> MULTIGRADE papers are popular because<strong>the</strong>y make <strong>print</strong>ing extremely easy <strong>and</strong>economical. With one box of paper you get 12contrast steps from 00–5 — equivalent to 6 boxesof graded paper.MULTIGRADE IV RC DeLuxeMULTIGRADE IV RC papers set <strong>the</strong> st<strong>and</strong>ards bywhich o<strong>the</strong>r resin coated papers are judged.MULTIGRADE IV RC DeLuxe has a medium weightRC base <strong>and</strong> is available in glossy, pearl <strong>and</strong>satin surfaces. MULTIGRADE IV RC Portfolio has adouble weight RC base <strong>and</strong> is available in glossy<strong>and</strong> pearl surfaces. MULTIGRADE IV RC isextremely easy <strong>and</strong> quick to process <strong>and</strong> dry.GRADED PAPERS<strong>ILFORD</strong> manufactures graded paper for <strong>the</strong>specialist <strong>print</strong>er <strong>and</strong> for applications wherevariable contrast is not necessary.<strong>ILFORD</strong> ILFOSPEED RC DeLuxeThis graded RC paper is available in a range ofgrades 0–5, with glossy, semi-matt <strong>and</strong> pearlsurfaces. The resin coated base ensures thatprocessing, washing <strong>and</strong> drying are quick <strong>and</strong>easy.ILFOBROM GALERIE FBAvailable in a range of grades 1–4 with glossy<strong>and</strong> matt surfaces, ILFOBROM GALERIE FB is apaper of uncompromising quality. Processing thisfibre-based material is exacting, but in <strong>the</strong> h<strong>and</strong>sof an expert <strong>print</strong>er, ILFOBROM GALERIE FBbrings out every detail <strong>and</strong> tone of even <strong>the</strong> mostsubtle negatives.MULTIGRADE RC COOLTONEA general purpose mid-weight resin coated<strong>print</strong>ing paper for all those photographers <strong>and</strong><strong>print</strong>ers who desire a cool image tone. Its surfacecharacteristics, cool image tone <strong>and</strong> bright <strong>white</strong>base tint can produce images that appear sharp<strong>and</strong> crisp with more ‘punch’. It is available in bothglossy <strong>and</strong> pearl surfaces in a variety of popularcut sheet sizes.MULTIGRADE IV FB FIBERMULTIGRADE IV FB Fiber is coated onto atraditional double weight fibre base, givingunmounted <strong>print</strong>s a distinctive ’feel’ similar to thatof lightweight card. Some collectors <strong>and</strong> gallerycurators prefer fibre <strong>print</strong>s for <strong>the</strong>ir proven longterm stability, <strong>and</strong> in addition <strong>the</strong> <strong>print</strong> surface iseasier to retouch. MULTIGRADE IV FB Fiber isavailable in glossy <strong>and</strong> matt surfaces. However,<strong>print</strong>s on fibre-based papers need more carefulprocessing <strong>and</strong> washing than resin coated (RC)<strong>print</strong>s, <strong>and</strong> fibre-base (FB) <strong>print</strong>s do not dry flat asRC <strong>print</strong>s do.MULTIGRADE WARMTONEMULTIGRADE RC WARMTONE (on an RC base)<strong>and</strong> MULTIGRADE FB WARMTONE (on an FBbase) are specially designed to be receptive to alltoners, <strong>and</strong> can be toned to give subtle colourchanges or dramatic effects. MULTIGRADE RCWARMTONE is available in glossy <strong>and</strong> pearlsurfaces. MULTIGRADE FB warmtone is availablein glossy <strong>and</strong> semi-matt surfaces.Page 4 of 9
MAKING YOUR FIRST BLACK & WHITE PRINTHOW TO MAKE YOUR FIRST BLACKAND WHITE PRINTExcellent <strong>print</strong>s can be obtained from <strong>your</strong> <strong>black</strong><strong>and</strong> <strong>white</strong> negatives by commercial processinglaboratories, <strong>and</strong> most photofinishers <strong>and</strong>minilabs. So why make <strong>your</strong> own <strong>print</strong>s? Printmaking is a creative technique that is enjoyable<strong>and</strong> fulfilling. Producing <strong>your</strong> own <strong>print</strong>s allowsyou to choose <strong>the</strong> main area of interest for <strong>your</strong>self<strong>and</strong> enlarge it to almost any size <strong>and</strong> shapedesired. By ‘dodging’ <strong>and</strong> ‘burning’, that is, using<strong>your</strong> h<strong>and</strong>s or pieces of card to hold back lightfrom or give extra light to selected areas of <strong>your</strong><strong>print</strong> you can emphasise key elements of <strong>the</strong>picture. O<strong>the</strong>r simple techniques can be used togreat effect such as using different contrasts fordifferent areas of <strong>the</strong> <strong>print</strong> or using two or morenegatives to produce one <strong>print</strong>. Developing <strong>your</strong>skills as a <strong>print</strong>er will alllow you to makeoutst<strong>and</strong>ing individual <strong>print</strong>s that give you greatsatisfaction <strong>and</strong> pleasure.<strong>Making</strong> <strong>the</strong> most of <strong>your</strong> negatives is not difficult.You do not need a purpose-built darkroom, just aroom that can be <strong>black</strong>ed out. You do not evenneed running water, because <strong>the</strong> washing stage of<strong>print</strong>-making takes place in daylight. Whateverroom you choose for <strong>your</strong> <strong>print</strong> darkroomworkspace you must try to divide it into two areas.A dry area for <strong>the</strong> enlarger, <strong>print</strong> composition,negative h<strong>and</strong>ling, etc. <strong>and</strong> a wet area for mixingsolutions <strong>and</strong> <strong>print</strong> processing. You should try tocreate a physical divide between <strong>the</strong> two such ashaving wet <strong>and</strong> dry work benches set apart fromone ano<strong>the</strong>r or if <strong>the</strong> same bench must be usederect a splash barrier.1Setting up <strong>your</strong> darkroomKitchens, bathrooms, lofts, attic, cellars <strong>and</strong>basements <strong>and</strong> spare rooms have been used asei<strong>the</strong>r temporary or permanent darkrooms. Theroom you have chosen for <strong>your</strong> darkroom needs tobe completely <strong>black</strong>ed out to stop light fromentering. For windows use thick card cut to shape<strong>and</strong> held in place with <strong>black</strong> canvas tape. Fordoors use tape or <strong>black</strong> cloth or canvas to seal <strong>the</strong>edges. While absolute light-tightness is notrequired for <strong>black</strong> & <strong>white</strong> <strong>print</strong>ing <strong>and</strong>processing, <strong>the</strong>re should be no visible cracks.2Setting up <strong>your</strong> safelights<strong>and</strong> equipmentYou do need an enlarger, but it need not beexpensive: even <strong>the</strong> simplest is capable of makingfine <strong>print</strong>s on <strong>ILFORD</strong> MULTIGRADE paper.Set up <strong>your</strong> safelight (e.g. <strong>the</strong> <strong>ILFORD</strong> SL1safelight) at least 1.2m/4ft from <strong>the</strong> developingdish. Lay out three processing dishes,label <strong>the</strong>mDEV, STOP <strong>and</strong> FIX, two pairs of <strong>print</strong> tongs, <strong>and</strong>a clock for timing development. Then mix up <strong>the</strong>processing chemicals using water at about23°C/73ºF. The aim is to process at a workingtemperature of 20°C/68ºF +/– 1ºC/2ºF, so a fewdegrees are allowed for heat lost in mixing <strong>and</strong>cooling.Page 5 of 9
MAKING YOUR FIRST BLACK & WHITE PRINT3Mixing <strong>your</strong> chemicals5Focusing<strong>your</strong> imageMix up <strong>the</strong> developer solution 1+9 by measuringout 60ml of <strong>ILFORD</strong> MULTIGRADE developer in a150ml cylinder, <strong>and</strong> adding this to 540ml of waterin a 600ml cylinder. For <strong>the</strong> stop bath, add 30mlof <strong>ILFORD</strong> ILFOSTOP stop bath to 570ml of water(1+19). For fixing, add 120ml of <strong>ILFORD</strong> RAPIDFIXER to 480ml of water (1+4). (This gives enoughprocessing solutions to process about 4020.3x25.4cm/8x10in MULTIGRADE RC <strong>print</strong>s).With <strong>the</strong> lens at full aperture, turn on <strong>the</strong> enlarger.Place an easel loaded with a spare piece of paperon <strong>the</strong> baseboard. Move <strong>the</strong> enlarger head toframe <strong>and</strong> focus <strong>the</strong> image. You can use a special‘focus finder‘ placed in <strong>the</strong> centre of <strong>the</strong> image tofocus on <strong>the</strong> negative grain for <strong>the</strong> sharpestpossible image.The chemicals are now ready to place in <strong>the</strong>irrespective dishes.4Choosing<strong>your</strong> negative6Setting<strong>the</strong> aperture (f stop)Choose <strong>the</strong> negative for <strong>print</strong>ing, <strong>and</strong> make sure itis clean. Remove any dust with a puffer brush.Hold <strong>the</strong> negatives so you can read <strong>the</strong> edgenumbers, <strong>the</strong>n turn <strong>the</strong> negatives round (not over)so <strong>the</strong> numbers are fur<strong>the</strong>st away from you. Place<strong>the</strong> negatives in <strong>the</strong> negative carrier of <strong>the</strong>enlarger. Slide <strong>the</strong> negative carrier into place.Switch on <strong>the</strong> safelight <strong>and</strong> switch off <strong>the</strong>roomlights.You can check <strong>the</strong> negatives are <strong>the</strong> right wayround by seeing if <strong>the</strong> edge numbers are projectedonto <strong>the</strong> baseboard <strong>the</strong> right way round.Turn <strong>the</strong> lens‘ aperture ring from full aperture to f8to increase edge sharpness <strong>and</strong> give more evenillumination. Count <strong>the</strong> number of clicks involved,so you can do it without looking at <strong>the</strong> lens. Theactual aperture used can vary, but should give anexposure time of about 10 seconds. Shorter timesare hard to time accurately; longer ones aretedious. Slide a MULTIGRADE filter 2 into <strong>the</strong> filterdrawer of <strong>your</strong> enlarger, or into <strong>the</strong> holder below<strong>the</strong> lens. This filter produces a good range of <strong>print</strong>tones with an average negative. If you have acolour enlarger, you may prefer to use <strong>the</strong> colourhead to dial in filtration equivalent to aMULTIGRADE filter 2.Page 6 of 9
MAKING YOUR FIRST BLACK & WHITE PRINT7Exposing a test <strong>print</strong>9 StopbathWith <strong>the</strong> safelight on, <strong>and</strong> <strong>the</strong> room lights off, puta sheet of MULTIGRADE paper into <strong>the</strong> easel,shiny side up. (Reseal <strong>the</strong> packet carefully.) Youare now ready to make a test <strong>print</strong>. Switch on <strong>the</strong>enlarger lamp <strong>and</strong> expose <strong>the</strong> whole sheet for twoseconds. Cover one-quarter of <strong>the</strong> sheet withopaque card, <strong>and</strong> expose <strong>the</strong> rest for ano<strong>the</strong>r 2seconds. Cover half of it, <strong>and</strong> expose <strong>the</strong> rest forano<strong>the</strong>r 4 seconds. Cover three-quarters, <strong>and</strong>expose <strong>the</strong> last part for ano<strong>the</strong>r 8 seconds.As one minute shows on <strong>the</strong> timer, quickly <strong>and</strong>smoothly slide <strong>the</strong> developed paper into <strong>the</strong> stopbath. take care not to contaminate <strong>the</strong> developertongs with <strong>the</strong> stop bath. Rock <strong>the</strong> dish for about30 seconds. Use <strong>the</strong> second pair of tongs (from<strong>the</strong> fixer) to lift <strong>the</strong> <strong>print</strong> while solution drains fromit, <strong>and</strong> transfer it to <strong>the</strong> dish of <strong>ILFORD</strong> RAPIDFIXER solution. (The timing of this step is notcritical.)8Developinga <strong>print</strong>10Fixing a <strong>print</strong>Check <strong>the</strong> <strong>the</strong>rmometer in <strong>the</strong> dish of developer(20°C/68ºF) <strong>and</strong> set <strong>the</strong> timer to zero. Slide <strong>the</strong>paper quickly <strong>and</strong> smoothly into <strong>the</strong> developer,making sure <strong>the</strong>re are no air bubbles on <strong>the</strong> shinysurface. Start <strong>the</strong> timer. Rock <strong>the</strong> developer dishcontinuously backward <strong>and</strong> forward to send <strong>the</strong>solution gently over <strong>the</strong> <strong>print</strong>. After 50 seconds,use tongs to lift <strong>the</strong> paper out, <strong>and</strong> drain off <strong>the</strong>developer.Slide <strong>the</strong> paper into <strong>the</strong> dish of fixer, <strong>and</strong> rock <strong>the</strong>dish to get a good flow of chemicals over <strong>the</strong>surface of <strong>the</strong> <strong>print</strong>. Fixing takes only 30 secondsin fresh solution. It does not matter if this time isexceeded slightly, but <strong>print</strong>s should not be left in<strong>the</strong> fixer for minutes on end. If not washing a <strong>print</strong>straight away, store it in a dish of clean water.Page 7 of 9
MAKING YOUR FIRST BLACK & WHITE PRINT11Examining <strong>the</strong> test <strong>print</strong>13Repeat <strong>the</strong> processing stepsRinse <strong>the</strong> test <strong>print</strong> <strong>and</strong> examine it under a brightlight (daylight or room lighting).It shows four strips,each one stop darker than <strong>the</strong> one next to it. Thelightest had only 2 seconds exposure; <strong>the</strong> next, 4seconds. The third strip received 8 seconds(2+2+4), <strong>and</strong> <strong>the</strong> darkest strip received 16seconds (2+2+4+8). Note <strong>the</strong>se times <strong>and</strong> <strong>the</strong>aperture used on <strong>the</strong> test for reference, so that youcan learn from <strong>your</strong> results. From <strong>the</strong> test, estimate<strong>the</strong> correct exposure for <strong>the</strong> final <strong>print</strong>.Repeat <strong>the</strong> processing steps (8-10) exactly as youdid before. Again, check <strong>the</strong> temperature of <strong>the</strong>developer <strong>and</strong> time <strong>the</strong> development stage. If <strong>the</strong>developer has cooled more than a few degrees,warm it up by pouring it into a 600ml cylinder<strong>and</strong> running hot water over <strong>the</strong> outside of it. (Thetemperature of <strong>the</strong> stop <strong>and</strong> fix are not as critical.)One strip should look about right, but if one stripis too dark <strong>and</strong> <strong>the</strong> next too light, <strong>the</strong> rightexposure will be somewhere in between. If all <strong>the</strong>strips are too light, open up <strong>the</strong> aperture by twostops <strong>and</strong> repeat <strong>the</strong> test. If <strong>the</strong>y are all too dark,close it by one stop <strong>and</strong> repeat <strong>the</strong> test.12<strong>Making</strong> <strong>the</strong> final <strong>print</strong>14Wash <strong>the</strong> final <strong>print</strong>Switch <strong>the</strong> room light off <strong>and</strong>, by safelighting,position <strong>the</strong> easel under <strong>the</strong> enlarger to frame <strong>the</strong><strong>print</strong> as you want it. Take out a new sheet ofMULTIGRADE paper, <strong>and</strong> place this on <strong>the</strong> easel.Using <strong>the</strong> timer, give <strong>the</strong> paper <strong>the</strong> correctexposure worked out by examining <strong>the</strong> test <strong>print</strong>.Wash <strong>the</strong> <strong>print</strong> for 2 minutes in a good flow ofwater ideally at about 20°C/68ºF but cold waterabove 5ºC/41ºF will give adequate washing.Empty <strong>the</strong> wash tray a few times to ensure acomplete change of wash water, or use rubbertubing to syphon water from <strong>the</strong> bottom of <strong>the</strong> tray.Page 8 of 9
MAKING YOUR FIRST BLACK & WHITE PRINT15 Drying17After <strong>the</strong> wash, drain <strong>the</strong> <strong>print</strong> <strong>and</strong> use a squeegeeor sponge to remove any excess water. Attach awooden or plastic clip to one corner, <strong>and</strong> hang <strong>the</strong><strong>print</strong> over a drip tray to dry. Drying can bespeeded up by using a hairdryer on a low setting,kept moving <strong>and</strong> about 30cm/1ft away from <strong>the</strong><strong>print</strong>. MULTIGRADE <strong>print</strong>s dry naturally in a warmroom in under 30 minutes.Even a correctly exposed <strong>and</strong> processed <strong>print</strong> maynot have a full range of tones if <strong>the</strong> negative hadtoo much or too little contrast. If <strong>your</strong> <strong>print</strong> lookstoo grey, <strong>and</strong> lacks ei<strong>the</strong>r solid <strong>black</strong> shadows orclean <strong>white</strong> highlights (or both) use aMULTIGRADE filter 3 or higher at step six. Use aMULTIGRADE filter 1 if <strong>the</strong>re is too much contrast,<strong>and</strong> <strong>your</strong> <strong>print</strong> is dominated by extreme <strong>black</strong> <strong>and</strong><strong>white</strong> tones, with too few shades of grey inbetween.16Examining <strong>the</strong> final <strong>print</strong>All solution volumes in this step by step guide aremetric measurements. If you use US liquidmeasurements please use <strong>the</strong> table of conversionfactors below.1 litre = 33.8 US fluid oz3.8 litres = 1 US gallon29.6 ml = 1 US fluid oz.A wide range of fact sheets is available which describe <strong>and</strong>give guidance on using <strong>ILFORD</strong> products. Some products inthis fact sheet might not be available in <strong>your</strong> country.Examine <strong>the</strong> final <strong>print</strong> by bright lighting. Thepicture should contain a full range of tones fromsmall areas of pure <strong>white</strong>(as <strong>white</strong> as <strong>the</strong> paper edges) to small areas ofintense <strong>black</strong>, with all <strong>the</strong> greys in between. If itdoes not, check that you followed <strong>the</strong> instructionsaccurately — particularly step 8. Although <strong>the</strong>image appears within seconds, <strong>the</strong> <strong>print</strong> needs afull 50 seconds to mature. Don‘t be tempted toremove it too soon!<strong>ILFORD</strong> Imaging UK Limited, Town Lane, MobberleyKnutsford, Cheshire WA16 7JL, Engl<strong>and</strong>www.ilford.comPage 9 of 996045.GB.www March 2003