Preparing a Raster Engraving Job in Engravelab 7.1 - CADlink
Preparing a Raster Engraving Job in Engravelab 7.1 - CADlink
Preparing a Raster Engraving Job in Engravelab 7.1 - CADlink

Create successful ePaper yourself
Turn your PDF publications into a flip-book with our unique Google optimized e-Paper software.
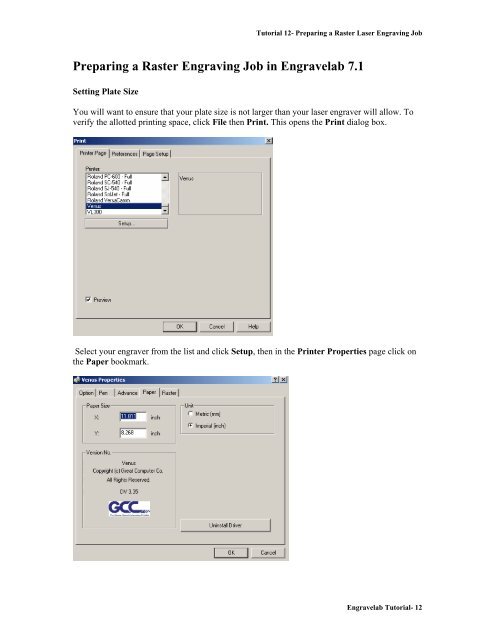
Tutorial 12- <strong>Prepar<strong>in</strong>g</strong> a <strong>Raster</strong> Laser <strong>Engrav<strong>in</strong>g</strong> <strong>Job</strong><strong>Prepar<strong>in</strong>g</strong> a <strong>Raster</strong> <strong>Engrav<strong>in</strong>g</strong> <strong>Job</strong> <strong>in</strong> <strong>Engravelab</strong> <strong>7.1</strong>Sett<strong>in</strong>g Plate SizeYou will want to ensure that your plate size is not larger than your laser engraver will allow. Toverify the allotted pr<strong>in</strong>t<strong>in</strong>g space, click File then Pr<strong>in</strong>t. This opens the Pr<strong>in</strong>t dialog box.Select your engraver from the list and click Setup, then <strong>in</strong> the Pr<strong>in</strong>ter Properties page click onthe Paper bookmark.<strong>Engravelab</strong> Tutorial- 12
Tutorial 12- <strong>Prepar<strong>in</strong>g</strong> a <strong>Raster</strong> Laser <strong>Engrav<strong>in</strong>g</strong> <strong>Job</strong>In this example we will want to keep our plate size smaller than 11.811<strong>in</strong>ches by 8.268<strong>in</strong>ches. Toadjust your plate sett<strong>in</strong>gs, click on Layout and select Plate Size.This opens the Plate Size dialog box.Remember, <strong>in</strong> this example, our engraver will only allow an area of 11.811<strong>in</strong>ches by 8.268<strong>in</strong>ches,we don’t want to exceed this. Before cont<strong>in</strong>u<strong>in</strong>g we also want to make sure that Show Fill, ShowReduced Bitmap and Show Tool Path are enabled <strong>in</strong> the View menu.Sett<strong>in</strong>g Up the Color Palette<strong>Engravelab</strong> Tutorial- 12
Tutorial 12- <strong>Prepar<strong>in</strong>g</strong> a <strong>Raster</strong> Laser <strong>Engrav<strong>in</strong>g</strong> <strong>Job</strong>Before we beg<strong>in</strong>, you will need to have <strong>Engravelab</strong> open with no items on the screen. We arego<strong>in</strong>g to <strong>in</strong>stall a color palette, specific for our engraver. At the bottom left of your screen youwill want to select the Context Menu button.This opens a fly out menu, from which, you want to select Load then NewSelect<strong>in</strong>g New br<strong>in</strong>gs up the Open Color Palette. From this, you will want to select Palettes.Follow<strong>in</strong>g this you will want to select Engrave.<strong>Engravelab</strong> Tutorial- 12
Tutorial 12- <strong>Prepar<strong>in</strong>g</strong> a <strong>Raster</strong> Laser <strong>Engrav<strong>in</strong>g</strong> <strong>Job</strong>F<strong>in</strong>ally double click on the file that is most compatible with your engraver. In this example wewill use GCCLaserEngraver.pal.Follow<strong>in</strong>g this, you will want to ensure that these colors are still present when you load thetutorial file. To ensure this, go back to the Context Menu at the bottom left of the screen. Thistime <strong>in</strong>stead of choos<strong>in</strong>g Load, you will want to select Save and the Save default on exit.Congrats, you have successfully loaded a new color palette. Please close <strong>Engravelab</strong> and reopento allow the changes to affect. You are now ready to open our tutorial file. For the follow<strong>in</strong>gexample we are us<strong>in</strong>g a plaque with a size of 7’x5’. Once you have opened the file, you will wantto make sure that the plate size is equal to the size of the material you are engrav<strong>in</strong>g. To load thefile Cortech.cdl go to File, then Open. The location of the file is <strong>in</strong> the <strong>Engravelab</strong> folder underTutorials.<strong>Engravelab</strong> Tutorial- 12
Tutorial 12- <strong>Prepar<strong>in</strong>g</strong> a <strong>Raster</strong> Laser <strong>Engrav<strong>in</strong>g</strong> <strong>Job</strong>Your screen should look like thisI would like to mention aga<strong>in</strong> to ensure that your plate size matches you engrav<strong>in</strong>gmaterial (ours is 7 <strong>in</strong>ches x 5 <strong>in</strong>ches)Pr<strong>in</strong>t<strong>in</strong>g- <strong>Raster</strong> <strong>Engrav<strong>in</strong>g</strong>Now that you have set up your file, you will learn how to pr<strong>in</strong>t the file. From the Filedrop down menu, you will want to select Pr<strong>in</strong>t.<strong>Engravelab</strong> Tutorial- 12
Tutorial 12- <strong>Prepar<strong>in</strong>g</strong> a <strong>Raster</strong> Laser <strong>Engrav<strong>in</strong>g</strong> <strong>Job</strong>This will open up the Pr<strong>in</strong>t dialog box.I would recommend that you select the pr<strong>in</strong>t Preview button. Before you adjust thepr<strong>in</strong>ter setup, it is important to adjust the pr<strong>in</strong>t preferences. To do this select the middlebookmark labelled Preferences which will br<strong>in</strong>g up the follow<strong>in</strong>g dialog box<strong>Engravelab</strong> Tutorial- 12
Tutorial 12- <strong>Prepar<strong>in</strong>g</strong> a <strong>Raster</strong> Laser <strong>Engrav<strong>in</strong>g</strong> <strong>Job</strong>It is very important that the Pr<strong>in</strong>t As Shown On Screen box has a checkmark <strong>in</strong> it. Also,it is important that Plate Area is also selected as this will affect the position of thegraphics on the pr<strong>in</strong>t page. Click the Pr<strong>in</strong>ter Page bookmark to return to the Pr<strong>in</strong>t dialogbox.You will then want to select the appropriate pr<strong>in</strong>ter and choose the Setup functiondirectly below the list.<strong>Engravelab</strong> Tutorial- 12
Tutorial 12- <strong>Prepar<strong>in</strong>g</strong> a <strong>Raster</strong> Laser <strong>Engrav<strong>in</strong>g</strong> <strong>Job</strong>This will open up the Pr<strong>in</strong>ter Properties dialog box shown above. For this example youwill want to make sure that the Mode Sett<strong>in</strong>g is Black and White. Follow<strong>in</strong>g this youwill want to select the Pen option, which br<strong>in</strong>gs up the box shown belowYou will notice that there is a list of many colors. In this example we are only us<strong>in</strong>gblack. The default sett<strong>in</strong>gs are 50% for both speed and power. To adjust both sett<strong>in</strong>gssimply select the sliders at the bottom left and adjust as required. This process can berepeated for any number of colors be<strong>in</strong>g used. Make sure the <strong>Raster</strong> box is checked.Click OK, which will return you to the Pr<strong>in</strong>t dialog box. Click OK, which will take youto the Pr<strong>in</strong>t Preview screen.<strong>Engravelab</strong> Tutorial- 12
Tutorial 12- <strong>Prepar<strong>in</strong>g</strong> a <strong>Raster</strong> Laser <strong>Engrav<strong>in</strong>g</strong> <strong>Job</strong>This shows what will be pr<strong>in</strong>ted and where it will be located. F<strong>in</strong>ally click Pr<strong>in</strong>t. Thisconcludes the pr<strong>in</strong>t<strong>in</strong>g setup. You’re now ready to <strong>Raster</strong> Engrave.<strong>Raster</strong> <strong>Engrav<strong>in</strong>g</strong>- AdvancedIn this section we will adjust colors to allow for different power and speed sett<strong>in</strong>gs foreach color on screen. Change the color of the text, hold down CRTL on your keyboardand left click with your mouse on the writ<strong>in</strong>g (see screen shot).<strong>Engravelab</strong> Tutorial- 12
Tutorial 12- <strong>Prepar<strong>in</strong>g</strong> a <strong>Raster</strong> Laser <strong>Engrav<strong>in</strong>g</strong> <strong>Job</strong>Once the writ<strong>in</strong>g has been selected you will want to click on the color red on the colorPalette at the bottom of your screen. Now that we have changed the color of the writ<strong>in</strong>gon-screen to red, we can adjust the pen sett<strong>in</strong>gs for the red color.Notice that the color of the writ<strong>in</strong>g has been changed from black to red. This will meanthat the setup is somewhat different. You still want to select Pr<strong>in</strong>t from the File menu.<strong>Engravelab</strong> Tutorial- 12
Tutorial 12- <strong>Prepar<strong>in</strong>g</strong> a <strong>Raster</strong> Laser <strong>Engrav<strong>in</strong>g</strong> <strong>Job</strong>The pr<strong>in</strong>t preferences rema<strong>in</strong> the same, but the pr<strong>in</strong>ter properties must be adjusted toreflect the changes made. Under the Options tab of the Pr<strong>in</strong>ter Properties you want tomake sure that the Manual Color Fill option is selected.You will then want to select the Pen tab. Because the black color still rema<strong>in</strong>s, we willleave the sett<strong>in</strong>gs the same as before. Now that we have added another color we canadjust the pen sett<strong>in</strong>gs for the red color as well. Notice that the default sett<strong>in</strong>g for powerand speed is 50%. In this example we will set both speed and power to 100%.<strong>Engravelab</strong> Tutorial- 12
Tutorial 12- <strong>Prepar<strong>in</strong>g</strong> a <strong>Raster</strong> Laser <strong>Engrav<strong>in</strong>g</strong> <strong>Job</strong>Once you have adjusted the colors click OK. This will return you to the Pr<strong>in</strong>t dialog box.Click OK and you will be taken to the pr<strong>in</strong>t preview screen.Click Pr<strong>in</strong>t. Notice that the black graphics laser at a power of 40% and a speed of 100%and that the red text lasers at a power sett<strong>in</strong>g of 100% and a speed sett<strong>in</strong>g of 100%? Youhave now completed this Tutorial. Congratulations.<strong>Engravelab</strong> Tutorial- 12