Richard Rosenman â Diffuse Glow - CADlink
Richard Rosenman â Diffuse Glow - CADlink
Richard Rosenman â Diffuse Glow - CADlink

You also want an ePaper? Increase the reach of your titles
YUMPU automatically turns print PDFs into web optimized ePapers that Google loves.
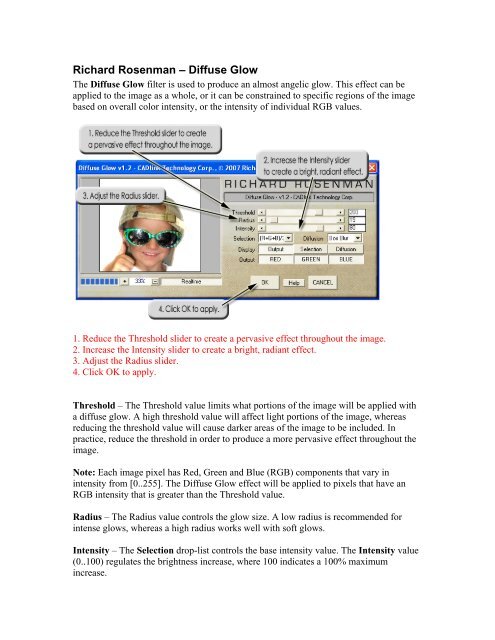
<strong>Richard</strong> <strong>Rosenman</strong> – <strong>Diffuse</strong> <strong>Glow</strong>The <strong>Diffuse</strong> <strong>Glow</strong> filter is used to produce an almost angelic glow. This effect can beapplied to the image as a whole, or it can be constrained to specific regions of the imagebased on overall color intensity, or the intensity of individual RGB values.1. Reduce the Threshold slider to create a pervasive effect throughout the image.2. Increase the Intensity slider to create a bright, radiant effect.3. Adjust the Radius slider.4. Click OK to apply.Threshold – The Threshold value limits what portions of the image will be applied witha diffuse glow. A high threshold value will affect light portions of the image, whereasreducing the threshold value will cause darker areas of the image to be included. Inpractice, reduce the threshold in order to produce a more pervasive effect throughout theimage.Note: Each image pixel has Red, Green and Blue (RGB) components that vary inintensity from [0..255]. The <strong>Diffuse</strong> <strong>Glow</strong> effect will be applied to pixels that have anRGB intensity that is greater than the Threshold value.Radius – The Radius value controls the glow size. A low radius is recommended forintense glows, whereas a high radius works well with soft glows.Intensity – The Selection drop-list controls the base intensity value. The Intensity value(0..100) regulates the brightness increase, where 100 indicates a 100% maximumincrease.
Selection – The Selection drop-list controls how the base intensity value will becalculated. Either the effect can be based upon the RGB pixel values within the image, ora grayscale equivalent of the image can be used:□ (R+G+B)/3 : This is the default algorithm, where an average of the RGB pixelvalues are used.□ Red, Green or Blue : The base intensity is derived from the selected colorchannel (i.e., choosing Red will cause the greatest intensity to occur where redcolor values are predominant).□ XYZITU, XYZ709, XYZ601-1 : These are grayscale conversions, where theselected grayscale conversion is used to calculate the base intensity.□ (R+G)/2 : Take average of the Red and Green color values.□ (G+B)/2 : Take average of the Green and Blue color values.□ (B+R)/2 : Take average of the Blue and Red color values.Diffusion – Choose the type of blur effect that will be used to create the glow effect.□ Box Blue : This is a faster blur, though it can appear pixelated at higherintensity values.□ Gaussian Blue : This is a slower blur, though it produces cleaner results,particularly at higher intensity values.Display – These three buttons (Output/Selection/Diffusion) control the dialog preview.□ Output : Preview the result of applying the diffuse glow effect.□ Selection : Show the pixels with color values that exceed the Thresholdvalue.□ Diffusion : Show how the blur effect will be distributed across the image.Output – These three buttons (RED/GREEN/BLUE) are each toggle buttons (ON/OFF)that control whether pixels of the given RGB color values will be affected by the diffuseglow effect. By default, all three of these buttons are ON, such that all RGB values willbe affected. However, turning these buttons OFF can be useful for creating off-colorglows.Real-time – This button is a toggle (ON/OFF). When clicked, all adjustments will bepreviewed in real-time as you drag a slider. Otherwise, adjustments will not be previeweduntil you are finished dragging a slider.(www.richardrosenman.com)
Lens FXThe Lens FX filter is used to produce an assortment of distortion effects, as would bepossible using a camera lens.This dialog has two drop-lists. The first drop-list is used to choose the effect, and thesecond drop-list is used to specify the sampling method that will be used in calculatingthe effect.Available Effects:□ Pinch – Compress image pixels towards the center.□ Push – Expand image pixels outwards from the center.□ Pinch/Push Sine – Like Pinch/Push, except the effect is concentrated withinthe center of the image.□ Pinch/Push-Zoom – Like Pinch/Push, except that less distortion occurs alongthe edges of the image.□ Concave – An inwardly rounded effect, like the inside of a bowl.□ Convex – An outwardly rounded effect, like mapping onto a sphere.□ Wave/Ripple – Create a wave/ripple effect, like a pebble dropped in a stillpond.Sampling Method:The sampling method is the mathematical formula that determines pixel color valuebased on its surrounding pixel colors. The Nearest Neighbor produces the fastest results,whereas the default of Bicubic produces the highest quality. Summaries of thesesampling methods are as follows:
□ Nearest Neighbor – Select the value of the nearest pixel, and disregardthe values of further adjacent pixels.□ Bisquare – Also known as biweight, is another method of evaluatingadjacent pixels.□ Bilinear – A method that evaluates an average of the 4 nearest pixels.□ Bicubic – A method that evaluates an average of the 16 nearest pixels.Real-time – This button is a toggle (ON/OFF). When clicked, all adjustments will bepreviewed in real-time as you drag a slider. Otherwise, adjustments will not be previeweduntil you are finished dragging a slider.PinchThe Pinch filter is a more advanced version of the Lens FX >> Pinch filter that providesgreater control over the vertical and horizontal distortion. When the edges of the imageare affected by the distortion, you can choose the color that will fill the edges.Horz, Vert – These sliders control the amount of pinch distortion introduced in both thehorizontal and vertical axes, respectively.Color out-of-range – This is a toggle button (ON/OFF), and there is a color picker to theright of this button. This button controls the fill color when edges of the image areaffected by the distortion. When the button is ON, the indicated color will be used to fillthe edges of the image. When the button is OFF, the existing pixels along the edges of theimage will be used.Lock Vert to Horz – This is a toggle button (ON/OFF). When ON, only the horizontalslider can be adjusted, and the vertical slider will be set equal to the horizontal slider (i.e.,proportional distortion).
Fit – This is a toggle button (ON/OFF). When ON, the image is scaled to compensate forpinch distorted size differences (i.e., try to maintain a consistent size for the subjectmatter).Real-time – This button is a toggle (ON/OFF). When clicked, all adjustments will bepreviewed in real-time as you drag a slider. Otherwise, adjustments will not be previeweduntil you are finished dragging a slider.Output – It is possible to apply the pinch effect according to the RGB color values of theindividual image pixels. These three buttons (RED/GREEN/BLUE) are each togglebuttons (ON/OFF) that control how pixels are affected by the pinch effect. Turning thesebuttons OFF can be useful for creating off-color halos.Sampling Method - The sampling method is the mathematical formula that determinespixel color value based on its surrounding pixel colors. The Nearest Neighbor producesthe fastest results, whereas the default of Bicubic produces the highest quality.Summaries of these sampling methods are as follows:□ Nearest Neighbor – Select the value of the nearest pixel, and disregardthe values of further adjacent pixels.□ Bisquare – Also known as biweight, is another method of evaluatingadjacent pixels.□ Bilinear – A method that evaluates an average of the 4 nearest pixels.□ Bicubic – A method that evaluates an average of the 16 nearest pixels.
ScanlinesThe Scan Lines filter is used to create horizontal raster lines that suggest an image that isbeing viewed on either a security camera, or a low-resolution television monitor.□ Spacing – The distance between scan lines (in pixels).□ Thickness – The thickness of each scan line (in pixels).□ Luma – The default scan line color is black. The Luma adjusts the luminosityof the scan lines to create shades of gray. Positive Luma values will createwhite scan lines. Note that the color picker can be used to choose a color otherthan black (see box: Set a Custom Scan Line Color).Set a Custom Scan Line Color1. By default, all three RGB buttons are ON (depressed).2. To the right of the RGB buttons, use the color picker to set the scan line color.3. The Luma slider can be used to adjust the luminosity of the chosen color.□ Shift – Reposition the scan lines.□ Noise and Noise Type – Introduce “dirt” into the scan lines. The Noise slideradjusts the amount of noise, and there are five types of noise that can beapplied:Lines: Causes one or more lines to appear faded.Segments: Causes segments of some lines to appear faded.Pixels: Causes pixels within the lines to appear faded.Edges: Fades scan lines along the edges of the image.Center: Fades scan lines near center of the image.
□ Orientation – Toggle the scan line direction between horizontal and vertical.□ Real-time – This button is a toggle (ON/OFF). When clicked, all adjustmentswill be previewed in real-time as you drag a slider. Otherwise, adjustmentswill not be previewed until you are finished dragging a slider.