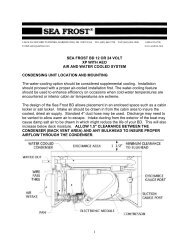
TWXP (before 6/01/09) - Sea Frost Refrigeration
TWXP (before 6/01/09) - Sea Frost Refrigeration
TWXP (before 6/01/09) - Sea Frost Refrigeration

You also want an ePaper? Increase the reach of your titles
YUMPU automatically turns print PDFs into web optimized ePapers that Google loves.
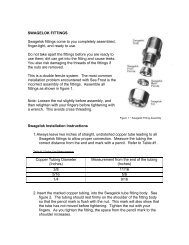
NOTES ON SWAGELOK FITTINGSSwagelok fittings come to you completely assembled, finger-tight. (Pieces a, b, and c inDrawing #1 are already together). They are ready for immediate use.Disassembly <strong>before</strong> use can result in dirt and foreign material getting into the fitting andcausing leaks and you risk damaging the threads if nuts are removed. If disassembly isnecessary, reassemble per drawing.This is a double ferrule system. The most serious installation problem encountered withSEA FROST is the improper assembly of these fittings. Be sure that you assemble allfittings as in Drawing #1.To ease assembly slacken the fitting nut slightly <strong>before</strong> assembly. Then retighten withfingers <strong>before</strong> tightening with a wrench. (This is to avoid cross threading.)Step 1. Always leave two inches of straight, undistorted tubing leading to all Swagelokfittings to allow proper connection.Step 2. Prior to inserting 1/2" tubing into the Swagelok tube fitting, make a pencil mark1" from end of tube. Prior to inserting 3/8" tubing, make a pencil mark 3/4" from the endof the tube. With 1/4" tubing make a mark 5/8" from the end.Step 3. Insert clean, smooth tubing with the pencil mark into the Swagelok tube fitting.You can be sure the tube is resting firmly on the shoulder of the fitting when the pencilmark is flush with the nut. This mark will also indicate that the tube has not moved<strong>before</strong> tightening. (As the fitting is tightened the space from the pencil mark to theshoulder will increase.)Step 4. Tighten the Swagelok nut to a wrench snug* position. Scribe the nut with apencil at the 6:00 o'clock position (see drawing #1, step # 2).* Wrench snug is the first point in the assembly tightening when the tube cannot bepulled from the fitting, (i.e. when the ferrules tighten enough to contact the tubing).Step 5. Now, while holding the fitting body with a back-up wrench, tighten the nut oneand-one-quarterturns ( 1-1/4). To do so, watch the scribe mark, make one completerevolution, and continue to the 9:00 o'clock position. (See drawing #1, step #3).4