MSV Manual Operation.fm - MB Companies, Inc.
MSV Manual Operation.fm - MB Companies, Inc.
MSV Manual Operation.fm - MB Companies, Inc.

Create successful ePaper yourself
Turn your PDF publications into a flip-book with our unique Google optimized e-Paper software.
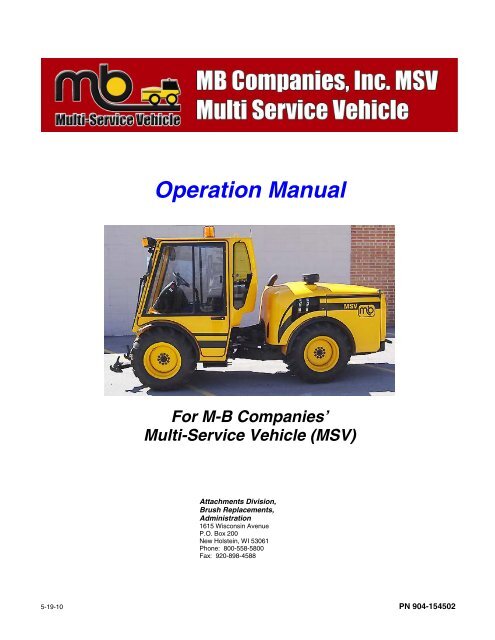
<strong>Operation</strong> <strong>Manual</strong>For M-B <strong>Companies</strong>’Multi-Service Vehicle (<strong>MSV</strong>)Attachments Division,Brush Replacements,Administration1615 Wisconsin AvenueP.O. Box 200New Holstein, WI 53061Phone: 800-558-5800Fax: 920-898-45885-19-10 PN 904-154502
5-19-10 PN 904-154502
Table of ContentsPAGESafety . . . . . . . . . . . . . . . . . . . . . . . . . . . . . . . . . . . . . . . . . .1.3Hazard Definitions. . . . . . . . . . . . . . . . . . . . . . . . . . . . . . . . . . 1.3Identification of Safety Labels . . . . . . . . . . . . . . . . . . . . . . . . . 1.4.General Safety . . . . . . . . . . . . . . . . . . . . . . . . . . . . . . . . . . . . 1.5Pre-Start-up Safety . . . . . . . . . . . . . . . . . . . . . . . . . . . . . . . . . 1.5Pressurized Systems Safety . . . . . . . . . . . . . . . . . . . . . . . . . . 1.6The <strong>Manual</strong> . . . . . . . . . . . . . . . . . . . . . . . . . . . . . . . . . . . . . . . 1.6Required Operator Training . . . . . . . . . . . . . . . . . . . . . . . . . . 1.6Work Area . . . . . . . . . . . . . . . . . . . . . . . . . . . . . . . . . . . . . . . . 1.7Maintenance Safety . . . . . . . . . . . . . . . . . . . . . . . . . . . . . . . . 1.8General Information . . . . . . . . . . . . . . . . . . . . . . . . . . . . . .2.9Introduction . . . . . . . . . . . . . . . . . . . . . . . . . . . . . . . . . . . . . . . 2.9Machine Identification . . . . . . . . . . . . . . . . . . . . . . . . . . . . . . . 2.9Customer Service . . . . . . . . . . . . . . . . . . . . . . . . . . . . . . . . . .2.11Manufacturer’s Limited Warranty . . . . . . . . . . . . . . . . . . . . . 2.12Vehicle Information . . . . . . . . . . . . . . . . . . . . . . . . . . . . . .3.13Introduction . . . . . . . . . . . . . . . . . . . . . . . . . . . . . . . . . . . . . . 3.13Specifications . . . . . . . . . . . . . . . . . . . . . . . . . . . . . . . . . . . . 3.14Dimensions . . . . . . . . . . . . . . . . . . . . . . . . . . . . . . . . . . . . . . 3.16Layout of Machine. . . . . . . . . . . . . . . . . . . . . . . . . . . . . . . . . 3.17Layout of Engine . . . . . . . . . . . . . . . . . . . . . . . . . . . . . . . . . . 3.19System Power. . . . . . . . . . . . . . . . . . . . . . . . . . . . . . . . . . . . 3.19CAN Network . . . . . . . . . . . . . . . . . . . . . . . . . . . . . . . . . . . . 3.20Circuit Breakers . . . . . . . . . . . . . . . . . . . . . . . . . . . . . . . . . . 3.20Attachment Controls . . . . . . . . . . . . . . . . . . . . . . . . . . . . . . . 3.20Speed Controls . . . . . . . . . . . . . . . . . . . . . . . . . . . . . . . . . . . 3.20Wiring . . . . . . . . . . . . . . . . . . . . . . . . . . . . . . . . . . . . . . . . . . 3.20<strong>Operation</strong> . . . . . . . . . . . . . . . . . . . . . . . . . . . . . . . . . . . . . .4.21Introduction . . . . . . . . . . . . . . . . . . . . . . . . . . . . . . . . . . . . . . 4.21Operator Cab Controls . . . . . . . . . . . . . . . . . . . . . . . . . . . . . 4.21Steering Column . . . . . . . . . . . . . . . . . . . . . . . . . . . . . . . . . . 4.27Monitor Diagnose-Control (MDC) . . . . . . . . . . . . . . . . . . . . . 4.33Main Menu . . . . . . . . . . . . . . . . . . . . . . . . . . . . . . . . . . . . . . 4.36Joystick Diagnostics . . . . . . . . . . . . . . . . . . . . . . . . . . . . . . . 4.38Lighting/Electrical . . . . . . . . . . . . . . . . . . . . . . . . . . . . . . . . . 4.40Attachments . . . . . . . . . . . . . . . . . . . . . . . . . . . . . . . . . . . . . 4.42Attachment Selection . . . . . . . . . . . . . . . . . . . . . . . . . . . . . . 4.44New Attachment . . . . . . . . . . . . . . . . . . . . . . . . . . . . . . . . . . 4.57System Hydraulics . . . . . . . . . . . . . . . . . . . . . . . . . . . . . . . . 4.59M-B Multi-Service Vehicle Page 1 Table of Contents© 2008 M-B <strong>Companies</strong> <strong>Inc</strong>.All Rights Reserved
Vehicle Diagnostics. . . . . . . . . . . . . . . . . . . . . . . . . . . . . . . . .4.60Input/Output Diagnostics . . . . . . . . . . . . . . . . . . . . . . . . . . . .4.61Vehicle Display . . . . . . . . . . . . . . . . . . . . . . . . . . . . . . . . . . . .4.62Engine Diagnostics . . . . . . . . . . . . . . . . . . . . . . . . . . . . . . . . .4.63Advanced Engine Diagnostics . . . . . . . . . . . . . . . . . . . . . . . .4.63Joystick Layout . . . . . . . . . . . . . . . . . . . . . . . . . . . . . . . . . . . .4.64Setup . . . . . . . . . . . . . . . . . . . . . . . . . . . . . . . . . . . . . . . . . . .4.65Pre-Start Up . . . . . . . . . . . . . . . . . . . . . . . . . . . . . . . . . . . . . .4.67Start-up Procedure . . . . . . . . . . . . . . . . . . . . . . . . . . . . . . . . .4.68Cold Weather Starting. . . . . . . . . . . . . . . . . . . . . . . . . . . . . . .4.69After Starting Engine. . . . . . . . . . . . . . . . . . . . . . . . . . . . . . . .4.71Safety Link . . . . . . . . . . . . . . . . . . . . . . . . . . . . . . . . . . . . . . .4.72Front Attachment Connections . . . . . . . . . . . . . . . . . . . . . . . .4.74Rear Attachment Connections . . . . . . . . . . . . . . . . . . . . . . . .4.80Wing Attachments (Future). . . . . . . . . . . . . . . . . . . . . . . . . . .4.84Maintenance . . . . . . . . . . . . . . . . . . . . . . . . . . . . . . . . . . . 5.85Preventative Maintenance . . . . . . . . . . . . . . . . . . . . . . . . . . .5.85Replacement Parts. . . . . . . . . . . . . . . . . . . . . . . . . . . . . . 6.87Replacement Parts . . . . . . . . . . . . . . . . . . . . . . . . . . . . . . . . .6.87Other Products from M-B . . . . . . . . . . . . . . . . . . . . . . . . 7.89M-B Multi-Service Vehicle Page 2 Table of Contents© 2008 M-B <strong>Companies</strong> <strong>Inc</strong>.All Rights Reserved
afetySafetyWARNING:Read this manual and any attachment owner’s manuals beforeusing this equipment. Failure to do so can result in seriousinjury or death. Call your dealer if you have any questions.Hazard DefinitionsFor your safety, and to assure the long life of your equipment, be sureyou understand the following signal words which will be seenthroughout this manual:• DANGER: Alerts you to an immediate hazard, which will alwaysresult in severe personal injury and possible death if it is notavoided.• WARNING: Alerts you to a hazard which will result in a seriouspersonal injury or possible death in some cases, if not avoided.• CAUTION: Alerts you to a potential hazard which may result in aserious personal injury if not avoided. It also alerts against anunsafe practice that will permanently damage equipment orproperty.• IMPORTANT: Points out a proper use that will avoid damage to themachine, and/or will extend the life of its parts.• NOTE: Suggests how to use or adjust the equipment for bestproduct results.M-B Multi-Service Vehicle Page 1.3 Safety© 2008 M-B <strong>Companies</strong> <strong>Inc</strong>.All Rights Reserved
Identification of SafetyLabelsSafety labels are strategically located around the attachment toprevent potential hazards. The labels are a permanent part of theequipment. If they become separated from the product or illegible,contact M-B <strong>Companies</strong> <strong>Inc</strong>. for no-cost replacements. Understand theinformation the labels are communicating before operating ormaintaining the equipment.See Parts List section for safety labels associated with this equipment.DANGERHOT FLUID UNDERPRESSURE390-152998WARNINGUneven terrain athigher speeds maycause vehicle tobecome unstable390-157200DANGERCUTTING/SEVERING OFFINGERS OR HAND - FAN390-152993WARNINGEMERGENCYPUSH TO STOPPULL TO RUN390-134607DANGERHOT SURFACE390-152994DANGERTo prevent serious injury or deathfrom pinching:• Keep all persons and objects clearwhile any part of this machine is inmotion.390-157201WARNINGDO NOT GO NEARHYDRAULIC OIL LEAKSDANGERNO RIDERS ORHANGERS ON390-152996When checking for hydraulic systemleaks, observe only.Never use your hands to check forleaks.Hydraulic oil from a pin hole leakcan puncture your skin and causeserious injury, gangrene, or death.ROTATING DRIVELINE HAZARDTo prevent serious injury or death fromrotating driveline:• Keep all guards in place when operating.• Keep hands, feet, hair and clothing awayfrom moving parts. 390-157202If injured by hydraulic oil underpressure, seek medical attentionimmediately.Oil can be hot and can cause severeburns.390-152995M-B Multi-Service Vehicle Page 1.4 Safety© 2008 M-B <strong>Companies</strong> <strong>Inc</strong>.All Rights Reserved
General Safety • This manual should be available during operation.• Extra copies of this manual are available for purchase through theM-B Customer Service Department.• To avoid serious injury or death, do not modify equipment. Anymodifications made to equipment can be dangerous and can voidequipment warranty.• Never defeat a safety device to make a task easier.• Never deface or remove factory-installed safety labels. If a labelever becomes lost, damaged, or illegible, report this condition to asupervisor and obtain a replacement label from the CustomerService department of M-B <strong>Companies</strong>, <strong>Inc</strong>.• Always wear proper apparel when operating equipment; safetyglasses, face shield or goggles, ear protection, and dust mask. Tiehair back. Never wear loose clothing or jewelry that could getcaught in moving parts.• Never operate equipment with covers or guards removed. Rotatingparts can cause severe injury. Keep hands, feet, hair, jewelry andclothing away from all moving parts.• Understand operation of hydraulic and pneumatic controls.• Understand which adjustments are operator and which aremaintenance adjustments.• Always shut OFF equipment when left unattended.• Never operate or work around equipment if under the influence ofalcohol, drugs or medications.Pre-Start-up Safety • Install any covers or guards which may have been removed forshipping purposes.• Before starting equipment, walk around equipment, making avisual inspection that all safety devices are properly installed andsecured.• Check that all hardware, fasteners, hydraulic fittings, etc. are ingood condition and properly fastened. Replace any fatigued ordamaged items with proper replacements.• Personnel who are not required to be in the work area should bekept away. Never start the equipment unless you are absolutelycertain that everyone in the area is clear of the machine and awareit is being started.• Follow the manufacturer’s recommended start-up procedure.M-B Multi-Service Vehicle Page 1.5 Safety© 2008 M-B <strong>Companies</strong> <strong>Inc</strong>.All Rights Reserved
Pressurized SystemsSafetyThe <strong>Manual</strong>• Do not disassemble a pressurized system unless properly trainedand equipped with adequate tooling.• Familiarize yourself with the proper method of relieving pressurefrom pneumatic or hydraulic systems. Never perform maintenanceon, or disassemble, pressurized systems without first locking outpower to these systems and then relieving pressure to them.• Oils and fluids can be very hot under pressure. Use caution andallow the system to cool before beginning maintenance work.• Never operate or pressurize one of these systems with worn ordamaged components. Replace hoses, fittings, valves or othercomponents which appear defective.• Never adjust pressurized systems beyond recommended levels toachieve higher operating pressures.It is the purpose of this manual to provide complete instructions forservice, maintenance disassembly, repair,and installation of themechanical components for the M-B <strong>MSV</strong> Hydraulic Power Broomattatchment.Directional ReferenceAll reference to left, right, front, or rear are given from the operator inthe operator position and facing the direction of your unit.Required OperatorTrainingOriginal purchaser of this unit was instructed by the seller on safe andproper operation. If unit is to be used by someone other than originalpurchaser; loaned, rented or sold, ALWAYS provide this manual andany needed safety training before operation.The Operator Must Understand:• How to operate all controls• The functions of all controls• How to STOP in an Emergency• Speed RangesM-B Multi-Service Vehicle Page 1.6 Safety© 2008 M-B <strong>Companies</strong> <strong>Inc</strong>.All Rights Reserved
Work Area • ALWAYS check overhead and side clearances carefullybefore operation. ALWAYS be aware of traffic when operatingalong streets and curbs.• Keep area of operation clear. Stay alert for hidden hazards.• DO NOT run engine in an enclosed area. Always provide goodventilation.• Abnormal Vibrations are a warning of trouble. Striking a foreignobject can damage unit. Stop unit and engine. Wait for all movingparts to stop. Inspect unit and make any necessary repairs beforerestart.• Protect eyes, face, and head from objects that may be thrown fromunit. Wear appropriate hearing protection.• Avoid Sharp Edges. Sharp edges can cause serious injury. Weargloves to service unit when handling sharp edges.• ALWAYS keep hands and feet away from all moving parts duringoperation. Moving parts can cause serious injury or death.• Be aware of the surroundings. Look for blind spots from whichpedestrians or vehicles may suddenly appear.• Locate the emergency stop on the vehicle.• Do not operate in crowded pedestrian areas. This equipment maycause serious injury or death if safety rules are not followed.• The M-B Multiple Service Vehicle (<strong>MSV</strong>) uses a level gauge. Thegauge helps the operator determine the angle or slope of thesurface being driven on. The gauge shows percent of grade.WARNING:During normal operation the M-B <strong>MSV</strong> must not exceed 30%grade to either side. Adding any attachment to the M-B <strong>MSV</strong>will affect the safe maximum grade.Figure 1M-B Multi-Service Vehicle Page 1.7 Safety© 2008 M-B <strong>Companies</strong> <strong>Inc</strong>.All Rights Reserved
Maintenance Safety • Do not remove guards while operating. After maintenance work, besure all guards and other safety devices are installed and in properworking order.• Never clean, lubricate, or adjust equipment while it is moving, hasthe potential to move or when engine is running.• Always release pressure from pressurized systems beforedisassembling.• Allow ample time for heated components to cool before working onor working close to them. Use temperature sticks or otherappropriate devices to test temperatures.• ALWAYS maintain unit in safe operation condition.• Check the conditions of the unit at the end of each day and repairany damage or defects.• Keep all fasteners properly torqued and in safe operating condition.• Before maintainance, adjustments, or service (except wherespecifically recommended), shut off engine, and secure frommoving.StorageALWAYS clean and lubricate equipment before extended storage.Clean and lubricate equpment every 6 months during prolongedstorage.M-B Multi-Service Vehicle Page 1.8 Safety© 2008 M-B <strong>Companies</strong> <strong>Inc</strong>.All Rights Reserved
eneralnformaonGeneral InformationIntroductionThank you for choosing M-B <strong>Companies</strong>, <strong>Inc</strong>. as your equipmentmanufacturer and supplier. As part of our commitment to totalcustomer satisfaction, we have strived to ensure that the informationcontained within this manual is complete and representative of theequipment you have purchased. The manual cannot, however,anticipate every possible contingency to be met in the installation,operation and maintenance for your equipment. If you requireadditional information not included in this manual, please contact ourService Department at:Customer Service Departmentc/o M-B <strong>Companies</strong>, <strong>Inc</strong>.1615 Wisconsin Ave.PO Box 200New Holstein, WI 53061Phone: 1-888-558-5801 or 1-800-558-5800Fax: 920-898-4588Machine IdentificationEach machine manufactured by M-B <strong>Companies</strong>, <strong>Inc</strong>. has anidentification plate mounted to it as shown in Figure 2. This platecontains the serial number of your M-B equipment. Copy theinformation from the plate on your equipment into the appropriatespace in Figure 2. This information is important to have available whencommunicating with M-B.M-B Multi-Service Vehicle Page 2.9 General Information© 2008 M-B <strong>Companies</strong> <strong>Inc</strong>.All Rights Reserved
VehicleCertification Label390-157208Figure 2M-B Multi-Service Vehicle Page 2.10 General Information© 2008 M-B <strong>Companies</strong> <strong>Inc</strong>.All Rights Reserved
Customer ServiceThe serial number on your equipment is essential for properservice support. When contacting M-B <strong>Companies</strong> regarding servicesupport, always provide the product serial number. This number islocated on the identification plate mounted on your equipment, andshould also have been recorded in the Machine Identification section.Customer Service Departmentc/o M-B <strong>Companies</strong>, <strong>Inc</strong>.1615 Wisconsin Ave.PO Box 200New Holstein, WI 53061Phone: 1-888-558-5801 or 1-800-558-5800Fax: 920-898-4588M-B Multi-Service Vehicle Page 2.11 General Information© 2008 M-B <strong>Companies</strong> <strong>Inc</strong>.All Rights Reserved
Manufacturer’s Limited WarrantyThe M-B <strong>Companies</strong>, <strong>Inc</strong>. warrants all its M-B <strong>MSV</strong> products to be free fromdefects in materials and workmanship for 12 months, to begin with thedelivery of said product to its original owner. This warranty is not transferablewithout the written consent of M-B.M-B will, at its own expense and without expense to the owner, replace allfailed parts for and make all repairs that may be required by reason ofworkmanship or material in any part of the assembly of the product andassociated components.Upon notice in writing, M-B will promptly repair or replace all defective ordamaged items delivered under the contract. The batteries, tires, rubbermaterials, brushes and material normally consumed in operation, and majorcomponents such as engines, air compressors, and hydraulic pumps andmotors are excluded from this warranty but shall, in any event, be guaranteedby M-B to the extent of any warranty received from its supplier.Any components replaced under warranty will be warrantied for the remainderof the original warranty. Replaced components do not restart the warrantyperiod.If requested by M-B, products or parts for which a warranty claim is made areto be returned, transportation prepaid, to M-B’s factory. Any improper use,operation beyond capacity, or substitution of parts not approved by M-B, oralteration or repair by others in such a manner as in M-B’s judgementmaterially and/or adversely affects the product shall void this warranty.This warranty does not apply to defects caused by damage or unreasonableuse while in the possession of the owner, including but not limited to: failure toprovide reasonable and necessary maintenance, normal wear, routine tuneupsor adjustments, improper handling or accidents, operation at speed orload conditions contrary to published specifications, improper or insufficientlubrication, or improper storage.The M-B <strong>Companies</strong>, <strong>Inc</strong>. shall not be liable for consequential damages ofany kind, including, but not limited to, consequential labor costs ortransportation charges in connection with the replacement or repair ofdefective parts, or lost time or expense which may have accrued because ofsaid defect.THE M-B COMPANIES DO NOT MAKE ANY WARRANTY OFMERCHANTABILITY OR OF FITNESS FOR A PARTICULAR PURPOSE.THE ONLY WARRANTY MADE BY M-B COMPANIES IS AS SET FORTHHEREIN. THIS WARRANTY CANNOT BE EXTENDED, BROADENED ORCHANGED EXCEPT IN WRITING BY AN AUTHORIZED OFFICER OF M-BCOMPANIES, INC.(M-B’s total liability hereunder in no event shall exceed the purchase price ofthe product.)M-B Multi-Service Vehicle Page 2.12 General Information© 2008 M-B <strong>Companies</strong> <strong>Inc</strong>.All Rights Reserved
ehicleformaonVehicle InformationIntroductionThis section provides information that is specific to the M-B <strong>MSV</strong>. Eachsub-section describes a component or system to give the reader areasonable understanding of the topic. If a more in-depth knowledge isneeded, contact M-B <strong>Companies</strong> Customer Support.M-B Multi-Service Vehicle Page 3.13 Vehicle Information© 2008 M-B <strong>Companies</strong> <strong>Inc</strong>.All Rights Reserved
SpecificationsEngineTypeCummins QSB4.5 Teir 3 Turbo DieselDisplacement 275 cu-in (4.5 L)Rated Horsepower110 @ 2500 RPM115 @ 2300 RP<strong>MB</strong>attery Size1125 CCACompression Ratio 17.2 to 1CoolingSuction Fan Cooled RadiatorCooling System Capacity 3 gallons (11.3 L)Fuel Tank Capacity 19 gallons (71.9 L)CabROPS certified to ISO 3471 and SAE J1040C at 12,000 lbsChassisTypeCustom Fabricated Steel Construction Reinforced Wheel Motor DesignArticulation45 degreesOscillation15 degreesCaster/Camber0.5 degrees / 1.0 degreesOverall Length157" (398 cm)Ground Clearance13" (33 cm) winter, 11" (28 cm) summerTrack Width50" (127 cm) winter, 60" (152 cm) summerWheel Base83" (210.8 cm)HeightWinter 82" (208 cm) top of cab and 89" (226 cm) top of beaconSummer 80" (203 cm) top of cab and 87" (221 cm) top of beaconCab Width48" (121.9 cm)Curb Weight5800 lbs (2631 kg)Front or Rear Axel Rating8000 lbs (3635 kg)Gross Combined Weight Rating (GCWR)12,000 lbs (5436 kg)Gross Vehicle Weight Raiting (GVWR)12,000 lbs (5436 kg)Winter TiresPrimeX Super Loader Grader II10.5/80-1810 Ply Rating55 psi max (379 kPa)Summer TiresOTR Litefoot33/16LL50010 Ply Rating38 psi max (262 kPa)Rim Size (Winter) 10.5 x 1810 x .59 x 5.512 Bolt Circle5.62 BackdropRim Size (Summer) 14 x 19.510 x .59 x 5.512 Bolt Circle5.62 BackdropOutside Turning Radius116" (294 cm) winter, 126" (320 cm) summerInside Turning Radius66" (168 cm) winter, 76" (193 cm) summerFront and Rear Three Point Hitch CAT 1 or CAT 2Electronic ControlsMaster Module TypeHED (Hydro Electronic Devices) GB-150-101PPSlave Module TypeHED (Hydro Electronic Devices) CL-411-106PPDisplay TypeHED (Hydro Electronic Devices) CL-702-110PPPower Output Module(2) Copper Bussman MVEC Modules 31M-000-0JM-B Multi-Service Vehicle Page 3.14 Vehicle Information© 2008 M-B <strong>Companies</strong> <strong>Inc</strong>.All Rights Reserved
Joystick TypeSuregrip LGGM-UUbUbUGGRG-02-B2J/JM P2-J19-02(1) 4 Position joystick w/trigger(4) 3 Position momentary toggle switches(3) Momentary push buttons2 Way Radio 12V power and memory quick hook upAuxilary Lighting (Optional)Front End ConnectorRear End ConnectorGround DriveDrive MotorsTraction ControlGround SpeedGround Speed @2700 RPM10A front10A rear6 outputs, (4) 4A and 2 (15A)6 outputs, (4) 4A and 2 (15A)Poclain MS05 D, 2-speed, Hydraulic Wheel MotorsAll Wheel Drive with Pressure Locking Differential0 to 12 MPH (19 KPH) low, 0 to 25 MPH (40KPH) highTransport Mode High Speed w/out Creep 0-up to 25 MPH (40KPH)Transport Mode High Speed with Creep 0-up to 20 MPH (32KPH)Transport Mode Low Speed w/out Creep 0-up to 12 MPH (19KPH)Transport Mode Low Speed with Creep 0-up to 9.5 MPH (15KPH)Work Mode w/out Creep 0-up to 12 MPH (19KPH)Work Mode with Creep 0-up to 9.5 MPH (15KPH)Ground Drive Pump Make/Model Sauer Danfoss Series 9075cc Axial Piston PumpElectronic Displacement ControlPressure5850 psi (403.3 bar)Hydraulic SystemTank Capacity18 gal (68L)Total Fluid Capacity Approximately 28 gal (106 L)Auxiliary HydraulicsAuxiliary Pump Make/ModelEaton Model 70422 (Standard)Eaton Model 70423 (Optional)Hydraulic Volume26 GPM (98.4 Lpm) adjustable, standard31 GPM (117.4 Lpm) adjustable, optionalOperating Pressure3000 psi (207 bar) maximumFront Quick CouplersLow Flow (5 gpm 18.9 Lpm max) - 2 pairs of 9/16" quick couplersHigh Flow (31 gpm 117 Lpm max) - 1 pair of 1-1/16" quick couplersCase Drain - 1-9/16" male quick couplerRear Quick Couplers (optional)Low Flow (4 gpm 15 Lpm max) - 1 pair of 9/16" quick couplersHigh Flow (24 gpm 90.8 Lpm max) - 1 pair of 1-1/16" quick couplersChassis Manifold (optional)Low Flow (5 gpm 18.9 Lpm max) - 2 pairs of 9/16" orb fittingsPower Take OffClutchDry type, electronic-over-hydraulicSpline6 spline 1-3/8" diameterRPM Front PTO540 @ 2200 RPM, 665 @ 2700 RPMRPM Rear PTO (Optional)540 @ 2200 RPM, 665 @ 2700 RPMHitch CapacitiesTowing Capacity6000 lbs (2721 kg)Tongue Weight Capacity2000 lbs (907 kg)Front Lift Capacity6000 lbs (2721 kg)Rear Lift Capacity4000 lbs (1814 kg)Wing Hitch Capacity2000 lbs/side, 4000 lbs total (907 kg/side, 1814 kg total)Cooling SystemFan Size20" (51 cm) Rear Mounted - SuctionEng Radiator35 x 24" x 4" - SuctionM-B Multi-Service Vehicle Page 3.15 Vehicle Information© 2008 M-B <strong>Companies</strong> <strong>Inc</strong>.All Rights Reserved
DimensionsIn (cm)82.17 (208.7)89.72 (227.8)Ø36.12(91.7)13.12 (33.3)143.68(365)165.71(421)82.90(210.5)11.16 (29.4)49.77(126.4)Winter DimensionsIn (cm)80.61 (204.7)88.16 (224)Ø33.00(83.8)11.57 (29.3)143.68(365)165.71(421)82.90(210.5)Summer Dimensions9.60 (24.3)60.83(154.5)Figure 3M-B Multi-Service Vehicle Page 3.16 Vehicle Information© 2008 M-B <strong>Companies</strong> <strong>Inc</strong>.All Rights Reserved
Layout of Machine1817153131693219712114 51014624213438371240413639303326292223253135282782042Figure 4M-B Multi-Service Vehicle Page 3.17 Vehicle Information© 2008 M-B <strong>Companies</strong> <strong>Inc</strong>.All Rights Reserved
1. Cooling System2. Disk Brake, Front3. Heater, A/C Box4. CAN Controls Cab5. Sound System6. Cab Subpanel STD7. Control, Main Auxiliary Hydraulic8. Controls, Rear Hitch AUX9. Interior Shroud ASM, Cab10. Floor Mat, Cab11. Steering, Cab Controls12. Brake, Cab Controls13. Fresh Air Intake14. Cab Tilt15. Structural, Cab16. Mirror, Cab17. Window18. Windshield, Cab19. Wiper/Washer20. Fender Trim21. Sub Panel22. Tire/Rim, Summer23. Tire/Rim, Winter24. Hydraulic Reservoir25. Battery26. Ground Drive27. Frame28. Hitch, Front29. Hitch Mount, Rear30. Hitch, Rear31. PTO, Rear32. Engine, Enclosure33. Air Conditioning34. Exhaust35. Fuel Tank36. Pump, AUX LS, Tier III37. Air Intake38. Engine, Tier III39. Fan Shroud40. PTO, Front41. PTO Drive42. Chassis WeightM-B Multi-Service Vehicle Page 3.18 Vehicle Information© 2008 M-B <strong>Companies</strong> <strong>Inc</strong>.All Rights Reserved
Layout of Engine187293451. Radiator cap2. Oil filter3. Starter4. Fuse-alternator to battery5. Fuel primer66. Fuel/water separator7. Fuel filter8. Engine oil dipstick9. Water InletFigure 5System PowerThe <strong>MSV</strong> system uses 12-volt power from a single battery pack. Thealternator and voltage regulator maintain battery charge and voltage.First, the engine starting power supply is delivered by 00 cable directlyfrom the positive pole(s) of the battery to the starter solenoid. Second,power for the engine electronic system is provided direct from thebatteries to the electronic control module. Third, power for the controlsis provided by the battery pack.M-B Multi-Service Vehicle Page 3.19 Vehicle Information© 2008 M-B <strong>Companies</strong> <strong>Inc</strong>.All Rights Reserved
CAN NetworkCircuit BreakersAttachment ControlsSpeed ControlsWiringA Controller Area Network (CAN) is used on the M-B Multi ServiceVehicle to control all hydraulic and engine functions. The CAN isdesigned with software switches that compliment other switches andthe joystick. Together, this system activates electric solenoids thatcontrol hydraulic valves. The main interface to the system is theMonitor Diagnose Control (MDC).The electrical system is protected by circuit breakers of various sizeslocated in the rear control panel in the engine enclosure.In compliance with engine manufacturer’s requirements, the powersupply for electronic control modules is protected by a fuse pack.These fuses will be located in the Cab Subpanel.All attachment hydraulic functions, PTO engagement, and somevehicle control selections are controlled by the MDC and joystick.Vehicle controls include the engine throttle and a foot pedal. Each ofthese are set using the MDC screens and the joystick to deliver acontrolled variable voltage to an actuator.Engine speed is controlled by an electronic control module provided bythe engine manufacturer. The operator in the cab uses MDC screensand joystick which are networked to the Electronic Control Module(ECM) to set desired engine operating speed.The auxiliary hydraulic flow rate is controlled from the operatorsposition in the cab by means of the MDC. The ground drive speed iscontrolled by means of the foot pedal. A variable current is delivered toan electronic displacement control (EDC) on each hydraulic pump forthe particular function. The variable current determines the angle of thepump swash plate which in turn determines pump displacement.Wiring in the system is color and number coded for ease of tracing,maintenance, and troubleshooting.M-B Multi-Service Vehicle Page 3.20 Vehicle Information© 2008 M-B <strong>Companies</strong> <strong>Inc</strong>.All Rights Reserved
Operaion<strong>Operation</strong>4IntroductionOperator Cab ControlsThis section of the manual describes the function of the controlstypically provided with the <strong>MSV</strong>. Because of the unique and complexnature of this equipment, this document may not be an exactrepresentation of the controls on your equipment.Controls which are not part of the standard or optional M-B controlspackage, but which are unique to an individual attachment may not belisted. Separate manuals are created for attachments.M-B <strong>Companies</strong> <strong>Inc</strong>. reserves the right to modify the function orlocation of the operator controls. Please call our Customer ServiceDepartment before operating the machinery if you have any questionsregarding the controls on your <strong>MSV</strong>.The operatior cab has several controls that are used to operate theM-B <strong>MSV</strong>. This section details the controls that the operator uses toprovide comfort and safety. The joystick and the MDC interface aredescribed in another section.Operator SeatThe seat is cushioned by an airbag that absorbs bumps and vibration.The firmness of the cushion is adjusted using a knob located at thefront of the seat and below the operators legs (Figure 6).Adjust SeatAir CushionFigure 6M-B Multi-Service Vehicle Page 4.21 <strong>Operation</strong>© 2008 M-B <strong>Companies</strong> <strong>Inc</strong>.All Rights Reserved
When the engine is running the firmness is adjusted by rotating theknob up for firmer or down for less firm. When the engine is off rotatingthe knob down releases air.Two levers on the side of the seat control forward/back and seat backposition (Figure 7).SeatForward/BackSeat Back AdjustFigure 7Move the front lever to release the seat and move the seat to the newposition. Release the lever to lock.Lift the rear lever to release the seat back. Reposition the seat backand release the lever to lock.The seat also has an adjustable lumbar support. A star wheel behindthe seat on the lower left side is used to adjust the firmness.FirmerLess FirmFigure 8The seat belt uses a movable clip to prevent retraction duringoperation. Set the tension on the seat belt by sitting in the seat with theM-B Multi-Service Vehicle Page 4.22 <strong>Operation</strong>© 2008 M-B <strong>Companies</strong> <strong>Inc</strong>.All Rights Reserved
elt connected. Pull and release the belt until the slack iscomfortable. When properly adjusted a person should be able to slidea hand between the upper belt and their chest. To prevent furtherchanges place the clip over the upper seatbelt and against the topguide (Figure 9).Seat Belt ClipFigure 9The cab also has a cup holder, document storage compartments, a flipdown armrest and a lever to allow ouside air into the ventilation system(Figure 10).Outside Air Lever (Pull Down)Flip-Down ArmrestDocument StorageCup HolderFigure 10M-B Multi-Service Vehicle Page 4.23 <strong>Operation</strong>© 2008 M-B <strong>Companies</strong> <strong>Inc</strong>.All Rights Reserved
VentilationFresh air is drawn into the cab from the vent at the top rear of the cab.A cartridge type air filter is used to remove dust and debris. The filtershould be inspected and changed as needed.To replace the air filter:1. Remove vent by unscrewing the two nuts. Notice that the top of thewindow is held in place by the vent (Figure 11).Remove NutsBottom Edge holds window inFigure 112. After the cover is removed the filter cartridge can be pulled out.Figure 123. Replace with clean/new cartridge and install the cover.4. Tighten both nuts.M-B Multi-Service Vehicle Page 4.24 <strong>Operation</strong>© 2008 M-B <strong>Companies</strong> <strong>Inc</strong>.All Rights Reserved
Air VentsThere are several air vents throughout the cab. The vents can berotated and the blades move to direct airflow (Figure 13).Rotating RingFigure 13SunroofThe sunroof can be opened by flipping the rear latch and pushing upon the back half of the window(Figure 14).Figure 14The window can be removed completely. The two front latches areopened by pulling down on the center piece (Figure 15).M-B Multi-Service Vehicle Page 4.25 <strong>Operation</strong>© 2008 M-B <strong>Companies</strong> <strong>Inc</strong>.All Rights Reserved
ClipOpenFigure 15Open the rear latch. Pull down sharply on the end attached to the roof.The latch will pull free from the connection leaving the post (Figure 16).Figure 16Remove the window and store in a safe place.To replace the window, position it on top of the opening seal.CAUTION:The seal must be in proper location or it will leak.Move the latches into position. Secure the front two by snapping thelevers into the hinge point. The rear latch should be positioned so theopen clip is over the post. Then push that end onto the post.Open the window and inspect the seal. The front edge of the windowmust lay flat on the seal (Figure 17).M-B Multi-Service Vehicle Page 4.26 <strong>Operation</strong>© 2008 M-B <strong>Companies</strong> <strong>Inc</strong>.All Rights Reserved
SealPushed OutSeal CorrectFigure 17With the window open the seal can be pulled into position.Steering ColumnSeveral controls are located on the seering column. The right side hascontrols for; windshield squirter, horn, wiper, headlight high beams andthe keyswitch (Figure 18).The left side and the top end of the column have controls for; fan,emergency stop, steering wheel tilt, lights, hazard lights and airconditioning (Figure 19).Key SwitchVery similar to an automotive key switch. There are three positions;OFF, ON, and START. When the key switch is OFF, all vehiclefunctions except the horn are off. After the engine is started thekeyswitch releases to ON (run).IMPORTANT: The engine will not start unless the MDC is ready.Turn the key to ON and wait for the MDC to start up.If the key is turned to START before the MDC isready, the key must be reset. Turn the key to OFFand back to ON. When the MDC is ready the enginepreheater will be ready. The engine can be started.To start the engine the operator must be in the seat and the seat beltmust be fastened. The MDC needs to be ready.M-B Multi-Service Vehicle Page 4.27 <strong>Operation</strong>© 2008 M-B <strong>Companies</strong> <strong>Inc</strong>.All Rights Reserved
Windshield SquirterThe ring at the end of the lever activates the windshield squirter. Pressin on the ring. Water will be pumped as long as the ring is pressed. Thewipers will not start moving when the ring is pressed. See Figure 18.HornThe horn will work regardless of the key switch position. Press in onthe button at the end of the lever. See Figure 18.WiperRotating the barrel of the lever will activate the wipers. From the offposition rotate the barrel up (clockwise) one notch for low speed.Rotate two notches for high speed wipers. Rotate the barrel down(counterclockwise) for intermittent wipers. See Figure 18.Headlight High BeamsWhen the headlights are on, push down on the lever to changebetween low and high beam settings. See Figure 18.Push down for headlight high beamsWindshield squirterHornWiper HighLowOffIntermittentFigure 18Key SwitchOffOnStartFanThe fan pulls air through the filter cartridge and into the cab. Rotatingvents distribute the air. The switch has four positions; OFF, LOW,MEDIUM, and HIGH. See Figure 19.M-B Multi-Service Vehicle Page 4.28 <strong>Operation</strong>© 2008 M-B <strong>Companies</strong> <strong>Inc</strong>.All Rights Reserved
Emergency Stop.Pushing in the emergency stop button will cut power to all functions onthe vehicle. The button stays in until it is rotated for release. The <strong>MSV</strong>can be restarted when needed. See Figure 19.Their are two other events that will quickly stop the vehicle. If the seatbelt is released or the operator presence seat switch is deactivated theM-B <strong>MSV</strong> will stop. The parking brake will turn on. To start the vehiclethe operator must be on the seat and the seatbelt fastened. Then anormal start-up can be followed.Steering Column TiltThe steering column can be tilted toward or away from the operator.Hold the steering wheel with one hand. Move the lever to unlock thetilt. Release the lever to lock the column in the new positon. SeeFigure 19.SwitchesThere are switches for the exterior lights, hazard flashers and airconditioning. These rocker switches are located at the top of thesteering column. See Figure 19.• Air Conditioning - On/Off• Hazard Flashers - On/OffWhen the lights are flashing, the turn signal arrows on the MDCdisplay will flash.• Exterior Lights - Off/Running/HeadlightsWhen the switch is moved to a position it will stay until it is pushedagain.M-B Multi-Service Vehicle Page 4.29 <strong>Operation</strong>© 2008 M-B <strong>Companies</strong> <strong>Inc</strong>.All Rights Reserved
Fan OffLowMedHighEmergency StopPush to stop.Twist to release.SteeringTilt ColumnAir ConditioningOnOffHazard FlashersOnOffFigure 19Exterior LightsOffRunningHeadlightsRadio ConsoleThe radio is on the right side of the steering column. Two LEDs aremounted below the radio. The first is labeled “Wait to Start”. This LEDis on when the MDC is starting up. It is a reminder to not turn the keyuntil the MDC is ready. The second LED turns on when the emergencystop is pushed in. It will go out when the stop button is released. A thirdfeature is a 12 volt power point socket. It is similar to an automotiveoutlet. Accessories can be plugged in. See Figure 20.M-B Multi-Service Vehicle Page 4.30 <strong>Operation</strong>© 2008 M-B <strong>Companies</strong> <strong>Inc</strong>.All Rights Reserved
Lights when MDCis starting upLights whenEmergency Stopis pushed inFigure 20Accessory Plug-inAccessory Terminal StripThe top right side of the dashboard has a three pole terminal block.The terminal screws are labeled as to their function (Figure 21).• Two way radio memory (+) - provides low amperage 12 Vdcuninterrupted power for memory functions• Two way radio power (+) - Provides 15 amp 12 Vdc power for theradio. Turns off when key switch is off.• Two way radio common (-) - goes to ground terminal on battery.Two Way Radio Common (-)Two Way Radio Power (+)Two Way Radio Memory (+)Figure 21M-B Multi-Service Vehicle Page 4.31 <strong>Operation</strong>© 2008 M-B <strong>Companies</strong> <strong>Inc</strong>.All Rights Reserved
Circuit Breakers (on some vehicles).In front of the right armrest are three push to reset circuit breakers(Figure 22).• Radio Memory - Controls power to the radio memory terminal• 2W Radio - Controls power to the +12 Vdc radio terminal• Work Light - Not used at this timeRadioMemoryWork Light(Not functional)Power ToFigure 22Heater BypassIn front of the joystick is an adjustment for bypassing the heater. Whenthis knob is rotated the temperature of incoming air is raised orlowered. Opening the valve increases heat.IMPORTANT: This adjustment should be closed when the airconditioning is on.Figure 23M-B Multi-Service Vehicle Page 4.32 <strong>Operation</strong>© 2008 M-B <strong>Companies</strong> <strong>Inc</strong>.All Rights Reserved
MonitorDiagnose-Control (MDC)StartupFigure 24 - Start Up ScreenThe start up screen (Figure 24) is displayed when the control isbeginning operation. When the <strong>MSV</strong> is ready for operation the mainoperating screen will display (Figure 25).111 2 16 3 47 12, 13 14, 15856231726Eng Temp 64 Fo0 Eng Oil PSI 0.0Battery 12.1 VHyd Temp 77 FEng Hours 9 RPMMPH Hyd GPM 0.0Hitch On HP Draw:0 Boom FlailQuickStop05CruiseOff10 15 20Park BrakeOn25WorkMode30N!MainMenu91025272218 19 20 2124Figure 25This is the main operational screen that is displayed while the vehicleis in use. After the power up sequence, this is the screen that isautomatically displayed. Refer to the table below for descriptions ofcallouts.M-B Multi-Service Vehicle Page 4.33 <strong>Operation</strong>© 2008 M-B <strong>Companies</strong> <strong>Inc</strong>.All Rights Reserved
Item # Name Description1 Left Signal Indicator Displays status of signal light or hazard lights, flashes bright green/gray at same rate ifleft signal is enabled by column switch or hazard lights enabled. If neither enabled, theindicator is dimmed.2 Headlight High BeamIndicatorDisplays status of headlight high beam. Bright when high beam is selected fromcolumn switch or when high beam FLASH is selected. Dim for low beam selection orheadlamps off.3 Vehicle Drive Status Displays Ground Drive Status. When in neutral, the arrow points both up and down,the arrow color is gray, and the status letter indication is an “N”. If the drive is forward,the arrow points up and if the drive is in reverse the arrow points down. If the GroundDrive is in low speed the letter indication is a “L” and if high speed the letter indicationis a “H”. When the foot pedal is depressed initiating ground drive motion, the arrowcolor changes to yellow.4 Right Signal Indicator Displays status of signal light or hazard lights, flashes bright green/gray at the samerate as right signal if right signal is enabled by column switch, or hazard lights areenabled. If neither enabled, the indicator is dimmed.5 Fuel Gauge Vertical bar graph filled with green to indicate the percentage of fuel in tank. When thefuel in the tank is low, the color of the bar graph changes to red.6 Hour Meter Displays the number of hours of operation on vehicle engine. Nonresettable.7 Engine RPM AnalogDisplay8 Vehicle Speed AnalogDisplayArc shaped display with gray background. Graphically displays engine RPM from 0 to3000 RPM max. As RPM increases, arc fills with green color from left to rightindicating the percent of maximum RPM.Arc shaped display with gray background. Graphically displays vehicle speed MPHfrom 0 to 30 max. As speed increases, arc fills with green color from left to rightindicating the percent of maximum vehicle speed.9 PTO Enabled Indicator Icon displayed in gray when PTO is not enabled. When PTO is enabled by operator,icon changes to red and flashes at same rate as signal lights.10 Aux Hydraulic Indicator Text displaying ACTUAL HYD GPM the auxiliary pump is supplying at current engineRPM. When the main auxiliary hydraulics (Aux 3) is not enabled, indicator displays theactual hydraulic flow in gallons-per minute (GPM) at the current engine RPM. Thebackground in the indicator box changes to red and flashes at the same rate as thesignal lights when Aux 3 is enabled. GPM can be changed by going in SystemHydraulics page. Attachments selected can change maximum GPM and sets GPM toa typical operating setting.11 Engine RPM Display Digital readout of current Engine RPM.12 Engine Coolant TempIndicatorHorizontal bar graph on white background providing analog indication of coolanttemperature. Left edge of graph corresponds to 120°F (49°C), right edge of graphcorresponds to 240°F (115°C). When temperature is below 120, the bar graph is filledwith background color. As temperature rises the graph is filled with green from the left.Text displaying current coolant temp on right side of graph.13 Engine Oil Pressure Horizontal bar graph on white background providing analog indication of engine oilpressure. Left edge of graph corresponds to XXX psi. Right edge of graphcorresponds to ZZZ psi. When pressure is below XXX bar graph is filled withbackground color. As pressure rises, graph is filled from left. Text displaying current oilPSI on right side of graph.14 Battery Voltage Indicator Horizontal bar graph on white background providing analog indication of batteryvoltage. Left edge of graph corresponds to 9 volts. The right edge of graphcorresponds to 16 volts. When voltage is below 9 the graph is filled with backgroundcolor (Controller will not work). As voltage rises, graph is filled from left. Text displayingcurrent battery voltage on right side of graph.M-B Multi-Service Vehicle Page 4.34 <strong>Operation</strong>© 2008 M-B <strong>Companies</strong> <strong>Inc</strong>.All Rights Reserved
Item # Name Description15 Hyd Oil Temp Indicator Horizontal bar graph on white background providing analog indication of hyd oiltemperature. Left edge of graph corresponds to 32°F (0°C). Right edge of graphcorresponds to 200°F (93.3°C). When temperature is below 120, the bar graph isfilled with background color. As temperature rises, graph is filled from left with greencolor. Text displaying current hyd temp on right side of graph.16 Vehicle Speed Display Digital readout of current vehicle speed in mph.17 Alarms Display This area is available for any alarms or messages that have been sensed by thecontrol system or relayed to the control from the engine ECM. During start up WAITTO START indicator will be displayed until intake heater is ready. The highest priorityalarm, those conditions producing the greatest opportunity for peril to the operator orvehicle are displayed most prominently.18 Quick Stop Indicates function of button #1. Pressing the Quick Stop button will turn allattachments operating off, decrease engine RPM to 1150, put ground drive in neutraland set parking brake. Operater can unbuckle seat belt and leave the cab to performduties outside while tractor stays running. Once operator returns to the seat andattaches the seat belt, pressing the Quick Stop button will start previously operatingattachments at the previous settings, set engine RPM’s to previous position, removeparking brake and put ground drive in previous gear position.19 Cruise Indicates function of button #2. When Cruise mode is chosen it will keep locked in thecurrent ground speed. Engine RPM can be raised or lowered to change ground speed.Cruise mode can be disengaged by pressing Button #2 again or by pressing brakepedal.20 Parking Brake On/Off Indicates function of button #3. When button is depressed it toggles the parking brakeenable from on to off to on etc. Display PARKING BRAKE ON or PARKING BRAKEOFF. The logic is as follows. When vehicle starts up, the parking brake is always onand the ground drive is in neutral. The parking brake can be turned on or off wheneverthe vehicle is at rest. When vehicle is shut down the parking brake can also bereleased from the joystick but not re-enabled.21 Vehicle Ground Drive Visual indication of vehicle mode. When transport mode is chosen box displaysTRANSPORT MODE. In this mode engine RPM is limited to 1900 RPM andattachments cannot be operated. Vehicle drive status arrow will display H when inforward gear position. When work mode is chosen, box displays WORK MODE. In thiswork mode the engine RPM is allowed to be increased between 2200 - 2700 RPMbased on attachment selected and all attachments can be operated. Vehicle drivestatus arrow will display L when in forward gear position.22 Main Menu Indicates function of button #5. When button is depressed the screen changes todisplay the main menu screen.23 Front Hitch Indicates function of the front hitch. Hitch function will change based on theattachment selected. HITCH ON means there is full use of the front hitch. HITCH OFFmeans the hitch will remain in a fixed position and cannot be raised of lowered. HITCHFLOAT means the float button on the joystick was pressed. Hitch will float each timethe joystick is pushed forward. To take out of float mode, float button on joystick mustbe pressed again.24 HP Draw Indicates actual horsepower engine is currently using. This is useful for gaugingoperation settings for attachments and estimating fuel consumption.25 Attachment Selected Indicates attachment selected in Attachment Selection screen.26 Amber Engine Fault Indicates when engine has a non-critical fault. Engine should be serviced as soon aspossible. Non-critical faults will not damage the engine for short periods of operationbut can effect runability and engine efficiency. Engine will not reduce power for thistype of fault. Cummin’s Fault Code will be displayed in Engine Fault Diagnostics.M-B Multi-Service Vehicle Page 4.35 <strong>Operation</strong>© 2008 M-B <strong>Companies</strong> <strong>Inc</strong>.All Rights Reserved
Item # Name Description27 Red Engine Fault Indicates when Engine has a critical fault. Engine should be shut off immediately andserviced before operating. Critical faults will cause engine damage if operationcontinues. Engine Protection will reduce speed and engine power gradually based onseverity of the observed condition. Engine Protection will not shut off engineautomatically. Cummin’s Fault Code will be displayed in Engine Fault Diagnostics.Main MenuThe Main Menu screen (Figure 26) is the primary screen from whichthe operator will navigate to other functional screens. The operatormust go through this screen to get to all other screens. All otherscreens will return to this screen.Main MenuJoystick DiagnosticsLighting/ElectricalSystem HydraulicsEngine DiagnosticsAttachment SelectionSetupVehicle DiagnosticsJoystick LayoutSelectVehicleDisplayErrorHistoryFigure 26M-B Multi-Service Vehicle Page 4.36 <strong>Operation</strong>© 2008 M-B <strong>Companies</strong> <strong>Inc</strong>.All Rights Reserved
NameMain MenuSelectDown ArrowUp ArrowVehicle DisplayError HistoryJoystick DiagnosticsLighting/ElectricalSystem HydraulicsEngine DiagnosticsAttachment SelectionSetupVehicle DiagnosticsJoystick LayoutDescriptionTitle block for this screen.When button is depressed the screen changes to display the screen that is highlighted (chosen) byscrolling with the UP/DOWN buttons.Button is depressed to navigate through screen options.Button is depressed to navigate through screen options.Press this button to display the Vehicle Display Screen.When this button is depressed the screen shows the error history. The last 50 errors will bedisplayed. The error, current status and engine hour when it occured are shown.When JOYSTICK DIAGNOSTICS is highlighted, depressing the SELECT button will transport tothat screen.When LIGHTING/ELECTRICAL is highlighted, depressing the SELECT button will transport to thatscreen.When SYSTEM HYDRAULICS is highlighted, depressing the SELECT button will transport to thatscreen.When ENGINE DIAGNOSTICS is highlighted, depressing the SELECT button will transport to thatscreen.When ATTACHMENT SELECTION is highlighted, depressing the SELECT button will transport tothat screen.When SETUP is highlighted, depressing the SELECT button will transport to that screen.When VEHICLE DIAGNOSTICS is highlighted, depressing the SELECT button will transport tothat screen.When JOYSTICK LAYOUT is highlighted, depressing the SELECT button will transport to thatscreen.M-B Multi-Service Vehicle Page 4.37 <strong>Operation</strong>© 2008 M-B <strong>Companies</strong> <strong>Inc</strong>.All Rights Reserved
Joystick DiagnosticsThe Joystick Diagnostics screen allows the operator the ability toactivate or test joystick functions without the joystick.Using the up/down arrows the operator selects the function they wantto test. The operator then presses SELECT ITEM to toggle betweenjoystick functions. When a function is selected, the legends abovebutton 2 and button 3 changes to reflect the function being tested.When testing a function, the screen input has precedence over thejoystick for that function only. All other non-selected joystick functionsare still controlled by the joystick. If no function is selected for test, thecurrently highlighted function text line changes based on changesmade at the joystick. As an example, the text line for the PTO is PTOON/OFF. When the PTO is on the word ON is bold and OFF is dim.Pressing the button on the joystick that toggles the PTO on and off willcause the screen display to change from PTO ON/OFF (ON bold) toPTO ON/OFF (OFF bold).Joystick DiagnosticsThrottle 0 RPM Hydraulic (Aux 1) Left RightDrive Fwd Rev Hydraulic (Aux 2) Up DownWheel Motor High Low Hydraulic Drive Aux 3 On OffPTO On OFF Hydraulic Aux 4 Up DownFront Hitch Up Down Hydraulic Aux 5 Up DownRear Hitch Up Down Electric Pump (Aux 6) On OffSelectItem<strong>Inc</strong>reaseDecreaseVehicleDisplayMainMenuFigure 27M-B Multi-Service Vehicle Page 4.38 <strong>Operation</strong>© 2008 M-B <strong>Companies</strong> <strong>Inc</strong>.All Rights Reserved
NameJoystick DiagnosticsThrottleDrive ControlWheel Motor High/LowPTOFront HitchRear HitchHydraulic (Aux 1)DescriptionTitle block for this screen. Cannot be accessed by scrolling with up/down arrow buttons.Used to simulate the Throttle when this function is selected. Text line displays THROTTLE XXXRPM. The legend above button 2 and button 3 changes to INCREASE and DECREASErespectively. Pressing the INCREASE button repeatedly, increases the engine RPM up to themaximum RPM. Pressing the DECREASE button repeatedly, decreases the engine RPM down tothe minimum RPM. Pressing SELECT ITEM (button 1) disables the testing of this function andhighlights the next joystick function but leaves the engine RPM at the currently selected level.Used to simulate the Drive Direction selection. Text line displays DRIVE FWD REV with one wordhighlighted depending on the currently selected ground drive direction. The legend above button 2and button 3 changes to FWD and REV respectively. When started, the vehicle is placed in neutralby the control and both words are grayed out. Pressing either button selects the correspondingdrive direction and highlights the appropriate word. Pressing the SELECT ITEM button disables thetesting of this function and returns the control input to that commanded by the joystick, but leavesthe ground drive state (direction) as selected by the up or down arrows.Used to simulate the Wheel Motor High/Low Selection. Text line displays WHEEL MOTOR HIGHLOW with one word highlighted dependent on the currently selected ground drive setting. Thelegend above button 2 and button 3 changes to HIGH and LOW respectively. Pressing button 2(HIGH) toggles the input to HIGH (bold). Pressing button 3 (LOW) toggles the input to LOW (bold).Pressing the SELECT ITEM button disables the testing of this function and leaves the control inputin the currently selected state.Used to simulate PTO ON/OFF Selection. Text line displays PTO ON OFF with one wordhighlighted dependent on the currently selected PTO setting. The legend above button 2 and button3 changes to ON and OFF respectively. Pressing button 2 (ON) toggles the input to ON (bold).Pressing button 3 (OFF) toggles the input to OFF (bold). Pressing the SELECT ITEM buttondisables the testing of this function and disables the PTO. The PTO should not be left enabled fromthis screen.Used to simulate the Front Hitch function UP/DOWN command. Text line displays FRONT HITCHUP DOWN. The legend above button 2 and button 3 changes to UP and DOWN respectively.Pressing button 2 (UP) causes the hitch to raise and the text line to display UP (bold). Pressingbutton 3 (DOWN) causes the hitch to lower and the text line to display DOWN (bold). Pressingneither button causes the text line to display UP DOWN (no bold). Pressing the SELECT ITEMbutton disables the testing of this function.Used to simulate the Rear Hitch function Up/Down command. Text line displays REAR HITCH UPDOWN. The legend above button 2 and button 3 changes to UP and DOWN respectively. Pressingbutton 2 (UP) causes the hitch to raise and the text line to display UP (bold). Pressing button 3(DOWN) causes the hitch to lower and the text line to display DOWN (bold). Pressing neitherbutton causes the text line to display UP DOWN (no bold). Pressing the SELECT ITEM buttondisables the testing of this function.Used to simulate the Hydraulic (Aux 1) function command. For most programmed M-B attachmentsthis function controls LEFT (joystick left) or RIGHT (joystick right) motion of the attachment (i.e.swing left/right, or chute rotate left/right). Text line displays HYDRAULIC (AUX 1) LEFT/RIGHT. Thelegend above button 2 and 3 changes to LEFT and RIGHT respectively. Pressing button 2commands Aux 1 to move left and the text line to display LEFT/RIGHT (left bold). Pressing button 3commands Aux 1 to move right and the text line to display LEFT/RIGHT (right bold). Pressingneither the UP or DOWN arrow causes the text line to display LEFT/RIGHT (no bold). Pressing theSELECT ITEM button disables the testing of this function and leaves the control input in thecurrently selected state.M-B Multi-Service Vehicle Page 4.39 <strong>Operation</strong>© 2008 M-B <strong>Companies</strong> <strong>Inc</strong>.All Rights Reserved
NameHydraulic (Aux 2)Hydraulic Drive (Aux 3)Left Wing (Aux 4)Right Wing (Aux 5)Electric Pump (Aux 6)Select ItemChanging LegendChanging LegendVehicle DisplayMain MenuDescriptionUsed to simulate the Hydraulic (Aux 2) function command. For most programmed M-B attachmentsthis function controls UP (joystick left plus trigger) or DOWN (joystick right plus trigger) motion of anattachment feature (i.e. deflector up or down on the snowblower chute). The legend above button 2and button 3 changes to UP and DOWN respectively. Text line displays HYDRAULIC (AUX2) UP/DOWN. Pressing button 2 commands Aux 2 to move up and the text line to display UP/DOWN (upbold). Pressing button 3 commands Aux 2 to move down and the text line to display UP/DOWN(down bold). Pressing neither the UP or DOWN arrow causes the text line to display UP/DOWN (nobold). Pressing the SELECT ITEM button disables the testing of this function and leaves the controlinput in the currently selected state.Used to simulate the Aux 3 On/Off Selection. Aux 3 provides the hydraulic flow necessary to powermost hydraulically driven front attachments. Text line displays AUX 3 ON/OFF. The legend abovebutton 2 and button 3 changes to ON and OFF respectively. Pressing button 2 toggles the input toON (on bold). Pressing button 3 toggles the input to OFF (off bold). Pressing the SELECT ITEMbutton disables the testing of this function and disables the Aux 3. The Aux 3 should not be leftenabled from this screen.Used to simulate the Left Wing function Up/Down command. Text line displays LEFT WING UP/DOWN. The legend above button 2 and button 3 changes to UP and DOWN respectively. Pressingbutton 2 causes the wing to raise and the text line to display UP/DOWN (up bold). Pressing button 3causes the wing to lower and the text line to display UP/DOWN (down bold). Pressing neither theUP or DOWN arrow causes the text line to display UP/DOWN (no bold). Pressing the SELECTITEM button disables the testing of this function and leaves the control input in the currentlyselected state. If the left wing option is not installed in this vehicle, this selection is grayed out.Used to simulate the Right Wing function Up/Down command. Text line displays RIGHT WING UP/DOWN. The legend above button 2 and button 3 changes to UP and DOWN respectively. Pressingbutton 2 causes the wing to raise and the text line to display UP/DOWN (up bold). Pressing button 3causes the wing to lower and the text line to display UP/DOWN (down bold). Pressing neither theUP or DOWN arrow causes the text line to display UP/DOWN (no bold). Pressing the SELECTITEM button disables the testing of this function and leaves the control input in the currentlyselected state. If the right wing option is not installed in this vehicle, this selection is grayed outUsed to simulate the Aux 6 function On/Off.Indicates function of button #1. When this button is depressed the joystick function is selected.Pressing the button repeatedly toggles through the listed joystick functions.Indicates Function of button #2. When button is depressed, the selected function can be controlledusing this button. The legend above the button changes dependent on the function selected.Indicates Function of button #3. When button is depressed, the selected function can be controlledusing this button. The legend above the button changes dependent on the function selected.Indicates function of button #4. When this button is depressed the screen changes to display theVehicle Display screen.Indicates function of button #5. When this button is depressed the screen changes to the MainMenu screen.Lighting/ElectricalThe Lighting/Electrical screen is the screen used to enable/disable anyvehicle lighting and electrical control outputs that is not otherwisecontrolled through a column switch or other operator interface. Thisscreen is used to enable/disable the outputs on the Front and Rearconnectors. The operator selects this screen from the Main Menuscreen. Exiting from this screen returns to the Main Menu.M-B Multi-Service Vehicle Page 4.40 <strong>Operation</strong>© 2008 M-B <strong>Companies</strong> <strong>Inc</strong>.All Rights Reserved
Lighting/ElectricalBacklight Day Night Rear End Connector 1 ON OFFBeacon(s) ON OFF Rear End Connector 2 ON OFFFront End Connector 1 ON OFF Rear End Connector 3 ON OFFFront End Connector 2 On OFF Rear End Connector 4 ON OFFFront End Connector 3 On OFF Rear End Connector 5 ON OFFFront End Connector 4 On OFF Rear End Connector 6 ON OFFFront End Connector 5 On OFFFront End Connector 6 On OFFSelectItemDayNightVehicleDisplayMainMenuFigure 28NameLighting/ElectricalBacklightBeaconDescriptionTitle block for this screen. Cannot be accessed by scrolling with UP/DOWN arrow buttons.Text line that displays the status of the backlight setting for the operator display. The legend abovebutton 2 and button 3 changes to DAY and NIGHT respectively when this function is chosen.Pressing button 2 selects DAY backlighting while pressing button 3 selects NIGHT. Pressing theSELECT ITEM button disables the setting of this function and leaves the control input in thecurrently selected state and scrolls to the next listed function.Text line that displays the status of the Beacon setting for the operator display. The legend abovebutton 2 and button 3 changes to ON and OFF respectively when this function is chosen. Pressingbutton 2 selects ON and enables the Beacon while pressing button 3 selects OFF and disables theBeacon. Pressing the SELECT ITEM button disables the setting of this function and leaves thecontrol output in the currently selected state and scrolls to the next listed function.Front End Connector 1-6 Text line that displays the status of the Front End Connector pin outputs. The legend above button 2and button 3 changes to ON and OFF respectively when this function is chosen. Pressing button 2selects ON and enables the selected output while pressing button 3 selects OFF and disables theoutput. Pressing the SELECT ITEM button disables the setting of this function and leaves thecontrol output in the currently selected state and scrolls to the next listed function.Rear End Connector 1-6 Text line that displays the status of the Rear End Connector pin outputs. The legend above button 2and button 3 changes to ON and OFF respectively when this function is chosen. Pressing button 2selects ON and enables the selected output while pressing button 3 selects OFF and disables theoutput. Pressing the SELECT ITEM button disables the setting of this function and leaves thecontrol output in the currently selected state and scrolls to the next listed function.Select Item Indicates function of button #1. When button is depressed the highlighted function is selected.Pressing the button repeatedly toggles through the listed functions.Changing Legend Indicates function of button #2. When button is depressed the selected function can be controlledusing this button. The legend above the button changes dependent on the function selected.Changing Legend Indicates function of button #3. When button is depressed the selected function can be controlledusing this button. The legend above the button changes dependent on the function selected.Vehicle Display Indicates function of button #4. When this button is depressed the screen changes to display theVehicle Display Screen.Main Menu Indicates function of button #5. When this button is depressed the screen changes to the MainMenu Screen.M-B Multi-Service Vehicle Page 4.41 <strong>Operation</strong>© 2008 M-B <strong>Companies</strong> <strong>Inc</strong>.All Rights Reserved
AttachmentsThe attachment screen displays the attachments currently selected forthe vehicle. The operator can also navigate to the selection to enableor select other attachments to be used on the vehicle. The operatorselects this screen from the Main Menu screen. Exiting from thisscreen returns to the Main Menu.Attachment SelectionBoom Flail Yes NoDefault Yes NoPTO Snow Blower Yes NoHydraulic Snow Blower Yes NoNone Yes NoRear Hitch Hydraulics Yes NoSprayer Spreader Yes NoSpreader Dump Box Yes NoCold Planer Yes NoSelectItemToggleClear AllVehicleDisplayMainMenuFigure 29NameAttachmentsFront Hitch AttachmentRear Hitch AttachmentLeft Wing AttachmentDescriptionTitle block for this screen.Text line that displays the currently selected Front Hitch Attachment. Text line is accessed(highlighted) by scrolling UP or DOWN with arrow keys. The selected attachment is displayed asfollows, FRONT ATTACHMENT - PTO DRIVEN SNOWBLOWER or similar. When none isselected the following is displayed, FRONT ATTACHMENT - NONE SELECTED. To change theselected attachment, scroll UP or DOWN until FRONT HITCH ATTACHMENT text line ishighlighted, then press the SELECT button. Pressing the SELECT button will change to the FrontHitch selection screen defined later.Text line that displays the currently selected Rear Hitch Attachment. Text line is accessed(highlighted) by scrolling UP or DOWN with arrow keys. The selected attachment is displayed asfollows, REAR ATTACHMENT - PTO DRIVEN FLAIL MOWER or similar. When none is selectedthe following is displayed, REAR ATTACHMENT - NONE SELECTED. To change the selectedattachment, scroll UP or DOWN until REAR HITCH ATTACHMENT text line is highlighted, thenpress the SELECT button. Pressing the SELECT button will change to the Rear Hitch Selectionscreen defined later. If the Rear Hitch Attachment option is not installed on this vehicle, thisselection is grayed out and cannot be selected.Text line that displays the currently selected Left Wing Attachment. Text line is accessed(highlighted) by scrolling UP or DOWN with arrow keys. The selected attachment is displayed asfollows, LEFT ATTACHMENT - HYDRAULIC DRIVEN FLAIL MOWER or similar. When none isselected the following is displayed, LEFT ATTACHMENT - NONE SELECTED. To change theselected attachment, scroll UP or DOWN until LEFT WING ATTACHMENT text line is highlighted,then press the SELECT button. Pressing the SELECT button will change to the Left WingAttachment Selection screen defined later. If the Left Wing Attachment option is not installed onthis vehicle, this selection is grayed out and cannot be selected.M-B Multi-Service Vehicle Page 4.42 <strong>Operation</strong>© 2008 M-B <strong>Companies</strong> <strong>Inc</strong>.All Rights Reserved
NameRight Wing AttachmentDump Box AttachmentSelectUp ArrowDown ArrowVehicle DisplayMain MenuDescriptionText line that displays the currently selected Right Wing Attachment. Text line is accessed(highlighted) by scrolling UP or DOWN with arrow keys. The selected attachment is displayed asfollows, RIGHT ATTACHMENT - HYDRAULIC DRIVEN FLAIL MOWER or similar. When none isselected the following is displayed, RIGHT ATTACHMENT - NONE SELECTED. To change theselected attachment, scroll UP or DOWN until RIGHT WING ATTACHMENT text line ishighlighted, then press the SELECT button. Pressing the SELECT button will change to the RightWing Selection screen defined later. If the Right Wing Attachment option is not installed on thisvehicle, this selection is grayed out and cannot be selected.Text line that displays the currently selected Dump Box Attachment. Text line is accessed(highlighted) by scrolling UP or DOWN with arrow keys. The selected attachment is displayed asfollows DUMP BOX ATTACHMENT M-B DUMP BOX or similar. When none is selected thefollowing is displayed, DUMP BOX ATTACHMENT - NONE SELECTED. To change the selectedattachment, scroll UP or DOWN until DUMP BOX ATTACHMENT text line is highlighted, thenpress the SELECT button. Pressing the SELECT button will change to the Dump Box AttachmentSelection screen defined later.Indicates function of button #1. Depressing this button jumps the operator to the Select screen forthe attachment type currently highlighted.Indicates Function of button #2. Button is depressed to navigate through screen options. Whenbutton is depressed, the icon above the presently highlighted icon is now highlighted removing thehighlight from original selection.Indicates Function of button #3. Button is depressed to navigate through screen options. Whenbutton is depressed, the icon below the presently highlighted icon is now highlighted removing thehighlight from original selection.Indicates function of button #4. When this button is depressed the screen changes to display theVehicle Display Screen.Indicates function of button #5. When this button is depressed the screen changes to display theMain Menu screen.M-B Multi-Service Vehicle Page 4.43 <strong>Operation</strong>© 2008 M-B <strong>Companies</strong> <strong>Inc</strong>.All Rights Reserved
Attachment SelectionThe Attachment Selection screen (Figure 30) is the screen used toselect or define the attachment to be used on the vehicle. The operatorselects this screen from the Attachment screen. Exiting from thisscreen returns to the Attachment screen.Attachment SelectionBoom Flail Yes NoDefault Yes NoPTO Snow Blower Yes NoHydraulic Snow Blower Yes NoNone Yes NoRear Hitch Hydraulics Yes NoSprayer Spreader Yes NoSpreader Dump Box Yes NoCold Planer Yes NoSelectItemToggleClear AllVehicleDisplayMainMenuFigure 30The selection of an attachment or multiple attachments will have someeffect on the operation of the M-B <strong>MSV</strong>. The following table showsattachment combinations and their effect.AttachmentAdditional AttachmentAcceptedTop MPH/KPH(Transport)Max RPM(Transport)Max RPM(Work)None None 25/40.2 1900 2700DefaultRear Hitch, Sprayer or 25/40.2 1900 2700Spreader, Spreader and/orDump BoxBoom FlailRear Hitch, Sprayer or 20.5/33 1900 2200Spreader, Spreader and/orDump BoxPTO Snow BlowerRear Hitch, Sprayer or 20.5/33 1900 2200Spreader, Spreader and/orDump BoxHydraulic Snow Blower Rear Hitch, Sprayer or 25/40.2 1900 2200Spreader, Spreader and/orDump BoxRear Hitch Hydraulics Default, PTO Snow Blower, 18/29 1900 2400Hydraulic Snow BlowerSpreader or Sprayer Default, PTO Snow Blower, 15/24 1900 2200Hydraulic Snow BlowerSpreader and/or Dump Box Default, PTO Snow Blower, 15/24 1900 2200Hydraulic Snow BlowerCold Planer No others allowed 20.5/33 1900 2200M-B Multi-Service Vehicle Page 4.44 <strong>Operation</strong>© 2008 M-B <strong>Companies</strong> <strong>Inc</strong>.All Rights Reserved
When an attachment is selected and made active the joystickfunction will change. The following screens show the selection of anattachment and the functions fo the joystick.Selection of Boom FlailUse the Attachment Selection screen to change Boom Flail to Yes(Figure 31). The joystick functions will become as shown (Figure 32).Attachment SelectionBoom Flail Yes NoDefault Yes NoPTO Snow Blower Yes NoHydraulic Snow Blower Yes NoNone Yes NoRear Hitch Hydraulics Yes NoSprayer Spreader Yes NoSpreader Dump Box Yes NoCold Planer Yes NoSelectItemToggleClear AllVehicleDisplayMainMenuFigure 31Forward - Secondary Boom DownTrigger Forward - Boom Head Swivel DownBackward - Secondary Boom UpTrigger Backward - Boom Head Swivel UpThrottle Up/DownShift Forward/ReverseNot UsedNot UsedBreak Away ReturnPTO On/OffLEDLeft - Primary Boom UpTrigger Left - Boom Head Swivel UpAux 3 On/OffRight - Primary Boom DownTrigger Right - Boom Head Swivel DownFigure 32M-B Multi-Service Vehicle Page 4.45 <strong>Operation</strong>© 2008 M-B <strong>Companies</strong> <strong>Inc</strong>.All Rights Reserved
Selection of DefaultUse the Attachment Selection screen to change Default to Yes(Figure 33). The joystick functions will become as shown (Figure 34).Attachment SelectionBoom Flail Yes NoDefault Yes NoPTO Snow Blower Yes NoHydraulic Snow Blower Yes NoNone Yes NoRear Hitch Hydraulics Yes NoSprayer Spreader Yes NoSpreader Dump Box Yes NoCold Planer Yes NoSelectItemToggleClear AllVehicleDisplayMainMenuFigure 33Forward - Front Hitch DownBackward - Front Hitch UpThrottle Up/DownShift Forward/ReverseNot UsedNot UsedFloat Mode On/OffPTO On/OffLEDLeft - Aux 1 <strong>Inc</strong>reaseTrigger Left - Aux 2 <strong>Inc</strong>reaseAux 3 On/OffRight - Aux 1 DecreasedTrigger Right - Aux 2 DecreaseFigure 34M-B Multi-Service Vehicle Page 4.46 <strong>Operation</strong>© 2008 M-B <strong>Companies</strong> <strong>Inc</strong>.All Rights Reserved
Selection of PTO Snow BlowerUse the Attachment Selection screen to change PTO Snow Blower toYes (Figure 35). The joystick functions will become as shown(Figure 36).Attachment SelectionBoom Flail Yes NoDefault Yes NoPTO Snow Blower Yes NoHydraulic Snow Blower Yes NoNone Yes NoRear Hitch Hydraulics Yes NoSprayer Spreader Yes NoSpreader Dump Box Yes NoCold Planer Yes NoSelectItemToggleClear AllVehicleDisplayMainMenuFigure 35Forward - Front Hitch DownTrigger Button 3 - Aux 3 ReverseBackward - Front Hitch UpThrottle Up/DownShift Forward/ReverseNot UsedNot UsedFloat mode On/OffPTO On/OffLEDLeft - Aux 1 <strong>Inc</strong>reaseTrigger Left - Aux 2 <strong>Inc</strong>reaseAux 3 On/OffRight - Aux 1 DecreasedTrigger Right - Aux 2 DecreaseFigure 36M-B Multi-Service Vehicle Page 4.47 <strong>Operation</strong>© 2008 M-B <strong>Companies</strong> <strong>Inc</strong>.All Rights Reserved
Selection of Hydraulic Snow BlowerUse the Attachment Selection screen to change Hydraulic SnowBlower to Yes (Figure 37). The joystick functions will become as shown(Figure 38).Attachment SelectionBoom Flail Yes NoDefault Yes NoPTO Snow Blower Yes NoHydraulic Snow Blower Yes NoNone Yes NoRear Hitch Hydraulics Yes NoSprayer Spreader Yes NoSpreader Dump Box Yes NoCold Planer Yes NoSelectItemToggleClear AllVehicleDisplayMainMenuFigure 37Forward - Front Hitch DownNot UsedBackward - Front Hitch UpThrottle Up/DownShift Forward/ReverseNot UsedNot UsedFloat mode On/OffNot UsedLEDLeft - Aux 1 <strong>Inc</strong>reaseTrigger Left - Aux 2 <strong>Inc</strong>reaseAux 3 On/OffRight - Aux 1 DecreasedTrigger Right - Aux 2 DecreaseFigure 38M-B Multi-Service Vehicle Page 4.48 <strong>Operation</strong>© 2008 M-B <strong>Companies</strong> <strong>Inc</strong>.All Rights Reserved
Selection of NoneUse the Attachment Selection screen to change None to Yes(Figure 39). The joystick functions will become as shown (Figure 40).Attachment SelectionBoom Flail Yes NoDefault Yes NoPTO Snow Blower Yes NoHydraulic Snow Blower Yes NoNone Yes NoRear Hitch Hydraulics Yes NoSprayer Spreader Yes NoSpreader Dump Box Yes NoCold Planer Yes NoSelectItemToggleClear AllVehicleDisplayMainMenuFigure 39Forward - Front Hitch DownBackward - Front Hitch UpThrottle Up/DownShift Forward/ReverseNot UsedNot UsedFloat mode On/OffPTO On/OffLEDLeft - Aux 1 <strong>Inc</strong>reaseTrigger Left - Aux 2 <strong>Inc</strong>reaseAux 3 On/OffRight - Aux 1 DecreasedTrigger Right - Aux 2 DecreaseFigure 40M-B Multi-Service Vehicle Page 4.49 <strong>Operation</strong>© 2008 M-B <strong>Companies</strong> <strong>Inc</strong>.All Rights Reserved
Selection of Rear Hitch HydraulicsUse the Attachment Selection screen to change Rear Hitch Hydraulicsto Yes (Figure 41). The joystick functions will become as shown(Figure 42).Attachment SelectionBoom Flail Yes NoDefault Yes NoPTO Snow Blower Yes NoHydraulic Snow Blower Yes NoNone Yes NoRear Hitch Hydraulics Yes NoSprayer Spreader Yes NoSpreader Dump Box Yes NoCold Planer Yes NoSelectItemToggleClear AllVehicleDisplayMainMenuFigure 41Forward - Front Hitch DownBackward - Front Hitch UpThrottle Up/DownShift Forward/ReverseRear Hitch Up/DownAux 4 Up/DownFloat mode On/OffPTO On/OffLEDLeft - Aux 1 <strong>Inc</strong>reaseTrigger Left - Aux 2 <strong>Inc</strong>reaseAux 3 On/OffRight - Aux 1 DecreasedTrigger Right - Aux 2 DecreaseFigure 42M-B Multi-Service Vehicle Page 4.50 <strong>Operation</strong>© 2008 M-B <strong>Companies</strong> <strong>Inc</strong>.All Rights Reserved
Selection of Sprayer SpreaderUse the Attachment Selection screen to change Sprayer Spreader toYes (Figure 43). The joystick functions will become as shown(Figure 44).Attachment SelectionBoom Flail Yes NoDefault Yes NoPTO Snow Blower Yes NoHydraulic Snow Blower Yes NoNone Yes NoRear Hitch Hydraulics Yes NoSprayer Spreader Yes NoSpreader Dump Box Yes NoCold Planer Yes NoSelectItemToggleClear AllVehicleDisplayMainMenuFigure 43Forward - Front Hitch DownBackward - Front Hitch UpThrottle Up/DownShift Forward/ReverseSprayer On/OffAux 4 Up/DownFloat Mode On/OffPTO On/OffLeft - Aux 1Trigger Left - Aux 2LEDAux 3 On/OffRight - Aux 1Trigger Right - Aux 2Figure 44M-B Multi-Service Vehicle Page 4.51 <strong>Operation</strong>© 2008 M-B <strong>Companies</strong> <strong>Inc</strong>.All Rights Reserved
Selection of Spreader Dump BoxUse the Attachment Selection screen to change Spreader Dump Boxto Yes (Figure 45). The joystick functions will become as shown(Figure 46).Attachment SelectionBoom Flail Yes NoDefault Yes NoPTO Snow Blower Yes NoHydraulic Snow Blower Yes NoNone Yes NoRear Hitch Hydraulics Yes NoSprayer Spreader Yes NoSpreader Dump Box Yes NoCold Planer Yes NoSelectItemToggleClear AllVehicleDisplayMainMenuFigure 45Forward - Front Hitch DownBackward - Front Hitch UpThrottle Up/DownShift Forward/ReverseDump Box Up/DownSpreader <strong>Inc</strong>./Dec.Float mode On/OffPTO On/OffLEDLeft - Aux 1 <strong>Inc</strong>reaseTrigger Left - Aux 2 <strong>Inc</strong>reaseAux 3 On/OffRight - Aux 1 DecreasedTrigger Right - Aux 2 DecreaseFigure 46M-B Multi-Service Vehicle Page 4.52 <strong>Operation</strong>© 2008 M-B <strong>Companies</strong> <strong>Inc</strong>.All Rights Reserved
Selection of Cold PlanerUse the Attachment Selection screen to change Cold Planer to Yes(Figure 47). The joystick functions will become as shown (Figure 48).Attachment SelectionBoom Flail Yes NoDefault Yes NoPTO Snow Blower Yes NoHydraulic Snow Blower Yes NoNone Yes NoRear Hitch Hydraulics Yes NoSprayer Spreader Yes NoSpreader Dump Box Yes NoCold Planer Yes NoSelectItemToggleClear AllVehicleDisplayMainMenuFigure 47Forward - Secondary Boom DownBackward - Secondary Boom UpThrottle Up/DownShift Forward/ReverseNot UsedNot UsedFloat mode On/OffPTO On/OffLEDLeft - Primary Boom UpTrigger Left - Boom Head Swivel UpAux 3 On/OffRight - Primary Boom DownTrigger Right - Boom Head Swivel DownFigure 48It is also possible to have more than one attachment in use. Somecombinations are not allowed and cannot be selected on theattachment screenM-B Multi-Service Vehicle Page 4.53 <strong>Operation</strong>© 2008 M-B <strong>Companies</strong> <strong>Inc</strong>.All Rights Reserved
Selection of Spreader Dump Box with PTO Snow BlowerUse the Attachment Selection screen to change Spreader Dump Boxand PTO Snow Blower both to Yes (Figure 49). The joystick functionswill become as shown (Figure 50).Attachment SelectionBoom Flail Yes NoDefault Yes NoPTO Snow Blower Yes NoHydraulic Snow Blower Yes NoNone Yes NoRear Hitch Hydraulics Yes NoSprayer Spreader Yes NoSpreader Dump Box Yes NoCold Planer Yes NoSelectItemToggleClear AllVehicleDisplayMainMenuFigure 49Forward - Front Hitch DownTrigger Button 3 - Aux 3 ReverseBackward - Front Hitch UpThrottle Up/DownShift Forward/ReverseDump Box Up/DownSpreader <strong>Inc</strong>./Dec.Float mode On/OffPTO On/OffLEDLeft - Aux 1 <strong>Inc</strong>reaseTrigger Left - Aux 2 <strong>Inc</strong>reaseAux 3 On/OffRight - Aux 1 DecreasedTrigger Right - Aux 2 DecreaseFigure 50M-B Multi-Service Vehicle Page 4.54 <strong>Operation</strong>© 2008 M-B <strong>Companies</strong> <strong>Inc</strong>.All Rights Reserved
Selection of Default with Rear HitchUse the Attachment Selection screen to change Default and RearHitch both to Yes (Figure 51). The joystick functions will become asshown (Figure 52).Attachment SelectionBoom Flail Yes NoDefault Yes NoPTO Snow Blower Yes NoHydraulic Snow Blower Yes NoNone Yes NoRear Hitch Hydraulics Yes NoSprayer Spreader Yes NoSpreader Dump Box Yes NoCold Planer Yes NoSelectItemToggleClear AllVehicleDisplayMainMenuFigure 51Forward - Front Hitch DownBackward - Front Hitch UpThrottle Up/DownShift Forward/ReverseNot UsedNot UsedFloat mode On/OffPTO On/OffLEDLeft - Aux 1 <strong>Inc</strong>reaseTrigger Left - Aux 2 <strong>Inc</strong>reaseAux 3 On/OffRight - Aux 1 DecreasedTrigger Right - Aux 2 DecreaseFigure 52M-B Multi-Service Vehicle Page 4.55 <strong>Operation</strong>© 2008 M-B <strong>Companies</strong> <strong>Inc</strong>.All Rights Reserved
Selection of Sprayer Spreader with DefaultUse the Attachment Selection screen to change Sprayer Spreader andDefault both to Yes (Figure 53). The joystick functions will become asshown (Figure 54).Attachment SelectionBoom Flail Yes NoDefault Yes NoPTO Snow Blower Yes NoHydraulic Snow Blower Yes NoNone Yes NoRear Hitch Hydraulics Yes NoSprayer Spreader Yes NoSpreader Dump Box Yes NoCold Planer Yes NoSelectItemToggleClear AllVehicleDisplayMainMenuFigure 53Forward - Front Hitch DownBackward - Front Hitch UpThrottle Up/DownShift Forward/ReverseNot UsedNot UsedFloat mode On/OffPTO On/OffLEDLeft - Aux 1 <strong>Inc</strong>reaseTrigger Left - Aux 2 <strong>Inc</strong>reaseAux 3 On/OffRight - Aux 1 DecreasedTrigger Right - Aux 2 DecreaseFigure 54M-B Multi-Service Vehicle Page 4.56 <strong>Operation</strong>© 2008 M-B <strong>Companies</strong> <strong>Inc</strong>.All Rights Reserved
New AttachmentThe New Attachment screen allows non-<strong>MB</strong> attachments to beconfigured for use on the <strong>MSV</strong>. The configuration is saved with aunique name that can be recalled from one of the Attachment Selectscreens. The operator selects this screen from one of the AttachmentSelection screens. This screen returns to that Select screen.There will be 5 user defined screens. Attachment name text will beentered by scrolling UP and DOWN and then selecting the desiredcharacter. These 5 screens can be saved, reused and cleared.NameNew AttachmentNameFront HitchRear HitchPTOAux 1Aux 2DescriptionTitle block for this screen. Cannot be accessed by scrolling with UP/DOWN arrow buttons.Text line that allows a unique name to be entered for the attachment to be configured. Text linedisplays DISABLED (or ENABLED) and is accessed (highlighted) by scrolling UP or DOWN witharrow keys and then pressing SELECT. The name above button 1 then changes to DESELECT.Pressing DESELECT saves the entered name and allows the UP/DOWN arrows to scroll to otherscreen lines. The name of button 1 changes back to SELECT.Text line that specifies that the attachment being defined is mounted to the front hitch. Text linedisplays DISABLED (or ENABLED) and is accessed (highlighted) by scrolling UP or DOWN witharrow keys. Text line is accessed (highlighted) by scrolling UP or DOWN with arrow keys and thenpressing SELECT. The name above button 1 then changes to DESELECT. Pressing the UP arrowenables the function. Pressing the DOWN arrow disables the function if previously enabled.Pressing DESELECT saves the entered name and allows the UP/DOWN arrows to scroll to otherscreen lines. The name of button 1 changes back to SELECT.Text line that specifies that the attachment being defined is mounted to the rear hitch. Text linedisplays DISABLED (or ENABLED) and is accessed (highlighted) by scrolling UP or DOWN witharrow keys. Text line is accessed (highlighted) by scrolling UP or DOWN with arrow keys and thenpressing SELECT. The name above button 1 then changes to DESELECT. Pressing the UP arrowenables the function. Pressing the DOWN arrow disables the function if previously enabled.Pressing DESELECT saves the entered name and allows the UP/DOWN arrows to scroll to otherscreen lines. The name of button 1 changes back to SELECT.Text line that allows the PTO output to be enabled for the configured attachment. Text line displaysDISABLED (or ENABLED) and is accessed (highlighted) by scrolling UP or DOWN with arrowkeys. Text line is accessed (highlighted) by scrolling UP or DOWN with arrow keys and thenpressing SELECT. The name above button 1 then changes to DESELECT. Pressing the UP arrowenables the function. Pressing the DOWN arrow disables the function if previously enabled.Pressing DESELECT saves the entered name and allows the UP/DOWN arrows to scroll to otherscreen lines. The name of button 1 changes back to SELECT.Text line that allows the Aux 1 output to be enabled for the configured attachment. Text line displaysDISABLED (or ENABLED) and is accessed (highlighted) by scrolling UP or DOWN with arrowkeys. Text line is accessed (highlighted) by scrolling UP or DOWN with arrow keys and thenpressing SELECT. The name above button 1 then changes to DESELECT. Pressing the UP arrowenables the function. Pressing the DOWN arrow disables the function if previously enabled.Pressing DESELECT saves the entered name and allows the UP/DOWN arrows to scroll to otherscreen lines. The name of button 1 changes back to SELECT.Text line that allows the Aux 2 output to be enabled for the configured attachment. Text line displaysDISABLED (or ENABLED) and is accessed (highlighted) by scrolling UP or DOWN with arrowkeys. Text line is accessed (highlighted) by scrolling UP or DOWN with arrow keys and thenpressing SELECT. The name above button 1 then changes to DESELECT. Pressing the UP arrowenables the function. Pressing the DOWN arrow disables the function if previously enabled.Pressing DESELECT saves the entered name and allows the UP/DOWN arrows to scroll to otherscreen lines. The name of button 1 changes back to SELECT.M-B Multi-Service Vehicle Page 4.57 <strong>Operation</strong>© 2008 M-B <strong>Companies</strong> <strong>Inc</strong>.All Rights Reserved
NameAux 3Aux 4Aux 5Aux 6SelectUp ArrowDown ArrowReturnMain MenuDescriptionText line that allows the Aux 3 output to be enabled for the configured attachment. Text line displaysDISABLED (or ENABLED) and is accessed (highlighted) by scrolling UP or DOWN with arrowkeys. Text line is accessed (highlighted) by scrolling UP or DOWN with arrow keys and thenpressing SELECT. The name above button 1 then changes to DESELECT. Pressing the UP arrowenables the function. Pressing the DOWN arrow disables the function if previously enabled.Pressing DESELECT saves the entered name and allows the UP/DOWN arrows to scroll to otherscreen lines. The name of button 1 changes back to SELECT.Text line that allows the Aux 4 output to be enabled for the configured attachment. Text line displaysDISABLED (or ENABLED) and is accessed (highlighted) by scrolling UP or DOWN with arrowkeys. Text line is accessed (highlighted) by scrolling UP or DOWN with arrow keys and thenpressing SELECT. The name above button 1 then changes to DESELECT. Pressing the UP arrowenables the function. Pressing the DOWN arrow disables the function if previously enabled.Pressing DESELECT saves the entered name and allows the UP/DOWN arrows to scroll to otherscreen lines. The name of button 1 changes back to SELECT.Text line that allows the Aux 5 output to be enabled for the configured attachment. Text line displaysDISABLED (or ENABLED) and is accessed (highlighted) by scrolling UP or DOWN with arrowkeys. Text line is accessed (highlighted) by scrolling UP or DOWN with arrow keys and thenpressing SELECT. The name above button 1 then changes to DESELECT. Pressing the UP arrowenables the function. Pressing the DOWN arrow disables the function if previously enabled.Pressing DESELECT saves the entered name and allows the UP/DOWN arrows to scroll to otherscreen lines. The name of button 1 changes back to SELECT.Text line that allows the Aux 6 output to be enabled for the configured attachment. Text line displaysDISABLED (or ENABLED) and is accessed (highlighted) by scrolling UP or DOWN with arrowkeys. Text line is accessed (highlighted) by scrolling UP or DOWN with arrow keys and thenpressing SELECT. The name above button 1 then changes to DESELECT. Pressing the UP arrowenables the function. Pressing the DOWN arrow disables the function if previously enabled.Pressing DESELECT saves the entered name and allows the UP/DOWN arrows to scroll to otherscreen lines. The name of button 1 changes back to SELECT.Depressing this button the operator to the SELECT screen for the attachment type currentlyhighlighted.Button is depressed to navigate through screen options. When button is depressed, the icon abovethe presently highlighted icon is now highlighted removing the highlight from original selection.Button is depressed to navigate through screen options. When button is depressed, the icon belowthe presently highlighted icon is now highlighted removing the highlight from original selection.When this button is depressed the screen changes to display the Select screen from which theoperator came.When this button is depressed the screen changes to display the Main Menu screen.M-B Multi-Service Vehicle Page 4.58 <strong>Operation</strong>© 2008 M-B <strong>Companies</strong> <strong>Inc</strong>.All Rights Reserved
System HydraulicsThe System Hydraulics screen (Figure 55) allows the operatorto see hydraulic setpoints which may be modified for each attachmentselection. When a new attachment is selected, certain setpoints maybe adjusted over a defined range on this screen.System HydraulicsAux 3 Flow 18.7 GPM at 2200 RPMFront PT1 532 PSIFront PT2 495 PSIRear PT1 3 PSIRear PT2 2 PSISelectItem<strong>Inc</strong>reaseDecreaseVehicleDisplayMainMenuFigure 55NameDescriptionSystem Hydraulics Title block for this screen. Cannot be accessed by scrolling with UP/DOWN arrow buttons.Aux 3 Flow Displays the hydraulic flow setpoint for the Aux 3 hydraulic output. Text line displayed as AUX 3FLOW XXX GPM at 2200 RPM. The legend above button 2 and button 3 changes to INCREASEand DECREASE respectively when this function is chosen. Pressing button 2 increases the flowsetpoint which will be achieved at 2200 RPM, while pressing button 3 decreases that flow. Pressingthe SELECT ITEM button disables the setting of this function and leaves the control output in thecurrently selected state and scrolls to the next listed function.Front PT1 Not currently supported. For future use will display pressure reading on front transducer.Front PT2 Not currently supported. For future use will display pressure reading on front transducer.Rear PT1 Not currently supported. For future use will display pressure reading on rear transducer.Rear PT2 Not currently supported. For future use will display pressure reading on rear transducer.Select Item Indicates function of button #1. When button is depressed the highlighted function is selected.Pressing the button repeatedly toggles through the listed functions.Changing Legend Indicates function of button #2. When button is depressed the selected function can be controlledusing this button. The legend above the button changes dependent on the function selected.Changing Legend Indicates function of button #3. When button is depressed the selected function can be controlledusing this button. The legend above the button changes dependent on the function selected.Vehicle Display Indicates function of button #4. When this button is depressed the screen changes to display theVehicle Display screen.Main Menu Indicates function of button #5. When this button is depressed the screen changes to the MainMenu screen.M-B Multi-Service Vehicle Page 4.59 <strong>Operation</strong>© 2008 M-B <strong>Companies</strong> <strong>Inc</strong>.All Rights Reserved
Vehicle DiagnosticsThe Vehicle Diagnostics screen (Figure 56) allows the operator or atechnician to view any faults sensed by the MDC Control.Vehicle DiagnosticsI/ODiagnosticsVehicleDisplayMainMenuFigure 56NameVehicle DiagnosticsDisplay WindowI/O DiagnosticsDown ArrowUp ArrowVehicle DisplayMain MenuDescriptionTitle block for this screen. Cannot be accessed by scrolling with UP/DOWN arrow buttons.Display area where vehicle faults sensed by the MDC Control are displayed.Indicates the function of button #1. When this button is depressed the screen changes to displaythe Input/Output Diagnostics screen. The operator has the option of returning to this screen fromInput/Output Diagnostics.Indicates function of button #2. Button is depressed to scroll through any listed diagnosticmessages. When button is depressed, the line below the presently highlighted line is highlightedremoving the highlight from original selection.Indicates function of button #3. Button is depressed to scroll through any listed diagnosticmessages. When button is depressed, the line above the presently highlighted line is highlightedremoving the highlight from original selection.Indicates function of button #4. When this button is depressed the screen changes to display theVehicle Display screen.Indicates function of button #5. When this button is depressed the screen changes to display theMain Menu screen.M-B Multi-Service Vehicle Page 4.60 <strong>Operation</strong>© 2008 M-B <strong>Companies</strong> <strong>Inc</strong>.All Rights Reserved
Input/Output Diagnostics The Input/Output Diagnostics screens (Figure 57 and Figure 58)are the primary screens used by technicians for electronic/systemstroubleshooting. These are viewable screens only. No capability toenter or modify values are provided. These screens are accessed formthe Vehicle Diagnostics screen. The operator has the option ofreturning to the Vehicle Diagnostics screen from this screen.Output Diagnostics0 Front Hitch Up 0.0 OK1 Front Hitch Down 0.0 OK2 Aux 3 Motor Drive 0.0 OK3 Aux 2 Front Extend 0.0 OK4 Aux 2 Front Retract 0.0 OK5 Aux 1 Front Extend 0.0 OK6 Aux 1 Front Retract 0.0 OK7 Front Hitch Locking Off OK8 Front End Connector 1 Off OKVehicleDiagnosticsVehicleDisplayMainMenuFigure 57Input Diagnostics0 Speed Sensor Input 01 Fan Low Sw Off2 Wiper High Column Sw Off3 Wiper Low Column Sw Off4 Wiper Int Column Sw Off5 Master Unswitched B 12.2376 Front Hitch_Press 1 0.5327 Front Hitch_Press 2 0.4948 Headlight_Enabled Sw OffNextScreenVehicleDisplayMainMenuFigure 58NameDescriptionInput/Output Diagnostics Title block for this screen. Cannot be accessed by scrolling with UP/DOWN arrow buttons.Display Window Display area where input - output status is displayed.Vehicle Diagnostics Indicates function of button #1. When this button is depressed the screen changes back to theVehicle Diagnostics screen.M-B Multi-Service Vehicle Page 4.61 <strong>Operation</strong>© 2008 M-B <strong>Companies</strong> <strong>Inc</strong>.All Rights Reserved
NameDown ArrowUp ArrowVehicle DisplayMain MenuDescriptionIndicates function of button #2. Button is depressed to scroll through pages of listed inputs andoutputs. When button is depressed, the next lower page is listed.Indicates function of button #3. Button is depressed to scroll through pages of listed inputs andoutputs. When button is depressed, the next higher page is listed.Indicates function of button #4. When this button is depressed the screen changes to display theVehicle Display screen.Indicates function of button #5. When this button is depressed the screen changes to the MainMenu screen.Vehicle DisplayThe Vehicle Display screens (Figure 59 and Figure 60) can be used toview the status of the front and rear MVEC systems. Both the front andrear screens show relays and fuses throughout the M-B <strong>MSV</strong>.Front MVEC Diagnostics1 Front MVEC Comm Status Comm OK2 Relay 1 Off OK3 Relay 2 Off OK4 Relay 3 Off OK5 Relay 4 Off OK6 Relay 5 Off OK7 Relay 6 Off OK8 Relay 7 Off OK9 Relay 8 Off OKNextScreenVehicleDisplayMainMenuFigure 59Rear MVEC Diagnostics1 Rear MVEC Comm Status Comm OK2 Relay 1 On OK3 Relay 2 Off OK4 Relay 3 Off OK5 Relay 4 Off OK6 Relay 5 Off OK7 Relay 6 Off OK8 Relay 7 Off OK9 Relay 8 Off OKNextScreenVehicleDisplayMainMenuFigure 60M-B Multi-Service Vehicle Page 4.62 <strong>Operation</strong>© 2008 M-B <strong>Companies</strong> <strong>Inc</strong>.All Rights Reserved
Engine DiagnosticsThe Engine Diagnostics screen (Figure 61) allows the operatoror a technician to view any faults sensed by the ECM.Engine DiagnosticsEngine Hours 7Active Fault Codes 0Number Active Faults 0VehicleDisplayMainMenuFigure 61NameDescriptionEngine Diagnostics Title block for this screen. Colors and font to be defined. Cannot be accessed by scrolling with UP/DOWN arrow buttons.Number of Sensed Faults Displays the current number of active faults currently sensed by the ECM. Display only, no ability toenter or change data. Test line displays NU<strong>MB</strong>ER OF SENSED ENGINE FAULTS XXX. WhereXXX is the number of faults since last reset.Active Fault Codes Text line header that defines the list of following faults as currently active. Text line displays,ACTIVE FAULT CODES:. List is scrollable.Vehicle Display Indicates function of button #4. When this button is depressed the screen changes to display theVehicle Display screen.Main Menu Indicates function of button #5. When this button is depressed the screen changes to the MainMenu screen.Advanced EngineDiagnosticsThe engine has diagnostic information that can be viewed using theMDC displays. The engine manufacturer provides a second level ofdiagnostic information. Refer to the engine documentation forhardware requirements and access to that level. The communicationport is located below the right side arm rest (Figure 62).Diagnostic PortFigure 62M-B Multi-Service Vehicle Page 4.63 <strong>Operation</strong>© 2008 M-B <strong>Companies</strong> <strong>Inc</strong>.All Rights Reserved
Joystick LayoutThe Joystick Layout screen is used to display all current joystickfunctions. Some functions will change depending on the Attachmentsselected. The layout shown results when None is selected in theAttachment Selection screen.Forward - Front Hitch DownBackward - Front Hitch UpThrottle Up/DownShift Forward/ReverseNot UsedNot UsedFloat mode On/OffPTO On/OffLEDLeft - Aux 1 <strong>Inc</strong>reaseTrigger Left - Aux 2 <strong>Inc</strong>reaseAux 3 On/OffRight - Aux 1 DecreasedTrigger Right - Aux 2 DecreaseFigure 63NameThrottle Up/DownAux 4LEDLegend Left - Aux 1Legend Right - Aux 1Legend Left - Aux 2Legend Right - Aux 2Sift Forward/ReverseAux 5PTODescriptionText and arrow defining throttle switch. Text line states, THROTTLE UP/DOWN. Pushing switchforward raises engine RPM, pulling switch back lowers RPM.Text and arrow defining Aux 4 switch. Text line states, AUX 4 - LEFT WING UP/DOWN. Pushingswitch forward raises left wing; pulling switch back lowers left wing.Displays when the joystick is active.Depicts joystick motion required to activate left direction of Aux 1. (Joystick motion left) Thisdescription may change dependent on attachment.Depicts joystick motion required to activate right direction of Aux 1. (Joystick motion right) Thisdescription may change dependent on attachment.Depicts joystick motion required to activate left direction of Aux 2. (Joystick motion left plus trigger)This description may change dependent on attachment.Depicts joystick motion required to activate right direction of Aux 2. (Joystick motion right plus trigger)This description may change dependent on attachment.Text and arrow defining Ground Drive switch. Text line states, SHIFT FORWARD/REVERSE. Pushingfirst changes ground drive state to Neutral from Reverse, then from Neutral to Forward. Pulling switchback first changes from Forward to Neutral, second changes from Neutral to Reverse.Text and arrow defining Aux 5 switch. Text line states, AUX 5 - RIGHT WING UP/DOWN. Pushingswitch forward raises right wing; pulling switch back lowers right wing.Text and arrow defining PTO switch. Text line states, PTO ON/OFF. Depressing switch enables PTO,depressing again disables PTO.M-B Multi-Service Vehicle Page 4.64 <strong>Operation</strong>© 2008 M-B <strong>Companies</strong> <strong>Inc</strong>.All Rights Reserved
NameAux 3Parking Brake OffAux 2Legend Forward -Front Hitch DownLegend TriggerForward - Rear HitchDownLegend Back - FrontHitch UpLegend Trigger Back -Rear Hitch UpButton 1Button 2Button 3Button 4Button 5DescriptionText and arrow defining Aux 3 switch. Text line states, AUX 3 ON/OFF. Depressing switch enables Aux3 pump, depressing again disables pump.Text and arrow defining Parking Brake Off switch. Text line states, PARKING BRAKE OFF.Depressing switch disables Parking Brake. Parking Brake cannot be enabled from joystick.Depicts joystick motion required to activate right direction of Aux 2. (Joystick motion right plus trigger).This description may change depending on attachment.Depicts joystick motion required to lower front hitch lift. (Joystick motion forward).Depicts joystick motion required to lower rear hitch lift. (Joystick motion forward plus trigger).Depicts joystick motion required to raise front hitch. (Joystick motion back).Depicts joystick motion required to raise rear hitch. (Joystick motion back plus trigger).No legend. When this button is depressed the screen changes to the Main Menu Screen.No legend. When this button is depressed the screen changes to the Main Menu Screen.No legend. When this button is depressed the screen changes to the Main Menu Screen.No legend. When this button is depressed the screen changes to the Main Menu Screen.No legend. When this button is depressed the screen changes to the Main Menu Screen.SetupThe Setup screen lists important information about the vehicleincluding installed options, the revision of the installed software, andany data that will need to be referenced for service or warrantyreasons. Options can be enabled from this screen. Changes to thescreen require the use of a password.Password1 2 3 4 5 6 7 8 9Versions: Display APP = 0.28 : Display HDL = 0.24.1 : Control Module Firmware 01.05NextNumberSelectNumberEnterVehicleDisplayMainMenuFigure 64M-B Multi-Service Vehicle Page 4.65 <strong>Operation</strong>© 2008 M-B <strong>Companies</strong> <strong>Inc</strong>.All Rights Reserved
NameSetup screenM-B Multi Service VehicleSerial NumberControl Software VersionNumberRear Hitch OptionInstalled/Not InstalledLeft Hitch OptionInstalled/Not InstalledRight Hitch OptionInstalled/Not InstalledDumpbox OptionInstalled/Not InstalledFuture OptionsPasswordAddress and copyrightlineSelectUp ArrowDown ArrowVehicle DisplayMain MenuDescriptionTitle block for this screen. Cannot be accessed by scrolling with UP/DOWN arrow buttons.Text line that displays the serial number assigned to this vehicle at manufacture. Text line cannot beaccessed or changed by scrolling. The text line is displayed as follows, M-B MULTI SERVICEVEHICLE SERIAL NU<strong>MB</strong>ER XX-XXXX, where XX-XXXX is the 6 digit serial number.Text line that displays the software version installed in this vehicle. Text line cannot be accessed orchanged by scrolling. The text line is displayed as follows, M-B SOFTWARE REVISION NU<strong>MB</strong>ERYYYY, where YYYY is the version number.Text line that displays whether the Rear Hitch Option is installed. Text line cannot be accessed orchanged by scrolling. The text line is displayed as follows, REAR HITCH OPTION INSTALLED. Ifoption is absent it displays NOT INSTALLED.Text line that displays whether the Left Hitch Option is installed. Text line cannot be accessed orchanged by scrolling. The text line is displayed as follows, LEFT HITCH OPTION INSTALLED. Ifoption is absent it displays NOT INSTALLED.Text line that displays whether the Right Hitch Option is installed. Text line cannot be accessed orchanged by scrolling. The text line is displayed as follows, RIGHT HITCH OPTION INSTALLED. Ifoption is absent it displays NOT INSTALLED.Text line that displays whether the Dumpbox Option is installed. Text line cannot be accessed orchanged by scrolling. The text line is displayed as follows, DUMPBOX OPTION INSTALLED. Ifoption is absent it states NOT INSTALLED.Function line that allows the entry of a password to allow options to be enabled.Text line that displays the following: M-B COMPANIES, INC. 1615 WISCONSIN AVE. NEWHOLSTEIN, WI 53061, www.m-bco.com, COPYRIGHT M-B COMPANIES, INC. 2008.Indicates function of button #1. When button is depressed the screen changes to display the screenthat is highlighted (chosen) by scrolling with the UP/DOWN buttons. Once selected the button titlechanges to ACCEPT and functions as described above.Indicates function of button #2. Button is depressed to navigate through screen options. Whenbutton is depressed, the icon above the presently highlighted icon is now highlighted removing thehighlight from original selection.Indicates function of button #3. Button is depressed to navigate through screen options. Whenbutton is depressed, the icon below the presently highlighted icon is now highlighted removing thehighlight from original selection.Indicates function of button #4. When this button is depressed the screen changes to display theVehicle Display screen.Indicates function of button #5. When this button is depressed the screen changes to the MainMenu screen.M-B Multi-Service Vehicle Page 4.66 <strong>Operation</strong>© 2008 M-B <strong>Companies</strong> <strong>Inc</strong>.All Rights Reserved
Pre-Start UpWARNING:Before performing any of the following inspections, make surethat the vehicle engine is shut down, the ignition key isremoved, and all personnel in the work area are aware that theequipment is being inspected and must not be started.Never check for hydraulic leaks by hand. Hydraulic fluid underpressure can penetrate skin.Inspect all hydraulic lines for evidence of leaking, loose fittings, andfrayed or damaged hoses.Check hydraulic cylinders for broken or loose parts, especially cotterpins on the hydraulic cylinders.Check the hydraulic oil level. A sight gauge is located on the side of thereservoir for this purpose. Add fluid as necessary.All access doors are secured in place.Visually inspect for fluid leaks under the vehicle.Check air filter by using the MDC screens.Check for faults on screen.Inspect attachments for damage and proper connection.M-B Multi-Service Vehicle Page 4.67 <strong>Operation</strong>© 2008 M-B <strong>Companies</strong> <strong>Inc</strong>.All Rights Reserved
Start-up ProcedureThe emergency stop on the steering column must not be pushed in.Emergency StopFigure 65Key SwitchThe key switch on the steering column is used to initialize the MDCcontroller and start the engine. The engine will not start until the MDChas booted up and until intake manifold heater has properly warmed.To start the <strong>MSV</strong> turn the key switch to the on position. Watch thescreen on the MDC. After an M-B splash screen the start up screen willappear. Turn the key to start the engine.Important: Do not turn the key to engage the starter until the start upscreen is showing. If this happens the engine will not start. The keymust be returned to the off position and then moved back to start theMDC software.Trying to start the engine prior to the Startup screen appearing maycause delays. Engine will not crank until manifold heater is at startingtemperature. Colder temps will cause delays.1. The Engine Speeds are stored in the MDC memory.2. Start the engine.3. Use the MDC to determine if the correct attachments areconfigured in the controls4. With the engine idling, operate the attachments until the systemwarms up.5. Return to the main screen for operation.M-B Multi-Service Vehicle Page 4.68 <strong>Operation</strong>© 2008 M-B <strong>Companies</strong> <strong>Inc</strong>.All Rights Reserved
Cold Weather StartingBefore Starting the EngineNOTE: Do not use a torch to heat a compartment. This causesfires, burns wiring, gaskets and seals, or melts protectiveplastic.When using canvas covers, do not install them nearexhaust systems. This helps to prevent fires.Using <strong>Manual</strong>ly Sprayed Ether Starting AidsDANGER:Do not use manually sprayed Ether starting aids. Using aspray type starting aid may cause the air intake to explode andcause personal injuryIntake Air HeaterThe engine has a grid heater in the air intake tube just before theintake manifold. This heater is controlled as needed by the engineelectronics. Do not bypass or force the heater on.M-B Multi-Service Vehicle Page 4.69 <strong>Operation</strong>© 2008 M-B <strong>Companies</strong> <strong>Inc</strong>.All Rights Reserved
Starting with Jump Start CablesWARNING:Batteries give off flammable fumes that can explode resultingin personal injury.Prevent sparks near the batteries. They could cause vapors toexplode. Do not allow the jump start cable ends to contacteach other or the machine.Do not smoke when checking battery electrolyte levels.Electrolyte is an acid and can cause personal injury if itcontacts skin or eyes.Always wear eye protection when starting a machine with jumpstart cables.Improper jump start procedures can cause an explosionresulting in personal injury.Always connect the battery positive (+) to battery position (+)and battery negative (-) to battery negative (-).Jump start only with an energy source with the same voltageas the stalled machine.Turn off all lights and accessories on the stalled machine.Otherwise, they will operate when the energy source isconnected.NOTE:When starting from another machine, make sure themachines do not touch. This could prevent damage toengine bearings and electrical outlets.Severely discharged maintenance free batteries do notfully recharge from the alternator after jump starting. Thebatteries must be charged to proper voltage with abattery charger. Many batteries thought to be unusableare still rechargeable.Use only equal voltage for starting. Check the batteryand starter voltage rating of your machine. Use only thesame voltage for jump starting.M-B Multi-Service Vehicle Page 4.70 <strong>Operation</strong>© 2008 M-B <strong>Companies</strong> <strong>Inc</strong>.All Rights Reserved
Use the following procedure:1. Turn the ignition switch on the stalled machine to the OFF position.Turn off all accessories.2. Move the machine that is being used as an electrical source nearthe stalled machine so that the jump start cables reach the stalledmachine. Do not allow the machines to contact each other.3. Stop the engine of the machine that is being used as an electricalsource. If you are using an auxiliary power source, turn off thecharging system.4. The positive ends of the jump start cables are red. Connect onepositive end of the jump start cable to the positive cable terminal ofthe discharged battery.5. Connect the other positive end of the jump start cable to thepositive cable terminal of the electrical source.6. Connect one negative end of the jump start cable to the negativecable terminal of the electrical source.7. Finally, connect the other negative end of the jump start cable tothe negative cable terminal of the discharged battery. Do not allowthe jump start cables to contact the fuel lines, the hydraulic lines, orany moving parts.8. Start the engine of the machine that is being used as an electricalsource or energize the charging system on the auxiliary powersource.9. Wait at least two minutes before you attempt to start the stalledmachine. This will allow the batteries in the stalled machine topartially charge.10. Attempt to start the stalled engine.11. Immediately after you start the stalled engine, disconnect the jumpstart cables in reverse order.After Starting EngineWhenever a machine has been parked for a long period of time, someof the systems will cool to below normal operating temperatures.always warm the machine systems before operating the machine at fulloperationDamage to engine valve control components can result from engineoperation for short intervals during operation in very cold weatherconditions. If the engine is not allowed to warm completely, the enginecan be damaged by repeated starting and stopping.To avoid damage, always run the engine until the coolant temperatureis at least 180 o F (82 o C).M-B Multi-Service Vehicle Page 4.71 <strong>Operation</strong>© 2008 M-B <strong>Companies</strong> <strong>Inc</strong>.All Rights Reserved
After the engine is warm, warm up the other systems. Start with thehydraulics. Run the engine at less than one-third throttle, and slowlymove the control lever to lift the attachment. Initially, lift the controllever for a few inches (centimeters). Lower the attachment slowly.Continue the sequence: raising, lowering, extending, and retracting.Extend the travel during each cycle. Perform this operation for allhydraulic circuits. Alternate between all of the attachments.Exercise the transmission and the power train. If you cannot move thecontrol for the transmission, perform the following steps:• Engage the parking brake or apply the brake pedal.• Run the engine slightly above LOW IDLE.• Shift the transmission several times from FORWARD toREVERSE.Release the brake. Move the equipment forward and backward forseveral feet (meters). Exercise the machine for several minutes.To reduce the total warm up time, start exercising the entire machinebefore you complete the hydraulic warm up time.Operate under light load until the systems reach normal operatingtemperatures.If the engine temperature is not high enough enclose the engine andblock the radiator. A thermostat that opens at a higher temperature willnot increase the engine temperature if the engine is not under load.To prevent seal damage and gasket damage, keep the enginecrankcase breather pipe clear of blockage.In extreme conditions, use a canvas over the engine compartment.Heat the engine area with a space heater. This will aid in starting theengine. Extending the canvas over the hydraulic components willprovide initial warming of the components.Multigrade lubricants (10W30) may be used successfully at ambienttemperatures below the pour point of the oil. However, in order to usethis oil, you must leave the engine running at low idle. This helps keeplubricants and compartments warm for the engine and for thetransmission. Running the engine at low idle will not keep the hydraulicsystems warm.Safety LinkThe chassis for the <strong>MSV</strong> articulates or pivots in the middle. This isused to help maneuver the <strong>MSV</strong> and provides a smaller turning radius.During maintenance it is advisable to lock-out the articulation of thechassis.To lock the Chassis:1. Pull straight ahead to align the chassis.M-B Multi-Service Vehicle Page 4.72 <strong>Operation</strong>© 2008 M-B <strong>Companies</strong> <strong>Inc</strong>.All Rights Reserved
2. Locate the safety link on the frame behind the cab (Figure66).3. Pull out the removable pin (Figure 67).4. Swing the link to meet the back half and insert the pin (Figure 68).When the safety link is not in use, it should be stored against the frontframe.Removable PinSafety LinkFigure 66 Safety Link OpenFigure 67M-B Multi-Service Vehicle Page 4.73 <strong>Operation</strong>© 2008 M-B <strong>Companies</strong> <strong>Inc</strong>.All Rights Reserved
Figure 68 Pivot Lock ClosedFront AttachmentConnectionsFront Hitch ConnectionsThe attachment hitch has two hooks with hitch clamps. Up and downmovement is supplied by two hydraulic cylinders.The hitch hooks will slide side-to-side to align with variousattachments.CAUTION:If the attachment is not centered on the vehicle damage mayoccur. Keep the hitch hooks tightened in place. The hydraulichoses must be kept clear from all interference points.Hydraulic Lift CylindersClamp LockHookOptional HooksLock PinFigure 69M-B Multi-Service Vehicle Page 4.74 <strong>Operation</strong>© 2008 M-B <strong>Companies</strong> <strong>Inc</strong>.All Rights Reserved
To connect an attachment:1. Pull the <strong>MSV</strong> close to the attachment.2. Adjust the hooks side-to-side as needed using the locking bolt onthe back side. Open the clamp locks and secure with lock pin(Figure 70).Figure 703. Drive the <strong>MSV</strong> forward with the hooks lowered.4. The hooks should fit into the arms of the attachment (Figure 71).5. Lift the hitch in position so the hooks engage and lift theattachment.6. Pull the safety pins out and push the clamp locks back completely.7. Insert the safety pins. Most attachments will have a top link as athird connecting point. This link is normally used to level theattachment.M-B Multi-Service Vehicle Page 4.75 <strong>Operation</strong>© 2008 M-B <strong>Companies</strong> <strong>Inc</strong>.All Rights Reserved
Push Backto LockSafety PinFigure 71Some attachments may be different. Review the instructions with eachattachment. Hydraulic, PTO, and electrical connections may also beneeded for proper attachment use.Front Power Take Off (PTO)The front attachment PTO is accessed thru a panel under theoperators feet (Figure 72).Remove the panel.WARNING:Turn the engine off before opening the access panel.M-B Multi-Service Vehicle Page 4.76 <strong>Operation</strong>© 2008 M-B <strong>Companies</strong> <strong>Inc</strong>.All Rights Reserved
PTO AccessPanelFigure 72The drive spline is visibleNOTE: The spline (Figure 73) should have a coating of greasebefore attaching the PTO shaft.Drive SplineLocking GrooveFigure 73The PTO shaft is inserted from the front of the <strong>MSV</strong> (Figure 74).Line the universal joint up with the spline and push together. Make surethe locking device or universal joint has compressed in grove of PTOshaft (Figure 75).M-B Multi-Service Vehicle Page 4.77 <strong>Operation</strong>© 2008 M-B <strong>Companies</strong> <strong>Inc</strong>.All Rights Reserved
PTO ShaftFigure 74Universal Jointof PTO ShaftPTO SplineFigure 75Replace the access panel before starting the engine.Hydraulic ConnectionsAt the front of the <strong>MSV</strong> there are three pair of connections. Each pairhas a line out and a line in. The connections are matched for each pair.Attachments are connected and the MDC controls are set to controlthe proper auxiliary ports. See Attatchment <strong>Manual</strong> for properconnections. Also refer to MDC Controls section in this manual.M-B Multi-Service Vehicle Page 4.78 <strong>Operation</strong>© 2008 M-B <strong>Companies</strong> <strong>Inc</strong>.All Rights Reserved
Aux 1Quick Disconnect9/16 ORB FemaleAux 1Case drainQuick DisconnectQuick Disconnect9/16 ORB Male9/16 ORB MaleAux 3 PressureQuick Disconnect1-1/16 ORB FemaleElectrical PlugAux 2Quick Disconnect9/16 ORB FemaleAux 2Quick Disconnect9/16 ORB MaleAux 3 ReturnQuick Disconnect1-1/16 ORB MaleFigure 76Attachments connected to the front of the <strong>MSV</strong> may have hydraulichoses that need to attach to the <strong>MSV</strong>. The following table lists the sizeand manufacturer of the quick couplers.Brand Name of Quick Coupler - TEMA IB Series9/16 ORB Female, 1/4 NPT TIB 2511 N9/16 ORB Male, 1/4 NPT TIB 2521 N1-1/16 ORB Female, 3/4 NPT TIB 7511 U1-1/16 ORB Male, 3/4 NPT TIB 7521 UElectrical ConnectionsThe electrical plug pin-out is provided to allow custom wireconnections. The on/off of each pin is controlled by the MDC in thelighting/electrical menu.M-B Multi-Service Vehicle Page 4.79 <strong>Operation</strong>© 2008 M-B <strong>Companies</strong> <strong>Inc</strong>.All Rights Reserved
#5 Brown#7 Ground#1 Black#4 Green#3 Red#6 Blue#2 YellowFigure 77Rear AttachmentConnectionsRear Hitch ConnectionsThe attachment hitch has two hooks with hitch clamps. Up and downmovement is supplied by two hydraulic cylinders, Figure 78.The hitch hooks will slide side-to-side to align with variousattachments.CAUTION:If the attachment is not centered on the vehicle damage mayoccur. Keep the hitch hooks tightened in place. The hydraulichoses must be kept clear from all interference points.Hydraulic Lift CylindersClamp LockHookOptional HooksLock PinFigure 78M-B Multi-Service Vehicle Page 4.80 <strong>Operation</strong>© 2008 M-B <strong>Companies</strong> <strong>Inc</strong>.All Rights Reserved
To connect an attachment:1. Pull the <strong>MSV</strong> close to the attachment.2. Adjust the hooks side-to-side as needed using the locking bolt onthe back side. Open the clamp locks and secure with lock pin(Figure 79).Figure 793. Drive the <strong>MSV</strong> forward with the hooks lowered.4. The hooks should fit into the arms of the attachment (Figure 80).5. Lift the hitch in position so the hooks engage and lift theattachment.6. Pull the safety pins out and push the clamp locks back completely.7. Insert the safety pins. Most attachments will have a top link as athird connecting point. This link is normally used to level theattachment.M-B Multi-Service Vehicle Page 4.81 <strong>Operation</strong>© 2008 M-B <strong>Companies</strong> <strong>Inc</strong>.All Rights Reserved
Push Backto LockSafety PinFigure 80Some attachments may be different. Review the instructions with eachattachment. Hydraulic, PTO, and electrical connections may also beneeded for proper attachment use.Rear PTO (Optional)The rear PTO is driven by the PTO drive assembly through a reversinggear box. The driveshaft is mounted under the engine using a series ofuniversal joints and bearings (Figure 81).M-B Multi-Service Vehicle Page 4.82 <strong>Operation</strong>© 2008 M-B <strong>Companies</strong> <strong>Inc</strong>.All Rights Reserved
Rear PTO ShaftFigure 81Rear Hydraulic Connections (Optional)The back of the <strong>MSV</strong> has two pair of hydraulic connections (Figure 82).Each pair has a line out and a line in. Attachments are connected andthe MDC controls are set to control the proper auxiliary ports (SeeMonitor Diagnose-Control (MDC).Aux 4 PressureQuick Disconnect9/16 ORB FemaleAux 3 PressureQuick Disconnect1-1/16 ORB FemaleAux 4 ReturnQuick Disconnect9/16 ORB MaleFigure 82Aux 3 ReturnQuick Disconnect1-1/16 ORB MaleM-B Multi-Service Vehicle Page 4.83 <strong>Operation</strong>© 2008 M-B <strong>Companies</strong> <strong>Inc</strong>.All Rights Reserved
Brand Name of Quick Coupler - TEMA IB Series9/16 ORB Female, 1/4 NPT TIB 2511 N9/16 ORB Male, 1/4 NPT TIB 2521 N1-1/16 ORB Female, 3/4 NPT TIB 7511 U1-1/16 ORB Male, 3/4 NPT TIB 7521 UWing Attachments(Future)Text still to be added-section not completed.M-B Multi-Service Vehicle Page 4.84 <strong>Operation</strong>© 2008 M-B <strong>Companies</strong> <strong>Inc</strong>.All Rights Reserved
MaintenancePreventative maintenance is a daily responsibility. The following chartsprovide a checklist fo areas that should be inspected on a regularschedule.Manan5Preventative MaintenanceFrequencyInspect all hydraulic lines for evidence of leaking, loose fittings, andfrayed or damaged hoses.As RequiredBefore Each UseDaily•MonthlyAnnuallyCheck hydraulic cylinders for broken or loose parts, especially cotterpins on the hydraulic cylinders.Check the hydraulic oil level. The MDC will display an alarm if the levelbecomes low. A sight gauge is located on the side of the reservoir forthis purpose. Add fluid as necessary.Visually inspect that all access doors and panels are secured in place.Visually inspect for leaks under the vehicle.Check MDC for any active alarms before operating vehicle. Service orrepair as needed.•••••EngineClean cooler intake.Inspect fuel filters; replace as necessary.Drain moisture from fuel/water separator.Check engine oil.Inspect air filter•••••M-B Multi-Service Vehicle Page 5.85 Maintenance© 2008 M-B <strong>Companies</strong> <strong>Inc</strong>.All Rights Reserved
FrequencyPTO DriveCheck gear lubricant level; add as necessary.Drain and replace gear lubricant.Inspect Bearings and Yokes.Inspect Shaft Assembly.As Required•Before Each UseDailyMonthly••Annually•Hydraulic SystemCheck hydraulic fluid level; add fluid as required.•Replace ground drive hydraulic pump charge pressure filter.• •Replace return filter.• •Drain and refill hydraulic system fluid.•Strainers•Ground DriveOil cooler - clean.Check tire pressure.Check connections for fluid leaks•••ElectricalCheck battery terminals for corrosion.Electrical guards in place.Inspect vehicle for loose or damaged wires•••M-B Multi-Service Vehicle Page 5.86 Maintenance© 2008 M-B <strong>Companies</strong> <strong>Inc</strong>.All Rights Reserved
eplacementartsReplacement PartsReplacement PartsWARNINGWARNINGWARNINGHOT SURFACE390-152994NO RIDERS ORHANGERS ON390-152996Uneven terrain athigher speeds maycause vehicle tobecome unstable390-157200390-152994 390-152996 390-157200DANGERCAUTIONDANGERCUTTING/SEVERING OFFINGERS OR HAND - FAN390-152993Use FINA #14100Universal Transdraulic Fluid(Hydraulic Tractor Fluid)390-152997HOT FLUID UNDERPRESSURE390-152998390-152993 390-152997 390-152998DANGERDANGERDANGERTo prevent serious injury or deathfrom pinching:• Keep all persons and objects clearwhile any part of this machine is inmotion.390-157201ROTATING DRIVELINE HAZARDTo prevent serious injury or death fromrotating driveline:• Keep all guards in place when operating.• Keep hands, feet, hair and clothing awayfrom moving parts. 390-157202DO NOT GO NEARHYDRAULIC OIL LEAKSWhen checking for hydraulic systemleaks, observe only.390-157201 390-157202Never use your hands to check forleaks.Hydraulic oil from a pin hole leakcan puncture your skin and causeserious injury, gangrene, or death.EMERGENCYPUSH TO STOPPULL TO RUN390-134607DIESELFUEL ONLYIf injured by hydraulic oil underpressure, seek medical attentionimmediately.Oil can be hot and can cause severeburns.390-152995390-157203390-134607 390-157203 390-152995M-B Multi-Service Vehicle Page 6.87 Replacement Parts© 2008 M-B <strong>Companies</strong> <strong>Inc</strong>.All Rights Reserved
COOLANT OVERFLOW TANKCOLDHYDRAULIC OIL LEVELCOLD390-157207GREASE390-157204390-157206390-157207 390-118356 390-157206M-B Multi-Service Vehicle Page 6.88 Replacement Parts© 2008 M-B <strong>Companies</strong> <strong>Inc</strong>.All Rights Reserved
theroductsom M-BOther Products from M-BVisit www.M-BCO.com to view all M-B <strong>Companies</strong> exciting Products.M-B Multi-Service Vehicle Page 7.89 Other Products from M-B© 2008 M-B <strong>Companies</strong> <strong>Inc</strong>.All Rights Reserved