How to Begin C# Programming with Microsoft Visual Studio.NET
How to Begin C# Programming with Microsoft Visual Studio.NET
How to Begin C# Programming with Microsoft Visual Studio.NET

Create successful ePaper yourself
Turn your PDF publications into a flip-book with our unique Google optimized e-Paper software.
<strong>How</strong> <strong>to</strong> Develop Console Application using <strong>C#</strong> in <strong>Microsoft</strong> <strong>Visual</strong> <strong>Studio</strong> .<strong>NET</strong> Jun Ni<br />
Jan. 20, 2004<br />
<strong>How</strong> <strong>to</strong> <strong>Begin</strong> <strong>C#</strong> <strong>Programming</strong> <strong>with</strong><br />
<strong>Microsoft</strong> <strong>Visual</strong> <strong>Studio</strong>.<strong>NET</strong><br />
Jun Ni, Ph.D.M.E.<br />
Department of Computer Science<br />
The University of Iowa<br />
(jun-ni@uiowa.edu)<br />
<strong>Microsoft</strong> <strong>Visual</strong> <strong>Studio</strong> .<strong>NET</strong> (MVS.<strong>NET</strong>) is a convenient integrated development<br />
environment (IDE),. It allows people <strong>to</strong> create, compile, run, and debug programs. It<br />
supports different programming languages, including <strong>C#</strong>, C, C++, etc. In this quick guide,<br />
we focus on how <strong>to</strong> use .<strong>NET</strong> <strong>to</strong> develop <strong>C#</strong> program.<br />
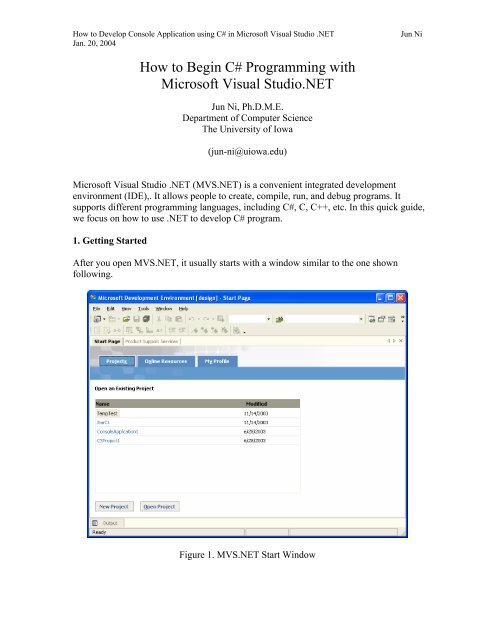
1. Getting Started<br />
After you open MVS.<strong>NET</strong>, it usually starts <strong>with</strong> a window similar <strong>to</strong> the one shown<br />
following.<br />
Figure 1. MVS.<strong>NET</strong> Start Window
<strong>How</strong> <strong>to</strong> Develop Console Application using <strong>C#</strong> in <strong>Microsoft</strong> <strong>Visual</strong> <strong>Studio</strong> .<strong>NET</strong> Jun Ni<br />
Jan. 20, 2004<br />
The appearance of the Start Page or Window may be different, but very similar,<br />
depending upon the initial or cus<strong>to</strong>mer system setting.<br />
Each job of development should be performed <strong>with</strong>in a project. You can either open an<br />
existing project or create a new project.<br />
1.1. Create New Project<br />
If you are working on an existing project which already allocated on your computer, you<br />
can skip this step. If you want <strong>to</strong> create a new project, you can<br />
Figure 2. Menu <strong>to</strong> create new project<br />
Or you can use Ctrl-Shift+N or click New Project Icon, shown in Figure 3. You can<br />
also click New Project But<strong>to</strong>n in Projects Tab <strong>to</strong> create new project, shown in Figure 4.
<strong>How</strong> <strong>to</strong> Develop Console Application using <strong>C#</strong> in <strong>Microsoft</strong> <strong>Visual</strong> <strong>Studio</strong> .<strong>NET</strong> Jun Ni<br />
Jan. 20, 2004<br />
Figure 3. Icon in <strong>to</strong>olbar <strong>to</strong> create new project.<br />
Figure 4. New Project But<strong>to</strong>n in Projects Tab <strong>to</strong> create new project.<br />
After you select one of these options, a New Project Window prompts out, which is<br />
shown in Figure 5.
<strong>How</strong> <strong>to</strong> Develop Console Application using <strong>C#</strong> in <strong>Microsoft</strong> <strong>Visual</strong> <strong>Studio</strong> .<strong>NET</strong> Jun Ni<br />
Jan. 20, 2004<br />
Figure 5. New Project Window which allows user <strong>to</strong> select project type.<br />
From the window, you can see there are many options, that allow users <strong>to</strong> create different<br />
types of project, such as <strong>Visual</strong> Basic, <strong>Visual</strong> <strong>C#</strong>, <strong>Visual</strong> C/C++, and others.<br />
At this moment, we will select Console Application Template. The Console<br />
Application Template enhanced by Console Application Icon can be found by sliding<br />
down the Sliding Bar of Templates, as shown in Figure 6.
<strong>How</strong> <strong>to</strong> Develop Console Application using <strong>C#</strong> in <strong>Microsoft</strong> <strong>Visual</strong> <strong>Studio</strong> .<strong>NET</strong> Jun Ni<br />
Jan. 20, 2004<br />
Figure 6. Select Console Application Template <strong>to</strong> define the type of new project for<br />
console application.<br />
Now you can name your project. You can also save your project file in<strong>to</strong> your preferred<br />
direc<strong>to</strong>ry by click Browse… but<strong>to</strong>n, shown in Figure 7.<br />
Figure 7. Project Location Window <strong>to</strong> specify the direc<strong>to</strong>ry in which the project file is<br />
saved.<br />
.
<strong>How</strong> <strong>to</strong> Develop Console Application using <strong>C#</strong> in <strong>Microsoft</strong> <strong>Visual</strong> <strong>Studio</strong> .<strong>NET</strong> Jun Ni<br />
Jan. 20, 2004<br />
Now MVS.<strong>NET</strong> gives you a new window <strong>with</strong> the project name you specified, shown in<br />
Figure 8.<br />
Figure 8. <strong>Programming</strong> File Edit Window which allows users <strong>to</strong> edit or develop code.<br />
Now you can edit your program. First, let's delete " namespace FirstProject" (as<br />
default, it is given as the project name) and its scope curly brackets {}. You can leave it<br />
alone. I will explain it late.<br />
Let's modify the default one as a simple <strong>C#</strong> code. Type the code listed on Page 4 of the<br />
text book.
<strong>How</strong> <strong>to</strong> Develop Console Application using <strong>C#</strong> in <strong>Microsoft</strong> <strong>Visual</strong> <strong>Studio</strong> .<strong>NET</strong> Jun Ni<br />
Jan. 20, 2004<br />
// Hello world in <strong>C#</strong><br />
// by Jun Ni<br />
using System;<br />
class Hello<br />
{<br />
public static void Main()<br />
{<br />
Console.WriteLine("Hello, world!");<br />
}<br />
}<br />
Also delete "[STATthread]", which is indented <strong>to</strong> indicate when the execution starts.<br />
You can also delete "string[] args" <strong>with</strong>in the parenthesis <strong>with</strong>in the Main(), if one<br />
does't want <strong>to</strong> pass arguments <strong>to</strong> the code (as we will explain late), as well as other<br />
unnecessary comments. Now the code looks like<br />
Figure 9. Simplest "hello" code defines a "FirstHello" class.<br />
1.2 Compile and Load Functions<br />
If there are no syntax errors, you can compile and load functions on the edited program.<br />
There are two major options which you can select. They are Build Project and Build<br />
Solution options. In the current study, it doesn't matter. Basically Build Project performs<br />
the compilation and loading over all the files associated <strong>with</strong> the current project, while
<strong>How</strong> <strong>to</strong> Develop Console Application using <strong>C#</strong> in <strong>Microsoft</strong> <strong>Visual</strong> <strong>Studio</strong> .<strong>NET</strong> Jun Ni<br />
Jan. 20, 2004<br />
Build Solution performs the compilation and loading on not only the files associated<br />
<strong>with</strong> the current project, but also other projects even <strong>with</strong> the file using. The Build menu<br />
gives<br />
Figure 10. Build menu.<br />
Either Build Solution or Build FirstProject submenus (the name of current project)<br />
gives the following successful result, shown in Figure 11.<br />
Figure 11. Success of building current project.
<strong>How</strong> <strong>to</strong> Develop Console Application using <strong>C#</strong> in <strong>Microsoft</strong> <strong>Visual</strong> <strong>Studio</strong> .<strong>NET</strong> Jun Ni<br />
Jan. 20, 2004<br />
1.3 Run or Execute Program<br />
Now you can run (execute) your code using Debug menu. There are four ways <strong>to</strong> run<br />
your code. The basic way is <strong>to</strong> run your code <strong>with</strong>out debugging.<br />
1.3.1 Go <strong>to</strong> Debug Menu and select Start Without Debugging (Ctrl+F5) (shown in<br />
Figure 1.2) <strong>to</strong> enable an execution window (Figure 13).<br />
Figure 12. Debug Menu<br />
Figure 13. Console application result window. Enter any key <strong>to</strong> close the result window.
<strong>How</strong> <strong>to</strong> Develop Console Application using <strong>C#</strong> in <strong>Microsoft</strong> <strong>Visual</strong> <strong>Studio</strong> .<strong>NET</strong> Jun Ni<br />
Jan. 20, 2004<br />
If user selects Start submenu (F5), it puts up the Execution Window only while the<br />
program is actually running. It will disappear once the program completes, so user can<br />
not check the results statically displayed on the window. In order <strong>to</strong> check the execute<br />
status, you need <strong>to</strong> set a breakpoint.<br />
Now we can close the project by clicking the Close Solution submenu in File Menu<br />
shown in Figure 14.<br />
Figure 14. Close solution (project).<br />
1.4 Open Existing Project<br />
If you have existing project which already developed and your would like <strong>to</strong> load <strong>to</strong> the<br />
current MVS.<strong>NET</strong>, you can select Project… Menu Item in Open submenu of File Menu.
<strong>How</strong> <strong>to</strong> Develop Console Application using <strong>C#</strong> in <strong>Microsoft</strong> <strong>Visual</strong> <strong>Studio</strong> .<strong>NET</strong> Jun Ni<br />
Jan. 20, 2004<br />
Figure 1.5 Open existing project.<br />
It prompts Open Project Window which allows users <strong>to</strong> find the existing project file,<br />
named as Project Name <strong>with</strong> extension .csproj. For example, we can search the location<br />
of our FirstProject saved and find the project file called FirstProject.csproj, shown in<br />
Figure 16.<br />
Figure 16. Open the existing project file.
<strong>How</strong> <strong>to</strong> Develop Console Application using <strong>C#</strong> in <strong>Microsoft</strong> <strong>Visual</strong> <strong>Studio</strong> .<strong>NET</strong> Jun Ni<br />
Jan. 20, 2004<br />
Now you have the project <strong>with</strong> a <strong>C#</strong> file called Class1.cs associated <strong>with</strong> the project. It<br />
should be noted that the file name of the <strong>C#</strong> may be different from the class defined in the<br />
file. In this case, we define a class called FirstHello. This is different from Java, in which<br />
the file name has <strong>to</strong> be identical <strong>to</strong> the name of class.<br />
1.5 View Opened Project (solution) using Solution Explorer<br />
After you open an existing project (solution) you can view the contents of the project by<br />
click View Menu and Solution Explorer (Ctrl_Alt-L), shown in Figure 17. The Solution<br />
Explorer gives display the contents of the current project (solution) opened, shown in<br />
Figure 18. It allows user <strong>to</strong> delete loaded <strong>C#</strong> file <strong>with</strong>in the project and display the<br />
updated new <strong>C#</strong> file.<br />
Figure 17. Access the Solution Explorer.
<strong>How</strong> <strong>to</strong> Develop Console Application using <strong>C#</strong> in <strong>Microsoft</strong> <strong>Visual</strong> <strong>Studio</strong> .<strong>NET</strong> Jun Ni<br />
Jan. 20, 2004<br />
Figure 18. Solution Explorer.<br />
For example, you can add new <strong>C#</strong> code by selecting Add New Item…<br />
(Ctrl+Shift+A)(shown in Figure 19), which gives a new window (Figure 20).<br />
Figure 19. Add New Item Submenu.
<strong>How</strong> <strong>to</strong> Develop Console Application using <strong>C#</strong> in <strong>Microsoft</strong> <strong>Visual</strong> <strong>Studio</strong> .<strong>NET</strong> Jun Ni<br />
Jan. 20, 2004<br />
Figure 20. Add New Item Window which has many options of item types.<br />
Let's select TextFile and save the file name as FirstHello.cs, which will be saved and<br />
added in<strong>to</strong> the current project, shown in Solution Explorer Window.<br />
Alternatively, you can use File Menu and New <strong>to</strong> create a new <strong>C#</strong> file, shown in Figure<br />
21. It gives a new window.<br />
Figure 21. Create a new <strong>C#</strong> file under File Menu and then New Submenu.
<strong>How</strong> <strong>to</strong> Develop Console Application using <strong>C#</strong> in <strong>Microsoft</strong> <strong>Visual</strong> <strong>Studio</strong> .<strong>NET</strong> Jun Ni<br />
Jan. 20, 2004<br />
Figure 22. New File window.<br />
Click Open But<strong>to</strong>n, it give you a subwindow <strong>with</strong>in the MVS.<strong>NET</strong>, shown in Figure 22.<br />
This allows user <strong>to</strong> type and edit a new <strong>C#</strong> file and then save it <strong>with</strong> extension name .cs,<br />
shown in Figure 23 and Figure 24. It should be noted that the file is not necessarily saved<br />
in<strong>to</strong> the project folder. It can be saved in<strong>to</strong> any direc<strong>to</strong>ry and late add <strong>to</strong> the project as we<br />
will discuss.
<strong>How</strong> <strong>to</strong> Develop Console Application using <strong>C#</strong> in <strong>Microsoft</strong> <strong>Visual</strong> <strong>Studio</strong> .<strong>NET</strong> Jun Ni<br />
Jan. 20, 2004<br />
Figure 23. new edit window allows user <strong>to</strong> type <strong>C#</strong> code and save it as a new <strong>C#</strong> file.<br />
Figure 24. Save new <strong>C#</strong> file using Save As.. Submenu.
<strong>How</strong> <strong>to</strong> Develop Console Application using <strong>C#</strong> in <strong>Microsoft</strong> <strong>Visual</strong> <strong>Studio</strong> .<strong>NET</strong> Jun Ni<br />
Jan. 20, 2004<br />
Figure 24. Locate the direc<strong>to</strong>ry and save the new file as <strong>C#</strong> file.<br />
1.6 Update <strong>C#</strong> File Within the Current Opened Project.<br />
Once you have existing <strong>C#</strong> file, you can update or replace the current one <strong>with</strong>in the<br />
project. First, you need <strong>to</strong> delete one you want <strong>to</strong> be replaced. Say, useHello.cs. You can<br />
highlight it and press Delete key or use menu function <strong>to</strong> delete the file as shown in<br />
Figure 25.
<strong>How</strong> <strong>to</strong> Develop Console Application using <strong>C#</strong> in <strong>Microsoft</strong> <strong>Visual</strong> <strong>Studio</strong> .<strong>NET</strong> Jun Ni<br />
Jan. 20, 2004<br />
Figure 25, Delete file in the project.<br />
It gives you a chance <strong>to</strong> confirm,, shown in Figure 26.<br />
Figure 26. Confirmation of Delete <strong>C#</strong> file from the opend project.<br />
Now you can add the existing <strong>C#</strong> file <strong>to</strong> the currently opened project by moni<strong>to</strong>ring<br />
through the Solution Explorer. You can click Project Menu and then Add Existing<br />
Item.. Submenu, shown in Figure 27. The option gives a new window <strong>to</strong> find the existing<br />
<strong>C#</strong> file, shown in Figure 28.<br />
Figure 27. Add Existing Item… Submenu.
<strong>How</strong> <strong>to</strong> Develop Console Application using <strong>C#</strong> in <strong>Microsoft</strong> <strong>Visual</strong> <strong>Studio</strong> .<strong>NET</strong> Jun Ni<br />
Jan. 20, 2004<br />
Figure 28. Load existing <strong>C#</strong> file in<strong>to</strong> the opened project.<br />
Now the Solution Explorer contains the newly added C3 file called UseHello2.cs, shown<br />
in Figure 29.<br />
Figure 29. Solution Explorer displays the newly added <strong>C#</strong> file.<br />
It is time <strong>to</strong> compile and run the project.
<strong>How</strong> <strong>to</strong> Develop Console Application using <strong>C#</strong> in <strong>Microsoft</strong> <strong>Visual</strong> <strong>Studio</strong> .<strong>NET</strong> Jun Ni<br />
Jan. 20, 2004<br />
1.7 Close Project<br />
After you accomplish your task, you need <strong>to</strong> save all and close the solution or project.<br />
Figure 30. Close Solution or just Close.