TABLE OF CONTENTS - Martin Archery
TABLE OF CONTENTS - Martin Archery
TABLE OF CONTENTS - Martin Archery

Create successful ePaper yourself
Turn your PDF publications into a flip-book with our unique Google optimized e-Paper software.
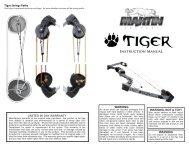
Welcome to the <strong>Martin</strong> <strong>Archery</strong> Family. We are confident that you willexperience many years of enjoyment from your new <strong>Martin</strong> bow. Each bow thatleaves our door is handmade one at a time as they have been for over fifty years.<strong>Martin</strong> <strong>Archery</strong> remains a family owned and operated business. We take greatpride in every product we produce and strive to offer you the most complete lineof professional accessories available.We welcome any comments you may have about our products. We alsolike to hear stories of your successes while using our products. If you have anycomments, photos, or information you would like to share with us, please callor write. We will do our best to answer any questions you may have.To better serve you, we have the most complete archery manufacturer'sweb page on the World Wide Web. Our home page includes a hot link directlyto our E-mail box so you can keep in touch with us.Our web page is located at: www.martinarchery.comOur E-mail address is: info@martinarchery.comThank You,Gail <strong>Martin</strong>Founder and President<strong>Martin</strong> <strong>Archery</strong> Inc.
<strong>TABLE</strong> <strong>OF</strong> <strong>CONTENTS</strong>PARTS <strong>OF</strong> THE BOW ................................................................................ 1BASIC SETUP ...........................................................................................2• Cable Guard Installation................................................................. 2• Changing Draw Weight................................................................... 2• Setting Tiller.................................................................................... 3• Setting Draw Length....................................................................... 3• Setting Arrow Rest Position............................................................ 3• Setting Nock Point.......................................................................... 4• Replacing Strings............................................................................ 4• Care and Storage ............................................................................ 4NITROUS & NITROUS-X CAM SYSTEM........................................... 4• Parts of the Nitrous Cam System.................................................... 5• Changing the Draw Length............................................................. 5• Setting the Cam Timing.................................................................. 6• Using Nitrous Mini-Modules.......................................................... 6• Converting to Shoot-Through X System........................................ 7TRU-ARC + CAM SYSTEM.................................................................. 7• Parts of the Tru-ARC+ Cam System.............................................. 7• Changing the Draw Length............................................................. 8• Stringing Diagram........................................................................... 8• Checking the Cams......................................................................... 9DYNA SINGLE CAM............................................................................ 9• Parts of the Dyna Cam System....................................................... 9• String Configuration....................................................................... 10• Adjusting the Draw Length............................................................. 10FINE TUNING............................................................................................ 11• Bare Shaft Planing Test................................................................... 11• Paper Tuning................................................................................... 13SUPER FINE TUNING............................................................................... 16• Short Range Group Tuning............................................................. 16• Flight Tuning Broadheads............................................................... 17MARTIN WARRANTY .............................................................................. 18ARCHERY SAFETY................................................................................... 19
OWNER'S RECORDBow Model:_________________________________Date Purchased:_________________________________Cam Style:_________________________________Draw Weight:_________________________________Draw Length:_________________________________String Length:_________________________________Cable Length:_________________________________Control String Length:_________________________________Tru- Arc Bows onlyPurchased From:_________________________________NOTICE:Staple your sales receipt here.Proof of purchase date is neededshould you ever require warranty work.
PARTS <strong>OF</strong> THE BOWAxleUpper LimbCablesShooting StringLimb BoltRiserBarrel NutQuiver MountsGripLock MountRest MountingSystemStabilizer InsertLimb PocketLower LimbCamShadowCat with Nitrous-X system1
BASIC SETUPYour new <strong>Martin</strong> bow takes little setup to get started shooting. Please read andfamiliarize yourself with these starting procedures before shooting. Many of theseprocedures may have been completed by your authorized <strong>Martin</strong> dealer. After completingthese simple steps, you will be more accurate and will have greater successfrom the start. A careful and thorough initial setup will make the tuning processmuch easier.CABLE GUARD INSTALLATIONInsert cable guard into the rear 3/8”hole in the riser. Put the lock screwthrough the NON-threaded half of theCam Lock and place it in the sight windowside of the riser. Put the threadedhalf of the Cam Lock in the back sideof the riser and screw in the screw, butdo not tighten. The cable guard rodshould be rotated toward the grip toprovide adequate fletching clearance.Caution should be taken against overrotatingthe rod as excessive clearancecan cause unnecessary pressures on thelimb tips and axle bearings. Once optimumangle is achieved, fully tightenthe screw, but do not over tighten. Ifyour bow has just a set screw, slip theguard in the hole just as above, and setfor proper clearance. Tighten the setscrew to hold the guard in place.Cam LockScrewNon-threaded3/8"CableGuard HoleCam LockCableGuardThreadedCHANGING DRAW WEIGHT<strong>Martin</strong> bows have a fifteen pound draw weight range. Using the 3/16” allen wrenchsupplied with each bow, you will turn the limb bolts clockwise to add weight and turncounter clockwise to reduce weight. One complete turn on each limb bolt providesabout 3 pounds of adjustment.TIP: Mark a line on each limb bolt in white-out or white paint marker to make it easierto keep track of how far you are turning each bolt.Note: Do not shoot your bow with the limb bolts more than 5 turns out from theriser.2
SETTING TILLERTaking a tiller measurement allows you to check therelative tension setting of the upper and lower limbs. Aftersetting the draw weight on your bow, you will need tocheck the tiller measurement to make sure that you haveadjusted your limbs evenly. On all <strong>Martin</strong> compound bows,“0” or even tiller will shoot perfectly. However, the tillermeasurement can vary up to 1/4” closer at the bottom.There is no set measurement that provides peak performancefor every shooter. To measure your tiller, simplymeasure from the limb pockets to the string on both endsof the bow. Some shooters find that different tiller measurementsfrom "0" work better for them. It will not hurt yourbow in any way if you experiment with tiller.Note: Your peep sight position and your nock point position canchange when you turn one limb bolt. Take detailed measurementsand be sure that your nock and peep are correct eachtime you turn your limb bolts.SETTING DRAW LENGTHAll <strong>Martin</strong> Bows are adjustable with the use of modules.However, you will need to refer to the section that coversyour specific cam style for instructions on adjusting drawlength.SETTING ARROW REST POSITIONAfter your arrow rest is installed,you will need to set it at a good startingpoint to begin tuning. The easiestway to do this is to visually align thebowstring in the center of the grip section.If you are shooting your bow witha release aid, the prongs or blade ofyour shoot-through rest will need to becentered with the bow string. Duringtuning, your arrow rest may need to bemoved in or out from its centered location.This is normal because differentshooters apply different pressuresto the bow. Finger shooters will needto position the rest so that the point isabout 1/8” outside the string. This is tocompensate for the horizontal bendingof the arrow upon release. An arrowrest that provides some side supportfor the arrow, such as a cushion button,is best for finger shooters.Finger SettingRelease Setting3
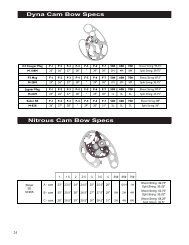
SETTING NOCK POINTPlace a bow square on the string and slide the square downuntil it rests on your arrow rest. Then place a moveable nock seton the string. Using the measuring scale on the bow square, setthe nock set at the proper location on the string. A good startingpoint for finger shooting is ¼” high, measuring from the bottomof the nock set to 90° on the bow string. Start at 1/8” high if youare using a release aid. If you do not have a bow square, you cansnap an arrow on the string and visually level the arrow. Thencrimp your nock set. In a pinch, this will get you to a good startinglocation.1/21/490 0REPLACING THE STRINGSShould your string need replacing, it is best to go to your <strong>Martin</strong> dealer and have it doneby experts. It is recommended that you replace your string once a year or anytime it showswear. Always be sure that the string you replace it with is of the correct length and materialfor your bow.CARE AND STORAGEWhen properly cared for, your new <strong>Martin</strong> bow will give you years oftrouble-free service. When your bow is new it will require no lubrication. Over time youmay need to lubricate your cams to guard against friction and noise. Use a dry lubricationsuch as Teflon spray powder or graphite powder. You can also use wet lube such as MolyLube or Tri-Flow. Do not use WD-40 lubrication.A good rule of thumb when caring for your bow is to keep it as comfortable as you are.If it is too hot for you, it is too hot for your bow. If it gets wet, dry it off completely. Periodicallyclean your bow with a wet rag and mild soap to remove mud or dust (caution: donot store until completely dry). Prolonged exposure to extreme heat may cause failure inyour bow limbs and excessive stretch in your harness system. It will not hurt your bow ifit is rained on while shooting, but make sure it is completely dry before storing in a bowcase to guard against rust or corrosion.CAM SYSTEMSNITROUS AND NITROUS-X CAMSYour Nitrous and Nitrous-X Cam System uses one rotating module in one of3 base cam sizes (see below). Refer to the specification charts at your dealer orwww.martinarchery.com to see what base you need for your draw.A Cam4B CamC Cam
PARTS <strong>OF</strong> THE NITROUS CAM SYSTEMX-ModuleModuleModuleScrewsSpeedBearingBaseCamCHANGING THE DRAW LENGTHYour Nitrous Cam may be an X Shoot-Through system or a standard system, butthe draw is adjusted basically the same. Thethreaded module has numbers and dashes onit that indicate what setting you are on whileyou are adjusting it. The dashes signal 1/2"draw increments. When you are adjustingthe draw, make sure that both modules are inthe same setting. To rotate the modules, youwill need to remove the mod screw closestto the Cable Boss and loosen the modulescrew that is closest to the Bearing Boss.If you are using a Mini Module for shortdraws, there is only one screw. Slide themodule to the desired position and replaceand tighten the screws in the appropriatepositions. The modules provide a longerdraw as the module number gets higher.BearingBossCableAnchorShootingStringAnchorMod settingsCableBossNote: For more options in draw length adjustment see the section called Using NitrousMini Modules on the next page.5
SETTING THE CAM TIMINGWheel timing on a two cam bow makes sure the nock travel through the shot isstraight and level. It is important that your bow is timed well for greatest accuracy.Setting the timing is very easy, and you will be able to go through this step by step toset your timing like a pro. First, you will need to draw your bow back to full draw withyour release and an arrow.As you begin to reach fulldraw, slow down and watchthe cable stops roll over tothe cable as seen to the left.You can have a friend checkor you can see it yourself.It is also helpful to performthis test with the bowBoth cable stopsare touching in unison.It is perfect.Twist or TIGHTENthis cable, either fromits loop end or its splityoke (located at theopposite end of thebow.)The top cable stop iscoming to rest beforethe bottom. The top isout of time with thebottom. Put a twist inthe cable that is connectedto the top cam.backed off a few turns. Thiswill make it easier to holdwhile you are checking thecable stops. If your camslook like the ones to thefar left, they are perfectlytimed. If one touches beforethe other, as seen on theright, you will need to twistor TIGHTEN the cable thatis connected to the camthat stops first. Relax thebow in a bowpress beforeattempting to make anyadjustments. You can adjustthe cam's rotation usingtwo methods; follow thatcam's cable to its split yokeand make adjustments thereby removing and twistingthe yoke, or disconnect the cable from its peg on the cam and twist. This will changethe cam's rotation a little to get it in sync with the other. Only twist one or two twists ata time. A little twisting goes a long way. Once you get rotation close, you can put a halftwist in the cable to get it perfect if needed. Try not to over complicate this procedure;it is as simple as it sounds.USING NITROUS MINI-MODULESIn some cases your draw length will be at the shortest end of the cam's draw lengthadjustment range. Using a Mini Module will give you two more inches down on anyof the Nitrous Cam bodies, and it will give you better performance in the short drawlengths. See your local dealer for a set of Mini Modules if you are in the last two drawlength settings. The Mini Module will give you more draw length flexibility.6
MountingScrew HolesLet-OffDesignationNotes an XModuleCountersinksLet-OffDesignationMountingScrew HoleNotes an XModuleCountersinkStandard ModulesStandard Modules use two mounting screws. The X module isnoted with an X on the tail, it can be installed per the instructionsbelow to make your bow a shoot-through system. The (T) on the tailof the mod notes that it will fit on the top cam (Note: left handedshooters are opposite.) The module that is labled with a (B) goeson the Bottom.MINI MODMINI MODMini ModulesMini Modules use one mounting screw. The Mini Module willgive you an additional 2 inch reduction of draw length on anyNitrous Cam System. If you are in the last two settings on theStandard Mod, the Mini Mod will give you more draw lengthflexibility and better performance in the shorter draw lengths.CONVERTING TO THE X SHOOT-THROUGH SYSTEMThe Nitrous-X system eliminates the cable guard and the pressures it creates.Converting your Nitrous System to the X Shoot-Through System is very easy. All youneed to do is order a conversion kit from your dealer and it will come with X-Modules,cables, long mod screws, and long axles. Your dealer can easily add the second moduleto the top and bottom and then slide in the long axles with the use of a bow press. Installthe 4 cables and presto! You have a Nitrous-X system.PARTS <strong>OF</strong> THE TRU-ARC CAM+ SYSTEMTop ModuleShootingStringModScrewMod ScrewControlStringSpeed BallBearingTRU-ARC+ CAMThe Tru-ARC+ is a very uniquecam system. It is technically a hybridcam because it is a blend of a dual camsystem and a single cam system. It hasthe straight and level nock travel of adual cam and the timing simplicity ofsingle cams. It is a simple system to setup and it is very easy to shoot. See thefollowing guide for complete set up andtuning of the Tru-ARC+ System.Speed BallBearingBottomModule7
CHANGING THE DRAWYour Tru-ARC+ uses two differentcam sizes to cover the full rangeof draw lengths. Each cam covers 4" ofdraw in half inch increments. Both camsuse the same module. Refer to your dealeror www.martinarchery.com to find outwhat module position gets which drawlength on your cam. You dealer canexchange cams if needed to attain yourdraw length.To move the modules, you will needto remove or loosen the mod screwsand rotate the mod to the proper letter.Higher letters give longer draw lengths.Short drawTopBottomLong drawSTRINGING DIAGRAMControl StringSplit StringShooting StringTop ModuleChanging Draw LengthBottom ModuleTopDraw lengthindicatorsBottomThere is no need to press your bow when changing your draw length onthe new Tru-Arc+. Your modules are lettered A through G. Each letter willchange your draw ½”. Make sure that both cams are in the same draw settingto keep them both working together.8
CHECKING THE CAMSAt rest, you can usethese holes in the camand their relationshipwith the limb to besure that the cams areworking together. Theposition of the holeand the limb will varybased on limb angle,but as long as the topmatches the bottom, itis ready to shoot.You can also checkthe bow at full draw.Pull the bow back on ascale and watch the circledareas of the camcome to rest on thiercables. They shouldtouch at the same time.If the top cam happensto touch first, twist thesplit string. If the bottomtouches first, twistthe control string.If the bottom cam is touchingits cable and the top looks likethis, put a twist in the splitstring until both cams touchtogether.If the top cam is touching itscable (the bottom looks likethis), put a twist in the controlstring until both cams touchtogether.DYNA SINGLE CAM SYSTEMThe Dyna System is unique among all other single cam systems. The DynaSystem has modular draw length adjustment, and can be adjusted in one inch adjustmentswithin each draw length module.PARTS <strong>OF</strong> THE DYNA CAM SYSTEMModuleScrewSpeedBallBearingSpeedBallBearingModuleBottomCamIdlerWheel9
STRING CONFIGURATIONThe string harness on the new DynaCam is installed according to the diagramto the right. Your string harnessshould be installed by your qualified<strong>Martin</strong> dealer. Pay close attention tohow the Shooting String leaves the cam.Although cam rotation is not critical, usethis diagram as a loose representation ofproper cam rotation.ADJUSTING THE DRAWUsing draw length modules, thedraw length can be adjusted in 1"increments. The modules can also beused to adjust the let-off. A high letoffmodule is marked as F. A 65% letoff module is marked with a F/. (The/ indicates 65% let-off.) To changethe draw length, replace the moduleon the cam by removing the screwsthat hold it to the cam. NOTE: do notdraw your bow without the moduleinstalled. It will damage your harness.The Dyna module sizes rangefrom F-1 to F-7. As the module numbersget higher, the draw gets longer.The draw length can also be adjustedin 1/2" increments using the pegs onthe back of the cam. The #2 peg isthe prescribed draw length for eachmodule. The #1 peg is 1/2" longer andthe #3 peg is 1/2" shorter.ShootingStringSplitStringShootingStringcomesstraight offof curve2nd halfShootingString12310
FINE TUNING YOUR COMPOUND BOWAfter completing the basic setup procedures, you are ready to fine tune your setup forthe best accuracy possible. There are four tuning methods described in this section. Someof these methods may not apply to certain styles of shooting. Read the introduction toeach method carefully to make sure it applies to your shooting style.BARE SHAFT PLANING TESTThe Bare Shaft Planing method of tuning works best when using a finger release. Tobegin the Bare Shaft Planing test you will need three fletched arrows and one or two bareshafts. You will also need a target that will catch the arrows without allowing the arrowto kick as it stops in the target. This test will help you establish the correct nock and restposition, and it will tell you if your arrow is the correct spine. Porpoising and Fish Tailingdescribe the different flight disturbances you may encounter while tuning.PorpoisingPorpoising is identified by an up and down kick during arrow flight and relates to thenock point adjustment. It is important to correct porpoising first because small left andright disturbances could be nock point related. Start at about ten to fifteen yards and shootthree fletched arrows into your target. Using the same aiming point, follow them up witha bare shaft. After you get the bare shafts to impact with the fletched shafts, you may wantto try shooting them at a longer distance for a finer indication of arrow flight.A high nock set will cause porpoisingIf the bare shafts impact below the fletched arrows, your nock point is too high. Moveyour nocking point down in small increments until the bare shaft strikes with the fletchedshafts. If the bare shafts impact above your fletched arrows, your nock point is too low.Raise your nock point in small increments until your fletched arrows and your bare shaftimpact together.Repeat the above steps from a longer distance to make sure you have completelycorrected the nock point. Shooting from a longer distance will make minordisturbances more apparent.High nocking point Low nocking point 11
FishtailingFishtailing relates to the arrow rest adjustment and the stiffness of yourarrow. Just as before, start at about ten to fifteen yards and shoot three fletched arrowsinto your target. Using the same aiming point, follow them up with two bare shafts. Afteryou get the shafts to impact with the fletched shafts, you may want to try shooting them ata longer distance for a finer indication of arrow flight.If your unfletched shafts impact to the left of your fletched shafts, your arrow is too stiff.There are two things that you can do to correct this problem; you can select a weaker arrow,or you can decrease the cushion plunger tension. Increasing the peak weight of yourbow or increasing your point weight will also make your arrow act a bit more limber.If your unfletched shafts impact to the right of your fletched shafts, your arrow is toolimber. There are two methods you can try that will correct this problem; you can select astiffer arrow, or you can increase the cushion plunger tension. Decreasing the peak weight ofyour bow or decreasing your point weight will also make your arrow act a bit more stiff.To fine tune your setup further, step back to twenty or thirty yards and repeatthe above procedures. Small flight disturbances will show up better as you get fartherfrom the target. Your <strong>Martin</strong> bow is essentially tuned when your bare shafts hittogether with your fletched shafts. Keep in mind that if you continue and complete the superfine tuning methods in this manual, it is not uncommon for your bare shaft impact to change.Even with your bow shooting its best, it is common for a perfectly tuned bow to shoot a bareshaft a bit low and right or low and left. Perfect arrow groups are the goal when completingthese exercises. NOTE: Left-handed shooters should follow instructions in reverse.12Stiff Arrow- bareshafts fly to left.Limber Arrow-bareshafts fly to right.Left handed shooters should follow instructions in reverse.
PAPER TUNINGPaper tuning will work for all styles of shooting. As you are going through these stepskeep in mind that paper tuning is not chiseled in stone as the law of archery. It is a guidelinefor clean arrow flight. Many shooters find that their setup shoots most accurately whenachieving less than perfect tuning results. For example, some target shooters set their bowsto tear slightly high through the paper. They feel this makes their arrow flight less likely tobe influenced by outside variables like wind or rain and helps arrow clearance when usinga shoot-around type rest such as a blade or pan type launcher.To begin paper tuning, set up a frame or rack with paper suspended fromit. Position the frame far enough away from your backstop so the arrow cancompletely clear the paper. Stand about ten feet from the paper, and make sureyour arrow is level as it flies through the paper. Fire a test shot and read the results.Compare the holes you have made in the paper to the diagrams below. Proceduresfor correcting the tear are listed next to each diagram. Please note that tuningprocedures recommended for finger shooting often differ from those used forrelease shooting. You will find that the arrow spine reaction is different for fingersand release, therefore, the procedures for correcting the different disturbances vary.Follow the instructions carefully for your particular shooting style.HIGH TEAR (fletching tears above point)This tear may signal:•Nocking point too high.Lower the nocking point.•Improper vane clearance.See if arrow fletching is hitting the rest.•Launcher is too stiff (release shooters).Weaken spring tension or use a more limber launcher.•Wheels may be out of time.Check wheel timing.•Arrow may be too limber.Select a stiffer arrow shaft.•Tiller adjustment may be incorrect.See basic setup section on page 7.•Irregular or inconsistent shooting form.See a qualified archery coach or professional and have them check your technique.LOW TEAR (fletching tears below point)This tear may signal:•Nocking point too low.Raise the nocking point.•Wheels may be out of time.Check wheel timing.•Tiller adjustment may be incorrect.See basic setup section on page 7.•Irregular or inconsistent shooting form.See a qualified archery coach or professional and have them check your technique.13
RIGHT TEAR (fletching tears to the right of point)Note: If you are left handed follow these instructions in reverse.This tear may signal:FINGERS:•Stiff arrow.This problem is cured using one or more of the following methods:a. Increase peak weight.b. Use a heavier point.c. Select a more limber arrow.d. Lighten cushion plunger tension, or use a weaker spring on shoot around rests.e. Make small incremental rest adjustments towards the bow.RELEASE:•Arrow rest is too far to the right.Move arrow rest to the left.EITHER STYLE:•Too much pressure on the cable guard.Rotate cable guard for minimum fletching clearance.•Irregular or inconsistent shooting form.See a qualified archery coach or professional and have them check your technique.•Clearance problem.See that arrow has adequate fletching clearance.LEFT TEAR (fletching tears left of point)This tear may signal:Note: If you are left-handed follow these instructions in reverse.FINGERS:•Weak arrow or a clearance problem.This problem is cured using these methods:a. Reduce bow weight.b. Use a lighter point.c. Select a stiffer arrow.d. Increase cushion plunger tension or use a stiffer spring on shoot around rests.e. Make small incremental rest adjustments away from the bow .RELEASE:•Arrow rest is too far to the left.Move the arrow rest to the right.•Arrow is too weak.Decrease bow weight or select a stiffer arrow.EITHER STYLE:•Arrow is not properly clearing cables.Rotate cable guard for complete fletching clearance.•Irregular or inconsistent shooting form.See a qualified archery coach or professional and have them check your technique.•Arrow rest clearance problem.See that arrow has adequate fletching clearance through or over the arrow rest.14
MULTIDIRECTIONAL TEARThis tear may signal:•More than one problem with accessory adjustment.Move nock adjustment first until the tear is horizontal and followInstructions for horizontal tear.•Clearance Problem.See that the arrow has adequate fletching clearance.•Wheels may be out of time.Check wheel timing.•Irregular or inconsistent shooting form.See a qualified archery coach or professional and have them check your technique.PERFECT HOLEThis pattern shows clean arrow flight. The point and fletchingimpacted the same location. Your bow is now ready to shoot or you maywant to continue and try some of the super fine tuning methods.AFTER ADJUSTINGAfter you have completed these steps and have achieved good paper testresults, it is best to try it at fifteen and twenty feet just to make sure you did not get a falsereading. A good rule to go by when paper tuning is to move your nock point or arrow restopposite the tear when using a release. In some rare cases if this does not clear up your tearyou may need to move your accessories in the same direction as the tear.15
SUPERFINE TUNINGSHORT RANGE GROUP TUNINGShort range group tuning will work with any style of shooting. Best results areachieved when this method is used after completing the Bare Shaft Planing or PaperTuning tests. This is a good ultra fine tuning method when space will not permit long rangeshooting. After completing the following steps you will have very clean arrow flight and awell tuned, accurate setup.To begin the short range tuning method, you will need a target face, or a piece of cardboardwill do nicely. Make a broad line through the center of the paper on the blank side,making sure the line is thick enough to see from twenty yards. Start at about 10 to 15 yardsfrom the target. Use your tuning target and position the line vertically when you are tuningthe arrow rest and position the line horizontally when you are tuning the nock point.This patternshows averticaldisturbance.This patternshows a cleanverticalresult.Vertical ImpactPosition your line horizontally and shoot six arrows at the line. Concentrate on keepingyour pin on the line. Don’t worry about left and right hits, just try to keep your shots onthe line. Shoot two good groups, discarding any rough or bad shots, and note the verticalimpact of the arrows and their relationship to the line. All adjustments are made with thenock point during these steps.If your arrows are not consistently grouping on the line, make small 1/32"adjustments up or down with the nock point and shoot two more groups. Continue makingnock adjustments in small increments. If all of your arrows begin to hit on the line you arecorrecting the nock position. In the event that your groups widen, move your nock back toits original location and make small adjustments in the opposite direction.This patternshows ahorizontalThis patternshows a cleanhorizontalresult.disturbance.Horizontal ImpactAfter achieving a nice, straight, horizontal pattern, rotate your target so your line willappear vertical. Just as before, shoot two good groups, discarding any rough or bad shots,and note the horizontal impact of the arrows and their relationship to the line. All adjustmentsare made with the arrow rest during these steps.If your arrows are not consistently grouping on the line, make small 1/32"adjustments left or right with the arrow rest and shoot two more groups. Continue makingrest adjustments in small increments. If all of your arrows begin to hit on the line you arecorrecting the rest position. In the event that your groups widen move your rest back to itsoriginal location and make small adjustments in the opposite direction.16
FLIGHT TUNING BROADHEADSBroadhead tuning will work for all styles of shooting. After you have completed one ormore of the tuning procedures described in this manual, you can proceed with this final testto get your new bow ready to hunt. You will need three fletched arrows with field tips andthree with broadheads that weigh the same as your field tips.Before you begin shooting, you will need to check your broadhead equippedarrows. After installing your broadheads, make sure they are perfectly straight on the shaft.This can be done by spinning the arrow on a flat counter while checking for any broadheadwobble. You can also use a commercially made spin check tool that is available from yourdealer. After all of your broadheads are spin-checked and straight you are ready to begin.Set up a broadhead target at twenty or thirty yards and shoot three arrows with fieldtips. Make sure you are properly warmed up and you are shooting to the best of your ability.Next, shoot three identically aimed arrows with broadheads. WARNING: NEVERSHOOT BARE SHAFTS WITH BROADHEADS ATTACHED. THE FLIGHT WILL BEEXTREMELY UNPREDIC<strong>TABLE</strong> AND DANGEROUS. Once you have shot the bestgroup you can shoot, compare the position of the broadhead group to the field tip group.Compare the groups to the diagram below and make very small incremental adjustments asdescribed next to the broadhead group that corresponds to your arrow pattern. Note: makevery small 1/32" adjustments. A small adjustment will greatly change your broadheadflight.Multidirectional FlightCorrect the nock point first.Once the arrow is straight left,follow instructions for left flight.High FlightRaise nock point.Field Point GroupBroadhead GroupLeft FlightRelease:Move arrow rest tothe right in smallincrements.Right FlightRelease:Move arrow restto the left insmall increments.Fingers:•Slightly increasedraw weight.•Use a heavierbroadhead.•Decrease cushionplunger tension.•Move plunger toward thebow in small increments.Reverse steps for left-handed shoot-Low FlightLower nock point.Fingers:• Decreasedraw weight.•Use a lighterbroadhead.•Increase cushionplunger tension.•Move plunger awayfrom the bow in small increments.Reverse steps for left-handed shooter.17
WARRANTY*Lifetime Bumper to Bumper WarrantyLIFETIME WARRANTYAll <strong>Martin</strong> Compound Bows are warranted against defects in materials or workmanship to theoriginal owner, on all risers, limbs, limb pockets, axles, bearings, and cams (everythingexcept the string and cables) for 10 years (starting at the date of purchase) and then 50% list pricefor the life of the product*.(Strings and cables are not included, and should be changed eitherevery season, or anytime they show wear, whichever comes first.)(*The life of a bow is determined according to the production cycle of the model andon-hand supply of replacement components. Should a bow no longer be in production and supply ofcomponents be exhausted, an upgrade fee may be charged in order to supply the customer with anewer, updated model.)The warranty is conditioned upon proof of purchase and other requirements listed below. IT ISIMPORTANT THAT YOUR SALES RECEIPT BE FILED IN A SAFE PLACE FOR FUTUREREFERENCE, AS REPAIRS WILL NOT BE PERFORMED UNDER WARRANTY WITHOUTA COPY <strong>OF</strong> THE DATED SALES RECEIPT. <strong>Martin</strong> <strong>Archery</strong>, Inc. warrants that your <strong>Martin</strong>compound bow will perform its intended function if used in accordance with the instructions provided.This Lifetime Warranty covers only the replacement parts, labor, and return ground transportationcosts performed by <strong>Martin</strong> <strong>Archery</strong> Inc. to the customer. Transportation for the return ofthe bow to <strong>Martin</strong> <strong>Archery</strong>, Inc. is not covered. No C.O.D. shipments will be accepted by <strong>Martin</strong><strong>Archery</strong>, Inc. Warranty repairs can be performed by an Authorized <strong>Martin</strong> Dealer, for which<strong>Martin</strong> <strong>Archery</strong>, Inc. will cover replacement parts and ground transportation costs to the AuthorizedDealer. Labor costs for warranty repairs performed by Authorized Dealers are not covered by<strong>Martin</strong> <strong>Archery</strong>, Inc. <strong>Martin</strong> <strong>Archery</strong> makes no other warranty either expressed or implied, whetherof fitness or of marketability, except as stated above. Any such additional warranty is expresslydisclaimed. No agent, employee, or representative of <strong>Martin</strong> <strong>Archery</strong> or its dealers has the authorityto bind <strong>Martin</strong> <strong>Archery</strong> to any agreement not herein stated. Buyer agrees that the sole and exclusiveremedies for breach on any warranty concerning <strong>Martin</strong> <strong>Archery</strong> Bows shall be repair or replacementof defective parts. <strong>Martin</strong> <strong>Archery</strong> shall not be liable for injury or property other than the bowitself. <strong>Martin</strong> <strong>Archery</strong> reserves the right to replace defective parts according to availability withcompatible replacement parts.18
Warranty limitations are as follows:1. If bow shows signs of misuse, alteration, or mishandling this warranty will be void. Use of arrowsweighing less than five (5) grains per pound of draw weight is considered misuse and willvoid this warranty.2. Claimant must be the original purchaser. This warranty is not transferable.3. All returns to <strong>Martin</strong> <strong>Archery</strong> Inc. must be pre authorized. Owner must contact <strong>Martin</strong> <strong>Archery</strong>,Inc. at (509) 529-2554 prior to shipping in order to obtain a Return Authorization number.4. All accessory items must be removed from the bow prior to shipping. <strong>Martin</strong> <strong>Archery</strong>, Inc. willnot be responsible for damage or loss of any accessory item left on the bow.5. Warranty is not effective unless a copy of the dated sales receipt accompanies the bow.6. This warranty gives you specific legal rights. You may also have other rights which vary fromstate to state.* This policy is subject to change and/or cancellation at the discretion of <strong>Martin</strong> <strong>Archery</strong>, Inc.* After acquiring a Return Authorization number, send bow to:<strong>Martin</strong> <strong>Archery</strong>, Inc.3134 W. Highway 12Walla Walla, WA 99362TEN COMMANDMENTS <strong>OF</strong> ARCHERY SAFETYNever -Never -Never -Never -Never -Always -Always -Always -Always -Always -“Dry fire" your bow (shoot it without an arrow.) This will result indamage to your bow and/or possible injury.Let anyone draw or shoot your bow if their draw length is longer thanyours. Over drawing of the bow can cause cable damage.Draw, aim, or shoot your bow unless you are sure that the line of fire isclear. Remember, once an arrow is fired it cannot be recalled.Shoot an arrow that is less than five grains per pound. For example, an80# bow requires a minimum of 400 grains of arrow weight. Less thanfive grains per pound of arrow weight simulates a dry fire effect and maydamage your bow.Expose your bow to extreme heat. Excessive heat, such as your car on ahot day, could lead to limb failure and premature wearing of the string harness.Check all of your arrow shafts and nocks upon removal from the target.If the arrows show defects or broken nocks, do not shoot them.Carefully inspect your bow after each use. Be sure all screws aresnug and accessories are tight. Inspect your string and cables for wear or damage.Draw your bow while pointing it at the target. A premature release of thearrow can be very dangerous. If you cannot draw your bow whilepointing it at the target without excessive movement, lower the peak weightof your bow until you can draw smoothly and correctly. Over time you will build up strength,and will be able to return to the higher weight.Draw your bow with an arrow on the string while keeping it pointed in asafe direction. Never draw your bow with a release aid without an arrow.A release aid failure could result in the dry fire of your bow.Back your limb bolts off five full turns from the riser before putting it in a bow press. Only let aqualified professional or a <strong>Martin</strong> authorized dealerput your bow in a bow press. Inexperienced use of a bow press or aT-stringer can result in damage to your bow. The type of damage causedby a press is not covered under the <strong>Martin</strong> <strong>Archery</strong> bow warranty.19