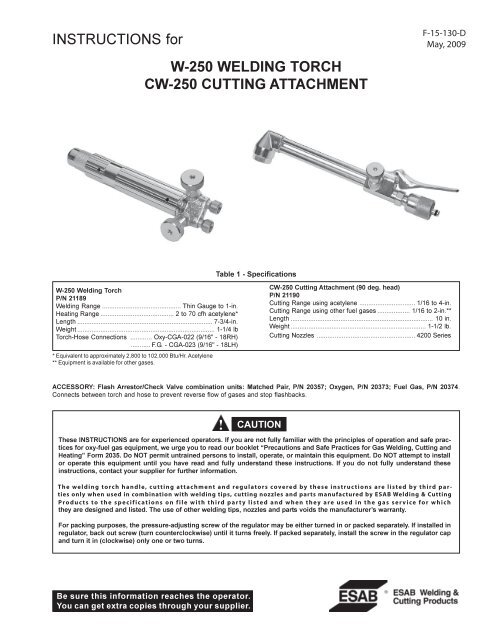
W-250 Welding Torch - OKI Bering
W-250 Welding Torch - OKI Bering
W-250 Welding Torch - OKI Bering
- No tags were found...

You also want an ePaper? Increase the reach of your titles
YUMPU automatically turns print PDFs into web optimized ePapers that Google loves.
OPERATING INSTRUCTIONSCONNECTING1. Attach regulators to the oxygen and fuel gas cylinders.Follow all instructions supplied with your regulators.2. Attach oxygen and fuel gas hoses (see Note 1 inOperating Data section on pg. 4 for recommendedhose sizes) to the regulators and to the torch handleafter making sure all metal seating surfaces areclean. Tighten all connection nuts with a wrench.3. Using <strong>Welding</strong> or Heating Head: Remove weldinghead connection nut from torch handle. Insertwelding head into handle using slight back and forthtwisting motion as you push. Slip connection nut overthe head and hand-tighten to handle.Using Cutting Attachment: Set the welding headconnection nut aside and insert the cutting attachmentto the torch handle in the same manner as thewelding head. Remove nozzle nut and insert cuttingnozzle into the cutting attachment head. Slip nut overthe nozzle and tighten with a wrench.4. Check throttle valve packing nuts for tightness.TESTING FOR LEAKSEvery welding and cutting outfit should be thoroughlytested for leaks after it is first hooked up, and at regularintervals thereafter. After all connections have beenmade, make sure both valves on the torch handle areclosed. Then turn in the regulator pressure-adjustingscrews clockwise until the oxygen delivery-pressuregauge registers 50 psi, the fuel gas delivery-pressuregauge registers 10 psi. Using Leak Test Solution suitablefor oxygen service, such as P/N 998771 (8 oz. container),check for leaks at the cylinder valves, the cylinder-to-regulatorconnections, the regulator-to-hose connections,and the hose-to-torch connections. If bubblingat any point indicates leakage, tighten the connection. Ifthis does not stop the leakage, close the appropriatecylinder valve, open the torch valve to remove all pressurefrom the line, and finally release the regulator pressure-adjustingscrew by turning it counterclockwise. Thenbreak the leaky connections, wipe metal seating surfaceswith a clean, dry cloth, and examine them for nicksand scratches. Remake the connection(s) and retest.Do not try to light the torch until you are satisfied that allconnections are gas tight.LIGHTING & FLAME ADJUSTMENTFlashbacks can cause serious burns.Be sure gas flow is sufficient for head or nozzle size.Adjust regulators for proper psig pressures.Adjust throttle valves properly.Keep torch in good repair.DO NOT throttle back gases to use large head or nozzleon thin material.ADJUSTING GAS PRESSURESFuel Gas: With oxygen valve closed, open the fuel gasvalve on the torch handle about one turn. Turn in thepressure adjusting screw on the fuel gas regulator untilits delivery-pressure gauge indicates the desired pressure(refer to operating tables starting on page 4). Thenimmediately close the torch fuel gas valve.Oxygen, Using <strong>Welding</strong> or Heating Head: Open thetorch oxygen valve at least 1-1/2 turns. Adjust oxygenpressure at the regulator to the desired pressures (referto Table 2, 3, or 4) and then close the torch oxygen valve.Oxygen, Using Cutting Attachment: Open the torchoxygen valve WIDE and leave the preheat oxygen valveon the cutting attachment closed. Depress the cuttingoxygen valve lever on the cutting attachment. Adjust theoxygen pressure at the regulator to the desired pressure(refer to Table 4 or 5). Shut off the oxygen flow byreleasing the cutting oxygen valve lever only.CAUTION: Use friction lighter for lighting torch. Do NOTuse a match. Use of a match can seriouslyburn your hand.<strong>Welding</strong> or Heating Head (Acetylene)1. Open fuel gas valve about 1/2 turn and light the gasat the tip.2. Slowly close the fuel gas valve until the yellow flamejust starts to throw off smoke.3. Open oxygen valve slowly until you have a neutralflame.4. If harsher or softer flame is desired, readjust thetwo valves.NOTE: When operating with a very soft flame, the weldinghead will tend to heat up and transfer someof this heat back to the torch handle. This maycreate some discomfort to the operator.Cutting Attachment (Acetylene)1. Open the acetylene valve on the torch handle about1/2 turn, and light the gas at the nozzle.2. Slowly close the acetylene throttle valve until theyellow flame just starts to throw off black smoke.3. Slowly open preheat oxygen valve on cutting attachmentuntil neutral flames are obtained.4. Finally, open the cutting oxygen valve by depressinglever and readjust the neutral flames by turningpreheat oxygen valve.3
The flame now has the proper strength for any cuttingjob. With this flame, acetylene is being consumed economicallyand the cutting attachment will be operatingat best resistance to flashback. If greater preheat flametemperature is desired for faster starts or piercing, openthe cutting oxygen valve and adjust the preheat oxygenvalve until the flame inner cones shorten about 10 percentand become sharply pointed.Cutting Attachment (Fuel Gases except Acetylene)1. Crack the fuel gas valve and light the gas at thenozzle.2. Open the fuel gas valve until flame starts to leavethe end of the nozzle.3. Slowly open preheat oxygen valve on cutting attachmentuntil flame stabilizes.4. Depress lever to open cutting oxygen valve and thenadjust preheat oxygen valve until preheat flames areat their shortest length.5. If larger or smaller preheat flames are desired, depresscutting oxygen valve lever and alternately readjustfuel gas and preheat oxygen valve to obtainthe final flame setting.SHUTTING OFFClose the fuel gas valve first, then the oxygen valvewhether you are using a welding head or cutting attachment.However, if the cutting attachment is to be relightedwithin a half-hour, you may close the preheat oxygenvalve on the attachment instead of the oxygen valve onthe torch handle.If operations are to be stopped for a half-hour or more,you should release all pressure from regulators. To dothis, first close both cylinder valves. Then open the torchvalves. Finally, back out the regulator pressure-adjustingscrews until they turn freely.OPERATING PRECAUTIONSDo not exceed 15 psig acetylene during operation.Flow: There must be proper flow of gases for safeoperation and full performance. This requires the followingthree conditions: (1) the regulators that determinethe inlet pressure to the hoses must be set to the correctpressure: (2) the hoses and their connectors must haveadequate capacity for the job (hoses that are too long,too small or have connectors with small passagewayscan cause problems); and (3) the throttle valves on thetorch must be adjusted with the procedure shown inthese instructions.Note: Items (1) and (2) can be checked by measuringthe gas pressures at the torch. Gauge adaptorsare available for this purpose.Backfire: Improper operation of the torch or cutting attachmentmay cause the flame to go out with a loud‘pop’. (If you are welding, the flame will often reigniteinstantly). Such a backfire may be caused by contact oftip or nozzle with the work, by spatter from the work, bythe use of incorrect gas pressure, or by leakage at thecutting nozzle seats due to dirt or nicks on seats or to aloose nozzle nut. After a backfire, you can normally relightthe flames immediately. However, if backfires occurrepeatedly, shut off the torch. Check the ‘O’-ring sealsbetween the welding head or cutting attachment and thehandle, and the nozzle seats (if cutting). Readjust operatingpressure and relight.Flashback: Under certain circumstances, the flame maynot ‘pop’ out (backfire) but instead burn back inside thetorch with shrill hissing or squeal. This is called a ‘flashback’.A flashback should never occur if (1) the equipmentis in good condition; (2) preheat ports on cuttingnozzles or welding tips are cleaned frequently; (3) operatingpressures are correct; and (4) throttle valves areadjusted properly. Should a flashback occur, IMMEDI-ATELY shut off the torch. Allow it to cool off for at least aminute. Then check your nozzle or tip, gas pressures,readjust regulators if necessary, and relight the torch. Ifflashback recurs, send the torch handle and weldinghead or cutting attachment to your distributor for repair.IMPORTANT OPERATING NOTES1. Pressures given in Tables 2 through 8 are measuredat the regulator using 25-ft. long hoses (1/4-in. I.D.up through size No. 30 welding/heating head or forcutting up to 3-in. thick steel; 3/8-in. I.D. for largerheads or cutting nozzles). If longer hoses re required,only 3/8-in. I.D. hoses should be used and pressuredrop between regulator and torch should be considered.Use test gauge adaptors to check for properpressure at torch if using long hose length, or if thereare doubts about the adequacy of gas flows. Do NOTuse hose line check valves when operating No. 55and larger heads.2. Head size number on each welding and heating headindicates the rated acetylene flow capacity in cubicfeet/hour (cfh). For example, No. 55A requires about55 cfh of acetylene at the given operating pressures.However, on heating heads designed for other fuelgases, the size indicates the approximate equivalentheating capacity in terms of acetylene flow. Forexample, note from Table 3 that No. 70A and 70FGprovide the same average heating output (102,000Btu/Hr.) but No 70FG head really requires about 43cfh of FG-2, 40cfh of propane, or 103cfh of naturalgas.4
For consumption purposes, the following are theoxygen/fuel gas ratios normally required for weldingand heating:1.1 to 1.5 cfh oxygen/1.0 cfh acetylene3.2 to 3.6 cfh oxygen/1.0 cfh FG-23.5 to 4.5 cfh oxygen/1.0 cfh propane1.7 to 2.0 cfh oxygen/1.0 cfh natural gas3. Correct pressure and flow must be maintained forproper operation of a welding or heating head. If atip is “starved” due to insufficient flow of fuel gas,the tip may overheat and cause backfire or flashback.An acetylene or a liquefied fuel gas (LFG) cylinderhas a limited capacity for delivering fuel to the tip;therefore, it is extremely important to manifold 2 ormore cylinders when operating larger heads to assureadequate supply of fuel gas to the tip. The rateof withdrawal depends on type of fuel gas cylindersize the contents remaining, and the outside temperature.Tabulated below is the number of the morecommonly used cylinders recommended formanifolding when using larger heads. If using othercylinders or gases, check with your fuel gas supplierfor recommended withdrawal rate information.4. The tables show average values based on typicalconditions. The type and quality of steel, its surfacecondition, and purity of oxygen, etc., will always havea bearing on the end results.Head Flowrate, Min. No. of Cylinders Required*Size cfh WKCyl (300cf) WTLCyl. (390cf)55 55 2 170 70 2 2*Based on that max. hourly flowrate should not exceed 1/7 of cylinder capacityat 70° F. Example 1/7 (300 of WK. cyl.) = 43 cfh max.FG-2 (104 lb. cyl.) Propane (100 lb. cyl.)Head Min. No. of Min. No. ofSize Flowrate Cyl. Req’d* Flowrate Cyl. Req’d**70 43 1 40 1*Based on max. continuous withdrawal rate of 110cfh for 104lb. cylinder, 1/2full @ 70° F.**Based on max. continuous withdrawal rate of 65cfh for 100lb. cylinder, 1/2full @ 70° F.Withdrawal rate will increase with wind velocity and intermittant usage; reducewith lower temperature.Table 2 - W-<strong>250</strong> Acetylene <strong>Welding</strong> Heads (Single-Flame)Pressure, psig Replacement Parts (See Fig. 2) Accessory TipComplete Steel CleaningHead Assembly Thickness Mixer Tip DrillSizeu Part No. inches Oxy. Acet. Tip Throat Mixer Extension Size2A 2214378 32 - 25 ga. 639683 621K74 42C26 — 724A 2214379 25ga. - 1/32 5-8 5-8 639684 621K74 622K67 — 646A 2214380 1/32 -1/16 639685 — 639892 — 6215A 2214381 1/16 - 1/4 639687 621K75 622K69 — 5330A 2214382 1/4 - 3/8 6925K58 621K76 622K70 — 4555A 42C49 3/8 - 5/8 7 - 9 7 - 9 998060 21K77 622K71 19X42 (12") 3370A 42C50 5/8 - 1 998061 21K78 622K72 19X42 (12") 30u Size indicates approx. acetylene flow rate in cu. ft./hr. (cfh) at normal operating pressure.See Important operating Notes above.Table 3 - W-<strong>250</strong> Standard Multiflame Heating HeadsComplete Pressure Avg. Replacement Parts Accessory TipHead Assembly psig Heat (See Fig. 2) Tip CleaningFuel No. of Output Mixer (Chrome- Tip DrillSizeu Part No. Oxy. Gas. Flames Btu/hr. Tip Throat Mixer Plated) Extension SizeFor Oxy-Acetylene Use55A 42C51 7-9 7-9 7 81,000 998070 21K77 622K71 — 19X42 (12") 5970A 42C52 7-9 7-9 7 102,000 998071 21K78 622K72 998046 19X42 (12") 56For Oxy-Fuel Gas Use - FG-2, propane, natural gas, etc.70FG 42C53 16-20 7-10 7 102,000 998078 21K78 622K72 998037 19X42 (12") 54u See Important Operating Notes on pg. 45
Table 3A - W-<strong>250</strong> Rosebud Style Multiflame Heating HeadsComplete Pressure, Avg. Tip ExtensionHead Assembly psig Heat Replacement Parts (See Fig. 2) (Accessory) TipFuel No. of Output Tip Mixer CleaningSizeu Part No. Oxy. Gas Flames Btu./hr. Assy. Stem Throat Mixer Length P/N Drill SizeFor Oxy-Acetylene Use55 O-A 21310 7-9 7-9 9 81,000 998797 998792 21K77 622K71 12-in. 19Z42 6170 O-A 21311 7-9 7-9 9 103,000 998798 998792 21K78 622K72 12-in. 19X42 57For Oxy-Fuel Gas Use FG-2, propane, natural gas, etc.70 O-FG 21312 13-25 6-13 8 104,000 999224 998792 21K72 622K72 12-in. 19X42 49u See Important Operating Notes on pg. 4.Table 4 - 4202 Series Acetylene Cutting NozzlesNozzle Steel Pressure, psig Gas Consumption CleaningThickness ft 3 /hr Drill SizeSize Part No. in. mm. Oxygen Acetylene Oxygen Acetylene Preheat Cutting1/8" 638869 1/8 3 30-40 5 31 - 34 8 - 9 73 761/4" 16K08 1/4 6 25-30 5 42 - 45 8 - 10 73 681/2" 16K09 1/2 13 30-40 5 70 - 75 10 - 12 73 601-1/2" 16K10 3/4 19 25-30 5 95 - 100 12 - 14 69 521 25 35-40 6 120 - 125 14 - 161-1/2 38 50-55 7 165 - 170 16 - 184" 16K11 2 50 40-45 5 195 - 200 18 - 20 68 503 75 45-60 6 230 - 235 20 - 22Table 5 - 4217 Series Fuel Gas Two-Piece Cutting NozzlesNOTE: Do NOT use with Acetylene.Nozzle Sleeve Steel Pressure, psig Gas Consumption ft 3 /hr. CleaningNozzle (Internal) (External) Thickness Fuel Gas Fuel Gas Drill SizeSize P/N P/N in. mm. Oxygen FG-2 Propane Nat. Gas Oxygen FG-2 Propane Nat. Gas Cuttingl1/4" 19485 19518 1/4" 6 30 4 6 7 70 8 12 30 681/2" 19486 19518 1/2" 13 35 4 7 8 120 9 14 32 601" 19487 19518 1 25 40 4 8 9 180 10 15 35 532" 19488 19518 2" 50 45 5 9 10 <strong>250</strong> 11 16 40 504" 19489 19519 4" 100 40 4 8 10 370 12 18 45 43l Use soft-bristled brush (750F99) to clean preheat slots of internal nozzles.6
MAINTENANCE INSTRUCTIONSFor all repairs other than those covered below, send theapparatus to your ESAB distributor or to ESABRemanufacturing Center, 411 S. Ebenezer Road, Florence,SC 29501. Improperly repaired apparatus is hazardous.<strong>Torch</strong> Handle and Cutting Attachment ThrottleValves — Leakage around throttle valve can almost alwaysbe corrected by tightening the packing nut slightly.If necessary, replace the complete throttle valve assemblyas directed below. If a valve will not shut off completely,loosen the packing nut and unscrew the throttlevalve assembly from the body. Wipe the stainless steelball seat on the valve stem, and the seating surface inthe body, with a clean cloth. Then reinstall the valve,retighten the packing nut, and operate the valve severaltimes, closing it with maximum force. If this does notend the leakage, install a new throttle valve assembly.When you do so, tighten the packing nut until you find itextremely difficult to turn the valve wheel. Set the unitaside for a few hours to set the packing. Then loosenthe packing nut until the throttle valve turns easily.Cutting Valve—If leakage is detected around the cuttingvalve stem, or if the valve does not shut off completelywhen cutting oxygen valve lever is released, unscrewthe lock screw (see Fig. 1) with a spanner wrench.When the thread is fully disengaged, lift out the cuttingvalve assembly. Then tilt the attachment and let the valvespring drop out in your hand.Now pull the lock screw off the valve stem and removeseat and retainer from the stem. Examine the stem carefully.If either the seating surface or the cylindrical sectionthat runs in the valve screw is marred, replace thestem with a new part. Always replace the seat with anew part. Replace the small ‘O’-ring in the lock screwwith a new part if there has been leakage around thevalve stem. Inspect the large ‘O’-ring and replace it if itis not in excellent condition. Place new seat on stem,slide on the retainer, and insert stem in lock screw (besure the lock screw has both ‘O’-rings in position). Finally,slide valve spring into body, insert valve assembly,and tighten lock screw.Cutting Attachment Mixer — To remove the mixer forcleaning or replacement, back off locknut (56K09) untilit reaches the end of the threads on the adaptor (05K38).Continue turning it with a wrench to unscrew the adaptorfrom the attachment body. Then remove the mixerby grasping the end of the mixer carefully with a pair ofpliers and pull it out. Clean mixer center orifice with aNo. 55 cleaning drill and the cross-drillings with a No. 66drill or soak the mixer overnight in a solution of NozzleCleaning Compound (P/N 761F00), rinse, and blow drywith clean air.Inspect all ‘O’-rings and replace them if they are not ingood condition. Reassemble in reverse order, and tightenlocknut against body securely.<strong>Welding</strong> Heads and Cutting Nozzles — <strong>Welding</strong> headsand cutting nozzle orifices should be cleaned by hand,using tip cleaners, whenever a flame distortion is noticed.Maintaining clean orifices is highly recommendedfor reducing any incidence of flashbacks. If you do nothave tip cleaners, twist drills of the correct sizes (seeTables) may be used. Insert the drill carefully, and pushit back and forth. DO NOT TWIST THE DRILL.If a welding tip requires replacement, secure the frontend of the mixer throat in a vise and unscrew the tip.Before installing a new tip, be sure it matches the mixerthroat in size (both parts are size-stamped). Alwaystighten the new tip as much as you can without bendingit.To clean a welding head mixer, unscrew it from the mixerthroat soak it overnight in a solution of Nozzle CleaningCompound (761F00), rinse with clear water, dry with ajet of air.Check the condition of ‘O’-rings on the welding headsperiodically. If they appear to be in poor condition, or areso worn that the head can be inserted in the handle withoutnoticeable resistance, replace them.Regulators — Each regulator is equipped with a porousmetal inlet filter, P/N 71Z33, pressed into the regulatorinlet nipple. No regulator should be connected to acylinder or station valve unless it contains this filter. Youcan replace the filter if you have reason to do so. Toremove a filter, insert a No. 1 ‘EZY-OUT’ or a No. 6 woodscrew (about 2-in. long) into the filter and pull it out. Pressthe new filter into the nipple with a 1/4-in. round metalrod.Regulators in need of repair should be returned to yourdistributor or to ESAB Remanufacturing Center, 411 S.Ebenezer Road, Florence, SC 29501.If you have your own properly-equipped and staffed repairfacility, repair parts information of this regulator isavailable on request to your distributor. Request Form15-301, which covers the regulators packed with thisoutfit.NOTE: Safety release device equipped on oxygen andinert gas regulators is designed for regulator protection;not for hose or equipment downstream.If gas escapes through the vent holes in the cap,immediately close cylinder valve and then removethe regulator for repair.7
PARTS INFORMATIONAll parts which can be replaced without breaking soldered or brazed joints are illustrated below. When ordering parts,please give both part number and description (including size, where appropriate). Parts may be ordered from yourESAB distributor or from ESAB <strong>Welding</strong> & Cutting Products, Customer Service Department, Florence, SC.SPRING - 23K08NUT - 802THROTTLE VALVEASSEM. 09M243/4" - 20ROLL PIN1/8" x 5/8"62350036MIXER - 639347LEVER - 24K13“O”-RING -14K12LOCKNUT -56K09STEM - 18559SEAT - 32Z01RETAINER - 57K03“O”-RING - 14K07LOCK SCREW - 57K02VALVE ASSEMBLY08M06“O”-RING - 14K07“O”-RING14K12“O”-RING - 85W11ADAPTOR TUBENUT05K3921175 ADAPTOR TUBE05K38“O”-RING - 14K10ADAPTOR HEAD -19K11“O”-RING -86W51“O”-RING -14K12NUT - 21175LABEL - 954098(2) THROTTLE VALVEASS'Y - 18255Fig. 1 - Replacement Parts - <strong>Welding</strong> <strong>Torch</strong> and Cuttting Attachment Assemblies:CW-<strong>250</strong> Cutting Attachment 90° Head - 21190W-<strong>250</strong> <strong>Welding</strong> <strong>Torch</strong> 90° Head - 21189“O”-RING14K12MIXER THROAT(See Table 2)RING - 13K02MIXER(See Table 2)NUT - 21175“O”-RING - 86W51TIP(See Table 2)WELDING HEADTIP(See Table 2)MULTI-FLAMEHEATING HEADFig. 2 - Replacement Parts - <strong>Welding</strong> and Heating Head AssembliesOXWELD, PUROX, AND PREST-O-LITE are registered trademarks of ESAB <strong>Welding</strong> & Cutting Products.F-15-130-C 11/2000 Printed in U.S.A.