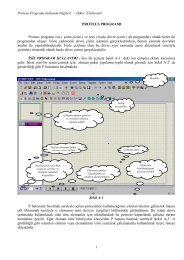
<strong>Electromechanical</strong> <strong>Timer</strong> <strong>Replacement</strong>FIGURE 1:SCHEMATICR1R2VCCC41824VCCGNDSELS/SU1RLYCINPWM50 Hz6735U2A1R332C5R42VCC3R5PIC12C508ComparingTime SettingJ3VccS112R6R956R8U2B7R7VccK1J1123START/STOPQ1Time-base GeneratorRelay OutputVccJ21T1D1D3U3I78L05G O23D2C1 C2 C3Power SupplyDS40160A/1_009-page 2© 1997 Microchip Technology Inc.
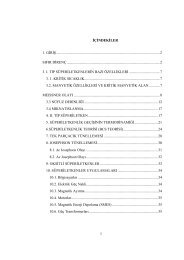
<strong>Electromechanical</strong> <strong>Timer</strong><strong>Replacement</strong>A Simple Programmable <strong>Timer</strong> with Time Correction CircuitAuthor: Kirill Yelizarov V.Moscow Power EngineeringInstituteMoscow, Russiaemail: tihonov@srv-OVERVIEWThe timer discussed in this application note may beused to operate different appliances using AC or DCvoltage (battery powered equipment). It is adjustablefrom 1 second to 99 hours, 59 minutes, 59 seconds andhas a time correction circuit to adjust the accuracy ofthe internal 4 MHz RC oscillator. It is based on thePIC12C508 microcontroller and requires few externalcomponents.The system block diagram is shown in Figure 1. Thetimer has 3 buttons, an LCD panel, and a power switch.The power switch, in the position shown in Figure 1, willactivate the timer, and in the other position the load willbe connected directly to the line out, thus switching offthe opto-transformer to prevent accumulator overcharge.When switched off, the timer is still operationaland may be set. To reduce power consumption, thetimer goes to sleep (LCD panel appears blank) in 15seconds after the last button depression, while in editmode.FIGURE 1:SYSTEM BLOCK DIAGRAMThe first keyboard button is “Change Digit.” This buttonis used to position the cursor to the desired digit. Thecursor moves clockwise from the lower seconds digit tothe higher hours digit. Separators are skipped. The secondbutton is “Increase Value.” With each depression ofthis button the digit value is increased. After 9 pressesthe value rolls over to 0. The third button is “Start/Stop.”This button is used to edit data and to activate the timer.When run in edit mode, with the earlier specified buttons,data may be entered. Once the Start/Stop buttonis pressed, the timer is activated. It stops if the timeexpires or the Start/Stop button is pressed again (inboth cases this will affect the load). In any case, if thetimer is stopped, then the edit mode becomes activeand the remaining data may be edited.This appliance may be used as a simple timer and ifused with a normally closed contact opto-relay, it mayturn on any load when the time expires.Use an 8-pin socket for the PIC12C508 JW devicebecause it needs to be programmed before putting it inthe circuit. The board has three buttons (S1, S2, S3),capacitor (C2), resistor (R1), and an LED (instead of anopto-relay).The opto-relay may be replaced with an opto-triac (ACoperation only). Using a triac or an ordinary mechanicalrelay with an opto-relay or an opto-triac will power-upthe output (DS00559). The opto-relay may be replacedwith an ordinary mechanical relay, but most of themneed a higher voltage and a transistor amplifier to activatetheir coil.Line InPowerSwitchOpto-relayLine OutKeyboardPowerPIC12C508LCDNeutral InNeutral OutMicrochip Technology Incorporated, has been granted a non-exclusive, worldwide license to reproduce, publish and distribute all submitted materials, ineither original or edited form. The author has affirmed that this work is an original, unpublished work and that he/she owns all rights to such work. Allproperty rights, such as patents, copyrights and trademarks remain with author.© 1997 Microchip Technology Inc. DS40160A/1_002-page 1