ECOBOX Heat Recovery Unit - VES
ECOBOX Heat Recovery Unit - VES
ECOBOX Heat Recovery Unit - VES
- No tags were found...

You also want an ePaper? Increase the reach of your titles
YUMPU automatically turns print PDFs into web optimized ePapers that Google loves.
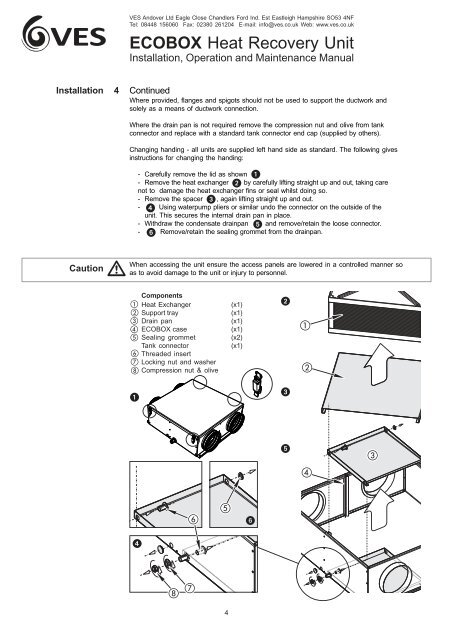
<strong>VES</strong><strong>VES</strong> Andover Ltd Eagle Close Chandlers Ford Ind. Est Eastleigh Hampshire SO53 4NFTel: 08448 156060 Fax: 02380 261204 E-mail: info@ves.co.uk Web: www.ves.co.uk<strong>ECOBOX</strong> <strong>Heat</strong> <strong>Recovery</strong> <strong>Unit</strong>Installation, Operation and Maintenance ManualInstallation 4 ContinuedWhere provided, flanges and spigots should not be used to support the ductwork andsolely as a means of ductwork connection.Where the drain pan is not required remove the compression nut and olive from tankconnector and replace with a standard tank connector end cap (supplied by others).Changing handing - all units are supplied left hand side as standard. The following givesinstructions for changing the handing:- Carefully remove the lid as shown- Remove the heat exchanger by carefully lifting straight up and out, taking carenot to damage the heat exchanger fins or seal whilst doing so.- Remove the spacer , again lifting straight up and out.- Using waterpump pliers or similar undo the connector on the outside of theunit. This secures the internal drain pan in place.- Withdraw the condensate drainpan and remove/retain the loose connector.- Remove/retain the sealing grommet from the drainpan.CautionWhen accessing the unit ensure the access panels are lowered in a controlled manner soas to avoid damage to the unit or injury to personnel.Components<strong>Heat</strong> ExchangerSupport trayDrain pan<strong>ECOBOX</strong> caseSealing grommetTank connectorThreaded insertLocking nut and washerCompression nut & olive(x1)(x1)(x1)(x1)(x2)(x1)4