Electric Potato Peeler - Coopers of Stortford
Electric Potato Peeler - Coopers of Stortford
Electric Potato Peeler - Coopers of Stortford
Create successful ePaper yourself
Turn your PDF publications into a flip-book with our unique Google optimized e-Paper software.
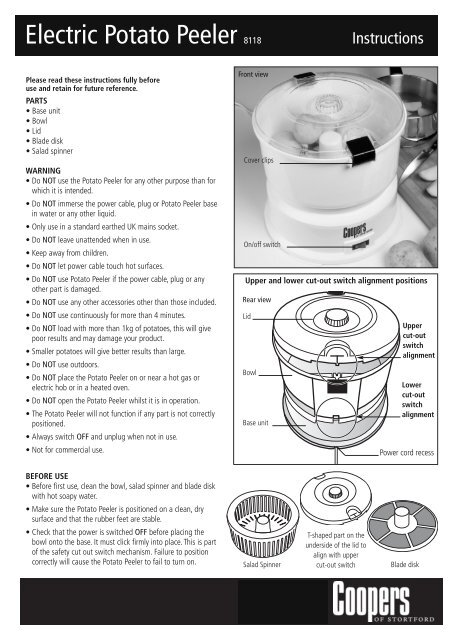
<strong>Electric</strong> <strong>Potato</strong> <strong>Peeler</strong> 8118InstructionsPlease read these instructions fully beforeuse and retain for future reference.PARTS• Base unit• Bowl• Lid• Blade disk• Salad spinnerWARNING• Do NOT use the <strong>Potato</strong> <strong>Peeler</strong> for any other purpose than forwhich it is intended.• Do NOT immerse the power cable, plug or <strong>Potato</strong> <strong>Peeler</strong> basein water or any other liquid.• Only use in a standard earthed UK mains socket.• Do NOT leave unattended when in use.• Keep away from children.• Do NOT let power cable touch hot surfaces.• Do NOT use <strong>Potato</strong> <strong>Peeler</strong> if the power cable, plug or anyother part is damaged.• Do NOT use any other accessories other than those included.• Do NOT use continuously for more than 4 minutes.• Do NOT load with more than 1kg <strong>of</strong> potatoes, this will givepoor results and may damage your product.• Smaller potatoes will give better results than large.• Do NOT use outdoors.• Do NOT place the <strong>Potato</strong> <strong>Peeler</strong> on or near a hot gas orelectric hob or in a heated oven.• Do NOT open the <strong>Potato</strong> <strong>Peeler</strong> whilst it is in operation.• The <strong>Potato</strong> <strong>Peeler</strong> will not function if any part is not correctlypositioned.• Always switch OFF and unplug when not in use.• Not for commercial use.Front viewCover clipsOn/<strong>of</strong>f switchUpper and lower cut-out switch alignment positionsRear viewLidBowlBase unitUppercut-outswitchalignmentLowercut-outswitchalignmentPower cord recessBEFORE USE• Before first use, clean the bowl, salad spinner and blade diskwith hot soapy water.• Make sure the <strong>Potato</strong> <strong>Peeler</strong> is positioned on a clean, drysurface and that the rubber feet are stable.• Check that the power is switched OFF before placing thebowl onto the base. It must click firmly into place. This is part<strong>of</strong> the safety cut out switch mechanism. Failure to positioncorrectly will cause the <strong>Potato</strong> <strong>Peeler</strong> to fail to turn on.Salad SpinnerT-shaped part on theunderside <strong>of</strong> the lid toalign with uppercut-out switchBlade disk
<strong>Electric</strong> <strong>Potato</strong> <strong>Peeler</strong> 8118InstructionsOPERATING INSTRUCTIONS FOR POTATO PEELING• Push the blade disk onto its axis. Take care as the blade issharp.• Check that all parts are correctly positioned and addenough potatoes to cover the blade disk.• Water may be added if required – if so, add no more than200ml.• Close the lid ensuring the lid is on the correct way. The Tshaped part on the underside <strong>of</strong> the lid must align with theUpper cut out switch. Push the cover clips firmly down intoplace.• Switch the power ON and the <strong>Potato</strong> <strong>Peeler</strong> will begin towork. Please be aware that the appliance will vibrate duringuse but the rubber feet keep the appliance from moving.• The <strong>Potato</strong> <strong>Peeler</strong> should take about 2 minutes to peel allthe potatoes. However, due to each potato being a differentsize and shape, this may vary.• Check progress regularly.• Once potatoes are peeled, or after 4 minutes, turn theswitch to OFF on the <strong>Potato</strong> <strong>Peeler</strong>, turn OFF at the mainsand unplug, before removing the lid and carefully taking thepotatoes out. Do not run the <strong>Potato</strong> <strong>Peeler</strong> for more than 4minutes at a time.• Wash potatoes in fresh water before cooking and removeany excess peeling with a small knife. N.B. the <strong>Potato</strong> <strong>Peeler</strong>can not remove skin from recesses or irregular shapes.OPERATING INSTRUCTIONS FOR SALAD SPINNING• Push the salad spinner into place. The blade disk is not used.• Close the lid and follow the instructions as above foroperation.CLEANING• Always switch OFF and unplug from the mains beforecleaning.• Wash the bowl, lid, salad spinner and blade disk in handhot soapy water only.• Never use abrasives to clean.• Take care when cleaning the blade disk as parts are verysharp.• Not dishwasher safe.PACKAGINGDispose <strong>of</strong> the packaging at your local recycling centre.Dispose <strong>of</strong> paper and carton separately from plastic bags atyour local recycling centre.Dispose <strong>of</strong> the item at the end <strong>of</strong> its lifespan at your localauthorised household waste recycling centre.TROUBLE SHOOTINGProblem Cause SolutionBlade disk does not rotate Safety cut out switches not aligned. • Ensure the lower cut out switch is alignedcorrectly from the base unit to the bowl.• Ensure the upper cut out switch is alignedcorrectly by checking the lid is on the correctway round.Unit does not switch on Fuse has failed. Check fuse and replace.<strong>Potato</strong>es not peeled fully • Irregularly shaped potatoes. • The blade disk can not peel into recesses orirregular shapes. These must be finished by hand.• Too many potatoes loaded.• Reduce the quantity <strong>of</strong> potatoes and try again.


