Download PDF instructions for Mini Walker - Coopers of Stortford
Download PDF instructions for Mini Walker - Coopers of Stortford
Download PDF instructions for Mini Walker - Coopers of Stortford

You also want an ePaper? Increase the reach of your titles
YUMPU automatically turns print PDFs into web optimized ePapers that Google loves.
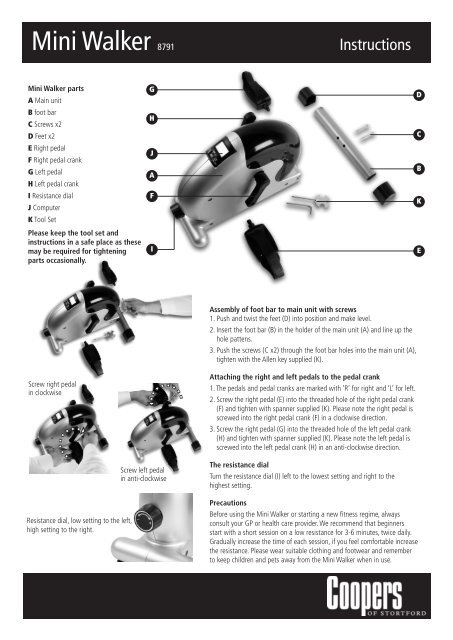
<strong>Mini</strong> <strong>Walker</strong> 8791Instructions<strong>Mini</strong> <strong>Walker</strong> partsA Main unitB foot barC Screws x2D Feet x2E Right pedalF Right pedal crankG Left pedalH Left pedal crankI Resistance dialJ ComputerK Tool SetPlease keep the tool set and<strong>instructions</strong> in a safe place as thesemay be required <strong>for</strong> tighteningparts occasionally.GHJAFIDCBKEScrew right pedalin clockwiseAssembly <strong>of</strong> foot bar to main unit with screws1. Push and twist the feet (D) into position and make level.2. Insert the foot bar (B) in the holder <strong>of</strong> the main unit (A) and line up thehole pattens.3. Push the screws (C x2) through the foot bar holes into the main unit (A),tighten with the Allen key supplied (K).Attaching the right and left pedals to the pedal crank1. The pedals and pedal cranks are marked with ‘R’ <strong>for</strong> right and ‘L’ <strong>for</strong> left.2. Screw the right pedal (E) into the threaded hole <strong>of</strong> the right pedal crank(F) and tighten with spanner supplied (K). Please note the right pedal isscrewed into the right pedal crank (F) in a clockwise direction.3. Screw the right pedal (G) into the threaded hole <strong>of</strong> the left pedal crank(H) and tighten with spanner supplied (K). Please note the left pedal isscrewed into the left pedal crank (H) in an anti-clockwise direction.Resistance dial, low setting to the left,high setting to the right.Screw left pedalin anti-clockwiseThe resistance dialTurn the resistance dial (I) left to the lowest setting and right to thehighest setting.PrecautionsBe<strong>for</strong>e using the <strong>Mini</strong> <strong>Walker</strong> or starting a new fitness regime, alwaysconsult your GP or health care provider. We recommend that beginnersstart with a short session on a low resistance <strong>for</strong> 3-6 minutes, twice daily.Gradually increase the time <strong>of</strong> each session, if you feel com<strong>for</strong>table increasethe resistance. Please wear suitable clothing and footwear and rememberto keep children and pets away from the <strong>Mini</strong> <strong>Walker</strong> when in use.
Safety <strong>instructions</strong>• The best way to use the <strong>Mini</strong> <strong>Walker</strong> is on a flat non-slip surface.• The <strong>Mini</strong> walker is <strong>for</strong> household use, not <strong>for</strong> commercial use.• This is not a toy, do not allow small children to use product.• Use the <strong>Mini</strong> <strong>Walker</strong> <strong>for</strong> its intended use as described in the <strong>instructions</strong>.• Do not use any attachments not supplied.• Never insert objects into the <strong>Mini</strong> <strong>Walker</strong>s openings.• Do not immerse in water, use dry cloth to clean. Do not use chemical cleaners.Sitting position1. Make sure you use a strong stable chair andposition the <strong>Mini</strong> <strong>Walker</strong> a com<strong>for</strong>table distanceaway from you.2. Make sure your lower back is supported whileusing the <strong>Mini</strong> <strong>Walker</strong>. We recommend that youuse a small pillow.3. Sit back placing both feet on the pedals, tightenstraps if necessary and begin.4. When the session is finished, you may want toremain seated <strong>for</strong> a few moments to recoverbe<strong>for</strong>e standing up.Lying down positionIMPORTANT if being used on a bed make sure the<strong>Mini</strong> <strong>Walker</strong> is on a stable surface e.g. solid board.1. When lying down make sure your lower back issupported. We recommend you use a small pillowunder your lower back and head <strong>for</strong> com<strong>for</strong>t aswell.2. Position feet in the pedals and tightenstraps then lay back and start the session.3. When the session is finished, you maywant to remain on your back <strong>for</strong> a fewmoments to recover be<strong>for</strong>e standing up(rise in stages if you have high bloodpressure).Computer <strong>instructions</strong>The computer is switched onby briefly pressing the Modebutton, or by simply using the<strong>Mini</strong> <strong>Walker</strong>.SettingsTo select a specific function toview, press Mode. Thecomputer shows STOP andone <strong>of</strong> the functions below:CNT this counts the number <strong>of</strong> times the pedals completea single turn.TM this is the timer <strong>for</strong> minutes and seconds.CAL this counts the approximate calories used whileexercising.DIST gives you the approximate distance in kilometres.TCNT is the total count <strong>of</strong> revolutions the <strong>Mini</strong> <strong>Walker</strong> hascompleted. This can be reset to zero by removing thebattery.STOP SCAN this function will scroll through each <strong>of</strong> thefunctions, including while the <strong>Mini</strong> <strong>Walker</strong> is in use.The computer will stop calculating when the <strong>Mini</strong> <strong>Walker</strong>comes to a halt and will show the last values <strong>for</strong> thevarious modes. The computer will switch <strong>of</strong>f automaticallyafter standing idle <strong>for</strong> approximately 4 minutes. The datawill be deleted except <strong>for</strong> the total count TCNT.To change the batteryThe computer uses a L1154 button cell battery, suppliedand fitted ready <strong>for</strong> use. remove plastic tab to activatebattery (if fitted).The computer unit simply clips into the main body <strong>of</strong> the<strong>Mini</strong> walker. Unclip it by pulling the computer unitdownwards and <strong>of</strong>f. Gently raise the metal tab that holdsin the battery and replace it with a new one. Close the taband reattach the computer unit. Please be careful not todrop the computer unit into the <strong>Mini</strong> <strong>Walker</strong>.Arms position1. Make sure you use a strong sturdy table andposition the <strong>Mini</strong> <strong>Walker</strong> a com<strong>for</strong>table distanceaway from you.2. When seated have your chest level with the<strong>Mini</strong> <strong>Walker</strong> and your feet shoulder distanceapart firmly on the floor, then start session.3. When the session is finished, you may want toremain seated <strong>for</strong> a few moments to recoverbe<strong>for</strong>e standing up.PackagingDispose <strong>of</strong> the packaging at your local recycling centre.Dispose <strong>of</strong> paper and box separately from plastic bags atyour local recycling centre.Dispose <strong>of</strong> the item at the end <strong>of</strong> its lifespan at your localauthorised household waste recycling centre.