LumeLEX 2024 SERIES INSTALLATION INSTRUCTIONS THIS ...
LumeLEX 2024 SERIES INSTALLATION INSTRUCTIONS THIS ...
LumeLEX 2024 SERIES INSTALLATION INSTRUCTIONS THIS ...

Create successful ePaper yourself
Turn your PDF publications into a flip-book with our unique Google optimized e-Paper software.
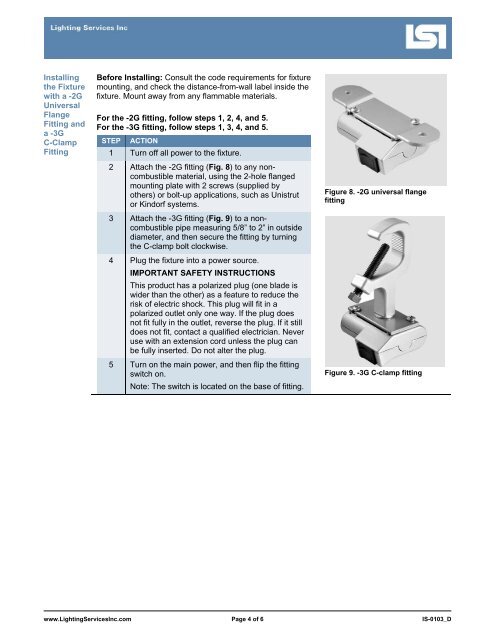
Installingthe Fixturewith a -2GUniversalFlangeFitting anda -3GC-ClampFittingBefore Installing: Consult the code requirements for fixturemounting, and check the distance-from-wall label inside thefixture. Mount away from any flammable materials.For the -2G fitting, follow steps 1, 2, 4, and 5.For the -3G fitting, follow steps 1, 3, 4, and 5.STEP ACTION1 Turn off all power to the fixture.2 Attach the -2G fitting (Fig. 8) to any noncombustiblematerial, using the 2-hole flangedmounting plate with 2 screws (supplied byothers) or bolt-up applications, such as Unistrutor Kindorf systems.3 Attach the -3G fitting (Fig. 9) to a noncombustiblepipe measuring 5/8” to 2” in outsidediameter, and then secure the fitting by turningthe C-clamp bolt clockwise.4 Plug the fixture into a power source.IMPORTANT SAFETY <strong>INSTRUCTIONS</strong>This product has a polarized plug (one blade iswider than the other) as a feature to reduce therisk of electric shock. This plug will fit in apolarized outlet only one way. If the plug doesnot fit fully in the outlet, reverse the plug. If it stilldoes not fit, contact a qualified electrician. Neveruse with an extension cord unless the plug canbe fully inserted. Do not alter the plug.5 Turn on the main power, and then flip the fittingswitch on.Note: The switch is located on the base of fitting.Figure 8. -2G universal flangefittingFigure 9. -3G C-clamp fittingwww.LightingServicesInc.com Page 4 of 6 IS-0103_D